


































.png)
 简体中文

A 4K webcam may record at a lower resolution due to its settings. The correct option could be inside different apps or system menus. Check your camera software, computer settings, or video recording program. The following guide explains where to look and what to change. This helps you select your preferred resolution before starting your next video call or livestream.

What Webcam Resolution Settings Actually Control
The resolution tells you how many pixels form each video frame. A higher pixel count reveals finer details on your display. Processing these extra pixels demands more computing power and network capacity.
Modern webcams support three main tiers:
| Resolution Tier | Dimensions | Recommended Use Case | Bandwidth Demand |
|---|---|---|---|
| 720p | 1280×720 | Basic video calls, low-bandwidth connections | Low |
| 1080p | 1920×1080 | Professional calls, live streaming, content recording | Medium |
| 4K | 3840×2160 | High-quality recording, content creation, post-production | High |
One thing most users miss: resolution is managed at three separate levels. Your webcam’s companion app sets it at the device level. The operating system exposes what the webcam reports through its UVC driver. Individual apps like Zoom, Teams, and OBS apply their own policies on top of that. Each software layer has its own limits on available resolution. Changing one program’s setting won’t update the others automatically.
Method 1: Change Resolution Through Your Webcam’s Companion App
Using a dedicated webcam app is the most precise and reliable method. It sets resolution at the device level before any conferencing software gets involved. The steps below use the Hollyland Lyra and HollyStudio as the primary example. If you use a different webcam with its own companion app, the same principle applies: find the Video or Camera tab and look for a resolution dropdown.

Hollyland Lyra - 4K AI Webcam
A flagship 4K AI webcam featuring a large 1/1.5″ CMOS sensor, smart auto-framing, and studio-grade 48 kHz/24-bit audio for effortless streaming and conferencing.
Key Features: 1/1.5″ CMOS & 4K30 | AI Tracking & Auto Framing | 48 kHz/24-bit Audio
- Position the Lyra. Attach it to your monitor using the built-in clip or place it on a desk stand. Confirm the lens faces forward and the physical shutter is open.

- Connect via USB-C. Plug the Lyra into your computer using the included USB-C cable.
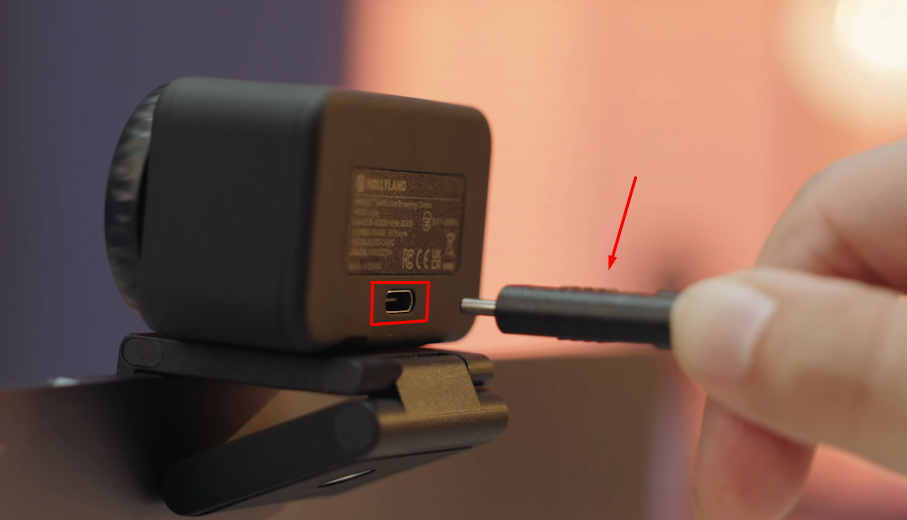

- Confirm the Lyra is recognized. No driver installation is required. The Lyra is UVC-compliant and appears automatically.
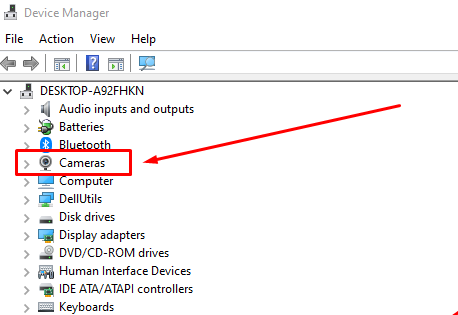
- On Windows: open Device Manager and expand Cameras (or Imaging Devices). You should see “Hollyland Lyra” listed.
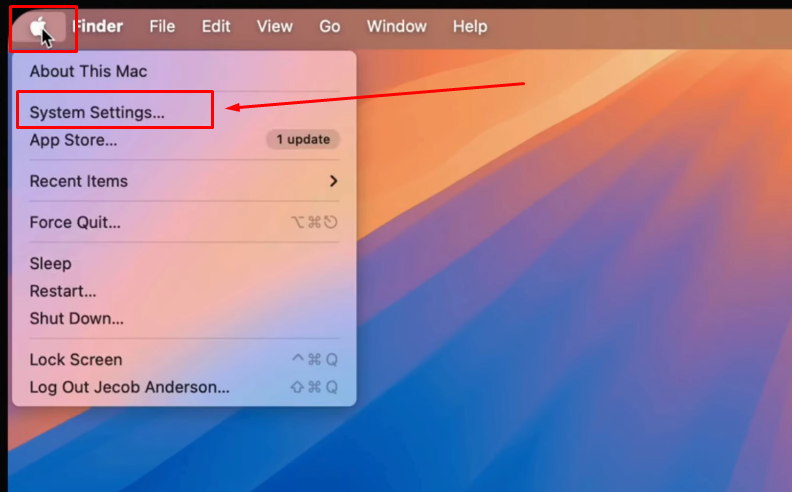
- On Mac: Go to Apple menu > System Settings > General > About > System Report > USB.
- The Lyra’s LED indicator will show a solid light when it is connected and active.
- Open HollyStudio. Launch the HollyStudio companion app on your PC or Mac. The Lyra should be recognized automatically within the app.
- Open the resolution dropdown above the preview screen. The following output options will be available:
- 3840×2160 (4K) at 30 fps
- 1920×1080 at 30 fps or 60 fps
- 1280×720 at 30 fps or 60 fps
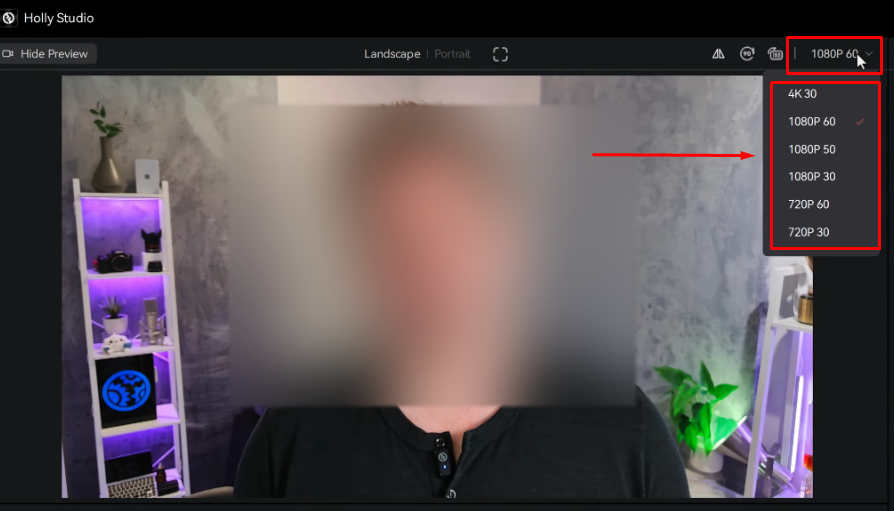
- Select your target resolution. Choose based on your use case. For video calls and live streaming, 1080p is the most reliable choice. For high-quality recorded content production, 4K delivers the most detail.
Method 2: Change Webcam Resolution in Windows
Windows lets you adjust camera resolution through its Camera app and video calling programs. These options depend on what your webcam reports through its UVC driver. The Hollyland Lyra supports 4K, along with 1080p and 720p. You can select these resolutions directly in the Windows Camera app. For finer control, HollyStudio offers frame adjustments, tracking settings, and virtual background color options.
- Confirm the webcam is connected. Open Device Manager and expand the Cameras category. You should see “Hollyland Lyra” listed by name. On some Windows versions, it may appear under Imaging Devices instead, which is also normal behavior.
- Open the Windows Camera app. Press the Start menu, search for “Camera,” and open the app. The Lyra should appear as the active camera. If it does not, use the camera switch icon to select it.
- Open Camera Settings.
- Windows 11: Click the Settings gear icon at the top of the Camera app. Under the Camera section, locate Video quality and open the resolution dropdown.
- Windows 10: Click the Settings gear icon, scroll to Video quality, and choose from the list of available options.
- Select a resolution. Pick your preferred resolution from the dropdown. Windows may display fewer resolution options than HollyStudio. This reflects Windows UVC enumeration behavior, not a hardware limitation on the Lyra.
- Optional: Use the Windows Settings path (Windows 11). Navigate to Settings > Bluetooth and Devices > Cameras, select the Lyra, and check for resolution and frame rate controls. This path surfaces the same UVC-reported modes as the Camera app and is useful for setting a baseline before opening a conferencing app.
Pro Tip: If 4K does not appear in the Windows Camera app dropdown, open HollyStudio first, set the resolution to 4K, and then reopen the Camera app. Some apps inherit the device-level setting after the companion app sets it.
Method 3: Change Webcam Resolution on macOS
macOS does not include a system-wide panel for setting webcam resolution. Resolution is managed through the webcam’s companion app or within individual apps. For Lyra users, the recommended approach is to set resolution in HollyStudio before launching any conferencing or recording software.
Option A: Set Resolution in HollyStudio (Recommended)
- Connect the Lyra via USB-C. No macOS driver download is required. macOS recognizes the Lyra as a standard UVC device immediately.
- Check camera permissions. Go to System Settings > Privacy and Security > Camera. Confirm HollyStudio is listed and has camera access. If it is not listed, you will be prompted to grant permission the first time you open the app.
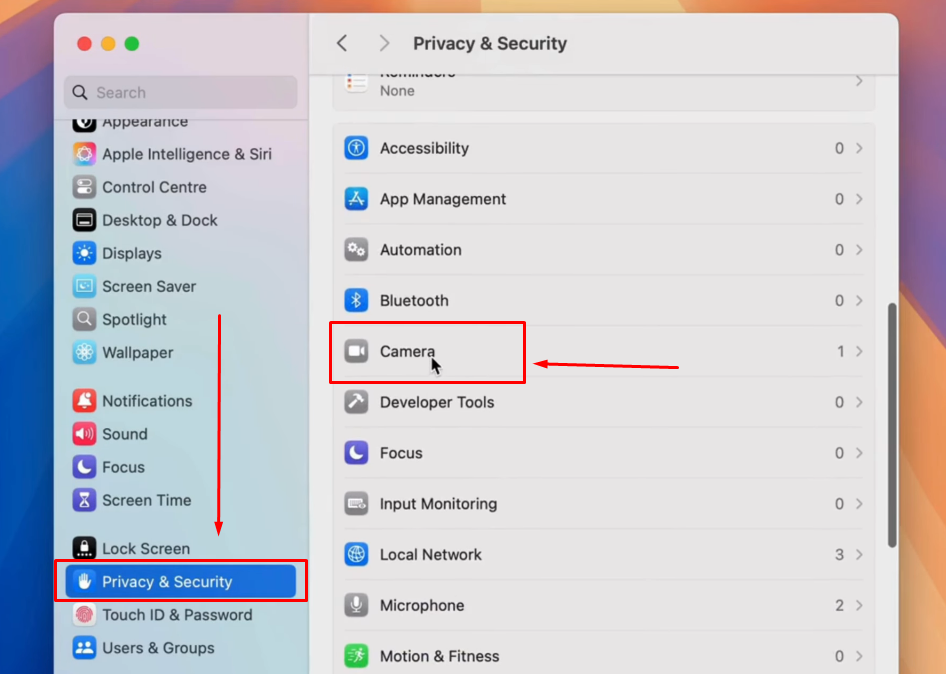
- Open HollyStudio on Mac. Launch the app. The Lyra will appear in the device list.
- Go to the Video tab. Open the Video settings panel inside HollyStudio.
- Select your resolution. The dropdown matches the Windows version: 4K30, 1080p30, 1080p60, 720p30, or 720p60. Confirm your selection.
- Open your conferencing or recording app. After setting the resolution in HollyStudio, open FaceTime, Zoom, OBS, or any other app. It will receive Lyra’s feed at the resolution you established.
Option B: In-App Resolution (Secondary Option)
Some macOS apps expose their own resolution controls and can be used without HollyStudio:
- FaceTime: Open FaceTime > Video in the menu bar. Select the Lyra as your camera. FaceTime adjusts incoming camera video to match its own limits and network quality. As a result, the displayed video may have fewer pixels than the webcam supports.
- QuickTime Player: Go to File > New Movie Recording. Click the small arrow next to the record button. Choose the Lyra from the camera selector and pick a quality option from the dropdown. Higher quality maps to the higher UVC resolution the Lyra reports.
Note: Option B presents simplified quality tiers rather than explicit resolution values. Use Option A when you need to specify a particular output such as 1080p60 or 4K30.
Method 4: Change Resolution in Your Video Conferencing or Streaming App
App-level settings control the resolution actually transmitted during calls or captures, and they can override or cap device-level settings. Plan restrictions in conferencing apps are a separate issue from webcam hardware limits. Knowing which one you are dealing with saves a lot of troubleshooting time.
Zoom
- Open Zoom and select the gear icon near the window’s upper-right corner, and choose Settings.

- In Settings, open Video & Effects and choose your webcam from the Camera menu, such as Hollyland Lyra.


- Turn on the HD video option to enable high-definition video when your account permits it.

- To select 720p or 1080p, sign in to Zoom’s web portal. Open Settings, select Meeting, and scroll down to Media Settings. Find Meeting-HD Video Quality and choose Standard HD (720p) or Full HD (1080p). These options depend on your subscription plan and account permissions. Full HD may also require activation by your administrator or Zoom support.
- For advanced 4K layouts, higher bitrates, or higher frame rates, check Zoom’s Enhanced Media add-on requirements. Your account must have the required license, with the relevant options enabled in the web portal.
Note: Zoom automatically adjusts video quality according to network speed and the viewer’s video window size. Even with 1080p enabled, poor network conditions may lower your video to 720p or below.
Microsoft Teams
- Open Teams, click Settings and more (three-dot menu), and select Settings from the menu.


- On the left sidebar, click on the Devices option.

- Select your camera. In the Camera section, choose Hollyland Lyra from the dropdown. A live preview will appear below the selector.
- Understand Teams’ resolution handling. Teams does not offer a manual resolution picker. It manages resolution adaptively based on bandwidth, CPU load, and meeting mode. You cannot lock output to 1080p or 4K from within Teams directly.
- Best practice. Set the Lyra to 1080p in HollyStudio before joining a Teams call. This gives Teams the highest-quality input to work with, and Teams will use up to 1080p when your connection and account configuration support it.
OBS Studio
OBS gives the most direct resolution control of any app in this guide. You can manually specify the exact resolution and video format, making it ideal for 4K capture with the Lyra.
- Add the Lyra as a source. In the Sources panel at the bottom of OBS, click + and select Video Capture Device. Name the source and click OK.
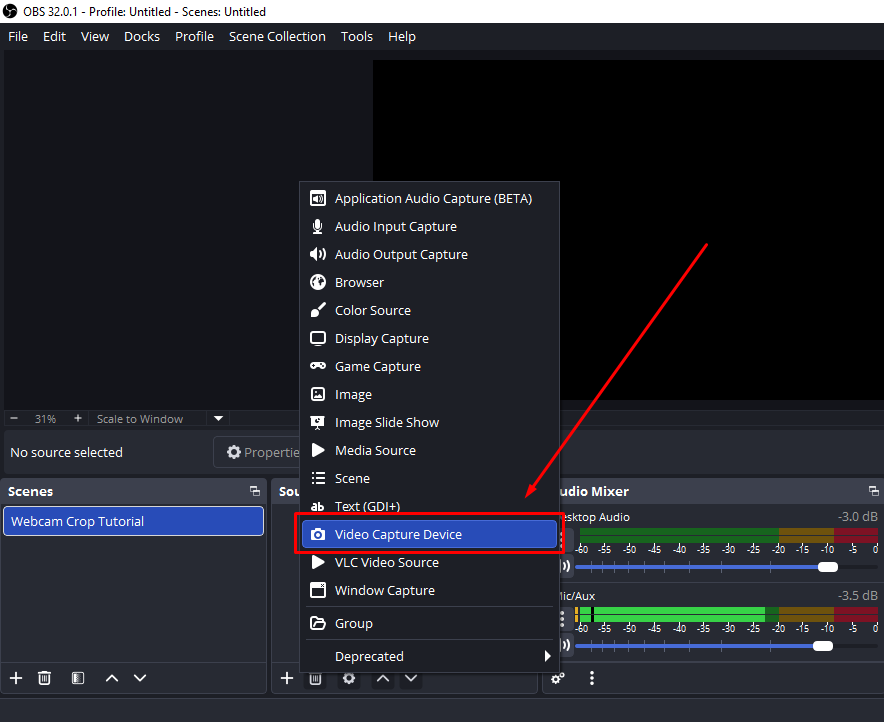
- Select the device. In the Properties window, open the Device dropdown and select Hollyland Lyra.

- Set Resolution/FPS Type to Custom. Change the Resolution/FPS Type field from “Device Default” to Custom. This unlocks the resolution input field.
- Enter your target resolution. For 4K, type 3840×2160. For 1080p, type 1920×1080. For 720p, type 1280×720.
- Set the Video Format. This step is important for 4K:
- Select MJPEG to enable 4K UVC output from the Lyra. Without MJPEG selected, the Lyra’s 4K mode will not be available as a live UVC stream.
- For 1080p or 720p, you can use NV12 or YUY2 for uncompressed UVC output at those resolutions.
- Set the frame rate. For 4K, set FPS to 30. For 1080p or 720p, set FPS to 60 if smooth motion is your priority.
- Click OK. OBS will capture the Lyra’s feed at the resolution and format you specified. Check the OBS preview to confirm the output looks correct before going live.
Why Your Resolution Options Might Be Limited
If your webcam’s spec sheet lists 4K but the dropdown in your app stops at 1080p or 720p, one of the following causes is usually responsible.

- USB port bandwidth. The Hollyland Lyra needs MJPEG mode to stream live video at 4K. Selecting NV12 in your software limits the maximum resolution to 1080p. Change the format in OBS Studio or adjust device defaults through HollyStudio. The Lyra also supports 4K streaming through USB 2.0 and USB 3.0 connections.
- App-side plan restriction. Zoom’s free plan caps resolution at 720p regardless of webcam capability. If Full HD is grayed out in Zoom, the issue is your account tier, not the hardware.
- CPU or GPU bottleneck. Some systems reduce webcam output resolution when under heavy processing load. Close unused applications and browser tabs before a call or recording session to free up resources.
- Outdated app version. Several conferencing and streaming apps added 1080p and 4K support in relatively recent releases. Check for updates and restart the app after installing them.
FAQs
Does changing resolution in one app affect all other apps?
No. Resolution settings in Zoom, Teams, and OBS are specific to each application and do not carry over to others. Changing the resolution in HollyStudio sets the webcam’s output directly. Some apps then adopt this setting when accessing the camera. Even so, each application applies its own resolution policy on top of whatever the device reports.
Will using 4K resolution slow down or freeze my video call?
It can. 4K streaming demands significantly more bandwidth and CPU resources than 1080p. For live calls, 1080p at 30 fps or 60 fps is typically the better balance of quality and stability. Reserve 4K for local recording sessions where you control the output pipeline. Platforms like Zoom and Teams also manage resolution dynamically and may downscale 4K input regardless of what you configure.
What resolution should I use for Zoom calls versus screen recording?
Most Zoom calls run at 720p or 1080p at 30 fps. Full HD may require Business, Enterprise, or Zoom Events subscriptions. Standard Pro accounts do not include the same 1080p access. Zoom also adjusts video quality according to available network bandwidth. Advanced enterprise plans may support 4K sharing and frame rates reaching 60 fps. These options require the right add-on licenses. For local recordings, OBS and QuickTime allow more resolution choices. Choose 4K at 30 fps for detail or 1080p at 60 fps for smoother motion. Local recordings do not depend on internet bandwidth.
Can I change webcam resolution without installing any software?
Yes, although certain controls require additional software. The Hollyland Lyra connects to Windows and macOS through standard UVC support. No custom drivers are needed to get the camera running. Windows users can change resolution through the built-in Camera app. OBS Studio, Zoom, and Teams also offer camera resolution options. These include native 4K at 30 fps and 1080p at 60 fps. For advanced controls, install the HollyStudio app. It provides access to AI tracking, FOV presets, green screen settings, and manual exposure adjustments.
Conclusion
For maximum resolution control, start with your webcam’s companion app. Lyra users should set the resolution in HollyStudio first, then open their conferencing or recording app. Use OS-level settings for a quick check when the companion app is not available, and adjust in-app settings when a specific platform enforces its own resolution policy. Want native 4K support, 1080p60, and full companion app control in a single device? Visit the Hollyland Lyra product page.
