


































.png)
 简体中文

Most webcams capture wide views, which suit groups but include distractions. This becomes quite annoying when you want tighter framing and cleaner backgrounds. Whether you’re joining calls from cluttered rooms or livestreaming, narrower framing gives you greater control. This guide compares five methods, from webcam software settings to OBS filters, ranked by image quality.

Why a Wide Field of View Is a Problem and What Narrowing It Actually Does
FOV is the angle your webcam captures, measured in degrees. Most consumer webcams ship at 80–90° or wider to accommodate varied desk setups. That broad angle is practical, but it often captures far more background than you want on a video call: cluttered shelves, messy corners, or private areas of a room that simply should not be on camera.
Narrowing the FOV digitally crops from the center of the sensor. The subject fills more of the frame, and the background shrinks. Source resolution determines how much you can crop before quality suffers. The Hollyland Lyra’s 82° native FOV and 50MP/4K sensor provide substantial headroom. At 2x digital zoom, the FOV narrows to roughly 47°, yet the 1080p output stays sharp because the sensor captures far more data than 1080p requires. A native 1080p webcam making the same 2x crop has much less margin before visible softness appears.

Hollyland Lyra - 4K AI Webcam
A flagship 4K AI webcam featuring a large 1/1.5″ CMOS sensor, smart auto-framing, and studio-grade 48 kHz/24-bit audio for effortless streaming and conferencing.
Key Features: 1/1.5″ CMOS & 4K30 | AI Tracking & Auto Framing | 48 kHz/24-bit Audio
Method 1: Use Your Webcam’s Companion App (Best Quality)
The Hollyland Lyra works with HollyStudio, which includes a dedicated Focal Length slider for digital zooming from 1x to 4x. Here is the full process:
- Connect the Lyra to your computer using the USB-C cable. The Lyra is plug-and-play on Windows and macOS, so no driver installation is required on most systems. The LED indicator on the camera confirms it is active.


- Open HollyStudio on your computer or laptop.
- Navigate to the Image Control page.
- Locate the Focal Length slider for digital zooming. The default position is 1x, which corresponds to the full 82° native FOV.

Note: You can also find the Focal Length slider on the FOV page of the HollyStudio app.
- Drag the slider to the right to increase zoom. At 2x, the FOV narrows to approximately 47°, removing most of the room background for a typical desk setup.
- Watch the live preview pane as you adjust. Stop when background clutter is fully cropped out of frame while your head and shoulders remain comfortably centered.
- The setting applies immediately and stays active while HollyStudio is running.
At 2x zoom, the Lyra’s 50MP capture feeds a 1080p output, meaning the camera draws on far more pixel data than the output resolution demands. Quality degradation at this level is minimal. At 4x, some softness may appear, especially in low light. Reserve 4x for close-up detail shots rather than standard video calls.
HollyStudio also lets you save preset FOV positions, so you can switch quickly between a wide view for group calls and a tighter solo frame without readjusting the slider each time.
Note: On macOS, HollyStudio currently supports basic camera features only. Advanced image tools such as skin smoothing and color correction are not available on the Mac version at this time.
Method 2: Enable AI Tracking and Smart Auto Framing (Hands-Free Narrowing)
Manual zoom or FOV adjustment sets a fixed crop on Lyra’s 4K sensor. AI Tracking and Smart Auto-Framing adjust that cropped view digitally.
AI Tracking follows your face using Phase Detection Autofocus (PDAF). It shifts the view horizontally and vertically as you move around. Smart Auto-Framing adjusts zoom and framing based on distance and people present. It zooms in when you move away and widens the view when someone joins. Together, both features mimic a camera operator. Lyra’s 4K sensor supports digital adjustments with less immediate quality loss.
To enable AI Tracking and Smart Auto Framing on the Lyra:
- Open HollyStudio.
- Click on the frame icon from the top options of the preview screen. Once clicked, you will see a padlock symbol within the frame symbol.


- Click the gear icon under the preview screen to open the Settings window.

- Choose the Camera Settings tab from the left menu when the Settings dialog appears.
- Then, turn on Face Priority Focus and close the window.

- Now, open the FOV page.
- Next, under the Smart Framing section, deselect None and enable auto framing by clicking the image tile next to None.

Method 3: Zoom In Through Your Video Conferencing App
If you prefer not to run a companion app, Zoom, Microsoft Teams, and Google Meet all offer camera-level controls inside their meeting settings. These work with any webcam, including the Lyra, which connects as a standard UVC device and appears by name in each app’s camera selector.
But here’s a thing! This approach can downgrade the quality. Because this method applies a software-side crop to the already-encoded camera stream, which carries a slightly higher quality impact than companion app or firmware-level zoom. For most everyday video calls, the difference is acceptable.
Zoom (main walkthrough):
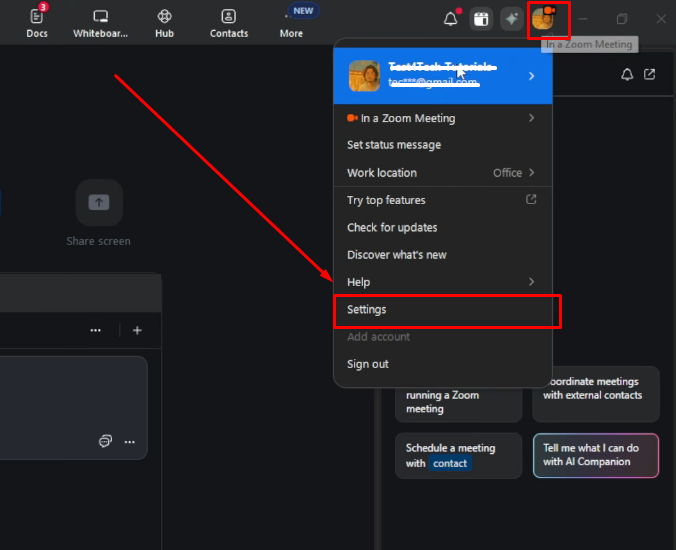
- Open Zoom, click your profile image, and once the menu appears, select Settings.
- Select Video & effects from the left sidebar.

- Under the camera preview, look for the Camera section. Enable HD and Original Ratio (if available, depending on the version).

- If your camera’s UVC driver exposes a Zoom slider here, drag it to increase the zoom level.
- Use the Pan and Tilt controls to shift the crop area if the default centering does not suit your setup.
Microsoft Teams: In Microsoft Teams, open Settings from the Settings and more (three-dot button) menu and select Devices. Scroll to Camera and turn off “Automatically adjust camera controls.” Then click Open camera settings. When a new window appears, select Camera Control. If your camera’s UVC driver supports it, adjust the Zoom slider as needed.
Google Meet: Google Meet does not expose a native zoom control in its settings. For Meet users, the companion app method or physical repositioning is a more reliable route to a tighter frame.
Note: If HollyStudio is already active with a zoom level above 1x, applying in-app zoom in Zoom or Teams will compound that setting. Set HollyStudio back to 1x before using any app-side zoom controls to avoid over-zooming.
Method 4: Crop and Zoom in OBS (For Streamers and Creators)
OBS uses a non-destructive filter system that crops your camera source without modifying the raw capture feed. Cropping a 4K source down to a 1080p output canvas produces a result that is essentially lossless, making this the best option for streamers and video creators who already use OBS in their workflow.
- In OBS, click the + icon in the Sources panel and add a Video Capture Device source.

- In the source properties, select Lyra by name from the device drop-down.
- In the Resolution/FPS Type dropdown, select Custom.
- Set the resolution to 3840×2160 (4K30) to maximize crop headroom before the canvas scales down to your output resolution.

- Click OK to close source properties.
- Right-click the Video Capture Device source in the Sources panel and select Filters.

- Click the + icon in the Filters dialog, select Crop/Pad, and rename it.


- Enter pixel values for Left, Right, Top, and Bottom to narrow the frame. For a centered crop that keeps the subject in the middle, enter equal values for Left and Right.

- For a visual shortcut, hold Alt on your keyboard and drag the red edge handles on the source in the OBS canvas to crop interactively. The affected edges will turn green, confirming Crop.

- To fill the 1080p output frame, right-click the source. Select Transform > Fit to Screen.

Streamlabs OBS uses an identical filter workflow, so these steps transfer directly if you use that platform instead.
Method 5: Reposition the Webcam (No Quality Cost)
Moving the webcam closer fills more of the frame without digital processing or quality loss. Your desk setup may limit how close you can place it. Moving the camera alone rarely replaces digital zoom, but it reduces the amount needed.

A few positioning tips for clip-mount webcams like the Lyra (80 g, standard 1/4-inch threaded mount):
- Add a desktop tripod. The Lyra’s 1/4-inch threaded mount accepts a standard tripod, letting you bring the camera to face height and closer to your seated position.

- Adjust vertical tilt. Tilting the camera slightly downward removes ceiling space from the top of the frame without any zoom adjustment.
- Combine with light digital zoom. Repositioning plus 1.2–1.5x digital zoom typically produces a better result than relying on 3–4x digital zoom from a greater distance.
Which Method Should You Choose?
Use this table to match your situation to the right approach quickly.
| Method | Best Use Case | Image Quality Impact | Effort Level |
|---|---|---|---|
| Companion app digital zoom (HollyStudio) | Any use case; cleanest result on high-res sensors | Minimal (4K sensor gives crop headroom) | Low |
| AI Trackinga nd Smart Auto Framing | Video calls, solo streaming, hands-free setups | Minimal | Very Low |
| Video conferencing app zoom | Quick adjustment in Zoom/Teams/Meet | Moderate (software-side crop) | Low |
| OBS Crop/Pad filter | Live streaming, video recording with OBS | Minimal (crops raw 4K source) | Medium |
| Physical repositioning | Eliminating zoom quality cost entirely | None | Low |
FAQs
Does narrowing your webcam’s FOV reduce video quality?
It depends on the method and source resolution. Digital zoom on a 4K/50MP sensor like the Lyra’s delivers clean 1080p at 2x because it crops within a much larger pixel pool. App-side zoom in Zoom or Teams applies a software crop to an already-encoded stream, which carries a slightly higher quality cost. OBS Crop/Pad filtering from a 4K source is essentially lossless at 1080p output.
What field of view is best for video calls?
For solo video calls, a 60–75-degree view often gives balanced framing. It shows your shoulders while keeping most background details outside the frame. With an 82-degree native view, try 1.2–1.5x digital zoom. A high-resolution sensor can maintain clear images at these settings.
Can I narrow the FOV on a built-in laptop webcam?
Older, budget laptops often lack built-in hardware controls for zooming. Newer models can narrow the view through Windows Studio Effects or Apple Center Stage. For 1080p webcams, video apps or OBS Crop/Pad provide manual cropping options. These methods can soften images because fewer pixels remain available. Premium laptops with 10-12MP sensors retain more detail during digital cropping. With basic webcams, physically moving the camera closer avoids quality loss.
Will Smart Auto Framing conflict with a manually set zoom level in HollyStudio?
The safest approach is to set the Zoom slider (Focal Length slider) back to 1x before enabling Smart Auto Framing. If both controls are active at the same time, their effects may compound, producing a tighter crop than either setting would create on its own. Verify this behavior in your installed version of HollyStudio, as app updates can change how these controls interact.
Conclusion
Start with your webcam’s companion app for quick, clean zoom adjustments. Most zoom controls take under 30 seconds to configure. The Lyra’s AI Smart Auto-Framing adjusts the view automatically. Without these options, OBS filters or meeting app zoom provide alternatives. These methods help narrow the view without changing your setup completely.
