



































.png)
 简体中文

Your mic records audio in Zoom, and QuickTime captures sound without any problems. But when you open iMovie, your recordings suddenly come out silent. This frustrating problem happens quite often, and it usually comes down to six possible reasons. iMovie may not have microphone permission, macOS might have the wrong input selected, or an audio setting could be misconfigured. An external or wireless microphone might also go unrecognized. In other cases, a damaged preference file or a stuck macOS audio service could be responsible. Go through the fixes below in order to find what’s causing the problem.

Why Your Microphone Stops Working in iMovie
Look over the table below, find the cause that best matches your issue. And go directly to its corresponding fix.
| Likely Cause | Jump to Fix |
|---|---|
| iMovie blocked from microphone access | Fix 1 |
| Wrong input device selected in macOS | Fix 2 |
| iMovie’s voiceover settings misconfigured | Fix 3 |
| External or wireless receiver not recognized | Fix 4 |
| iMovie preference file corrupted or app outdated | Fix 5 |
| Core Audio daemon in a broken state | Fix 6 |
Fix 1: Grant iMovie Microphone Access (macOS and iPhone)
One of the easiest causes to overlook is microphone permission being denied. When this happens, neither macOS nor iOS shows an error inside iMovie. Instead, the app simply records without capturing any sound. That’s why many users waste time checking other settings first. Before changing anything else, make sure iMovie has microphone access.
On Mac (macOS Ventura, Sonoma, or later):
- Quit iMovie completely using Command + Q.
- Open the Apple menu and click System Settings.

- In the left sidebar, click Privacy & Security.
- Scroll down and click Microphone.

- Find iMovie in the app list. If the toggle next to it is switched off, turn it on.
- Relaunch iMovie and attempt a voiceover or direct recording to confirm the fix.
Note: If iMovie does not appear in the Microphone list at all, macOS has never received a permission request from the app. This can happen after a fresh install or a system migration. Reinstall iMovie from the Mac App Store to trigger the permission prompt on the next launch.
On iPhone or iPad (iOS/iPadOS):
- Open the Settings app.
- Tap Privacy & Security.

- Tap Microphone.

- Find iMovie in the list and switch the toggle on.
- Return to iMovie and test recording.
Note: On iOS, a second app running in the background can hold an exclusive lock on the microphone, blocking iMovie from accessing it. If the toggle is already enabled and recording is still silent, close all background apps and try again.
Fix 2: Select the Correct Audio Input in macOS Sound Settings
iMovie does not have its own independent audio routing engine. It inherits whichever input device is set as the macOS default. If that default is set to the wrong device, or silently switches to “None” when an external mic is unplugged, iMovie will record silence without displaying any warning.
- Open System Settings and click Sound in the sidebar.
- Click the Input tab.

- Review the list of available input devices and click the one you intend to use — built-in microphone, USB mic, or external receiver.
- Speak into your microphone and watch the Input Level bar at the bottom of the window. The bar should animate in response to your voice, confirming the device is live.

- If the Input Level bar stays completely flat, the selected device is not receiving signal. Check its physical connection, confirm it is powered on, and reselect it in the list.
- When the Input Level bar doesn’t move, the selected microphone isn’t receiving any audio. Check its physical connection and make sure it’s powered on or unmuted. Then select the microphone again from the device list.
Note: Some desktop Macs, such as the Mac mini, don’t have built-in microphones. On these computers, the tab displays “No input devices found” until you connect an external microphone.
- Once the Input Level bar responds to your voice, quit and reopen iMovie, then test.
Pro Tip: Checking the Input Level bar in System Settings helps identify where the problem starts. If the bar doesn’t move, check your microphone connection and macOS permissions first. But when the bar responds to your voice, the microphone is working. In that case, open Voiceover Options in iMovie and check whether the correct microphone is selected.
Fix 3: Check Audio Settings Inside iMovie
Even with correct permissions and a confirmed live macOS input, iMovie can still produce silent recordings if its internal voiceover panel points to the wrong device or has its volume slider set to zero.
Recording a voiceover on the timeline:
- Open your project in iMovie and position the playhead at the point where you want the voiceover to begin.

- Click the Record Voiceover button.
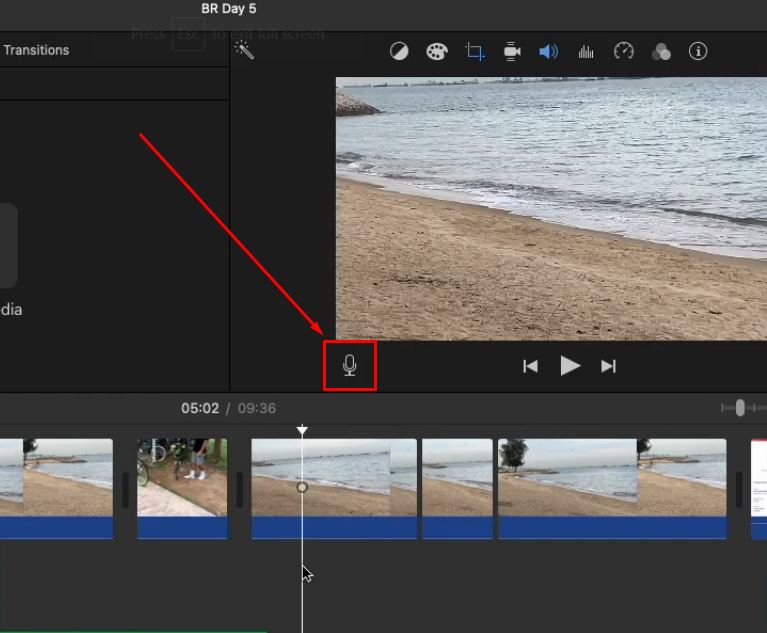
- Once the voiceover control bar appears, click Voiceover Options. You’ll find it just right of the red Record button, marked by an adjustment sliders icon.
- Open the Input Source pop-up menu and check which microphone appears there. Make sure it matches the microphone you intend to record with. You can also select System Setting when your macOS default input is already correct. If the menu shows a different or disconnected device, choose your microphone from the list instead.

- Find the Volume slider in that same options menu. When it’s set too low or close to zero, your recording may have no sound at all. Drag the slider to the right until you reach a suitable level. iMovie won’t show an error or warning when the slider is at zero.

- Before clicking Record, speak into your microphone and watch the audio meter beside the red Record button. Adjust the slider until the meter stays mostly green. It can reach yellow briefly when you speak louder, but avoid red. If the meter doesn’t light up while you’re speaking, check your macOS Sound settings and microphone permissions again. The problem is likely occurring before the audio reaches iMovie.

Recording direct clip audio:
- Click Import in the toolbar, then find your camera under Cameras in the sidebar. Select it to record both video and audio directly into iMovie.
- Confirm the audio input source shown in that panel matches your target device.
- If it shows the wrong device, update the macOS default input in System Settings > Sound > Input, then relaunch iMovie and check again.
Fix 4: Diagnose External and Wireless Microphone Issues in iMovie
External microphones, including USB mics, 3.5mm lavaliers, and wireless receivers, need a few extra checks. Unlike built-in microphones, they depend on macOS audio routing, app permissions, and compatible physical connections. Most problems usually come down to three things:
- Check macOS permissions and iMovie input settings. iMovie normally detects a microphone when you connect it. But macOS won’t pass audio if iMovie doesn’t have microphone permission. Open System Settings > Privacy & Security > Microphone and make sure iMovie is enabled. Then open Voiceover Options inside iMovie and select your external microphone. When a newly connected device doesn’t appear, quit iMovie and open it again. This refreshes its audio system.
- Check USB class compliance or install the required macOS driver. Most modern USB microphones and wireless receivers support USB Audio Class. This allows them to connect through macOS’s built-in audio drivers without extra installation. But specialized audio interfaces may require a manufacturer’s compatible macOS driver. Install the correct driver so your device appears under System Settings > Sound > Input. Note: USB Audio Class compliance is required when running iMovie on an iPhone or iPad.
- Make sure your 3.5mm connector matches your Mac’s TRRS headset jack. Modern Macs have a 3.5mm TRRS combo jack that follows the CTIA standard. A smartphone-style TRRS lavalier microphone can connect directly to this jack. Camera-style TRS microphones and wireless receivers need a TRS-to-TRRS adapter or USB audio adapter. Without the right adapter, your Mac may not receive the microphone signal.
Diagnosing a Wireless Mic: Hollyland LARK MAX 2 Walkthrough
The steps below feature the Hollyland LARK MAX 2 as a practical example. They show how to check each detection stage, starting with the transmitter and ending in iMovie. If you have another wireless lavalier microphone, follow the same general order.
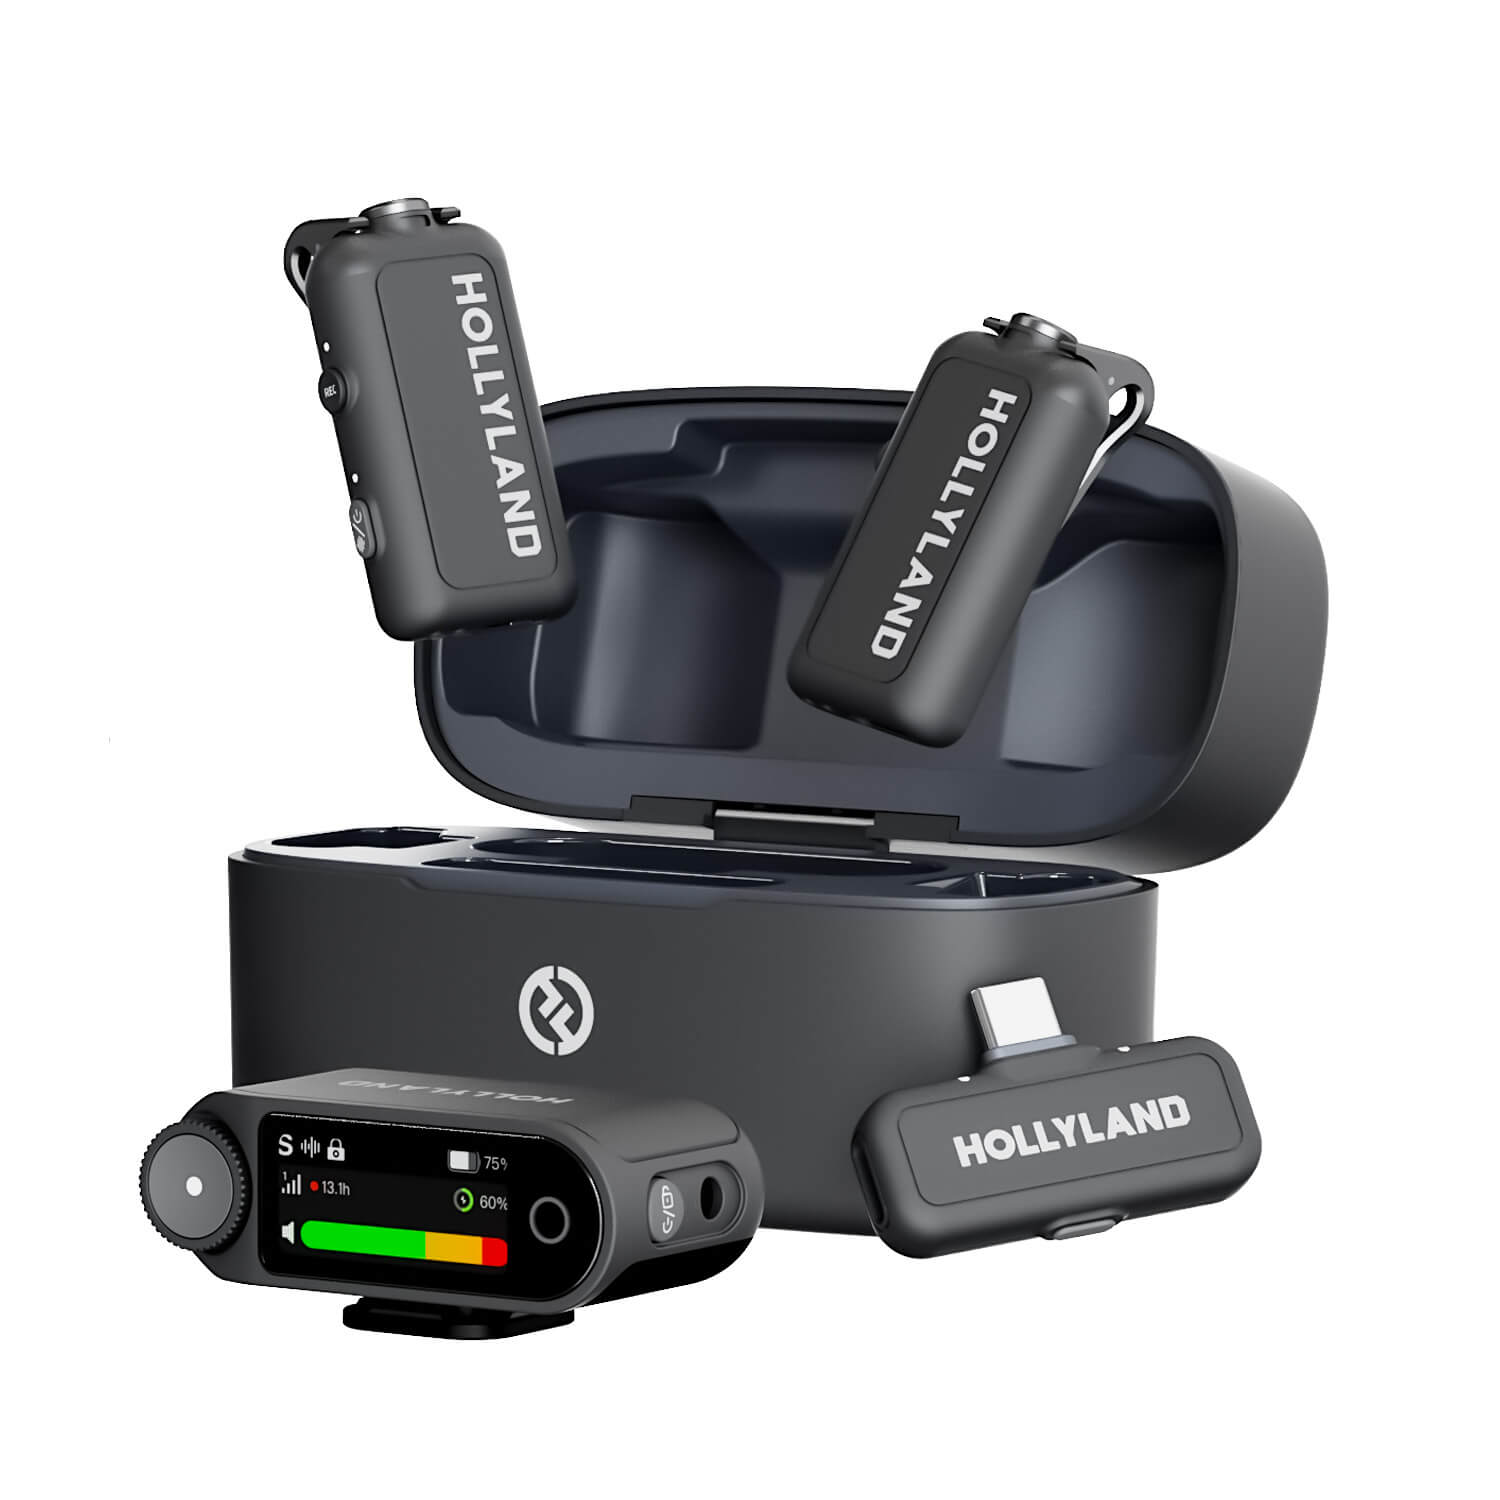
Hollyland LARK MAX 2 - Premium Wireless Microphone System
A premium wireless microphone for videographers, podcasters, and content creators to capture broadcast-quality sound.
Key Features: Wireless Audio Monitoring | 32-bit Float | Timecode
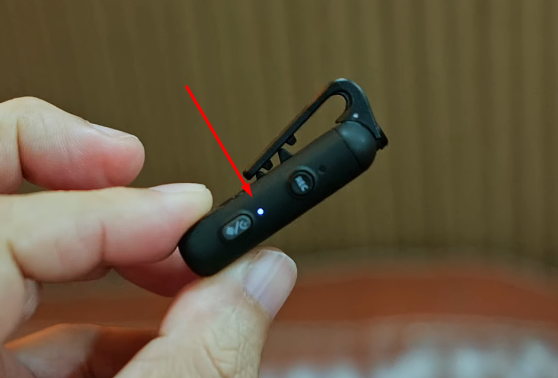
- Check the TX LED status. Look at the LED indicator on the LARK MAX 2 transmitter (TX) unit. A solid blue light means the TX pair is locked and transmitting signal. A blinking or absent LED means pairing has not been established or the receiver (RX) is out of range. Move both units within range and wait for the LED to go solid before continuing.
- Confirm RX status. Assuming that you attach the LARK MAX 2 Camera RX to your macOS, check pairing confirmation on the receiver’s OLED once the TX LED indicator is solid blue.
- Check the TX mute-toggle LED. On the LARK MAX 2 transmitter, inspect the mute button and its LED color. A solid red LED on the TX body means the transmitter is in mute mode, and no audio signal is being sent regardless of pairing or connection status. Double-press the mute/power button (it’s a multifunction button on the TX) to mute or unmute the TX.

- Connect the Camera RX to your Mac via a USB-C cable. Plug the LARK MAX 2 RX unit directly into a USB-C port on your Mac. Open System Settings > Sound > Input and confirm “LARK MAX 2” appears as a selectable device. If it does not appear, try a different USB-C port or cable and check again.

- Check the gain level on the Camera RX unit. If the gain control on the RX unit is at its minimum position, the macOS Input Level bar will show no movement even when the TX is actively transmitting audio. Increase the gain on the RX until the Input Level bar in System Settings responds visibly when you speak into the TX. On the LARK MAX 2’s Camera RX, find the gain adjustment option by following the steps below.
- Press the control knob to see the menu.

- Rotate the control knob and tap Mic Settings.
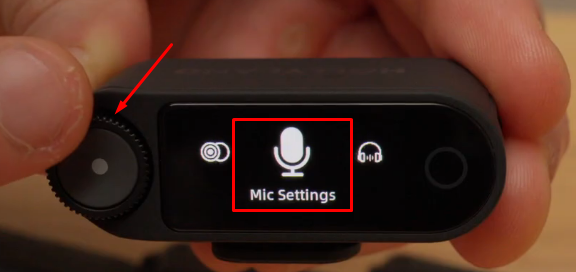
- Look for and select for the Mic Gain option.
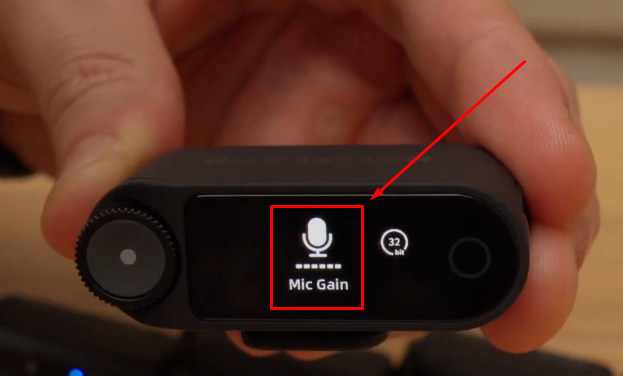
- Choose “Auto” or “Custom” gain.


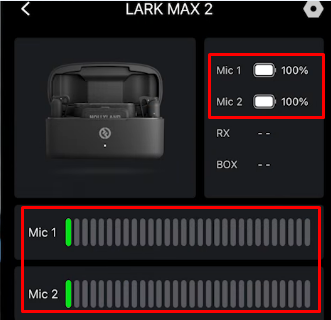
- Verify connection quality in the HollyAudio App. Open the Hollyland companion app and navigate to the device status screen. Confirm the TX and RX tiles both show an active connection with strong signal strength. If the app reports a channel conflict or degraded signal, use the app to switch the wireless channel and retest.
- Quit and relaunch iMovie. After the LARK MAX 2 RX is connected, confirmed as live in System Settings, and the Input Level bar is responding, quit iMovie completely and reopen it. The app will now detect the LARK MAX 2 as an available input source. Open the voiceover panel, select “LARK MAX 2” from the input dropdown, and confirm the waveform animates when you speak.
Fix 5: Reset iMovie Preferences and Update the App
If Fixes 1 through 4 have not resolved the problem, a corrupted preference file may be causing iMovie to reference an audio device that no longer exists or to carry broken settings forward from a previous macOS version.
- Quit iMovie completely. If it is frozen, use Apple menu > Force Quit to close it.
- Hold down the Option and Command keys on your keyboard, then click the iMovie icon to launch the app.
- When a confirmation window appears, select Delete Preferences. iMovie will start with its original default settings. You might need to open your existing library again through File > Open Library.
- Open the App Store on your Mac and select Updates from the left sidebar. Press Command + R to refresh the page when needed.
- Check whether an iMovie update is available. When you find one, click Update and install it before testing your microphone again.
Fix 6: Restart Core Audio (Advanced)
macOS routes all audio through a background process called coreaudiod. When this daemon enters a broken state, no application (including iMovie) can access the microphone correctly, even when permissions and input settings appear normal. Restarting it takes less than ten seconds and does not require a system reboot.
- Open Terminal (Applications > Utilities > Terminal).

- Type the following command and press Return:
sudo killall coreaudiod

- Enter your administrator password when prompted. macOS kills the daemon and restarts it automatically within one to two seconds. You may hear a brief audio interruption across all apps.
- Return to iMovie and test microphone input.
Note: This fix requires administrator access. On a managed or enterprise Mac where Terminal or sudo access is restricted, contact your system administrator rather than attempting this step directly.
Frequently Asked Questions
Q: How do I fix the iMovie microphone on iPhone or iPad?
On your iPhone or iPad, open Settings > Privacy & Security > Microphone and make sure the toggle beside iMovie is turned on. If it’s already enabled but recordings still have no sound, check a few other things. Swipe down from the top-right corner to open Control Center. Look for an orange dot at the top of your screen, which indicates that an active call or another audio app is accessing the microphone. Also, check your Bluetooth settings to see whether audio is going to a connected headset instead. Next, open Settings > Screen Time > Content & Privacy Restrictions and make sure microphone access isn’t blocked. Finally, force-close iMovie and launch it again to test your mic.
Q: My USB microphone works in every other app but not in iMovie — why?
iMovie captures its available audio device list at launch. If you plugged the USB mic in after iMovie was already open, the app cannot see it. Quit iMovie, confirm the mic is recognized in System Settings > Sound > Input, then reopen iMovie. If the device still does not appear in the voiceover dropdown, run the preference file reset in Fix 5.
Q: Can I use a wireless lavalier mic with iMovie on a Mac?
Yes, provided the wireless receiver appears as a USB audio input or 3.5mm audio input in macOS. iMovie will then list it as a selectable source in the voiceover panel. For a full step-by-step walkthrough covering pairing, LED status checks, USB-C connection, and gain setup, follow the Hollyland LARK MAX 2 diagnostic steps in Fix 4.
Conclusion
Work through the fixes in order: permissions, system input, iMovie settings, external hardware, preference reset, and Core Audio. If all six fail, reinstalling iMovie from the Mac App Store is the genuine final step, and your project library files are stored separately so they will not be affected. For wireless mic users who want to eliminate audio dropout as a recurring iMovie concern, the Hollyland LARK MAX 2’s 32-bit float backup recording preserves audio internally on the TX unit even when the wireless link drops, making it a reliable workflow safeguard beyond any software fix.
