



































.png)
 简体中文

You’ve recorded your footage and added it to the timeline. Then, while listening back, you notice a steady hiss, low hum, or crackling sound underneath your dialog. It can be annoying when the footage looks fine, but the audio has unwanted noise. The good thing is that Premiere Pro already gives you several ways to clean it up. You can usually fix the problem without opening another application. Let’s look at three built-in methods, starting with the simpler options. We’ll also discuss when to move to another method and how to prevent noise during recording.

Why Your Microphone Audio Has Static
Not all static is the same, and diagnosing the type you are dealing with saves time before you reach for a noise slider. Three forms appear most frequently in video production work.
| Static Type | Likely Cause | Best Fix Method |
|---|---|---|
| Broadband hiss | High noise floor, weak preamp, or excessive gain | Method 1: Essential Sound Panel, Reduce Noise slider |
| Electrical hum (50/60 Hz) | Ground loop, unshielded cable near power source, faulty connection | Method 2: DeHum effect, or Essential Sound DeHum slider |
| Intermittent crackle | Clipping, RF interference, or wireless dropout | Method 3: Audition roundtrip for complex cases |
Identifying which type you have before opening any panel points you directly to the right tool.
Method 1: Remove Static Using the Essential Sound Panel (Recommended Starting Point)
The Essential Sound Panel is the fastest path to cleaner audio in Premiere Pro. Its Repair tab consolidates the most useful noise-reduction controls into a single interface without requiring any effect-by-effect setup. For broadband hiss and mild electrical hum, start here.
Open the Essential Sound Panel and Tag Your Clip as Dialogue
- Go to Window > Essential Sound to open the panel. If it is already docked in your workspace, click the tab to bring it forward.
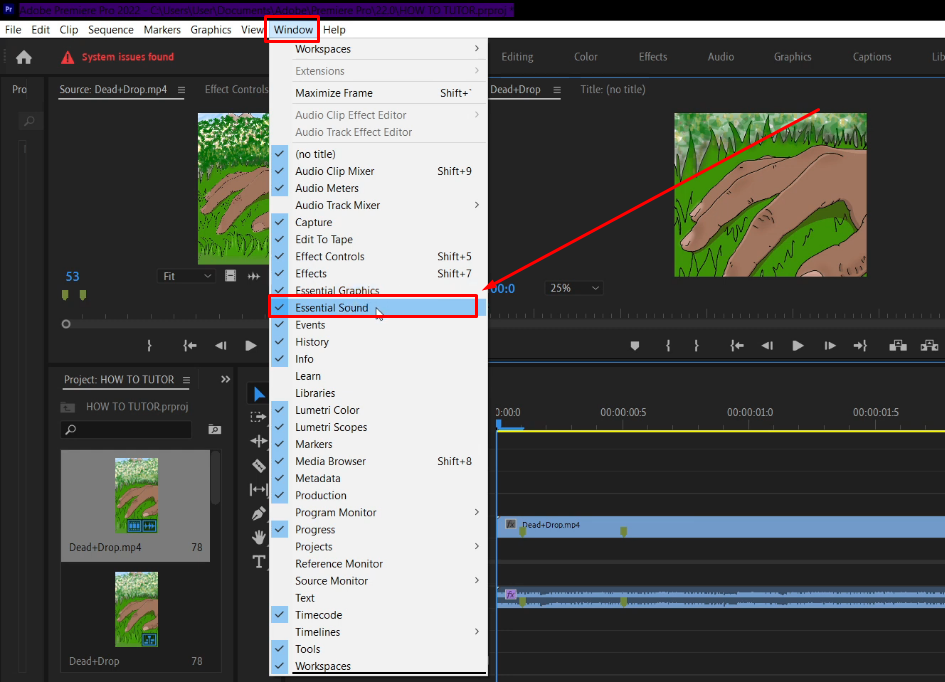
- Select the audio clip on your timeline that contains static.
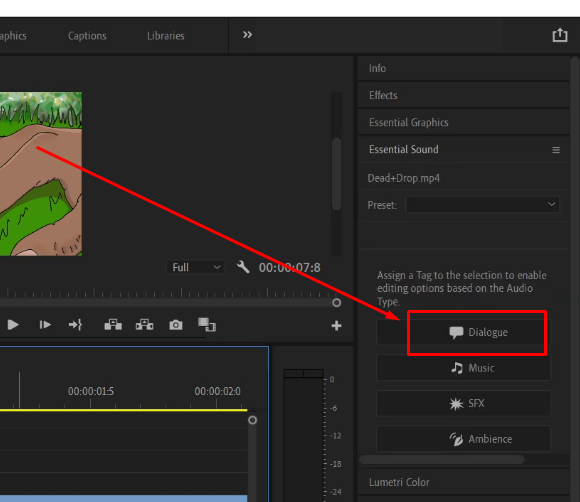
- In the Essential Sound Panel, click Dialogue. This tags the clip and unlocks the Repair tab. Without tagging the clip, the Repair controls remain hidden.
- Click the Repair heading inside the panel to expand the noise-reduction tools.
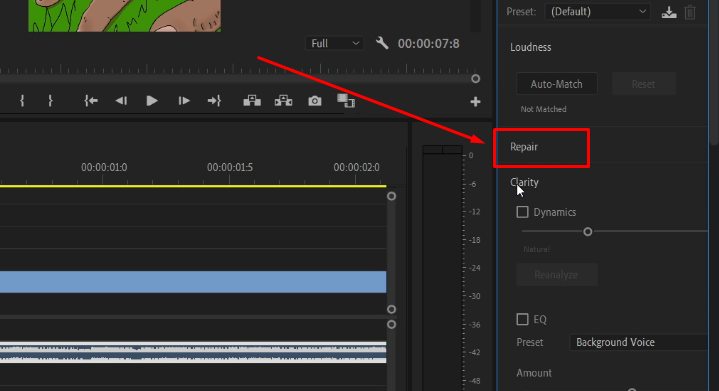
Note: Tagging a clip as Dialogue does not apply any processing on its own. It only tells Premiere Pro which set of tools to surface. You remain in full control of what gets applied.
Use Reduce Noise and Reduce Rumble
The Reduce Noise slider targets broadband hiss — the steady background noise produced by a high noise floor or an underperforming preamp.
- Play the clip so you can monitor the audio in real time.
- Slowly raise the Reduce Noise slider from 0. Listen carefully as you move it upward.
- For most recordings, a value between 30 and 50 percent removes audible hiss without introducing artifacts. Above 60 to 70 percent, dialog begins to sound processed — a hollow, slightly robotic quality sometimes described as “underwater” or “metallic.”
- Enable the Reduce Rumble checkbox if you hear a low-frequency rumble beneath the dialog. This targets sub-100 Hz noise from handling vibration, HVAC, or low-end environmental interference.
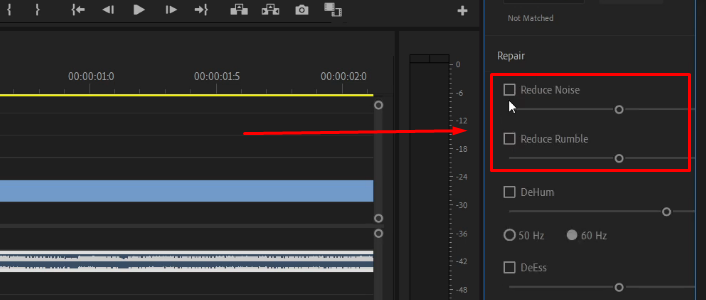
Pro Tip: To compare your processed audio against the original, use the bypass toggle in Effect Controls rather than undoing and redoing your settings. This gives you a clean before/after comparison without losing your slider values.
Apply DeHum for Electrical Interference
If your static is a steady tonal hum rather than broadband hiss, the DeHum checkbox in the Repair tab is the correct control to reach for.
- Check the DeHum box inside the Repair tab.
- Select the correct base frequency. Choose 50 Hz if you are in a region that uses 50 Hz power (most of Europe, Asia, Africa, and Australia). Choose 60 Hz if you are in North America, parts of South America, or Japan.
- Increase the DeHum strength slider until the hum disappears from your monitored playback. Pushing this control too far can attenuate fundamental voice frequencies that sit near the hum frequency, so increase it gradually.
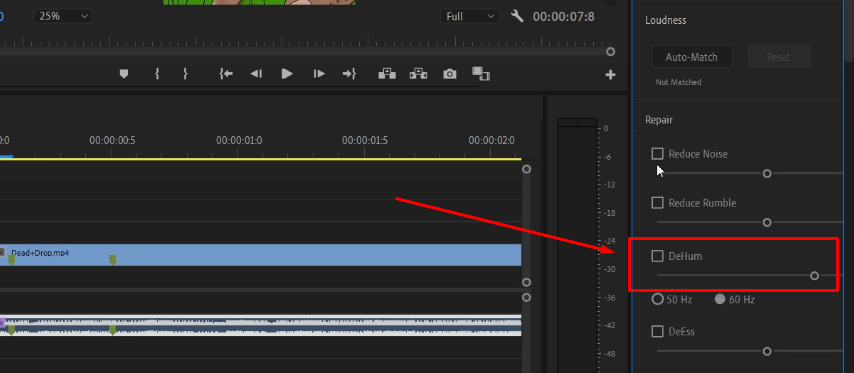
DeHum and Reduce Noise operate independently, so you can have both active simultaneously if your recording contains both hiss and hum.
Method 2: Apply DeNoise and DeHum Effects Directly from the Effects Panel
The Essential Sound Panel is convenient, but applying effects directly from the Audio Effects panel gives you clip-level precision and makes batch processing across multiple clips more practical.
- Open the Effects panel (Window > Effects) and expand the Audio Effects folder.
- Locate DeNoise for broadband hiss, or DeHum for electrical interference.
- Drag the effect onto the audio clip in your timeline. Alternatively, drag it onto an audio track header in the Audio Track Mixer to apply it to every clip routed through that track simultaneously.
- Select the clip and open Effect Controls (Shift + 5). Click the Edit button next to the effect name to open the custom setup dialog.
- Inside the DeNoise dialog, use the Amount knob to set reduction strength. The same 30–50 percent guideline from Method 1 applies here. Inside the DeHum dialog, select the correct base frequency and configure harmonics to match your power grid.
When this approach is preferable over the Essential Sound Panel:
- You need to apply consistent noise reduction to a large number of clips across multiple tracks. Applying DeNoise to an audio track in the Audio Track Mixer processes every clip on that track without touching each one individually.
- You want clip-level effect settings that remain independent from your Essential Sound Panel tagging.
- You are handing off the project to another editor and want the effect visible directly in Effect Controls rather than buried inside the Essential Sound Panel settings.
Method 3: Send Audio to Adobe Audition for Severe Static
When Premiere Pro’s native tools begin introducing artifacts before the static is fully removed, it is time to escalate to Adobe Audition. This is the correct path for heavy broadband noise, variable noise floors where the noise character changes across the recording, or audio with multiple overlapping noise sources.
The Premiere Pro to Audition roundtrip keeps everything connected to your original timeline — no manual reimporting required.
- Right-click the audio clip in the Premiere Pro timeline and select Edit Clip in Adobe Audition. Premiere Pro exports the clip as a new file and opens Audition automatically.
- In Audition, locate a section of your recording that contains only static and no dialog. The first half-second before a speaker begins is usually the cleanest option.
- Select that silent section using the Time Selection tool.
- Go to Effects > Noise Reduction / Restoration > Capture Noise Print (or press Shift + P). Audition samples the spectral noise signature from your selection.
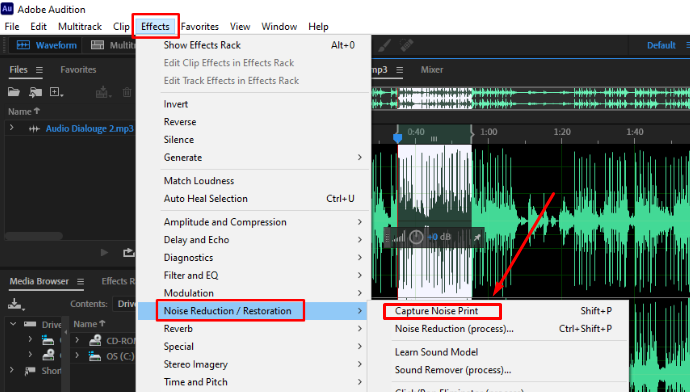
- Go to Effects > Noise Reduction / Restoration > Noise Reduction (process).
- In the Noise Reduction dialog, start with Reduce Noise By set to around 25–35 dB. Use the preview button to monitor the result before committing. Increase the reduction only if the hiss remains clearly audible.
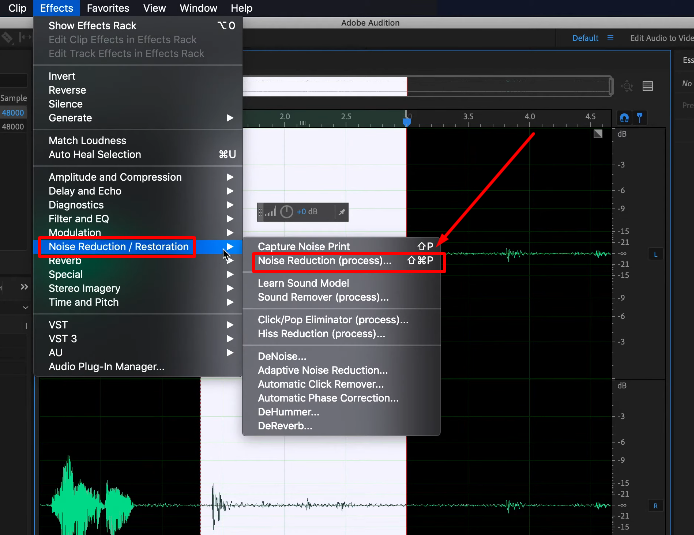
- Click Apply.
- Save the file in Audition (Ctrl + S on Windows, Cmd + S on Mac). The processed audio updates automatically on your Premiere Pro timeline.
When to escalate from Method 1 or 2: If you are past 60 percent on the Reduce Noise slider and static is still audible, Audition’s Noise Print method will almost always produce a cleaner result. Because it samples the actual noise signature of your specific recording, it removes the noise more selectively and preserves more of the voice signal than a generic broadband algorithm.
Prevent Microphone Static Before It Reaches the Timeline
Every decibel of static you eliminate at the capture stage is noise you never have to fix in post. No editing tool, however sophisticated, fully recovers dialog buried under heavy static without some degree of quality loss. Three habits significantly reduce the static you encounter in Premiere Pro.
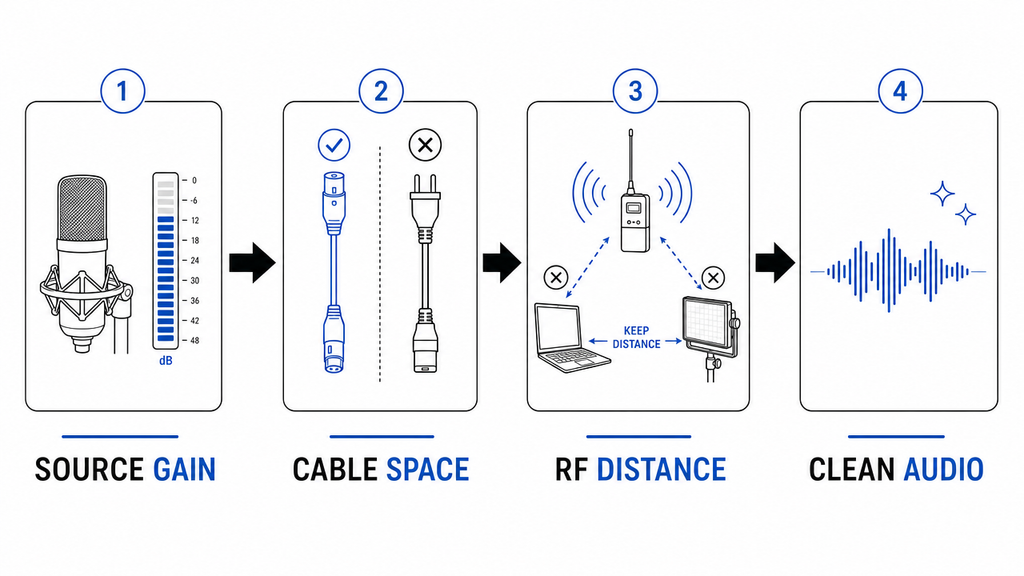
- Gain staging at the source. Set recording gain so that conversational speech peaks between -12 and -6 dBFS. A clip recorded too quietly forces you to boost gain in post, which amplifies the noise floor along with the dialog.
- Cable and positioning discipline. Keep audio cables separated from power cables, monitor cables, and fluorescent lighting fixtures. Even a few centimeters of separation can eliminate a ground hum.
- Distance from interference sources. Wireless transmitters and unshielded cables near laptops, LED panels, and power bricks are common sources of RF interference and 60 Hz hum.
For recurring static problems, particularly in run-and-gun or uncontrolled environments, hardware-level noise cancellation at the transmitter stage eliminates static before it is ever recorded.
Enable AI Noise Cancellation on the LARK MAX 2 Transmitter
The Hollyland LARK MAX 2 includes AI Noise Cancellation that processes audio inside the transmitter in real time, before the signal is recorded or sent to the receiver.
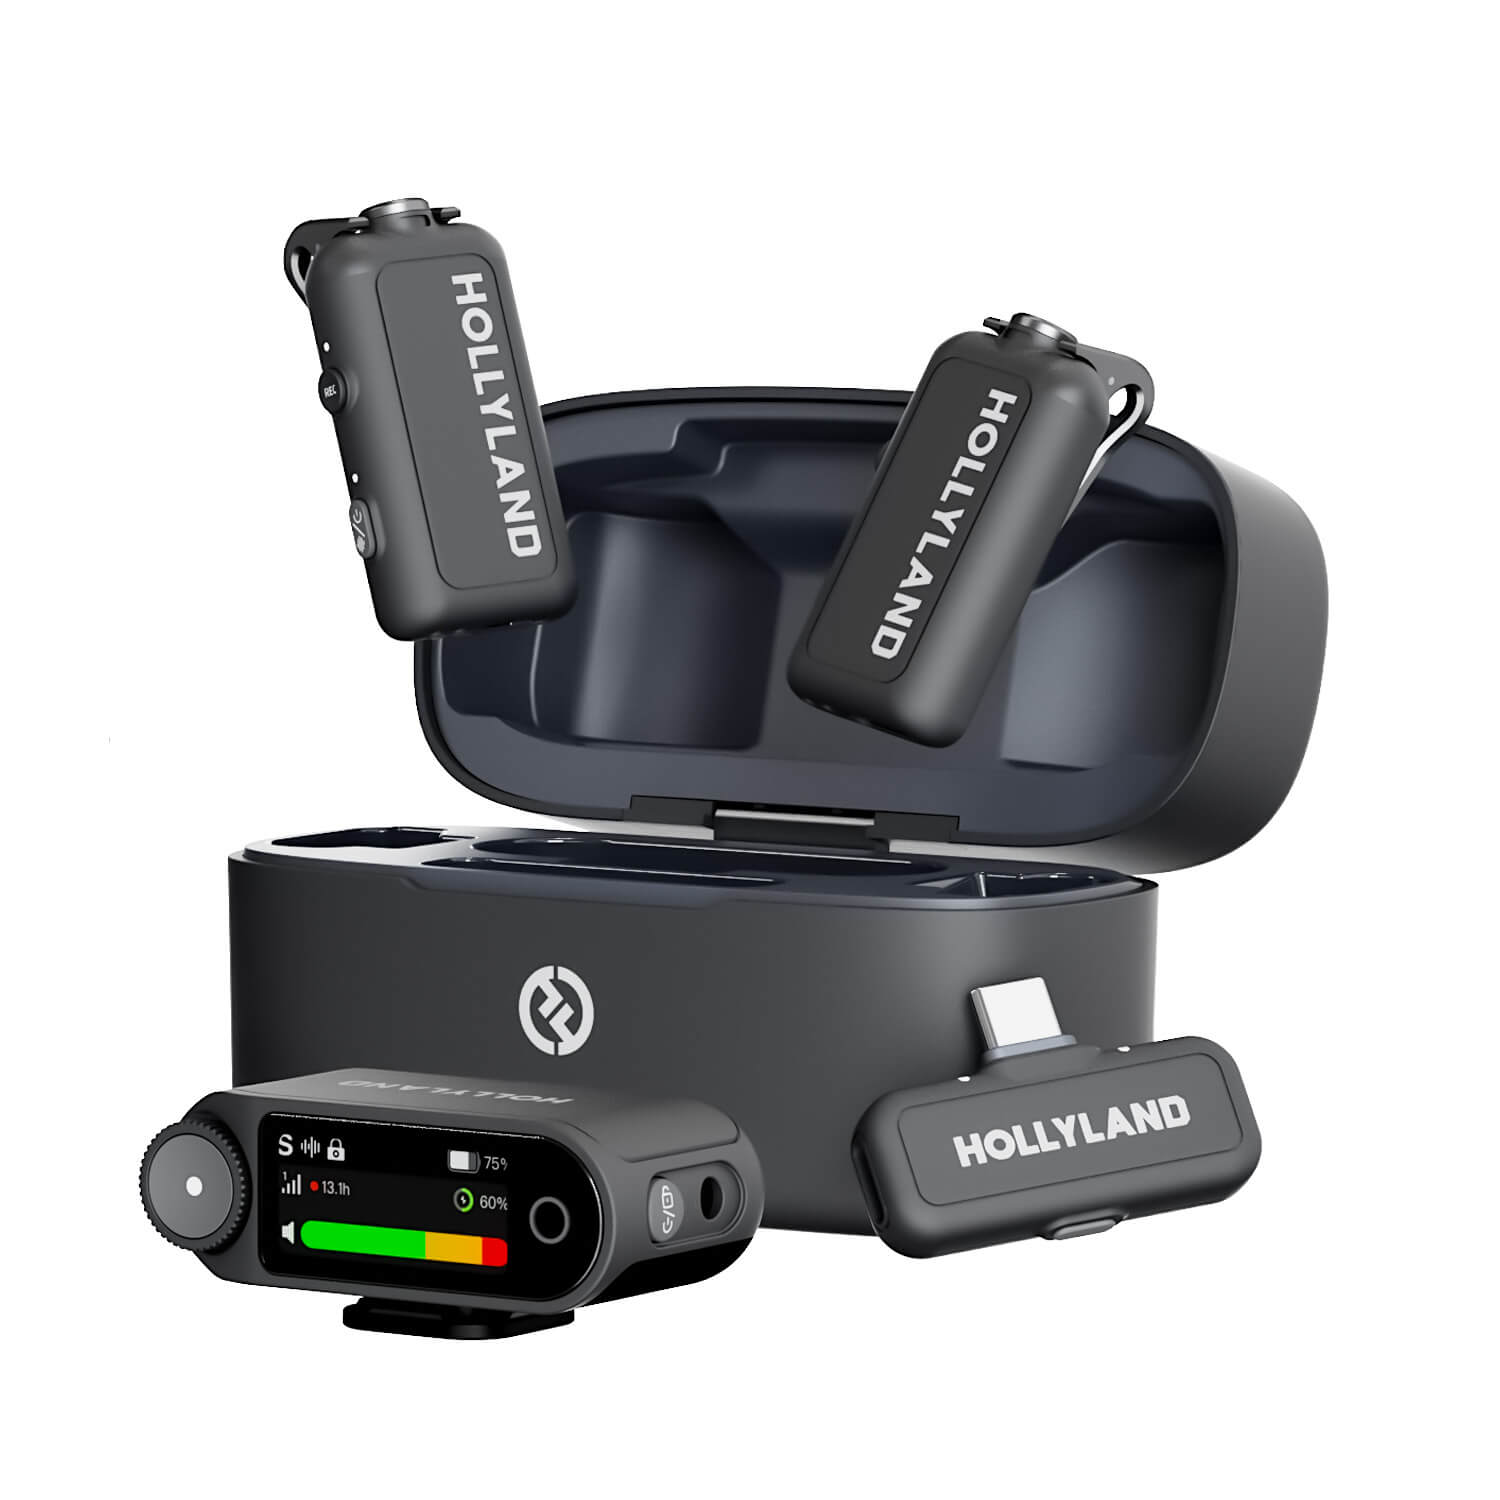
Hollyland LARK MAX 2 - Premium Wireless Microphone System
A premium wireless microphone for videographers, podcasters, and content creators to capture broadcast-quality sound.
Key Features: Wireless Audio Monitoring | 32-bit Float | Timecode
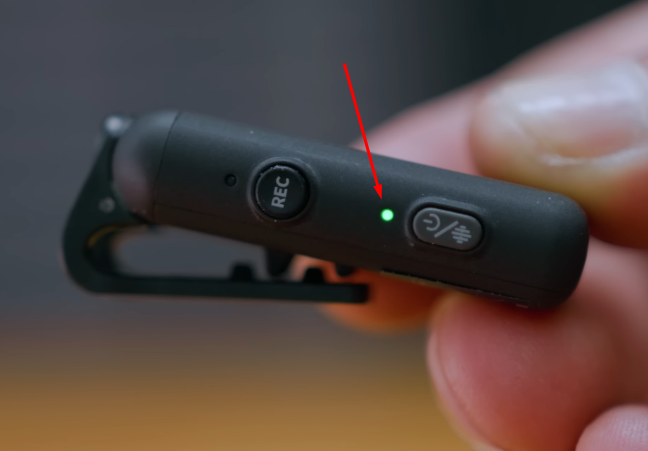
- Make sure that the LARK MAX 2’s TX and RX units are paired. To confirm, check the LED indicator light on the TX. A solid blue light confirms the TX is paired.
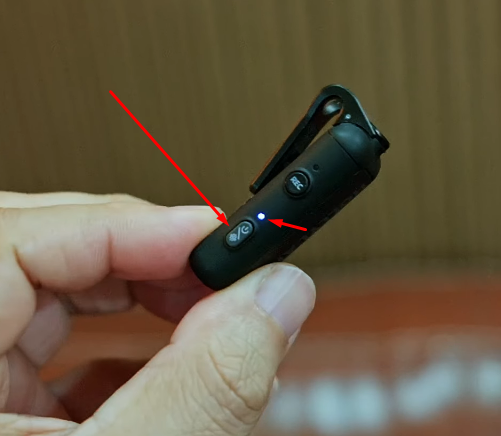
- Press the power/multifunction button once on the TX unit to enable or disable noise cancellation. The LED light will turn solid green when the noise cancellation function is active.
Adjust Noise Cancellation Strength in the HollyAudio App
For fine control over how aggressively AI NC operates, the Hollyland app provides settings beyond what the transmitter button cycle allows.
- Open the HollyAudio app on your phone and connect to the LARK MAX 2 via Bluetooth.
- Tap the TX device card for the transmitter you want to configure.
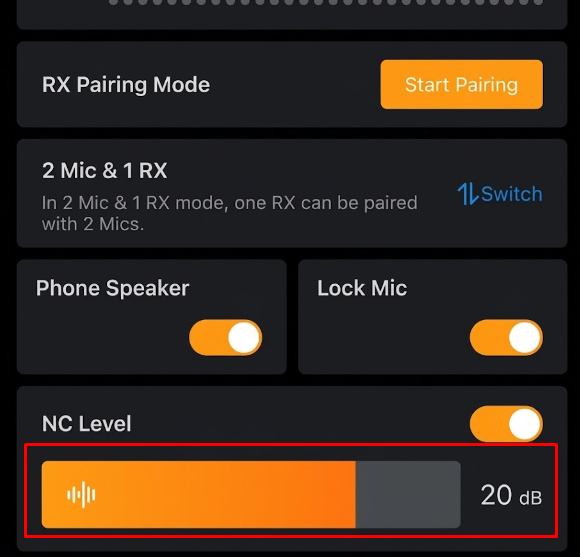
- Locate the NC Level toggle and make sure it’s turned on.
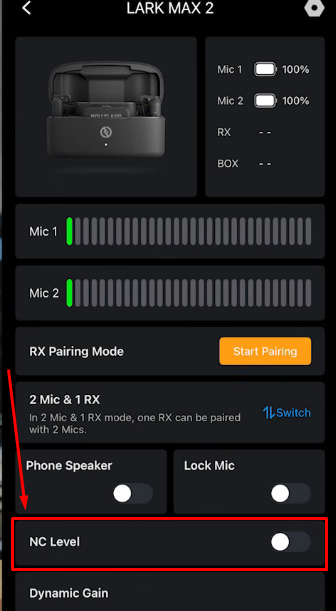
- Adjust the noise cancellation level.
Quick Comparison — Which Method Should You Use?
| Situation | Recommended Method |
|---|---|
| Light background hiss on dialogue | Method 1: Essential Sound Panel, Reduce Noise at 30–50% |
| Heavy or variable broadband static | Method 3: Adobe Audition Noise Print roundtrip |
| Steady 50/60 Hz electrical hum | Method 2: DeHum effect, or Essential Sound DeHum slider |
| Static recorded through a wireless microphone | LARK MAX 2 AI NC at capture, then Method 1 if residual noise remains |
Frequently Asked Questions
Will noise reduction in Premiere Pro damage my audio quality?
It can, especially when you apply too much noise reduction. Both the Reduce Noise slider in Essential Sound and the separate DeNoise effect can make audio sound hollow, processed, or robotic. This usually happens when you push their settings too high. For most recordings, keep the Essential Sound Reduce Noise slider between 2.0 and 5.0 on its 0–10 scale. With the standalone DeNoise effect, start around 30% to 50% instead. Once you apply either effect, open Effect Controls and toggle bypass to compare both versions. This lets you hear whether the cleaned audio sounds better than the original. Also, try Premiere Pro’s AI Enhance Speech or Enhance Audio tools first. When those options aren’t enough, consider Adobe Audition instead of maxing out noise reduction settings.
What is the difference between DeNoise and Reduce Noise in the Essential Sound Panel?
They access the same underlying noise reduction algorithm through different parts of the Premiere Pro interface. Reduce Noise in the Essential Sound Panel’s Repair tab is the panel-based control for that process. The DeNoise effect in the Audio Effects panel is the same tool applied as a standalone clip or track effect. Results are functionally identical — the difference is only which UI path you use to reach them.
Can I remove static from multiple clips at once in Premiere Pro?
Yes, and Premiere Pro gives you two ways to do this. One option is to open the Audio Track Mixer and expand its effects and sends panel. From there, select DeNoise or DeHum from an audio track’s effect slot dropdown menu. Once applied, the effect processes every clip routed through that particular track.
Another option is to copy your existing effect settings across clips. First, right-click the clip where you’ve already configured noise reduction and select Copy. Next, select the other clips you want to clean. Go to Edit > Paste Attributes to transfer those same effect settings to all selected clips.
When should I use Adobe Audition instead of Premiere Pro for noise removal?
Use Audition when the noise floor varies across the recording, when you have multiple overlapping noise types, or when the Premiere Pro Reduce Noise slider is approaching 60 percent and artifacts appear before the static is gone. Audition’s Noise Print captures the actual spectral signature of your specific noise, making it more precise than Premiere Pro’s general-purpose broadband approach.
Does a wireless microphone cause more static than a wired microphone?
Not inherently. A poorly designed or frequency-congested wireless system can introduce RF artifacts that a shielded cable would not, but a well-engineered system like the LARK MAX 2 uses stable transmission architecture and AI Noise Cancellation to keep the noise floor comparable to or lower than many wired setups. Static in a wireless system is primarily a function of preamp quality and transmission stability, not wireless transmission itself.
Conclusion
For mild background hiss, Premiere Pro’s Enhance Speech tool or Repair sliders can clean up dialog in minutes. When you need more control, apply DeNoise or DeHum to individual clips or through the Audio Track Mixer. If these effects create unwanted artifacts, move your project to Adobe Audition for further cleanup. To avoid static and hiss later, focus on proper microphone placement, clean gain staging, and transmitter noise reduction during recording.
