



































.png)
 简体中文

Your iPhone microphone may sound muffled without any warning. This can happen during calls or while recording audio. Someone may also say they can barely hear you. The good news is that most cases have a straightforward fix. This guide explains common causes, starting with a blocked grille. It also covers incorrect iOS settings that may affect audio. You’ll learn to find the problem and fix it quickly.

Why Does an iPhone Microphone Sound Muffled?
iPhone mic muffling almost always falls into one of four categories:

- Physical blockage: Lint, debris, or a poorly fitting case is covering one or more mic grilles
- iOS mic mode suppression: Voice Isolation or Phone Noise Cancellation is actively filtering the audio signal
- Software bug: An iOS version introduced an audio routing issue, or an app permission is redirecting input
- Hardware damage: The mic capsule is faulty due to a drop, moisture exposure, or general wear
Before working through the fixes, it helps to know that your iPhone has three separate microphones. The bottom mic sits along the bottom edge next to the charging port and handles calls and Voice Memos. The front mic is built into the earpiece area and activates during FaceTime and front-camera video. The rear mic is positioned near the camera module and is used for rear-lens video recording.
Only one of these may be affected, which means the problem is often narrower than it first appears. Most causes on this list can be fixed in under a few minutes.
Step 1: Check and Clean the Microphone Grille
The bottom microphone grille collects lint faster than almost any other part of the phone, particularly if you carry it in a pocket. A partial blockage can noticeably degrade audio quality without any visible sign of buildup.

How to clean safely:
- Remove your case and any screen protector that wraps around the bottom edge of the phone.

- Hold the iPhone under bright light and inspect all three mic openings: the bottom-edge grille, the earpiece slot at the top front, and the small opening near the rear camera module.
- Use a dry, soft-bristled toothbrush to brush gently across each grille in short strokes. The goal is to dislodge packed debris, not push it further inside.
- If lint is visibly stuck, use a wooden toothpick to lift it from the edge of the grille. Avoid metal tools, and do not aim compressed air directly into any port at close range.
- Wipe the surrounding surface with a dry microfiber cloth.
Test the fix: Open Voice Memos, record a 10-second clip at a normal speaking distance, then play it back. Clear audio confirms the grille was the culprit.
Note: A thick silicone or rugged case that partially covers the bottom edge of the phone is one of the most common and most overlooked causes of muffled audio. Always remove the case and retest before moving on to software fixes.
Step 2 — Change Your iPhone Mic Mode (Automatic, Standard, Voice Isolation, or Wide Spectrum)
Apple added Mic Modes to Control Center with iOS 15. These settings let you control how your iPhone captures audio. Apple later expanded this feature to phone calls and recordings. The update also added an Automatic mode for easier adjustments. Voice Isolation may sometimes make your voice sound thin or muffled. This happens when the setting removes too much background noise. Quiet surroundings can make this filtering unnecessary.
How to change Mic Mode during a call:
- Start or join an active phone call or FaceTime session.
- Swipe down from the screen’s top-right corner.r to open Control Center.
- Find the Controls banner at the screen’s top. Its name may show Phone Controls or FaceTime Controls.
- Tap the banner and find the Audio & Video section. Select Mic Mode from the available options. Choose Standard or Automatic to reduce heavy noise filtering.

When each mode is appropriate:
- Automatic: This mode switches between Voice Isolation and Standard. The selected mode depends on your call setup. For example, it may change when switching speakers.
- Standard: This setting provides balanced audio processing for everyday conversations. It captures your voice without heavy background noise filtering.
- Voice Isolation: Choose this mode when your surroundings are noisy. It reduces background sounds during calls. Busy streets and crowded rooms are common examples.
- Wide Spectrum: This mode captures sounds from your surroundings. It suits music sessions and conversations with groups. Wide Spectrum supports FaceTime, compatible apps, and recordings. Regular cellular phone calls do not support this mode.
Test the Change: Mic Mode settings are saved separately for each app. Ask the other caller whether your voice sounds clearer. Check their response immediately after changing the setting.
Pro Tip: Each app keeps its own Mic Mode setting. Changing it during a regular phone call affects that app. It does not automatically change FaceTime or WhatsApp settings. The same applies when recording audio through another app. Check the Controls menu whenever switching between different apps.
Step 3: Adjust Phone Noise Cancellation or Mic Mode (Old and New iPhones)
Your iPhone model determines which call filtering options appear. Older and newer models offer different noise reduction settings.
For iPhone 12 and Earlier (Phone Noise Cancellation):
Older iPhones have a built-in feature for reducing call noise. It helps you hear callers more clearly in noisy places. This feature affects the sound coming through your earpiece. Turning it off may make incoming voices sound more natural. Apple removed this setting from the iPhone 13 lineup.
- Open the Settings app on your iPhone.

- Tap Accessibility to view its available options.

- Select Audio & Visual from the menu.

- Find Phone Noise Cancellation and switch it off.

For iPhone 13 and Newer (Mic Mode / Voice Isolation):
Newer iPhones rely on software to reduce background noise. Mic Modes filter unwanted sounds from your outgoing voice. These settings apply to Phone, FaceTime, and supported third-party calls. Your voice may sound muffled when filtering removes too much. This can happen during calls in quiet surroundings. Switch Mic Mode to Standard to restore natural audio.
- Start an active voice call on your iPhone.
- Swipe down from the top-right corner to open Control Center.
- Tap Phone Controls or Mic Mode at the screen’s top.
- Choose Standard instead of Voice Isolation or Automatic.
Step 4: Check App Microphone Permissions
If muffled audio only appears inside one specific app, such as Instagram, Zoom, or TikTok, a restricted microphone permission may be forcing the app to use a lower-quality or secondary input source.
How to check:
- Open Settings.
- Go to Privacy & Security, then tap Microphone.

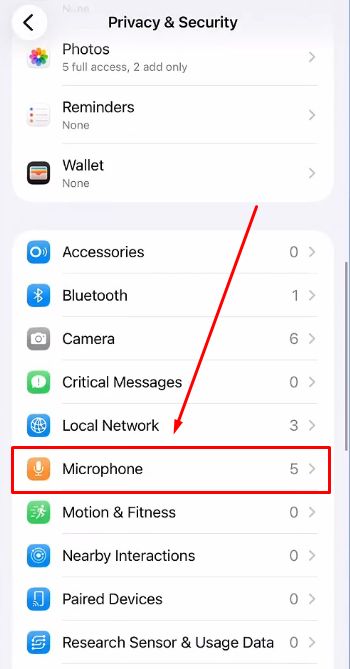
- Find the app in question and confirm the toggle is switched on.
- Return to the app and retest the audio.
Also check whether the app is routing audio through a connected Bluetooth accessory. If AirPods or a car audio system are paired and active, the app may default to the Bluetooth device’s microphone instead of the iPhone’s built-in mic. Disconnect the accessory and retest to rule this out.
Step 5: Restart Your iPhone and Update iOS
A soft restart clears temporary audio subsystem bugs without affecting any data. Hold the side button plus a volume button, slide to power off, wait 30 seconds, then power back on.
If your iPhone is running an older iOS version, go to Settings → General → Software Update and install any available update. Muffled microphone behavior has been documented in specific iOS point releases and resolved in subsequent patches. Updating eliminates a known software regression as a possible cause.
Step 6: Isolate Which iPhone Microphone Is Faulty
Testing each microphone individually confirms whether you are dealing with a hardware fault and, if so, narrows it to a specific location.
| Microphone | Location | Test App | How to Verify |
|---|---|---|---|
| Bottom mic | Bottom edge, next to charging port | Voice Memos with phone flat on a table | Play back the recording and listen for muffling |
| Front mic | Earpiece area, top front of phone | FaceTime using front camera video | Check the recorded call or ask the other party |
| Rear mic | Near rear camera module | Camera app, rear lens video | Play back the video clip and compare |
If only one test produces muffled audio, the fault is isolated to that specific microphone, which makes any Apple repair estimate more targeted. If all three tests produce muffled audio, the problem is more likely iOS-level or an audio routing issue rather than a physical hardware failure.
Step 7: Reset All Settings (Last Resort Before Repair)
If no individual fix has worked, resetting all settings clears audio routing configurations, Bluetooth pairings, and system preferences that may be silently misdirecting microphone input.
- Go to Settings → General → Transfer or Reset iPhone.


- Tap Reset, then select Reset All Settings.


This does not erase photos, apps, or personal data. It only restores system preferences to their defaults. After the reset completes, retest using Voice Memos and a test call before concluding the issue is hardware-related.
If the iPhone Mic Is Still Muffled: Use an External Wireless Microphone
If the steps above confirm a hardware fault, or if you need reliable audio immediately without waiting for a repair, an external wireless microphone is the most direct solution. It bypasses the built-in mic and delivers clean, close-range audio regardless of the iPhone’s internal condition.
e
The Hollyland LARK A1 is a practical fit here. Its USB-C or Lightning receiver plugs directly into your iPhone’s charging port, and the phone immediately recognizes it as the active audio input. No Bluetooth pairing, no app installation, and no settings adjustments are required.

Hollyland LARK A1 - Affordable Wireless Microphone
A perfect starter mic for creators on a budget. It’s simple to use and features effective noise cancellation.
Key Features: 48kHz/24-bit | 3-Level Noise Cancellation | 54-Hour Battery
How to set up the LARK A1 with an iPhone:
- Connect the receiver: Plug the LARK A1 USB-C or Lightning receiver into your iPhone’s USB-C or Lightning port. The iPhone switches audio input automatically.

- Clip the transmitter: Attach the TX unit to your clothing near the collar or lapel.

- Confirm the link: Check that the LED on the TX unit shows a solid blue light rather than blinking, which indicates an active and stable connection.

- Set noise cancellation level: Press the power/NC button (it is a multifunction button) on the TX to activate or deactivate noise cancellation.
To cycle through three Intelligent Noise Cancellation levels, download the HollyAudio app and connect it to your LARK A1. Then, go to the NC Level option and make sure it’s enabled. Next, select Low, Medium, or High noise cancellation levels, depending on your surrounding environment.

Whether the noise-canceling is turned on through the transmitter unit or the HollyAudio app, the LED indicator on the TX and RX units will turn solid green, confirming that the NC mode is active.
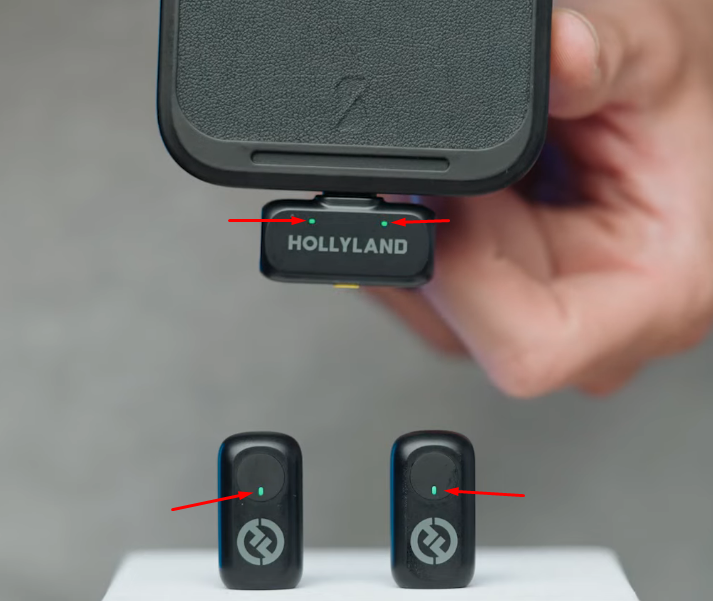
- Verify input: Open Voice Memos or the Camera app. The audio waveform should reflect clean, close-range input from the TX transmitter rather than the built-in mic.
- Mute check: Double-press the TX button to mute and unmute the microphone. The LED changes to solid red to confirm the mic is muted.

When to Contact Apple Support
If the microphone isolation test in Step 6 confirms a hardware fault and no software fix has resolved the issue, book a diagnostic with Apple directly at apple.com/support or through an Apple Authorized Service Provider. If your iPhone is within the standard one-year warranty or covered by AppleCare+, microphone repair costs may be reduced or covered entirely. Check the liquid damage indicator inside the SIM tray before your appointment, as moisture damage affects warranty eligibility.
Frequently Asked Questions
Why does my iPhone microphone sound muffled only on phone calls?
iPhone calls don’t always sound like video recordings. That’s because both use different mics and audio settings. For example, Voice Isolation, available through Control Center on iOS 16.4 and newer, helps reduce surrounding noise during calls. Older iPhone models also have Phone Noise Cancellation under Accessibility settings. Both features aim to keep conversations clearer. But sometimes, they go a little too far! Switching Mic Mode to Standard or turning off Phone Noise Cancellation, as explained in Steps 2 and 3 above, can usually fix muffled call audio without changing how your microphone sounds in other apps.
Can a phone case cause a muffled iPhone microphone?
Yes. Cases that partially cover the bottom mic grille, especially thick silicone or rugged designs, are one of the most common causes of muffled audio. Remove the case entirely, record a Voice Memos clip, and play it back. If the audio clears, the case is blocking the mic port.
Will cleaning my iPhone microphone fix muffled audio?
If lint or debris has built up in the bottom mic grille, which is very common for phones carried in pockets, cleaning often resolves the issue immediately. Use a dry, soft-bristled toothbrush with gentle strokes. Avoid compressed air aimed directly at the grille and keep all liquids away from the opening.
Is a muffled iPhone microphone a sign of water damage?
Muffled audio following water exposure is a common indicator of moisture in the mic capsule. Apple recommends leaving the phone in a dry, well-ventilated area for up to 24 hours before retesting. If muffling continues after the phone has fully dried, book a diagnostic appointment at an Apple Authorized Service Provider.
Conclusion
Start by checking the microphone openings and removing your case. Next, try the software fixes one at a time. Change Mic Mode and Phone Noise Cancellation settings first. Then check app permissions, restart your iPhone, and update iOS. Run the microphone test to check for hardware problems. If needed, try Reset All Settings as your last software fix. Do this before taking your iPhone for repair.
If the mic is damaged, consider an external microphone. Creators can also choose the Hollyland LARK A1. Its Lightning connection records audio without the built-in microphone. You can connect it without changing any technical settings. Follow each step in the order shown above. If muffled audio continues after Step 7, contact Apple Support. You can also try recording with an external microphone.
