



































.png)
 简体中文

Loom cannot detect your mic, but you still need to complete that recording? This issue typically stems from five common underlying causes. An OS permission restriction might prevent mic access. Browser permissions may also block access to your microphone. On the other hand, Loom might have another input device selected. Or, another application could be occupying your microphone simultaneously. Likewise, hardware problems or pairing failures can also interrupt mic detection. So, try these fixes one by one. Begin with the first solution and proceed through subsequent steps. Continue until Loom successfully detects incoming microphone audio.

Why Loom Fails to Detect Your Microphone
Before trying the fixes, here’s a quick look at every cause.

- OS permission block: macOS or Windows is preventing Loom from accessing any microphone at the system level
- Browser permission block: Chrome is blocking mic access for the Loom extension or loom.com independently of the OS
- Wrong device selected in Loom: Loom’s audio picker is pointing to a disconnected or incorrect input device
- System default mismatch: the OS default audio input is set to an inactive device such as an HDMI output or a Bluetooth headset that is off
- Competing app exclusivity: Zoom, Teams, Discord, or OBS is holding the microphone, and Loom cannot access it
- Hardware or wireless pairing failure: A USB receiver is not appearing as an audio input, or the TX transmitter is muted or unpaired
Fixes are ordered easiest first. If you can identify your cause above, skip directly to that section.
Fix 1: Grant Loom Microphone Access at the OS Level
This is one of the most common causes. Without OS-level permission, Loom receives no audio regardless of what is selected in its own settings. Check this before trying anything else.
macOS (Ventura, Sonoma, Sequoia, and Tahoe)
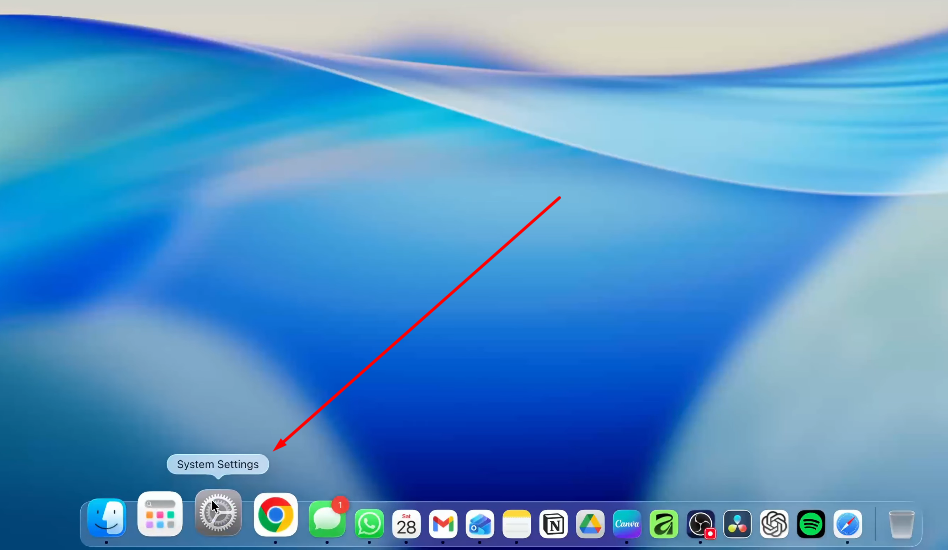
- Open System Settings from the Apple menu.
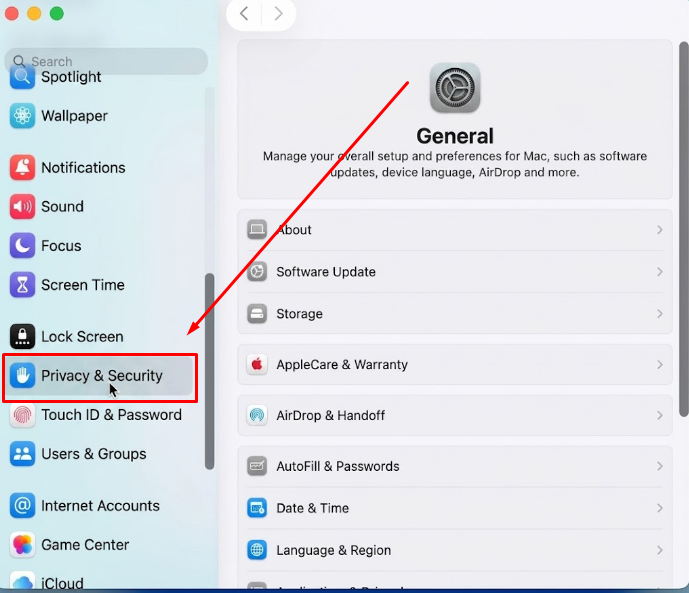
- Go to Privacy & Security and select Microphone.

- Find Loom in the list and confirm the toggle is turned on.
- If Loom does not appear in the list, launch the app once and return to this screen. macOS only adds an app after it has requested access at least once.
- Quit Loom fully using Cmd + Q, then relaunch and attempt a new recording.
Windows 10 / 11
- Open Settings and go to Privacy & Security, then Microphone.


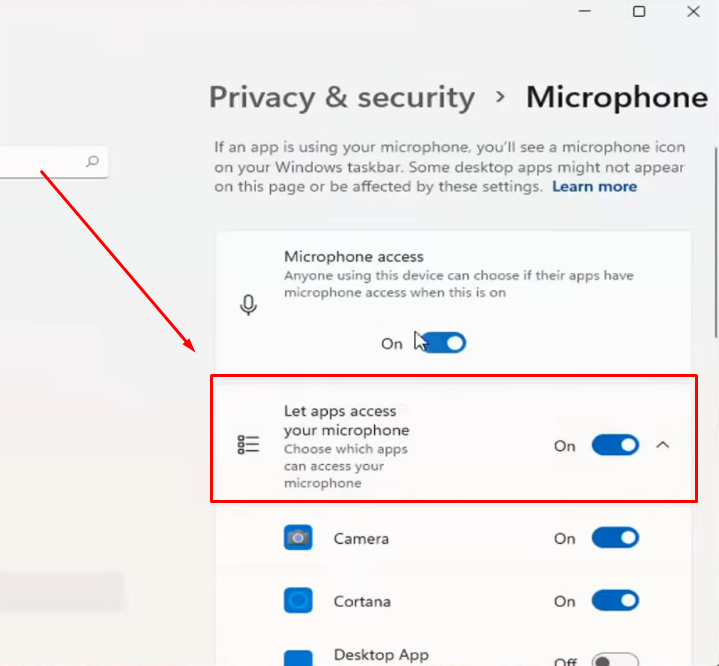
- Confirm the master toggle “Microphone Access” is turned on.
- Scroll down to find Loom. The desktop app may appear under “Let apps access your microphone” rather than the modern apps section. Enable its individual toggle.
- Close and restart Loom.
Note: Toggling the OS permission while Loom is already running does not take effect immediately. Always quit and relaunch the app after changing this setting.
Fix 2: Allow Microphone Access in Chrome (Extension / Web App Users)
If you run Loom through the Chrome extension or record directly at loom.com, Chrome maintains its own microphone permissions separate from the OS. Chrome can block mic access silently even after the OS permission is already granted.
- With a Loom recording tab open or the extension active, click the slider icon or tune icon in the Chrome address bar.
- Select Site settings.
- Under Microphone, change the setting from Block or Ask to Allow.

- Reload the page and start recording.
Note for Edge users: For loom.com, click the lock icon beside the website address. Select site permissions, then change Microphone permission to Allow. For Edge extensions, manage permissions through edge://extensions or Edge’s internal extension settings URL.
Important: Fix 1 and Fix 2 must both be granted at the same time. Fixing only the OS permission or only the browser permission will not resolve the issue for Chrome extension and web app users.
Fix 3: Select the Correct Input Device Inside Loom’s Recorder
Loom may select your built-in microphone, even with permissions granted. It might also choose a device that is disconnected. Loom’s audio menu may not refresh when new devices connect. This can happen while the app is already running.
- Click the Loom icon in your system tray (Windows) or menu bar (macOS) to open the recording setup window.
- Find the Microphone option on the main recording control panel.
- Click the microphone dropdown to view all available input devices. USB microphones and wireless receivers appear with their device names.
- Select your preferred microphone and speak normally into it. Check whether the audio level indicator responds to your voice.
Note: Your mic may be missing if connected after Loom launched. Click the More actions (…) menu and quit Loom completely. Make sure your microphone is plugged in properly. Then relaunch Loom to scan your audio hardware again.
Fix 4: Set Your Microphone as the Default Input in macOS or Windows
When Loom’s microphone picker is set to “Default,” it inherits whichever device the OS has designated as the system audio input. If the OS default is pointing to the wrong device, such as a TV connected via HDMI or a Bluetooth headset that is powered off, Loom captures silence or nothing at all.
macOS Sound Input
- Go to System Settings and open Sound, then click the Input tab.


- Click the microphone you want to use to select it.
- Speak into the mic and confirm the input level meter moves. A flat meter means the device is not receiving a signal.

Windows Sound Input
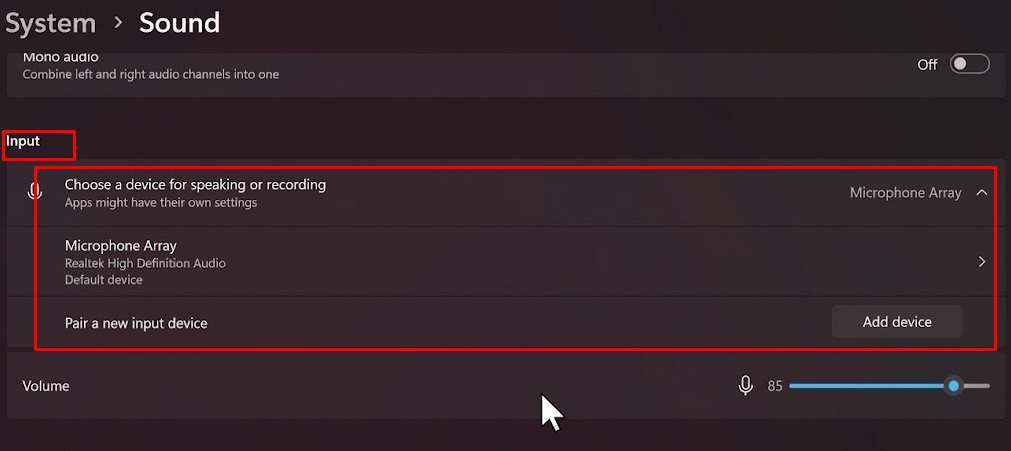
- Open Settings and go to System, then Sound.


- Under Input, use the “Choose a device for speaking or recording” dropdown to select the correct microphone.
- Click “Test your microphone” to see a live level bar and confirm it responds to your voice.
Fix 5: Close Apps That Are Holding Exclusive Microphone Access
Apps like Zoom, Teams, Discord, and OBS may take exclusive microphone control. This leaves no audio signal for Loom to read. Simply minimizing these apps will not solve the problem. You must fully quit each app before recording.
- Quit Zoom, Teams, Discord, OBS, or any other audio or video app before launching a Loom recording.
- On macOS, right-click the app icon in the Dock and choose Quit.
- On Windows, right-click the taskbar icon and choose Close window, or end the process in Task Manager.
Windows Exclusive Mode: If the issue continues, open Settings after closing other apps. Go to System > Sound and scroll down to Advanced. Click More sound settings to open the sound control panel. Select the Recording tab and double-click your microphone. Open the Advanced tab and uncheck “Allow applications to take exclusive control of this device.” Finally, click Apply to save your changes.
Fix 6: Using a Wireless Mic with Loom? Confirm Pairing and OS Recognition First
Wireless microphones add a hardware layer that the fixes above cannot reach. The USB-C receiver must appear as a recognized audio input in the OS before Loom can list it in its audio picker. This section uses the Hollyland LARK MAX 2 as the reference device, but the steps apply to any wireless microphone with a USB receiver.
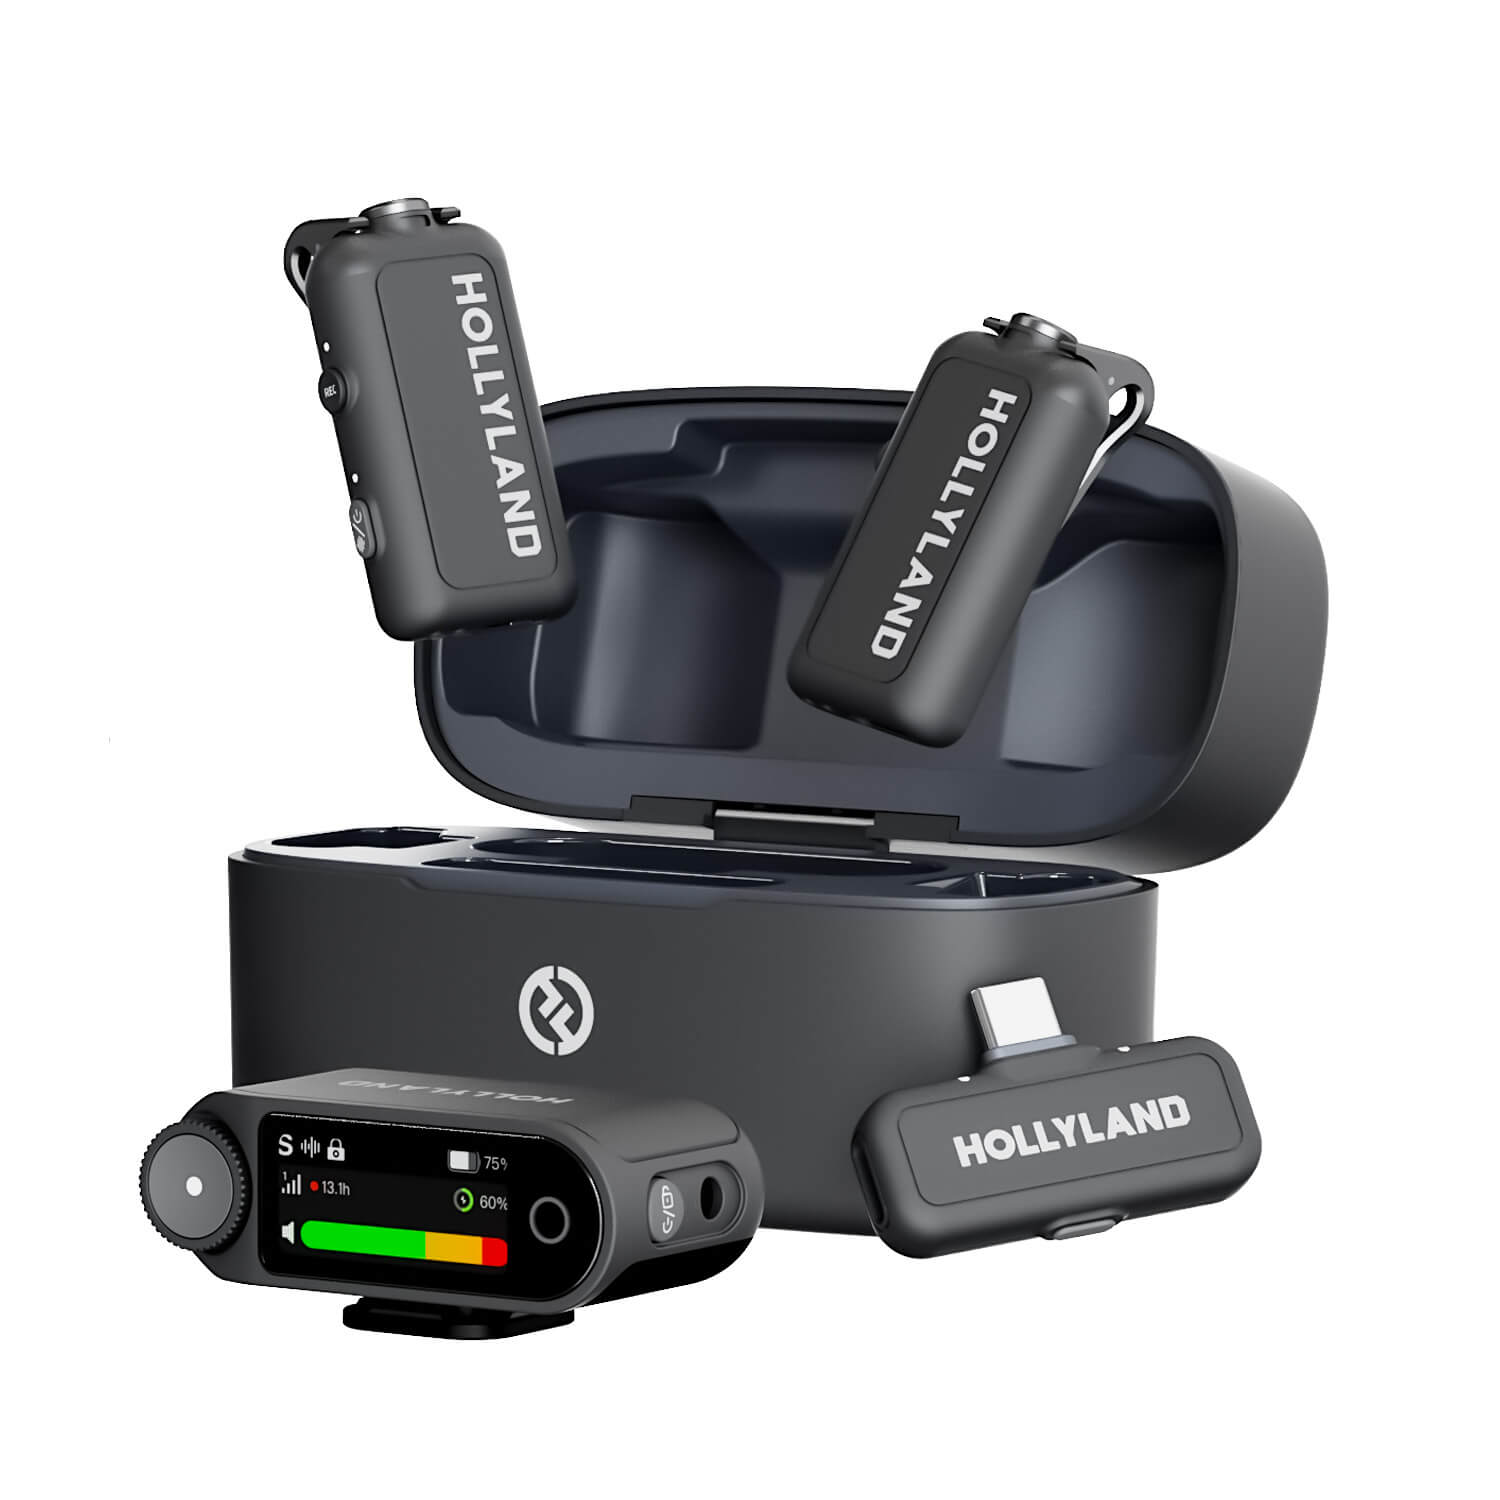
Hollyland LARK MAX 2 - Premium Wireless Microphone System
A premium wireless microphone for videographers, podcasters, and content creators to capture broadcast-quality sound.
Key Features: Wireless Audio Monitoring | 32-bit Float | Timecode
Note: The LARK MAX 2 Camera RX is used as an example to connect with a Windows/Mac computer.

Step 1: Connect the USB-C Receiver and Confirm the OS Sees It
- Plug the LARK MAX 2 Camera RX receiver directly into a USB-C port on your computer using the provided USB-C cable. Avoid USB hubs and connect to the machine directly.

- On macOS, open System Settings, then Sound, and click the Input tab. The receiver should appear as “Hollyland LARK MAX 2” within a few seconds of connection.
- On Windows, go to Settings, then System, then Sound, and check the Input section. The device should populate the list automatically.
- If it does not appear, try a different port, check for firmware updates using the Hollyland companion app (HollyAudio), or test the receiver on a second computer to rule out a hardware fault.
Step 2: Verify TX– Camera RX Pairing via LED Indicators
Removing both the transmitter and Camera RX from the charging case should trigger automatic pairing. If they do not connect, carry out the following steps to pair them manually.
- Press the power button on each unit for 3 seconds to switch both devices off.


- With the LARK MAX 2 mic/transmitter (TX) turned off, hold the power/multifunction button for 6 seconds. The LED will activate to show that pairing mode has started.
- Keep the Camera RX switched off and hold its power button for 6 seconds to enter pairing mode.
- Wait until the pairing process is complete. The Camera RX touchscreen display will show the successful pairing status.
- Verify the connection through the TX indicator. It will glow solid blue when paired with the RX.
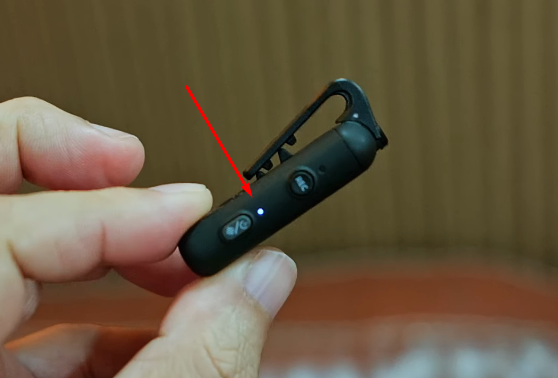
- A red LED on the TX means the microphone is muted at the hardware level. Press the mute button once to toggle the mute off and confirm the LED returns to solid green before recording.
Step 3: Select the LARK MAX 2 in Loom’s Audio Source Picker
- Open Loom, click the gear icon to open Settings, go to the Audio tab, and open the Microphone dropdown.
- Select “Hollyland LARK MAX 2” or the receiver’s listed device name.
- If the name does not appear in the list, restart Loom with the receiver already plugged in. Loom scans audio devices on launch, and the device must be present at startup to populate the dropdown.
- Record a short test clip and confirm the waveform moves in the recording preview before committing to a full session.
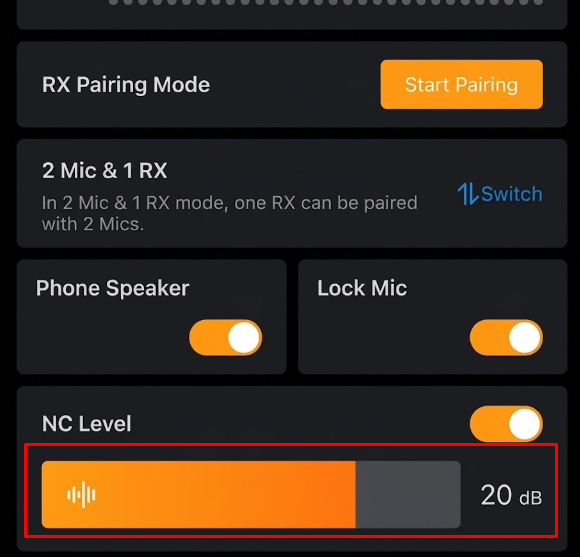
Note: If you use the HollyAudio app, check the AI Noise Cancellation setting. When set to maximum, noise cancellation can suppress the mic signal below Loom’s detection threshold. A low or medium setting is recommended for screen recording and async video messages. You can also activate or deactivate noise cancellation by pressing the power/multifunction button once. When AI Noise Cancellation is active, the LED indicator on the LARK MAX 2 transmitter turns solid green.

Fix 7: Reinstall Loom or Update Audio Drivers (Last Resort)
If every fix above has failed, these final options address the remaining edge cases:
- Reinstall Loom: Uninstall the current version completely, download the latest installer from loom.com, and reinstall. This clears any corrupted audio permissions cache that persists across OS-level toggle changes.
- Update audio drivers on Windows: Open Device Manager, expand Sound, video and game controllers, right-click your audio device, and select Update driver, then choose “Search automatically for drivers.”
- Install pending OS updates: A queued macOS or Windows update can include audio subsystem fixes that resolve device detection failures.
FAQs
Why does Loom show “No microphone found” even when my mic is plugged in and working?
This often happens when Loom selects the wrong audio source. Browser permissions or blocked system access can also cause this issue. First, open Loom’s recording settings and check the microphone dropdown. Make sure your active microphone is selected from the available devices. If you use the browser extension, check its site permissions. Next, check microphone privacy settings on macOS or Windows. Make sure Loom has permission to access your microphone. Lastly, restart Loom or your browser to apply changes.
My microphone works fine in Zoom and Teams, but Loom won’t pick it up. Why?
Zoom and Loom manage device access independently, so a working mic in one app does not guarantee access in the other. The most likely causes are the wrong device selected in Loom’s own audio picker (Fix 3) or one of those apps holding exclusive microphone access while still running in the background (Fix 5).
Loom detects my mic but records silent audio. What is different?
The device is recognized, but the signal level is at zero. Confirm the device is set as the OS default input (Fix 4), check that no competing app is monopolizing it (Fix 5), and for wireless mic users, verify the TX transmitter is not hardware-muted by confirming the LED shows solid green rather than red (Fix 6, Step 2).
Will a wireless microphone USB receiver work with Loom?
Yes. Any USB receiver the OS registers as an audio input device will appear in Loom’s microphone dropdown. The Hollyland LARK MAX 2 Camera receiver is fully compatible once it is paired to the TX unit, confirmed active via solid blue LED status, and visible in the OS sound input list.
Does the Loom Chrome extension handle microphone permissions differently than the desktop app?
Yes. The Chrome extension and the loom.com web app require both an OS-level permission grant (Fix 1) and a browser-level site permission for loom.com (Fix 2). The Loom desktop app requires only the OS permission. Both layers must be active simultaneously for the extension to access the microphone.
Conclusion
Apply each fix in order, starting with OS microphone permissions. Check browser permissions next, followed by Loom’s device selection. Then check hardware connections and any pairing problems. Record a short Loom video after each separate fix. Avoid applying several changes together during this testing process. This helps you identify exactly which step fixed everything. Wireless microphone users can consider the Hollyland LARK MAX 2. It offers a direct USB-C connection for easier microphone detection. LED pairing confirmation helps you check the connection status. A physical mute indicator also shows the microphone status. These features make Loom’s audio source selection easier.
