


































.png)
 简体中文

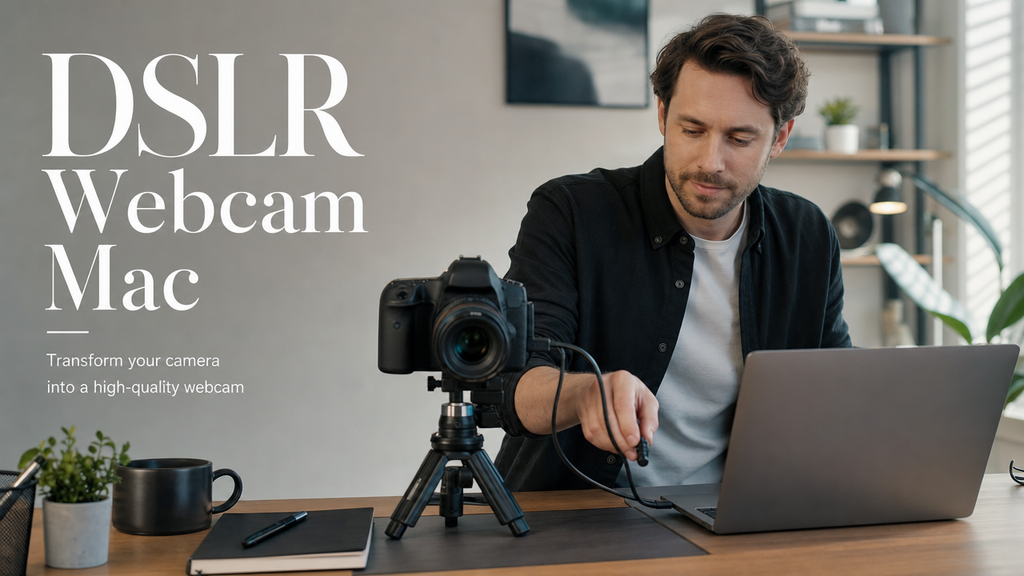
Your DSLR can deliver far better video quality than the built-in camera on your MacBook, but macOS does not recognize most cameras as webcams out of the box. Depending on your camera brand and whether you have extra hardware on hand, you have three practical ways to get your DSLR live on Zoom, Google Meet, Microsoft Teams, or any other video app. This guide covers each method with Mac-specific steps so you can pick the right path and get set up quickly.
What You Need Before You Start
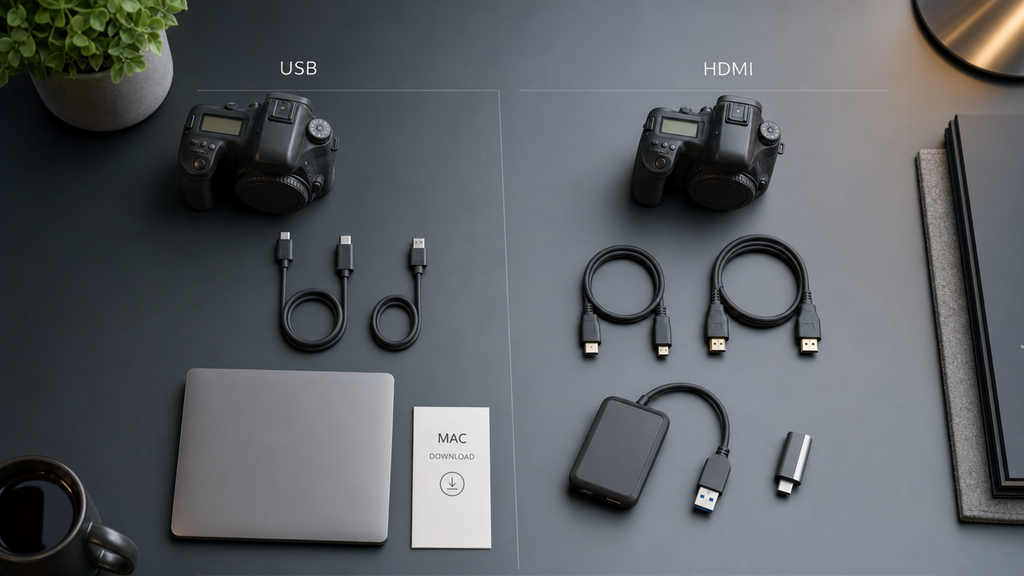
Set yourself up for success by confirming your gear matches the method you plan to use before reading further. The requirements split cleanly into two tracks.
Track 1: USB + Manufacturer Software (Free, No Extra Hardware)
- Your DSLR body (Canon, Sony, Nikon, or Fujifilm)
- USB cable for your camera (USB-C on newer bodies, Micro-USB on older models)
- Free manufacturer webcam utility installed on your Mac:
- Canon: EOS Webcam Utility Pro Pro
- Sony: Imaging Edge Webcam
- Nikon: Webcam Utility
- Fujifilm: FUJIFILM X Webcam
- macOS Monterey, Ventura, or Sonoma recommended; check each utility’s support page for exact macOS version compatibility before downloading
Track 2: HDMI Capture Card (Universal, No Brand Restrictions)
- Your DSLR with a working HDMI output port
- HDMI cable sized for your camera (standard to micro-HDMI or standard to mini-HDMI depending on model)
- USB capture card (Elgato Cam Link 4K is the most widely confirmed option for macOS)
- USB-C or USB-A port on your Mac
- No additional software required; macOS detects the capture card automatically
- Recommended for long sessions: a dummy battery and AC adapter kit matched to your camera model
Note: Some older DSLR bodies are not listed on any manufacturer’s supported model list. If your camera is not covered, skip directly to the HDMI capture card method. It works with any camera that has a standard HDMI output port, regardless of age or brand.
Method 1: Manufacturer USB Software (Free, No Extra Hardware)
The no-cost entry point for most DSLR owners is the official webcam utility from your camera brand. Each manufacturer provides a free macOS download that installs a lightweight driver, making the camera appear as a standard webcam over USB. One important caveat: the utility must stay running in the background every time you use the camera on a call. Closing the app drops the video feed immediately.
Canon: EOS Webcam Utility Pro
- Go to Canon’s official support website and download the latest version of EOS Webcam Utility Pro for macOS.
- Run the installer and follow the on-screen prompts. Restart your Mac if prompted.
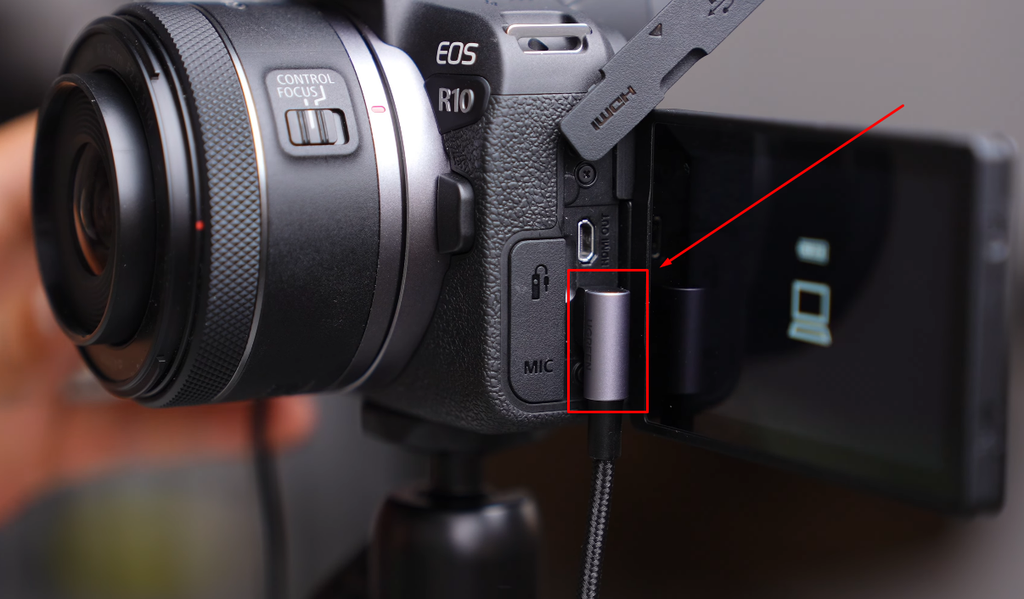
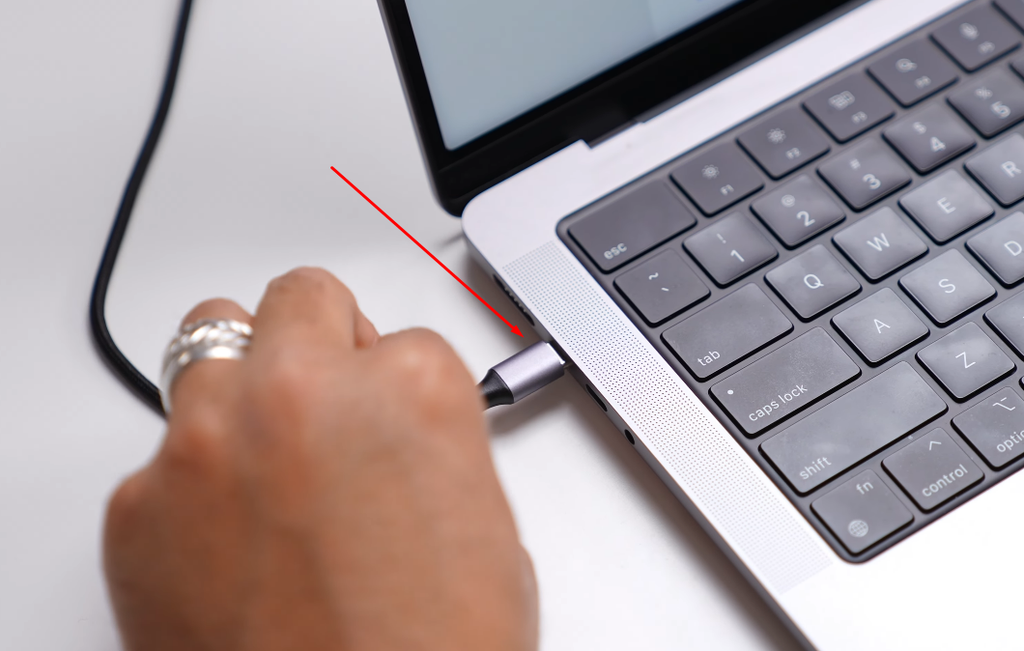
- Connect your Canon camera to your Mac using a USB cable.
- Turn the camera on and set the mode dial to Movie or Video.
- Enable Live View on the camera body if it does not start automatically.
- Open EOS Webcam Utility Pro from your Applications folder. It will run quietly in the menu bar.
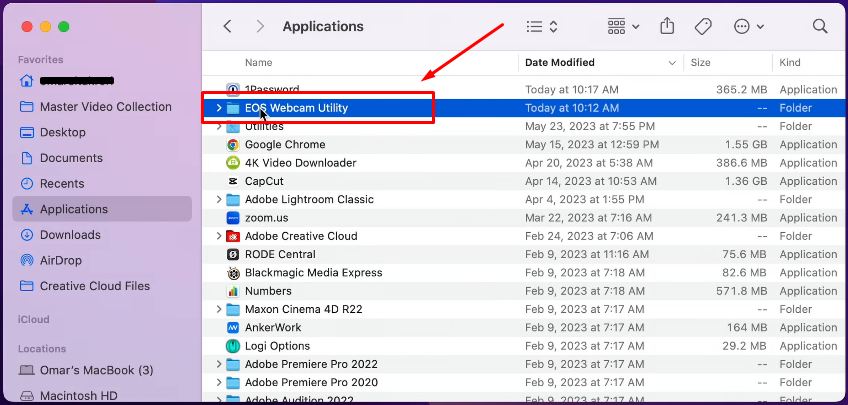
- Open your video-call app and navigate to camera settings. Select EOS Webcam Utility Pro from the camera source dropdown.
- Confirm the live feed appears in the preview.
Supported bodies include most Canon EOS Rebel, EOS R, EOS M, and EOS 90D-series cameras released after 2018. If your body does not appear on Canon’s compatibility list, use the capture card method in the next section.
Sony: Imaging Edge Webcam
- Visit Sony’s support page and search for Imaging Edge Webcam. This is a separate application from Imaging Edge Desktop (which is used for photo import and management), so confirm you are downloading the correct tool.
- Download the macOS version and run the installer.
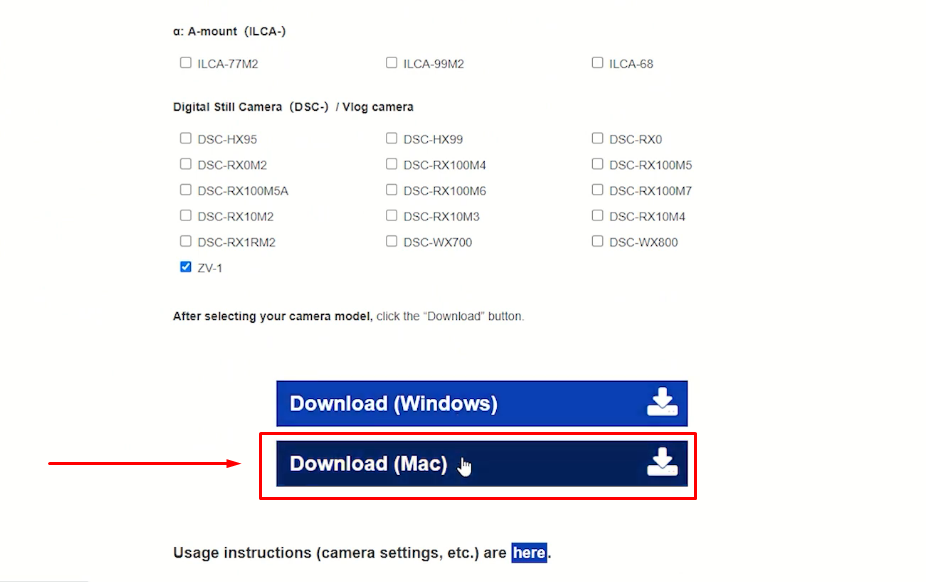
- Connect your Sony camera to your Mac using its USB cable (USB-C on newer Alpha-series bodies; Micro-USB on older models).
- Power on the camera. Open Camera Settings > USB Connection > select PC Remote.
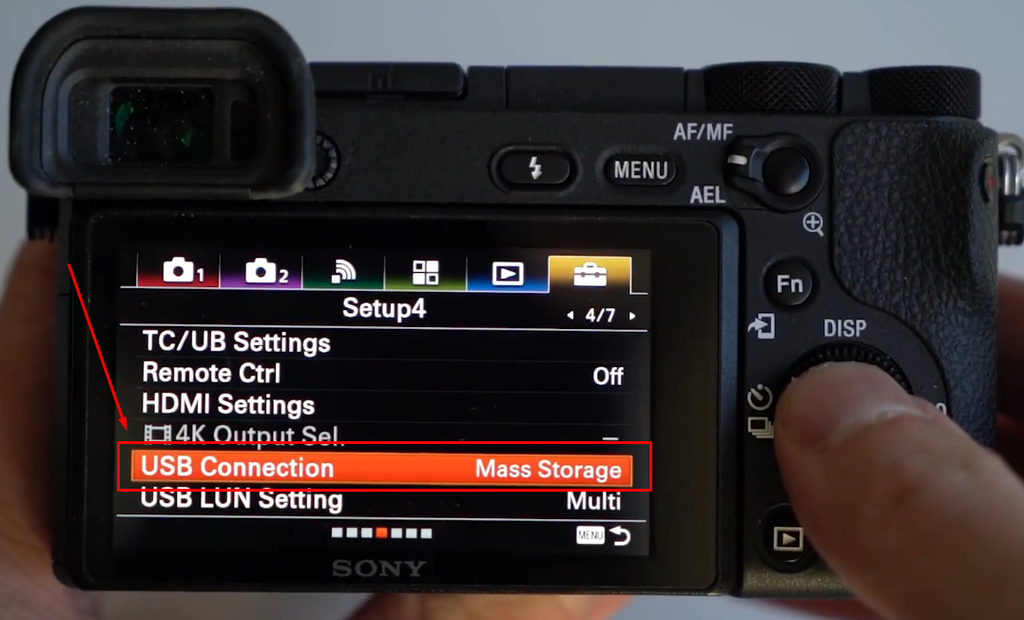
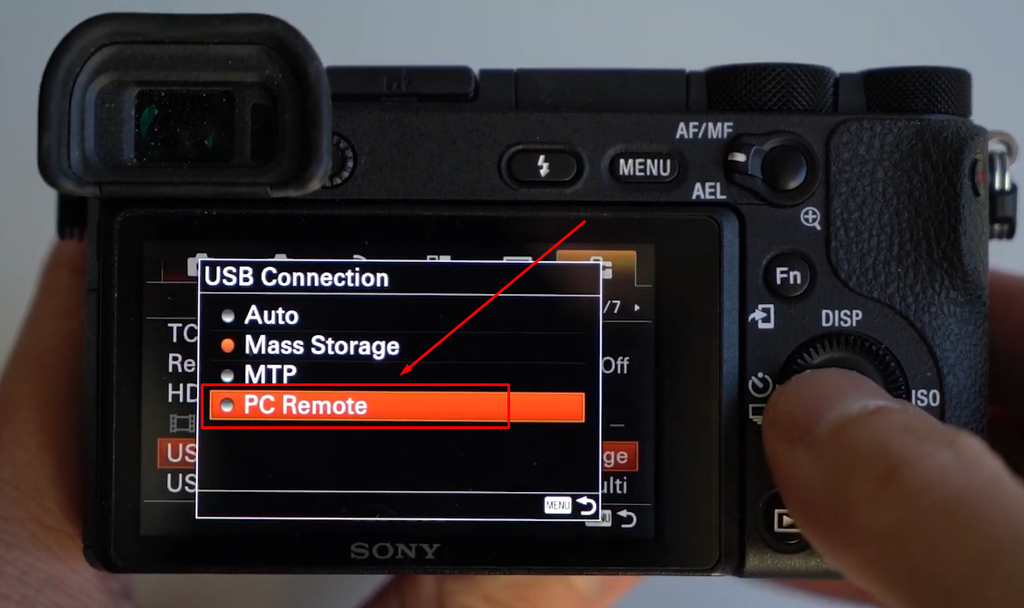
- Next, set your camera to Movie mode or the appropriate shooting mode for your model.
- Open Imaging Edge Webcam from your Applications folder so it runs in the background.
- In your video-call app, look for Sony Camera in the camera source list.
- If the source does not appear immediately, quit the video app completely and relaunch it.
- Adjust focus and exposure on the camera body as needed before going live.
Nikon: Webcam Utility
- Download Nikon Webcam Utility from Nikon’s official support page.
- Install the utility and restart your Mac if prompted.
- Connect your Nikon camera to your Mac using the supplied USB cable.
- Turn the camera on and set it to Movie Live View mode.
- Open Nikon Webcam Utility so it runs in the background.
- In Zoom, Teams, or Google Meet, open camera settings and select Nikon Webcam Utility from the dropdown.
- Confirm the live view feed appears in the app preview.
- Adjust white balance, ISO, and focus on the camera body as needed.
Nikon’s utility covers a narrower selection of bodies than Canon or Sony. Older D3000 and D5000 series bodies are typically not supported. If your Nikon is not listed, the HDMI capture card method will work without any manufacturer software.
Fujifilm: Fujifilm X Webcam
Fujifilm users follow the same basic pattern. Download X Webcam from Fujifilm’s support site, install it on your Mac, and connect your X-series camera via USB cable. Once X Webcam is running in the background, your camera will appear as Fujifilm X Webcam in the camera dropdown inside Zoom, Teams, or Meet. Check the supported model list on Fujifilm’s site before downloading, as the utility covers a defined set of X-series and GFX bodies.
Method 2: HDMI Capture Card (Universal, Best Quality)
If your camera lacks official webcam software, an HDMI capture card helps. It’s also a solid pick when you want top video quality. You won’t need brand-specific software to get everything running. Any DSLR with an HDMI port can connect this way. It also keeps the video signal clean and stable.
Why Clean HDMI Matters and How to Enable It
By default, your DSLR’s HDMI output mirrors what appears on the camera’s rear screen, including the battery indicator, focus point overlays, histogram, and shooting settings. If you skip this step, those overlays will appear in your video call. Clean HDMI strips all of that out so the capture card receives only the image.
Here is where to find the setting on common brands:
- Canon: Shooting Settings or HDMI Settings menu → set HDMI info display to Off
- Sony: Setup menu → HDMI Settings → Info Display → Off
- Nikon: Setup menu → HDMI → disable on-screen display output options
- Fujifilm: Set Up menu → HDMI Output → Info Display → Off
Enable clean HDMI before connecting to the capture card. You can’t remove overlays embedded in the HDMI signal downstream in software.
Step-by-Step Capture Card Setup on Mac
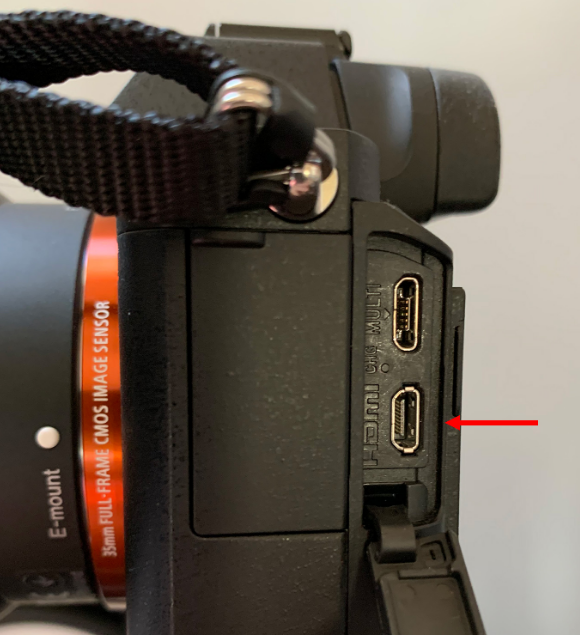
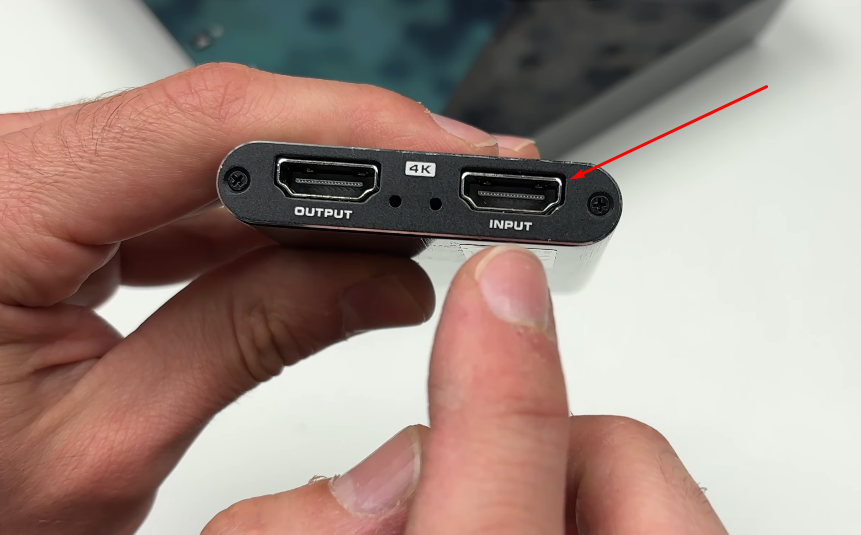
- Connect the camera to the capture card. Run an HDMI cable from the DSLR’s HDMI output to the input port on the capture card. Use the correct cable size for your camera’s port (micro or mini HDMI on most DSLR bodies).
- Plug the capture card into your Mac. Connect the capture card via USB to your Mac. Devices such as the Elgato Cam Link 4K are recognized natively by macOS with no driver installation required.
- Set the camera to Video/Movie mode and start live view. The capture card needs a continuous video signal from the camera to pass through to your Mac.
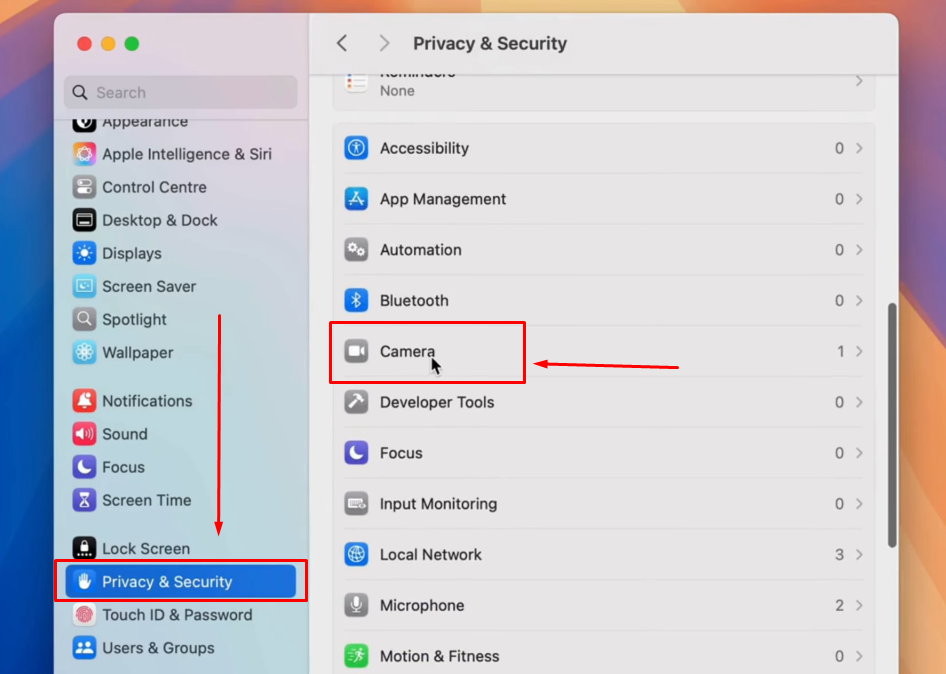
- Grant camera access in macOS. Open System Settings → Privacy & Security → Camera and confirm the toggle is enabled for the specific app you plan to use.
- Select the capture card as your camera source. In your video-call app’s camera settings, look for the capture card by name (such as “Cam Link 4K”) rather than by your camera brand.
- Confirm the feed before going live. Check the preview window in your app and adjust focus, exposure, and white balance on the camera body.
Method 3: OBS Virtual Camera (For Streamers and Broadcasters)
This method is intended for users who already stream on Twitch or YouTube and want to route their DSLR feed through OBS before sending it to a video-call app. The HDMI capture card setup from Method 2 must already be working before you begin.
- Download and install OBS Studio (free, from obsproject.com) if you have not already.
- Open OBS. In the Sources panel, click the + button and add a Video Capture Device source.
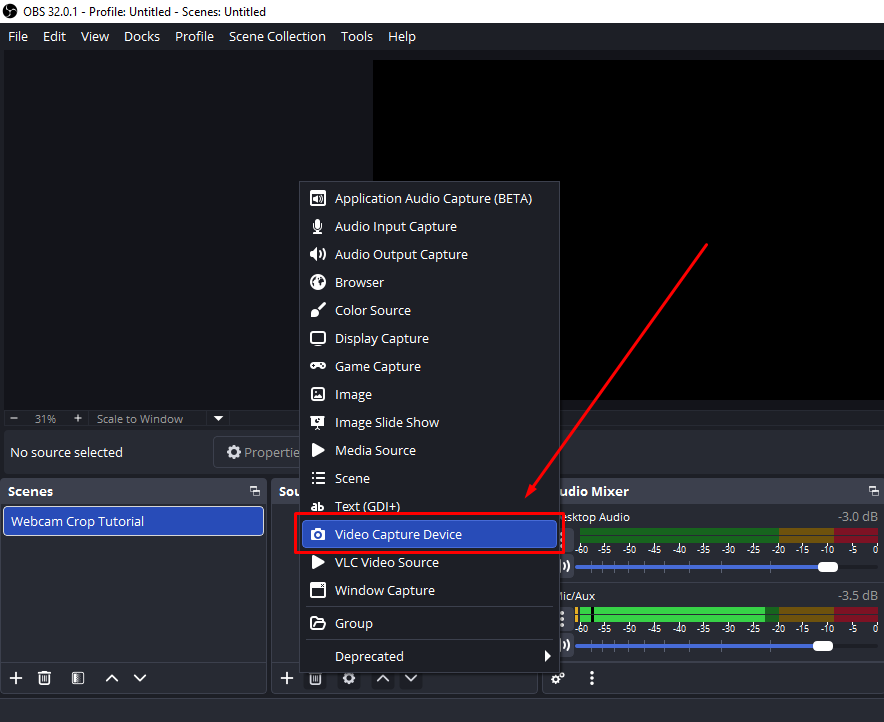
- In the device dropdown, select your capture card (such as Cam Link 4K) and click OK.
- Confirm the DSLR feed appears in the OBS preview window.
- Click Start Virtual Camera in the Controls panel at the bottom right of the OBS interface.
- In Zoom, Teams, or Meet, open camera settings and select OBS Virtual Camera as the camera source.
Use this route when you want to apply filters, add scene overlays, or switch between camera inputs during a live stream while also appearing on a video call.
How to Select Your DSLR as the Camera in Mac Apps
Completing the hardware or software setup is only part of the process. Many users connect everything correctly but cannot find their DSLR in the video-call app because macOS permissions are not granted or the camera source is not selected at the app level.
macOS Camera Permission (required for all methods)
Open System Settings → Privacy & Security → Camera. Confirm each app you plan to use has its toggle switched on. If a specific app does not appear in the list, launch it first and attempt to access the camera; macOS will prompt for permission at that point.
Camera Selection by App
| App | Where to Select the Camera |
|---|---|
| Zoom | Settings → Video → Camera dropdown |
| Google Meet | Settings (gear icon) → Video → Camera |
| Microsoft Teams | Settings → Devices → Camera |
| FaceTime | Menu bar → Video → Camera |
If the DSLR or capture card does not appear in any dropdown, quit the app completely and reopen it after confirming the camera is connected and the manufacturer utility is already running in the background.
Quick Comparison: Which Method Should You Use?
| Method | Upfront Cost | Setup Complexity | Video Quality | Camera Compatibility | Best Use Case |
|---|---|---|---|---|---|
| USB + Manufacturer Software | Free | Low | Good (1080p typical) | Brand-specific; check model list | First attempt for most users |
| HDMI Capture Card | $100–$200 | Medium | Excellent (up to 4K) | Universal (any DSLR with HDMI) | Best quality, unsupported bodies |
| OBS Virtual Camera | Free (requires capture card) | High | Excellent (up to 4K) | Same as Method 2 | Streamers who also video call |
Common Issues and Fixes
- DSLR not appearing in the app’s camera dropdown: Confirm the manufacturer utility is actively running in the menu bar. Then verify macOS System Settings → Privacy & Security → Camera has the target app enabled. Quit and relaunch the app after confirming both.
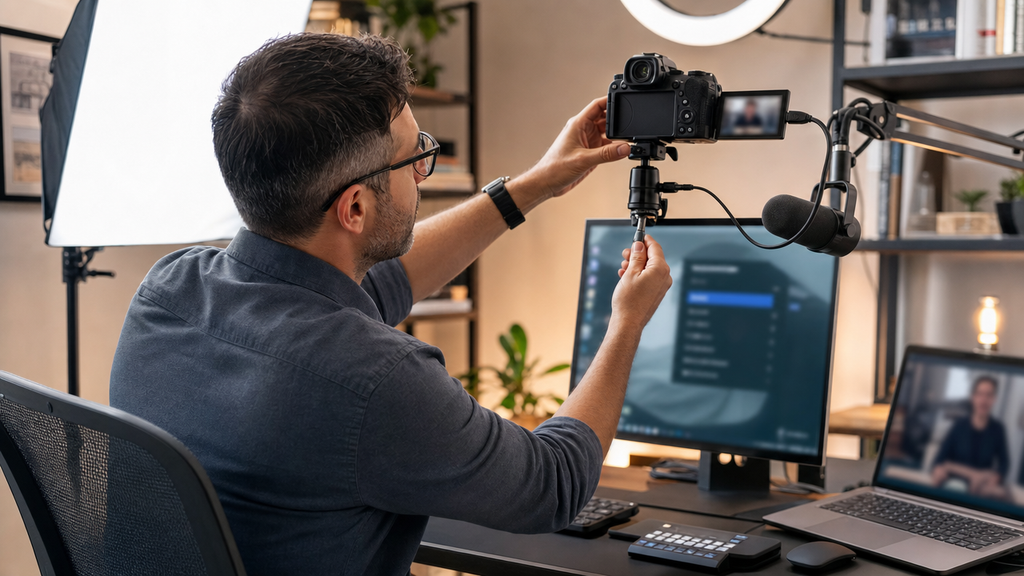
- Black screen or no video signal: Verify that live view is switched on at the camera body. For capture card users, confirm clean HDMI is enabled. Some cameras will not output a usable signal over HDMI unless that setting is explicitly toggled off in the menu.
- Camera overheating or shutting off mid-call: DSLR live view has thermal limits and built-in shutoff timers, typically triggering between 30 and 60 minutes. A dummy battery connected to an AC adapter kit matched to your camera model keeps power continuous and removes overheating as a variable during long sessions.
- Laggy or low-frame-rate video: Confirm the USB cable is connected to a USB 3.0 port rather than USB 2.0. For capture card users, check the manufacturer’s firmware page; a firmware update can resolve frame-rate instability on newer macOS releases.
- Camera disappears after a macOS update: Manufacturer utilities occasionally lose compatibility after a major macOS update. Reinstall the utility and check the brand’s support page to confirm a version supporting your current macOS is available. Most manufacturers release updates within a few weeks of a major macOS release.
Skip the Complexity: The Hollyland Lyra Webcam on Mac
Setting up webcam software, Clean HDMI, and a dummy battery takes time. Finding the right cable for each session adds more hassle. If you just want sharper video calls, there’s an easier option. You won’t need to rely on a specific camera you already own. The Hollyland Lyra is a 4K webcam built around a 1/1.5” CMOS sensor and F/1.8 aperture, connecting to your Mac via a single USB-C cable. macOS detects it immediately as a standard webcam device with no driver installation required.

Hollyland Lyra - 4K AI Webcam
A flagship 4K AI webcam featuring a large 1/1.5″ CMOS sensor, smart auto-framing, and studio-grade 48 kHz/24-bit audio for effortless streaming and conferencing.
Key Features: 1/1.5″ CMOS & 4K30 | AI Tracking & Auto Framing | 48 kHz/24-bit Audio
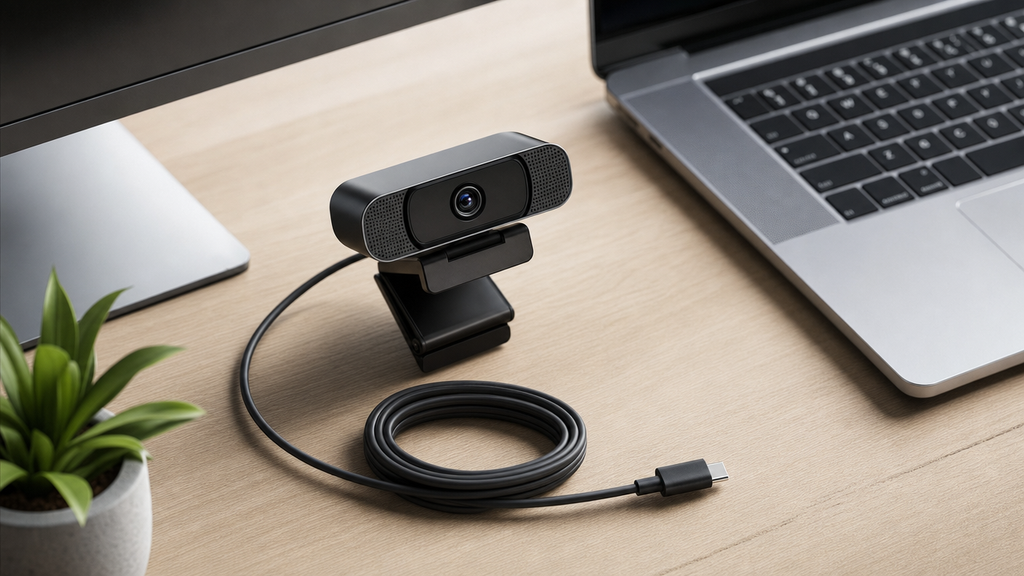
Getting the Lyra running on Mac:
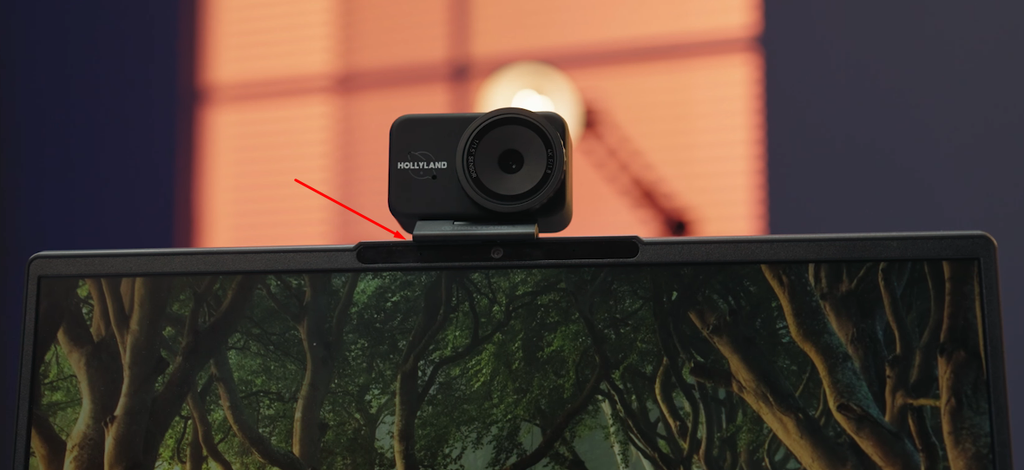
- Clip the Lyra onto the top of your monitor using its built-in mount. The clip opens and closes firmly to seat securely on most display panels.
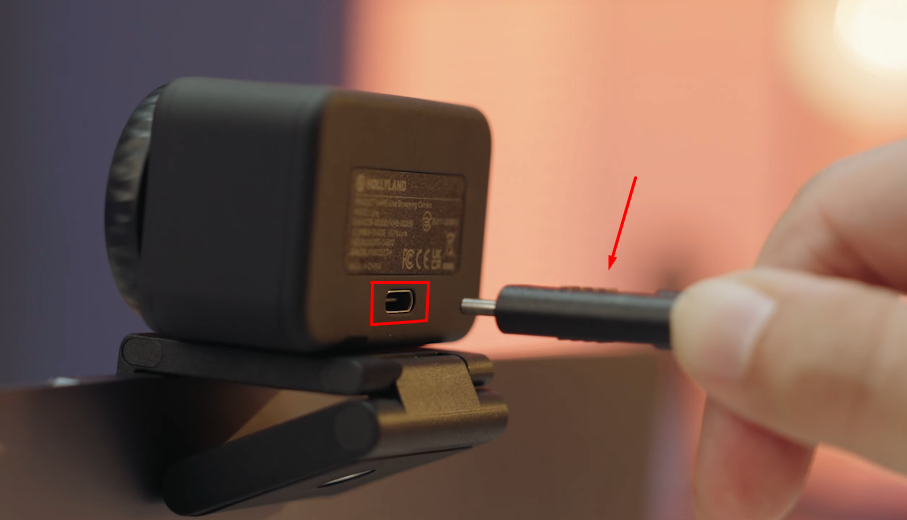
- Connect the included USB-C cable from the Lyra to a USB-C port on your Mac or a powered docking station. Avoid unpowered hubs; the Lyra requires a stable 5V/1A power supply.
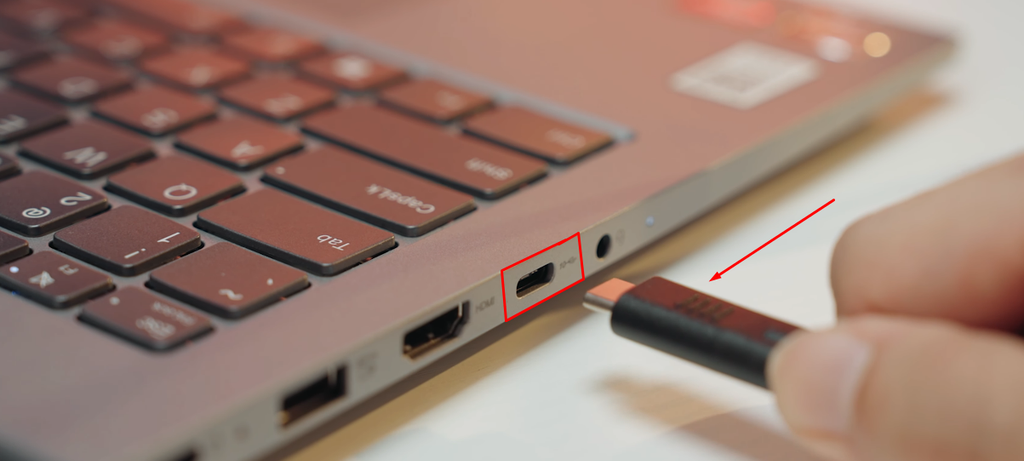
- macOS recognizes the Lyra automatically. No driver installation prompt appears. You will see Hollyland Lyra listed as a camera device in System Settings without any additional configuration.
- The LED indicator on the Lyra glows solid when the camera is active and connected. If the LED is off, check that the USB cable is fully seated.
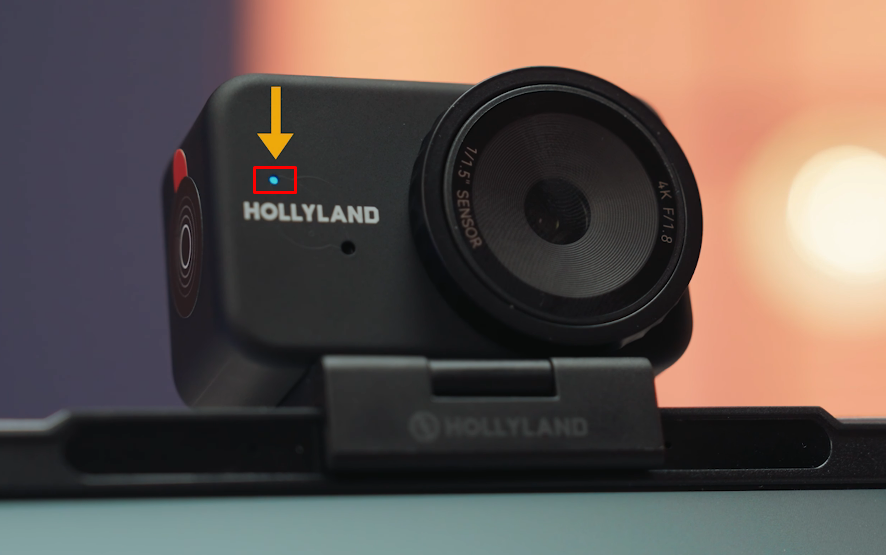
- Open your video app, navigate to camera settings, and select Hollyland Lyra from the dropdown. The feed is live immediately.
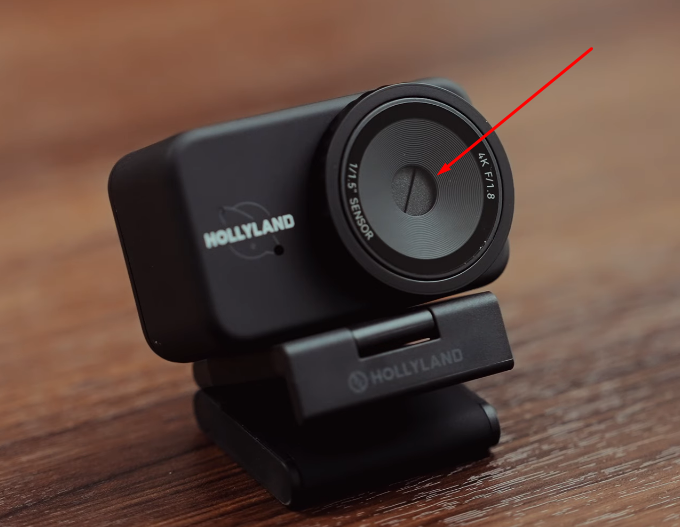
- When you are not on a call, close the physical privacy shutter on the front of the camera body to cover the lens.
Key controls in HollyStudio on Mac:
Download HollyStudio from Hollyland’s website to adjust the Lyra’s imaging parameters without leaving your desk.
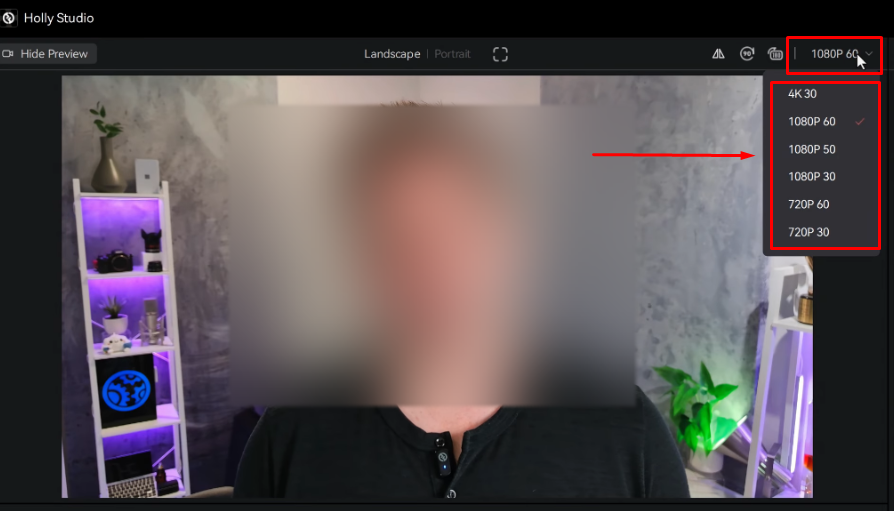
- Resolution and frame rate: From the Resolution dropdown at the top of the preview window, select 3840×2160 at 30 fps for 4K output or 1920×1080 at 60 fps for smooth full HD.
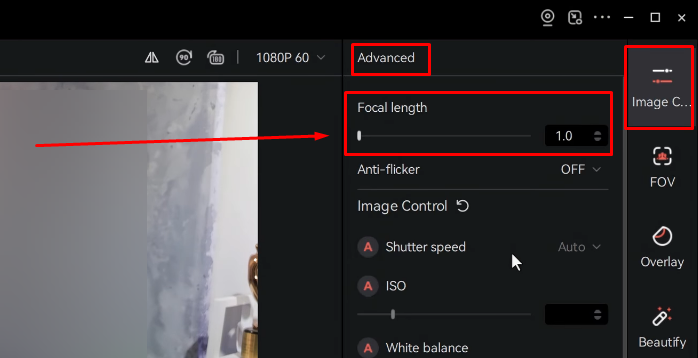
- Digital zoom: On the Image Control page, adjust the Focal Length slider to digitally zoom. You can move the slider between 1x and 4x by physically positioning the camera.
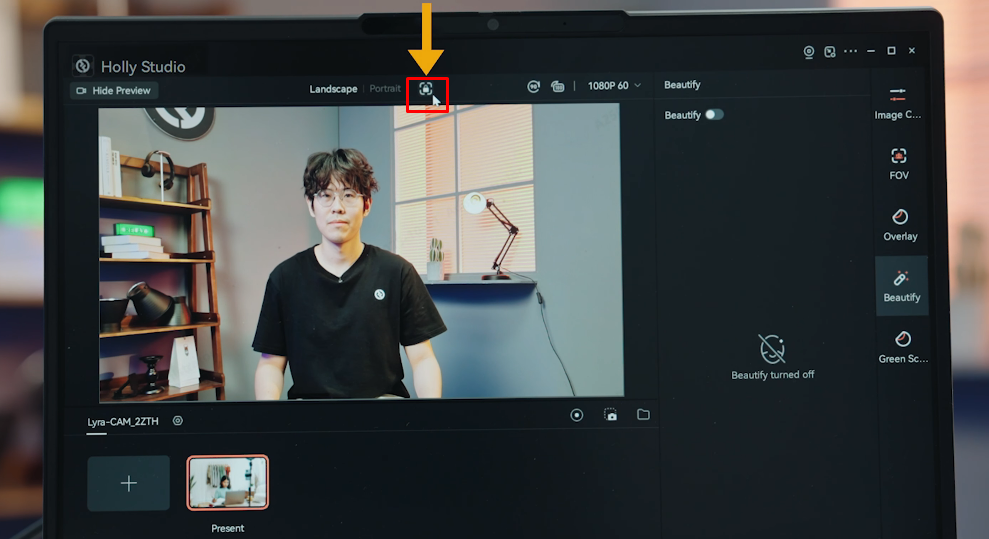
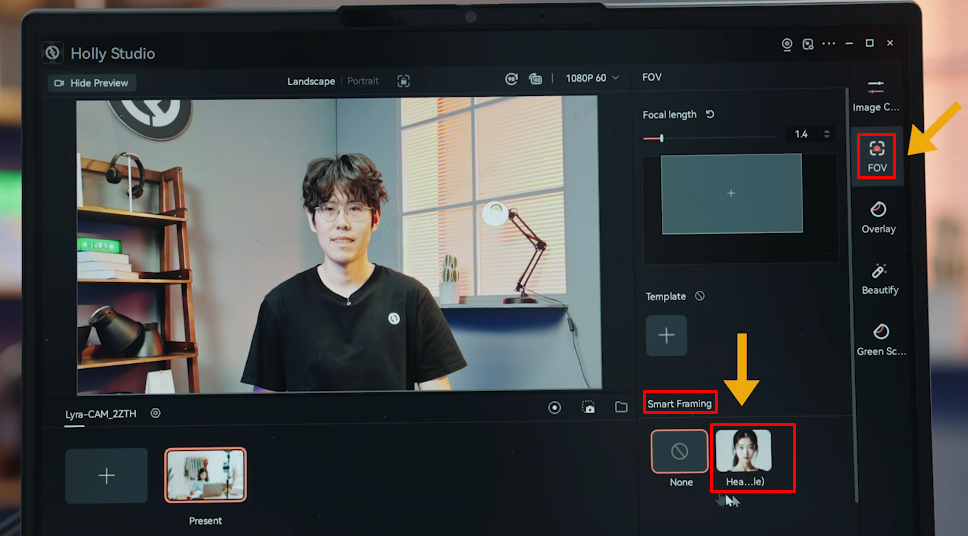
- AI Tracking and Smart Auto Framing: Enable AI Tracking and Smart Auto Framing options so the camera tracks and recenters on you as you move within the frame. To do that:
- Click the frame icon above the preview window. After clicking it, a padlock symbol will appear inside it.
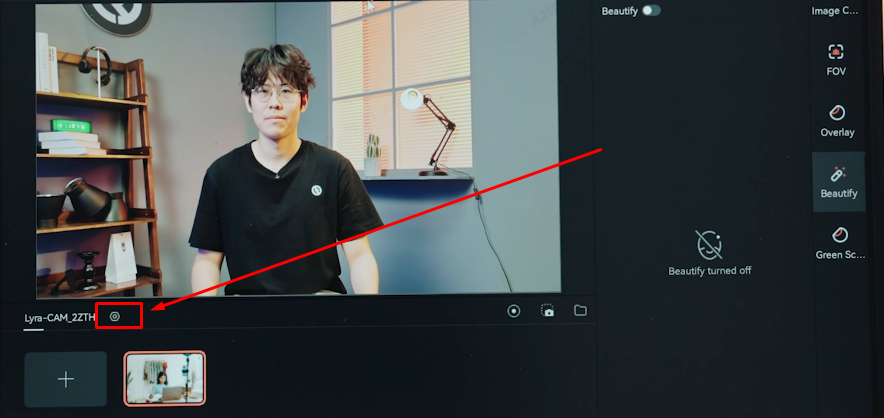
- Select the gear icon under the preview window to open Settings.
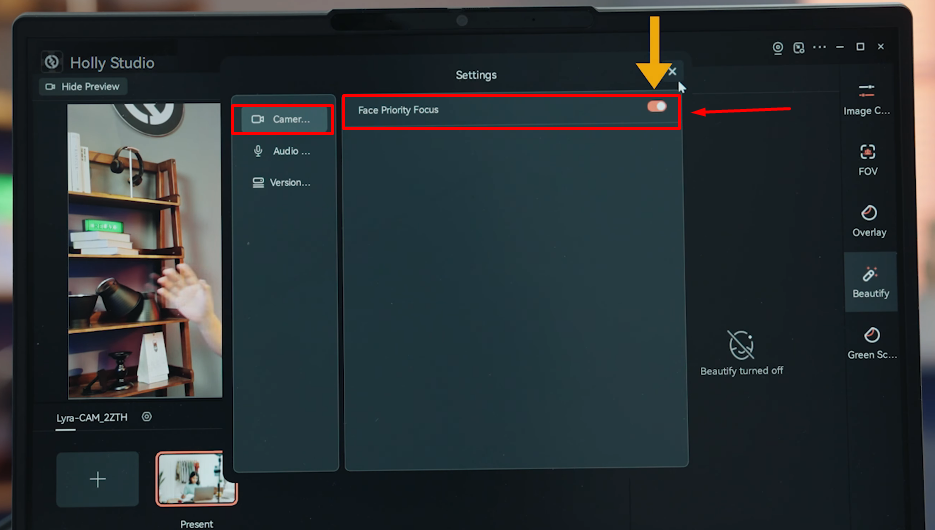
- Open Camera Settings from the left menu when the Settings dialog appears.
- Toggle Face Priority Focus on.
- Select the FOV page.
- Locate the Smart Framing section, deselect None, and enable the auto framing option (image tile) beside the None tile.
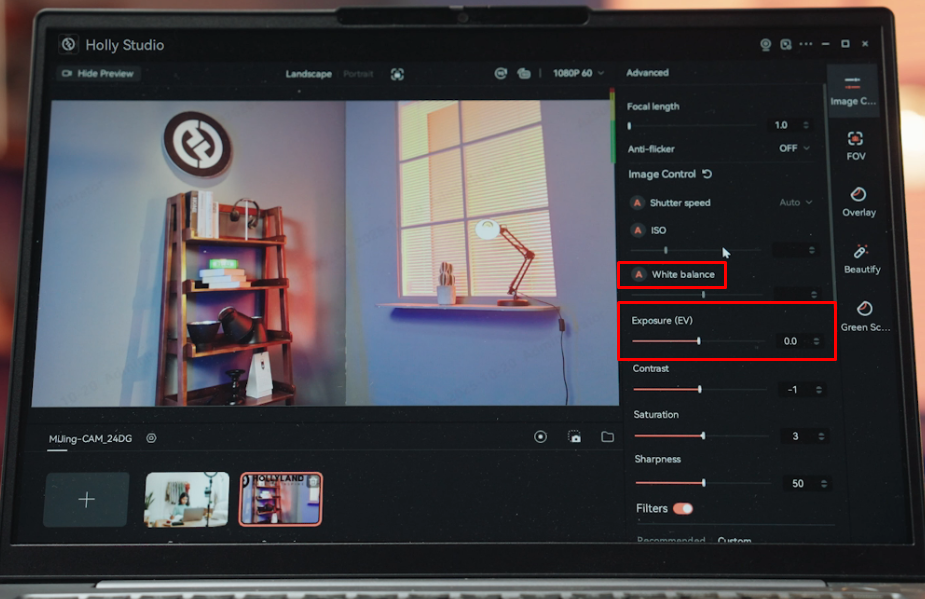
- Exposure and white balance: On the Image Control page, set the manual exposure slider and choose a white-balance slider to match your lighting.
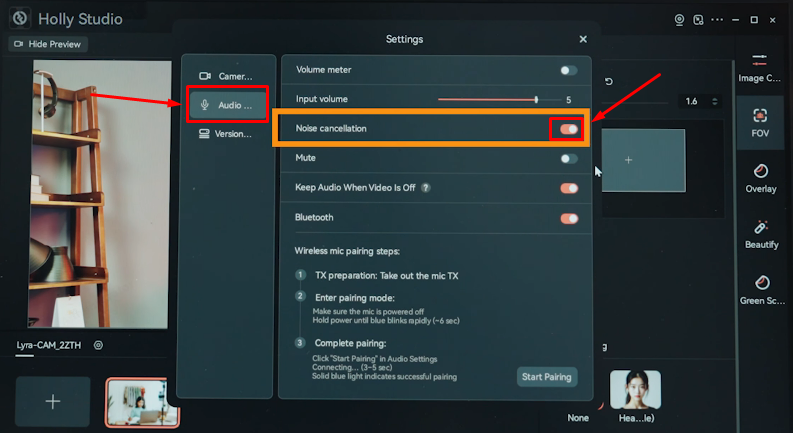
- Intelligent Noise Cancellation: In Audio Settings, enable noise cancellation to reduce keyboard sounds, fan noise, and room echo from your audio feed.
Note: HollyStudio on Mac currently supports basic parameter settings including resolution, zoom, AI framing, exposure, and audio controls. Advanced effects such as virtual backgrounds, skin smoothing, and color correction magic are available on Windows and may not yet be fully accessible in the current macOS build. Check Hollyland’s release notes for the latest Mac feature status before relying on those capabilities.
The Lyra also accepts a direct wireless microphone connection from the Hollyland LARK A1 without a separate receiver, giving you 48 kHz/24-bit audio alongside 4K video through a single USB-C cable.

Hollyland LARK A1 - Affordable Wireless Microphone
A perfect starter mic for creators on a budget. It’s simple to use and features effective noise cancellation.
Key Features: 48kHz/24-bit | 3-Level Noise Cancellation | 54-Hour Battery
FAQs
Q: Can I use any DSLR as a webcam on Mac?
Most modern Canon, Sony, Nikon, and Fujifilm DSLRs work via the manufacturer’s free USB utility or an HDMI capture card. Older or entry-level bodies not on the supported model list need the capture card route. The capture card method only works if your camera supports Clean HDMI output. This lets you turn off screen overlays, as well as keep things clear. Your camera also needs an option to disable its automatic sleep timer.
Q: Do I need to install drivers to use a DSLR as a webcam on Mac?
It depends on your camera’s age and how you connect it. With HDMI capture cards, macOS recognizes most devices without extra drivers. The Elgato Cam Link 4K is one common example here. Newer cameras also support USB plug-and-play through native UVC/UAC support. Older DSLR models may need the brand’s webcam utility installed first. That software helps your Mac recognize the camera over USB.
Q: Why is my DSLR not showing up in Zoom on Mac?
The three most common causes are: (1) the manufacturer utility is not running in the background, (2) Zoom has not been granted camera permission in macOS System Settings → Privacy & Security → Camera, or (3) your camera might not be set to Movie or Video Mode. Check all three settings in order before trying other fixes.
Q: Can I use a DSLR as a webcam on Mac without a capture card?
Yes. Sony’s Imaging Edge Webcam and Nikon’s Webcam Utility are free. Both need only a regular USB cable to get started. Canon offers EOS Webcam Utility Pro Pro, with paid 1080p access. On macOS, these tools may not support Mac App Store apps. A capture card helps when your camera model isn’t supported. It’s also useful for App Store support or better video quality.
Q: Does using a DSLR as a webcam drain the battery?
Yes, live view is battery-intensive. Most camera bodies will shut off automatically after 30 to 60 minutes in live view. A dummy battery connected to an AC adapter kit matched to your specific camera model is the standard fix for longer calls or extended recording sessions.
Q: What is the best capture card for DSLR webcam use on Mac?
The Elgato Cam Link 4K is the most widely used option with confirmed macOS compatibility and no driver installation required. The Magewell USB Capture HDMI Gen 2 is a higher-end alternative suited to professional broadcast or production environments where reliability under heavy use is critical.
Conclusion
For most DSLR owners, the brand’s free USB utility is easiest to start with. An HDMI capture card is another option for almost any camera brand. It can also provide better video quality across different camera models. Whichever method you pick, test everything inside your video app first. Do this before joining any live call or meeting. If software setup, Clean HDMI, and battery management feel like too much, the Hollyland Lyra offers an easier option. Connect one USB-C cable, skip driver setup, and start within minutes.
