.png)
MuseScore 4 is a significant update to the popular free music program. MuseScore 4 provides a more realistic and dynamic music composition experience by including several upgrades and new capabilities, particularly in terms of sound quality. New features including Muse Sounds, VST plugin support, and Mixer upgrades provide users with more freedom and control when composing music.

In this article, I will show you how to add sounds in MuseScore 4, from basic setup to exporting the score with the best sound quality. By the end of this lesson, you will have a better understanding of how to use the various sound capabilities to achieve the greatest outcomes in your music productions.
Initial Setup: Audio Installation and Setup
Before you start, ensure that MuseScore 4 is installed on your device. To ensure that you have the most recent upgrades, go to the official MuseScore website and download the current version. Once installed, configure audio settings to ensure uninterrupted playback. Follow these instructions:
- Launch MuseScore and navigate to ‘Edit’ > ‘Preferences’.

- In the ‘I/O’ tab, pick the proper audio device, whether it’s the speakers or headphones being utilized.

- Adjust the buffer size to eliminate lag or damaged audio. A bigger buffer size reduces the possibility of delay but may decrease responsiveness.
- When the settings are finished, click ‘OK’ and you will be ready to begin working.
Downloading and Activating Muse Sounds
MuseScore 4 introduces a very useful new tool called Muse Sounds. This is a collection of excellent orchestral instrument sounds that can help you produce better music. To begin using Muse Sounds, you must first download it.
Here is how you may download and activate Muse Sounds:
- Launch MuseScore and navigate to ‘View’ > ‘Resource Manager’.

- In the Resource Manager, search for ‘Muse Sounds’ and click ‘Download’.

- To download and install Muse Sounds on your device, simply follow the on-screen directions.
- Muse Sounds will thereafter be automatically available in MuseScore. You can start using these sounds for the instruments in your composition right now.
- Muse Sounds offers more realistic and extensive instrument sounds, ranging from strings, brass, woodwinds, and percussion.
Using Muse Sounds in Your Score
You can utilize Muse Sounds in your scores right away after downloading and activating them. The steps are fairly easy.
- MuseScore allows you to open or create new scores.
- MuseScore will select the right sounds from Muse Sounds for each instrument in the score.
- You may verify the sounds used by navigating to the ‘Mixer’ (View > Mixer) and ensuring they are from Muse Sounds.

If you wish to adjust the sound of a specific instrument, open the Mixer and pick it. Choose a different sound from Muse Sounds, or use a VST plugin or SoundFont.
Getting to Know and Use the Mixer
The Mixer is one of the key features in MuseScore 4 that allows you to organise the sound of each instrument in more detail. Within the Mixer, you can make the following various
settings:


- Volume: Adjust the volume of each instrument to ensure a balanced sound between instruments.
- Panning: Set the panning to change the sound distribution of the instruments on the left or right, giving them a more interesting stereo dimension.
- Effects: Add effects like reverb or chorus to give more depth to the sound.
- Sound Selection: You can replace the automatically applied instrument sounds with other sounds from Muse Sounds, SoundFonts, or your own VST plugins.
With Mixer, you can customise almost every aspect of playback for each instrument individually. This is especially useful when you’re working with more complex music projects and want to create richer sounds.
Adding VST Plugins
MuseScore 4 now includes support for VST (Virtual Studio Technology) plugins in addition to Muse Sounds. VST enables you to employ professional digital instruments to increase the sound quality of your composition. Here’s how to add a VST plugin to MuseScore.
- Launch the Mixer and click the ‘Add Plugin’ button under the VST section.

- Select a VST plugin that is already installed on your computer, then the chosen sound preset.
- Once you’ve chosen a VST plugin, the instrument’s sound will be determined by it. This plugin can be used to replace any instrument sound and get a more realistic sound quality.
The utilization of these VST plugins provides a wide range of alternatives, from solo instruments to complete symphonic sounds. Many high-quality VST plugins are available for both free and paid use, providing you with a wide range of sound experimentation options.
Using Soundfonts
In addition to Muse Sounds and VST plugins, MuseScore 4 supports SoundFonts (.sf2,.sf3) for a greater range of sounds. A SoundFont is a collection of audio samples that may be used to substitute instrument sounds in MuseScore. Here’s how you use them:
- Get the SoundFont of your choice from a website that offers SoundFont files.
- Navigate to ‘View’ > ‘Synthesizer’ and choose the ‘Fluid’ tab.
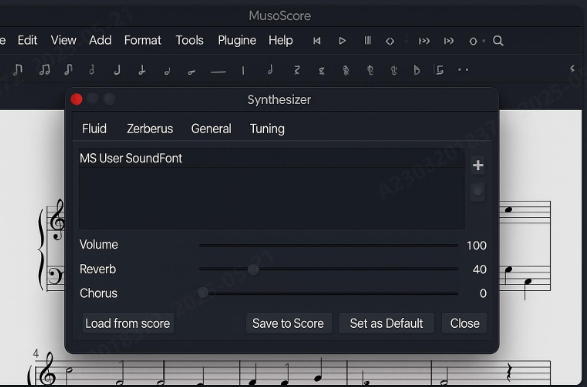
- Click ‘Add’ and choose the downloaded SoundFont. Once the SoundFont has been chosen, apply it to the appropriate instrument using the Mixer.
- SoundFonts can help you add more sound variations to your projects, whether they’re for solo instruments or symphony groups.
Effects and Playback Options
The Mixer can be used to add numerous sound effects to the instrument, making it sound more vivid. Some effects that can be added are:
- Reverb: This effect creates a sense of space in the sound, as if it were originating from a huge room or studio.

- Chorus: Adds depth to the sound by delaying and changing the pitch of the original sound.
- EQ: Used to modify the frequency of an instrument’s sound to make it more balanced.
Dynamic and expression settings can also be made directly from the score, allowing you complete control over how each piece of music is played and perceived.
Solving Sound Problems
Even with the proper settings, sound issues can still occur. Here are some frequent concerns and strategies to address them:
- No sound: Check the audio device settings in ‘Preferences > I/O’ to ensure that everything is properly connected.

- Delay/latency: Increase the buffer size to reduce delay.

- Sound breakup or distortion: Reduce the output level or check the audio driver to ensure that everything is properly installed.
- VST does not show up: Make sure your VST plugin is MuseScore-compatible and supports a 64-bit file format.

Exporting Scores with Playback
When you are satisfied with the sound and playback settings, you can export the score and audio to WAV or MP3 formats. The method is as follows.
- Choose ‘File’ then ‘Export’.
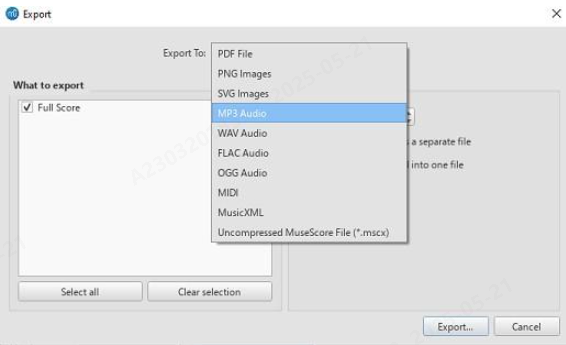
- Choose an audio format, like WAV or MP3.
- Make sure the ‘Use current playback settings’ option is checked, so that all of the sound adjustments you’ve made in Mixer are applied to the exported audio file.

Exporting your project allows you to share your music in an audio format that is ready for further production.
Tips for Optimizing Sound Usage in MuseScore.
Here are some extra tips for making the best use of sound in MuseScore:
- Use high-quality monitor headphones to hear playback details clearly.
- Save projects frequently to avoid losing data or settings.
- Update MuseScore and Muse Sounds on a regular basis via Muse Hub to ensure the latest features and bug fixes are included.
- Experiment with Muse Sounds, VSTs, and SoundFonts to create more complex and dynamic sounds.
MuseScore 4’s new features make making high-quality music easier and more economical. The Muse Sounds feature provides rapid access to professional symphonic sounds, while VST plugin compatibility enables the usage of high-quality virtual instruments from third parties. Additionally, the ability to use SoundFonts allows you to generate a greater range of sounds.
Exploration and experimenting are important to achieving the greatest results when using MuseScore 4. Feel free to experiment with different sounds, effects, and settings in the mixer. Understanding how to handle sounds and playback settings in greater detail allows you to create musical works that are not only enjoyable but also sound professional.
This guide will hopefully assist you in maximising the potential of MuseScore 4 and achieving the greatest outcomes in any music production you undertake. With a little practice and rigor, you will be able to create lively, dynamic, and expressive music.
FAQs
- What are Muse Sounds in MuseScore 4 and how should they be used?
Muse Sounds is a collection of high-quality orchestral instrument sounds that are included by default in MuseScore 4. These noises can help to improve the quality of your music and make it sound more authentic. To utilize them, simply download Muse Sounds from MuseScore’s Resource Manager, and they will be automatically available for each instrument in your score. You can also adjust the instrument sounds in the Mixer to suit your tastes.
- What should I do if I hear a delay or broken sound when using MuseScore 4? If you’re having delays or broken sound, start by changing the buffer size in MuseScore’s I/O Preferences. Setting a bigger buffer size can reduce delay while also marginally affecting responsiveness. If the broken sound problem persists, ensure that your audio device is correctly connected and try lowering the output volume. You can also check your audio driver settings to ensure everything is in good order.
- How can I install VST plugins to MuseScore 4?
Adding VST plugins to MuseScore 4 is quite simple. Simply open the Mixer and select the Add Plugin button under the VST section. Choose an already installed
plugin on your computer and the suitable sound preset for the instrument you wish to modify. VST plugins allow you to use high-quality virtual instruments that are not included by default in MuseScore, giving you more creative freedom when making music.
- What exactly is SoundFont, and how do I utilize it in MuseScore 4.
A SoundFont file replaces the basic instrument sounds in MuseScore. To use a SoundFont, first download the.sf2 or.sf3 file, then open Synthesizer in MuseScore and navigate to the Fluid tab. Click Add and pick the downloaded SoundFont. After that, use the Mixer to apply it to the instrument for further sound changes.
- Can I export my scores using the sounds I’ve configured in MuseScore 4?
Yes, You can export your MuseScore 4 score with specified sounds and effects. To do so, go to File > Export, then select an audio format like WAV or MP3. Make sure to check the Use current playback settings box so that all of the sound settings you’ve altered are applied when the file is exported. This enables you to obtain personalized playback results in a ready-to-use audio format.