.png)
Bouncing stems is a crucial technique in music production that enables you to convert your virtual tracks into different audio files. The commonly used digital audio workstation (DAW) Logic Pro X offers a smooth and effective procedure for bouncing stems. Knowing how to bounce stems in Logic Pro X is crucial whether you’re working with other musicians, prepping music for mixing or performance, or just making backups.
That’s why I have come up with an article that will walk you through the step-by-step process, allowing you to utilize stem bouncing in your music production workflow fully. So, are you ready? Then, let’s dive in and learn about stem bouncing in Logic Pro X!
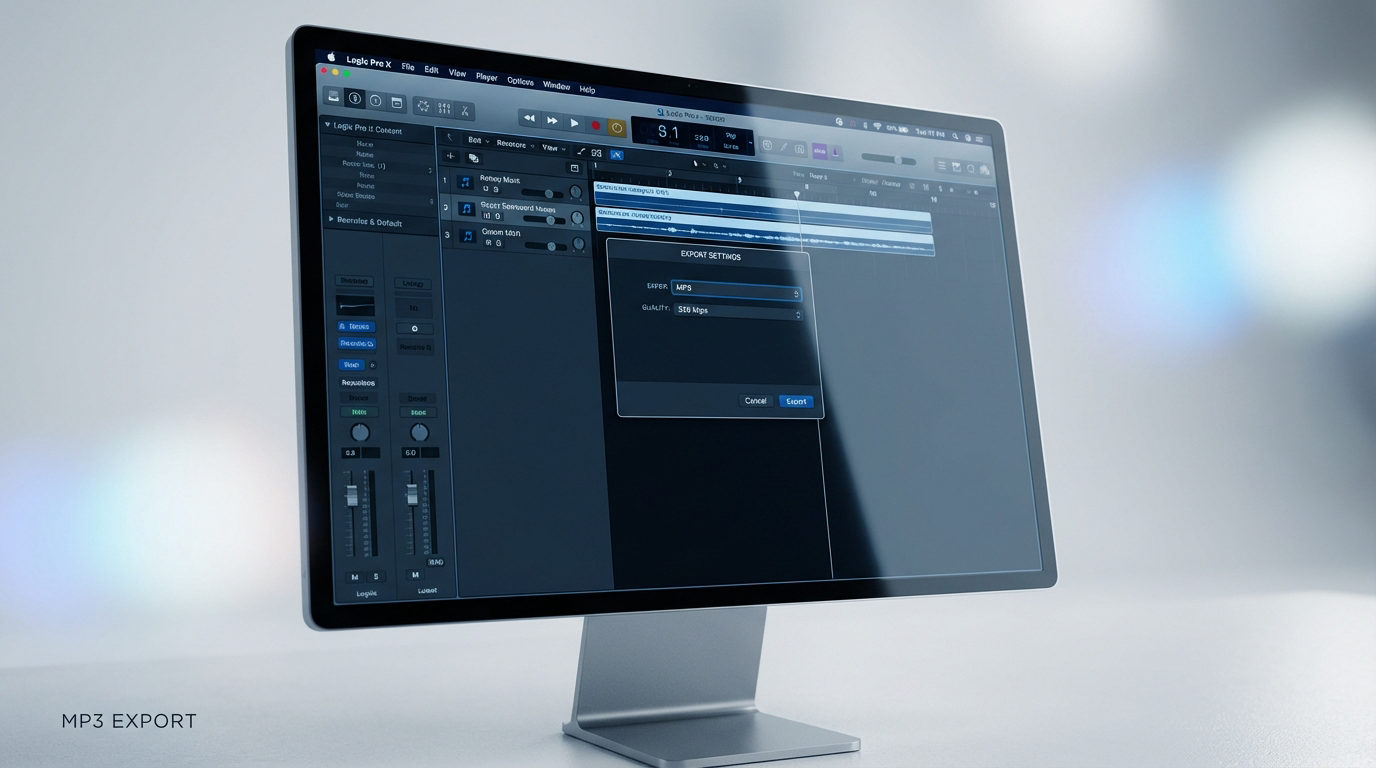
What is Bounce and Export in Logic Pro X?
As an audio engineer or music producer, understanding bounce and export is crucial while using Logic Pro X. They are key to finishing your projects and distributing your music to others. While they may appear to be the same, they serve different functions and have different functionalities within the software. So, let’s look at the most important parts of bounce and export in Logic Pro X.
1. Bounce
The term “bounce” describes the process of rendering or combining your project’s tracks or individual project parts into a single audio file. This may be used to make stems, prepare tracks for mixing or mastering, export parts for additional editing, or share audio files with others. You may turn your MIDI and virtual instrument tracks into audio via bouncing, which can be utilized in other programs or live performances.
2. Export
In contrast, export entails exporting your project or chosen portions as audio files in various formats for eventual distribution, archiving, or additional processing outside of Logic Pro X. A project can be exported in a variety of ways, such as a stereo mixdown, as individual tracks, or as specified project areas.
What are the Factors to Consider Before Bouncing Stems in Logic Pro X?
Now you understand the concept of bounce and export in Logic Pro X. You would think that it’s enough to know to master the bouncing technique in Logic Pro X. But hold on!
Although you are now clear with the concept of bounce and export, some factors still need to know if you want a successful and efficient operation.
So, scroll down and read the factors:
1. Mixing and Editing Process
Ensure you have satisfactorily finished all editing and mixing requirements before bouncing. It is harder to modify individual songs after you bounce the stems.
2. Solo and Mute Statuses
Ensure each track’s solo and mute statuses are correctly set. Unexpected audio results might occur when bouncing stems with unintentionally solo or muted recordings.
3. File Settings and Format
Choose the bouncing stems’ desired file format, bit depth, and sampling rate. Take into account your Project’s requirements as well as any particular delivery requirements. Making the proper settings guarantees compatibility and preserves audio quality.
4. Dithering and Normalization
Determine whether you want the stems normalized to a specified level during the bounce process. Normalization is the process of adjusting the entire volume to a constant level. Consider if dithering, which decreases quantization
5. Back up and save your work
Before bouncing stems, you should always create a backup of your Project. If something goes wrong during the bounce process, you are guaranteed to have a safe duplicate of your Project. To keep track of your work, you also need to save your Project with a new version name or raise the version number.
6. Project Management
A well-organized project with labeled tracks and regions is a must. Thanks to this, you will be able to quickly find and choose the precise songs you want to bounce as stems.
7. Remove Unnecessary Automation
Before bouncing your stems, consider removing any unnecessary or undesired automation. You should do away with this automation if the mixing engineer doesn’t require it. Tapping the A key, you may instantly turn off automation on your songs. The Mix tab in the main top-level menu of the project window is where you can also find the automation settings.
You can avoid problems, control your audio quality, and get what you want in your music production process by considering all of these factors before bouncing stems in Logic Pro X.
How to Bounce Stems in Logic Pro X?
So, till now, you have learned the concept of bounce and export in Logic Pro X and the factors that need to be considered before bouncing stems in Logic Pro X. It’s the right time to understand how to bounce stems in Logic Pro X.
But before that, what exactly is the stem?
Stems are a single song’s component or track that you may export as a single file. This enables you to collaborate on a Logic Pro X project with other producers or musicians by sharing a song’s entirety or a piece with them. A Logic project’s stems must be bounced to be shared. This entails changing the files to a specific format so they may be shared more easily. The files can be shared both with and without effects.
Now let’s move to the different methods of bouncing stems in Logic Pro X.
Method 1: Bounce and Replace all Tracks
In Logic Pro X, bouncing all the tracks in a project and replacing the tracks with the bouncing files is one of the simplest ways to bounce stems. This enables you to distribute the Logic project in a more portable, smaller file format.
Save your work in progress and clone your existing Logic project into a new one before bouncing your stems. By doing this, you may be confident that your original recorded files will remain when you bounce the stems.
To save a duplicate of your Project with the name Stems or a similar name, choose “Save a Copy As” from the “File” menu. A second project will be created with the same settings and effects as the original Project.
To bounce stems in Logic Pro X after creating a copy, follow these steps-
Step 1: Select the “stems” you wish to bounce and open the Project.
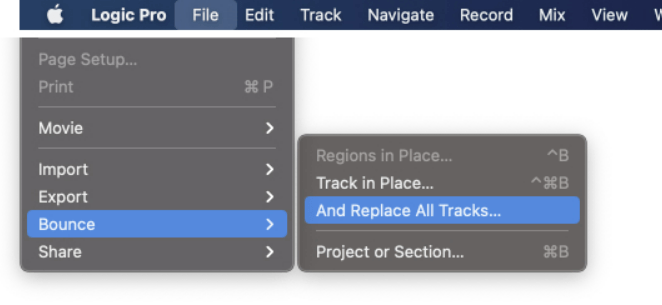
Step 2: Choose the File menu from the top of the screen.
Step 3. Click on Bounce.
Step 4: Choose “And Replace All Tracks”.
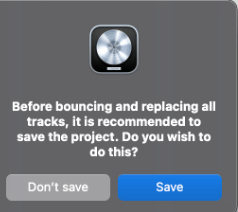
Step 5. If you haven’t previously, save the Project before continuing after seeing a warning menu.
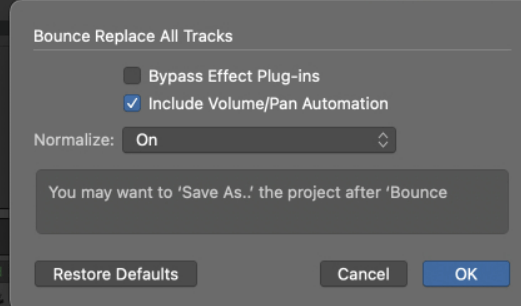
Step 6: A different menu with choices you may modify based on your preferred bounce settings will now display. Select the following options you want from the menu:
- Bypass Effect Plug-ins: By checking this option, all of your available channel strip inserts will not be used to bounce any of the tracks. If you’d like, the plugins can be removed, but they’ll still be on the new audio track that replaces the old one.
- Include Volume/Pan Automation: Any volume/pan automation and the current volume/pan position are applied to the audio file as a result. This is quite helpful if you want to apply the current volume balance on the bounced stems.
- Normalize: By doing this, all of the audio files’ cumulative gain will be changed such that their loudest peak is at 0 dB. Although it is typically advised that you leave this at “Off” or “Overload Protection Only,” this might be handy if your audio is unusually quiet.
(Note: As soon as the bounce is finished, you will see that the popup also suggests you “Save As” the Project. This is advised so you can access the bounced tracks, as the original MIDI/audio tracks will all be deleted.)
Step 7: Press OK when you have the settings you desire. All of your stems will be bounced by Logic, replacing any existing tracks in the Project with bounced recordings.
This must be clarified since the audio will be combined with any additional audio files you have used in your production. Method 2 will provide you with many more options if you want to choose the place and have more control over the final audio files.
Method 2: Export the Tracks as Audio Files
The second method exports the tracks as audio files to a location on the computer of the user’s choice rather than replacing all of the original tracks with the bouncing stems.
To bounce your stems, export the tracks as audio files and then follow the steps below-
Step 1: Launch the Logic Pro X project containing the stems you wish to bounce.
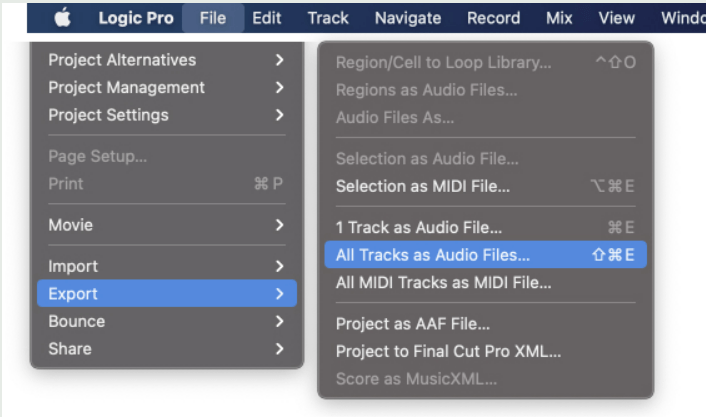
Step 2: Choose the File option.
Step 3: Click on Export.
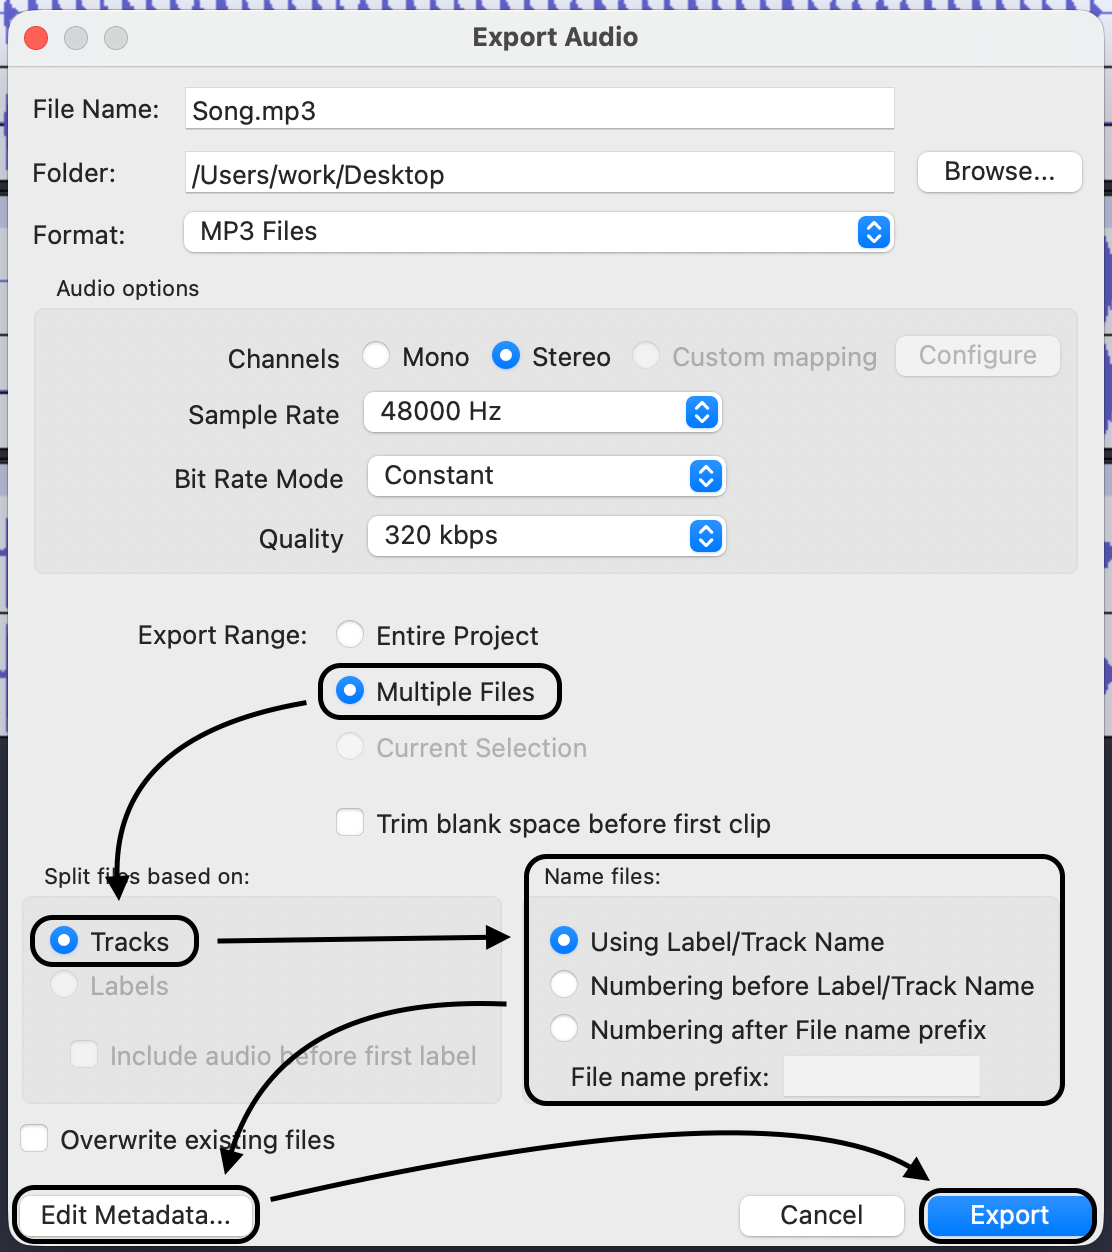
Step 4: Click the All Tracks as Audio Files option.
Step 5: Depending on how you bounce the stems and what sort of file you want them to be, a window will display the following parameters you may adjust.
- Range: The range option lets the user specify which portion of the Project will be represented by the audio files.
- Save Format: This option lets the user specify the audio file’s format.
- Bit Depth: This option allows users to alter the stems’ bit depth.
- Multi-Output Software Instruments: The number of stems to export for multi-output instruments is determined by this option. Multiple outputs are frequently utilized with instruments like Drum Kit Designer, Ultrabeat, etc. It would help if you typically exported a different stem for each output.
- Add resulting files to Project Browser: This option allows you to insert a link to the audio files in the Project’s “Project Browser” section.
- Naming System: Using the Naming System option, you may control how each file will be named. Any combination of the “Elements” seen in the image can be clicked and dragged in the “Pattern” box. Additionally, you can provide some unique content in the “Custom” box; this text will then be shown in its place.
You can change any option displayed on this menu. The file format, bit depth, and file location are all customizable. Additionally, you may decide whether to use automation or ignore effect plugins.

Step 6: Then, click on Export.
A Few Words About Bus Groups
For each of the methods mentioned above, the software will only produce audio files for the tracks shown in the main window.
If you don’t make a track just for bus groups, they won’t be included in the bounce. You can get this quickly by selecting “Create Track” from the context menu when you right-click the group bus channel strip. This will create a track that will be included in the stems.
Conclusion
Bouncing stems is a crucial skill to acquire in Logic Pro X. So, follow the two methods mentioned here and share your projects with other artists or producers easily.
When you’re bouncing stems in Logic Pro X to streamline your workflow and ensure smooth production sessions, clear communication with collaborators or team members on set is key. Especially during larger productions or live events, a reliable wireless intercom system helps you manage instructions effortlessly, keeping everyone in sync and productive.
Frequently Asked Questions
Q1: In Logic Pro X, what are stems?
Individual audio files called stems are part of a project and include a particular track or set of tracks.
Q2: What are the benefits of bouncing stems in Logic Pro X?
Bouncing stems help you work together, mix, master, and distribute your music. You can make backups, work with the audio files in other apps, or provide certain tracks to other producers or mix engineers.
Q3: In Logic Pro X possible to bounce every track at once?
If you use the “All Tracks” option in the Bounce dialog box, you may bounce every track in a project.