


.png)
Do you have a stack of old audio cassettes lying around collecting dust? Maybe these tapes have your precious family recordings, rare music, or personal interviews you can’t find anywhere else.
As cassette players become harder to find and tapes slowly deteriorate with age, digitizing your audio tapes is the best way to keep those sounds alive.
But how can you convert an outdated audio tape to MP3? This guide will show you exactly how, with a step-by-step process, a list of the equipment you’ll need, and solutions to some common issues you might encounter along the way. Let’s get started!
Devices You Can Use to Record Audio from Cassette Tapes
Before we get into the software steps, let’s quickly look at the different devices you can use to play your tapes and connect them to your computer. Whichever one you choose to use, the steps for converting the audio with Audacity will be the same.
1. Cassette-to-MP3 Converters (Standalone or USB)
These are plug-and-play devices designed specifically to digitize tapes. Many models resemble a portable Walkman but include a USB port or SD card slot to record audio directly to a digital format.
- Pros: Easy to use, no computer needed in some models
- Cons: Audio quality may be lower than pro setups
- Popular options: Reshow Cassette Player, DigitNow USB Converter
2. Cassette Decks
These are the machines that play a cassette in a stereo system or can be used standalone to copy new cassettes. They offer higher audio fidelity. Pair them with a stereo RCA output and a USB audio interface to get great results.
- Pros: Better sound quality, good for large tape collections
- Cons: Bulky, may require additional cables or adapters
3. Walkmans with 3.5mm Output
If you still have an old Walkman (portable cassette player), you can use its headphone jack to connect directly to your computer’s line-in port.
- Pros: Compact and familiar
- Cons: May have worn-out tape heads or limited output quality
4. USB Cassette Capture Devices
These are compact USB-powered cassette players that stream audio to your computer via USB. They often come with basic software, but can be used with Audacity for better control.
- Pros: Affordable, easy to set up
- Cons: Variable build quality and audio output
Once you’ve chosen the right playback device, the next step is to connect it to your computer and record the audio using Audacity. Here’s how to do that.
Convert Audio Tape to MP3 Using Audacity (Step-by-Step)
- Connect the cassette recording device output to the audio input of your computer using an appropriate cable or audio adapters.
- Download and install Audacity on your Mac or PC. Once installed, launch it and prepare to set your input source.
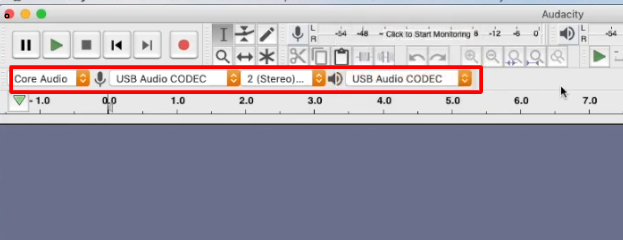
- In Audacity, make sure the input is set to the correct device (e.g., “Line In” or your USB adapter).
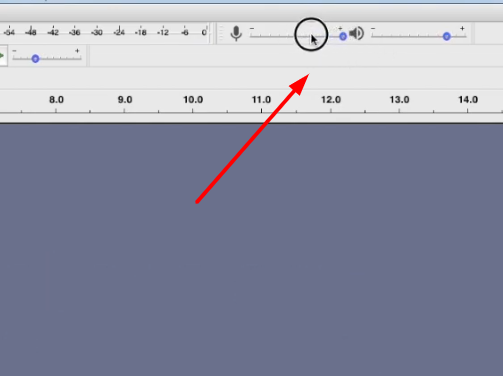
- If you’re using a mic input, reduce the mic gain to line level using the slider as shown in the image.
- Click Record in Audacity, then press Play on your tape. You should see the waveform appear.
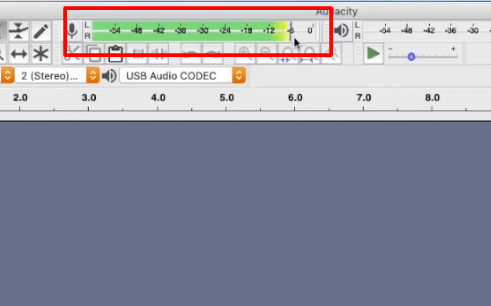
- Do a quick test recording. Press Record (through the red button) in Audacity, then press Play on your cassette deck. If you see a waveform appear as the audio plays, everything is working.
- Click Stop, then listen to the recording to confirm sound quality.

- Rewind the cassette to the beginning, press Record in Audacity again, and press Play on the tape. Let the entire side play through in real time without interruptions.

- When the tape finishes, press Stop in Audacity. You’ll now see the full waveform of the recording. Listen to the full playback to check for any issues or dropouts.
- Save the session as an Audacity project. This acts as a backup in case you need to edit or resume later. Give the project a clear name.

- Trim silence at the beginning and end of the waveform. Click and drag to highlight unwanted sections, then press Delete or go to Edit > Delete.

- Normalize the audio to bring overall volume up. Select the full waveform, go to Effect > Normalize, and use default settings (e.g., peak at –1 dB, do not normalize stereo channels independently).

- Wait for normalization to complete; you’ll see the waveform expand slightly, indicating volume adjustment.
- Double-check for any excess silence at the end and trim it out to keep the final audio clean.
- Save your work again after editing is complete.

- Export the audio by going to File > Export and choosing MP3.

- Choose a destination folder for the exported file, enter basic metadata (title, artist, album, year, genre), and complete the export.

Troubleshooting Tape-to-MP3 Conversion Issues
Here are some of the most common problems faced during the tape-to-MP3 conversion process, and how to solve them:
- Tape Player Not Recognized by Computer:
Make sure your audio cables are firmly connected and plugged into the correct input (line-in, not microphone).
If you’re using a USB audio interface or converter, check that all drivers are installed and that the device is selected as the audio input in Audacity. Restart your computer if needed.
- No Sound or Poor-Quality Recording
Double-check volume levels on both your cassette player and in Audacity. Make sure mute isn’t enabled. If the audio is distorted, lower the input volume in Audacity. If you’re only getting sound from one channel (left or right), try using a different cable or adapter.
- Dealing With Hums, Hiss, or Tape Noise
Old tapes often have background noise. Use noise reduction tools in your software (like Audacity’s Noise Removal effect) to clean up your recordings. Keep cables away from power sources to minimize hum, and regularly clean your tape heads for better sound quality.
- Files Too Large or Too Small
If your MP3 files are too large, use a lower bitrate (128–192 kbps is usually enough). If the sound quality is poor, choose a higher bitrate or export as WAV/FLAC first, then convert to MP3 for sharing or storage.
- Sync Problems (Audio Not Matching Tape Speed)
If playback sounds too fast or slow, check your tape deck’s speed setting (normal or high-speed dubbing). Some older tapes may have stretched over time; you can use Audacity’s speed/pitch adjustment tools to fix the timing as needed.
Tips for Achieving the Best Cassette-to-MP3 Results
Here’s how to get the best possible results with Audacity:
- Clean your tapes and equipment before each use to reduce hiss and extend tape life.
- Record at the highest possible quality in Audacity (WAV or FLAC), then convert to MP3 for sharing.
- Back up your files in multiple places. Use external drives and cloud storage to prevent accidental loss.
- Label and organize your files immediately in Audacity with track names, dates, and details.
- If you don’t have a cassette recording device, a workaround is to record audio playback with an external mic in a quiet environment. For example, you can use Hollyland LARK M2 wireless microphone with AI noise-cancelling feature.
Conclusion
Converting your old audio tapes to MP3 is a simple way to preserve precious memories and enjoy them on modern devices. With a cassette player or USB converter and Audacity, you can easily record, edit, and save your tapes digitally—bringing analog sound into the digital age with just a few steps.
FAQ’s
Q: Can I improve old or fuzzy tape audio with Audacity?
Yes, Audacity offers several tools, like Noise Reduction, Equalization, and Amplify, that can help clean up background noise, reduce hiss, and boost weak recordings. Experiment with these effects to get the best sound from your tapes.
Q: What’s the best bitrate for MP3 conversions?
A bitrate of 192 kbps offers a good balance between audio quality and file size for most tapes. If you want higher fidelity, you can use 256 or 320 kbps, but your files will be larger.
Q: Are there copyright issues with old tapes?
If your tapes contain commercially released music or broadcasts, sharing them publicly might infringe on copyright laws. Personal or family recordings are fine for private use.
Q: How long does it take to digitize a tape?
Digitizing happens in real time. For example, a 60-minute tape takes 60 minutes to record, plus extra time for editing, exporting, and organizing your files.
