.png)
With seamless transitions, DaVinci Resolve enhances the potential of the videos with its dynamic quality of connecting the bridges. And with modern technology, it provides solutions to enrich your videos with smoothness and momentum. However, the frustration of the inability to add transitions may engulf your productivity and halt the quality of work.
The elegant Davinci Resolve provides modern solutions to video editing with its fastest technology and brings life to smooth videos. Therefore, it’s vital to identify the significant transition problems and implement practical solutions to bring creativity.
Why won’t Davinci Resolve let me add transitions?
The modern-day DaVinci Resolve is essential for adding transitions and bringing smoothness and clarity to work. The issues may range from software to video overlapping when encountering the transition challenge. However, whatever the reason, it’s essential to understand the problems to bring seamless transition in your videos.
So, there could be several reasons you cannot add transitions in Davinci Resolve. Some of the significant common issues include:
Case no 1- When Clips are not adjacent
The video clips you try to add transitions between are not adjacent.
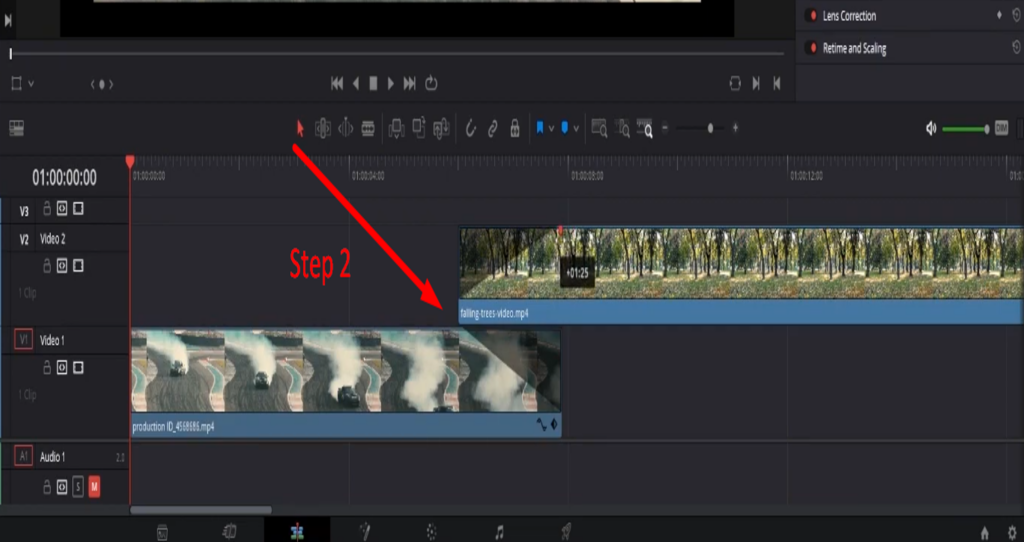
Case no 2- Clips are in different tracks
When the video clips are in different tracks, you must use the “Swap Clip” command to move them to the same video track.
Case no 3- Clips length too short
When you are trying to add a transition to a clip that is too short.
Case no 4- Selecting the right transitions
You have yet to select the resolve transition you want to add before applying it.
Case no 5- Software issues
After updating the Davinci Resolve, video transitions may cause significant playback lag disrupting the video quality.
How to solve these transition issues?
There are multiple methods to solve transition issues and choose the suitable method after carefully examining the transition issues. And this comprehensive guide will empower you with essential solutions to solve general problems to enjoy smooth transition videos.
Hereunder enlisted suitable solutions for adding transitions:
Case no 1- When clips are not adjacent to each other
Step 1- Trim the Videos
Sometimes, the video clips are not adjacent during the drag-and-drop video transitions. First, the video should have enough handle or, in simple words, the length. It’s important to trim or cut the videos and make a color adjustment to make them look similar.
When there’s enough room for transition, you can adjust the length and smoothness of the change.
Step 2- Using New Compound Click
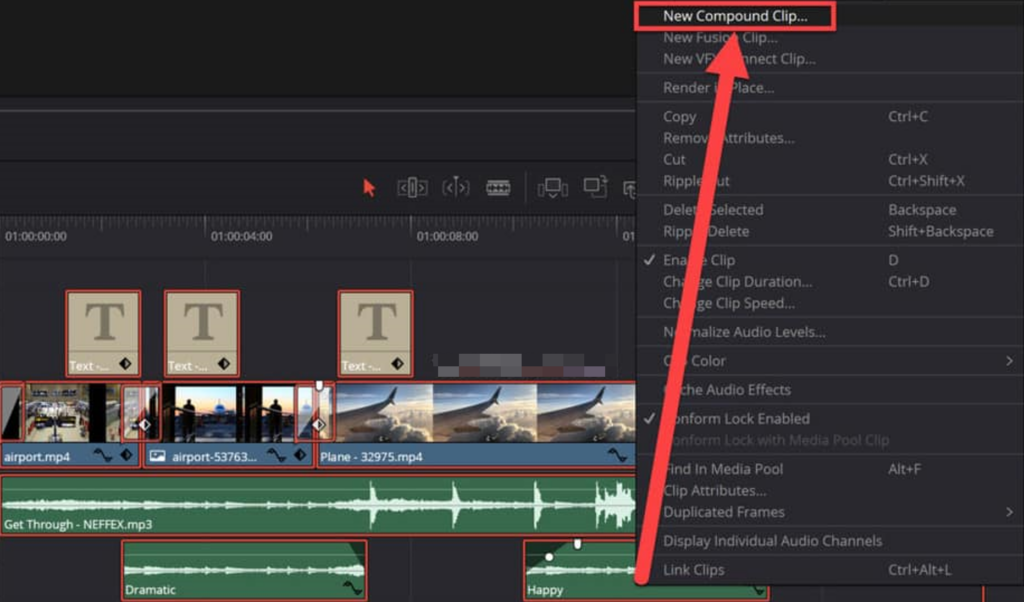
With “New Compound Clip,” merging different clip or image sections becomes handy and provides a seamless transition. However, when clipping the images in the conform room, they appear “unable to join because the two clips do not share the same master clip.”
So, when making changes to the original videos, use the compound clip. It’s essential to properly trim the videos from the first end and the start of the second video. So, the New Compound click will cut and color the clips, making them combine two lost pieces.
Case no 2- When clips are in different tracks
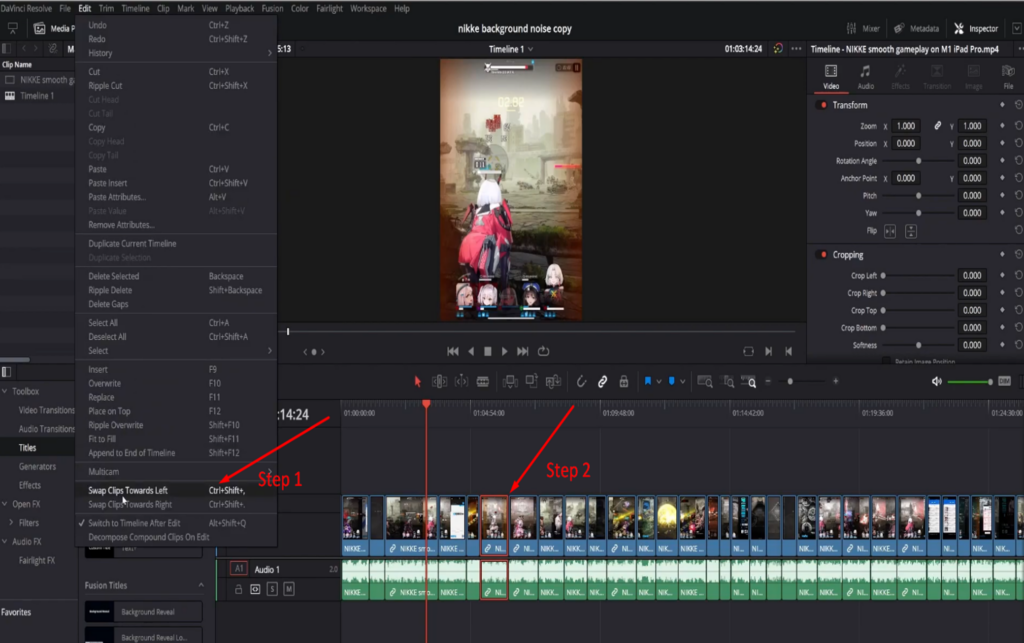
Step 1- Using the “Swap Click”
For different audio tracks, Swap Clip is proficient in merging distinct resolve tracks and enhancing the overall quality of the video. Sometimes, swapping the clips does not work as expected because it will measure the distance between video tracks and does not bother focusing on the cuts and overlapping.
Step 2- Swapping the videos
Also, turning off the layered audio editing will prevent the audio clips over the same track, for left or right swapping of the audio tracks, simple commands Ctrl+Shift+, and Ctrl+Shift+. And you can also make vertical audio transitions or snap different audio tracks with simple easy-to-go controls.
Method 2- Adjusting by Flatten Track Layers
Besides this, the audio will shorten and overlap when the same audio tracks collide. And to avoid the overlapping problem, Flatten audio track layers will prevent overlapping and also helps in the collision of different channels.
When snapping the different audio tracks, hold shift as you drag the audio tracks and ensure to turn off the ‘linked move across tracks’ for perfect joining of the audio tracks.
Before swapping the videos, ensure transparency exists between composing video clips and that they are in perfect condition.
Case no 3- When the clips are too short
Method 1- Trim Edit Mode
For transitions, the length of clips matters because Resolve consumes a significant portion to bring smoothness. So, with Trim Edit mode, you can access the ‘selection mode,’ enabling you to select the video portion.
Method 2- Crossfading the clips
Crossfading the clips is essential because giving enough room for clips to merge and compile. So, cut a few seconds from both merging sides before butting the clips.
By positioning the cursor inside the clip’s right boundary, you can drag it to the left or right and push other video clips behind it along a different timeline. When enhancing the single clip length, it’s vital to drag it to the right and make enough room for transition.
Method 2- Slowing down the speed
Another way to enhance the length of videos is by slowing down the speed and adding ins and out to improve the measurement. There is no need to overwrite the videos when enhancing or shortening their size, and you can do this by selecting a significant portion to insert the images.
Case no 4- Selecting the right transition
Step 1- Navigating the edit tab
After navigating the Edit tab, you can select multiple videos for the transition by dragging them or moving them by keyboard command.
Step 2- Using Effects Panel
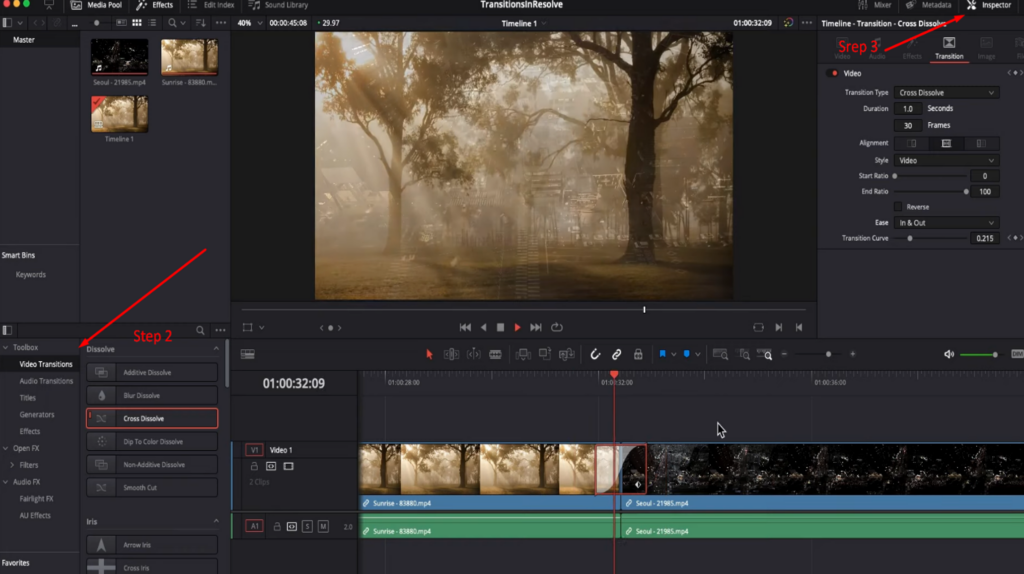
From the Effects Panel, you can access multiple transitions and adjust the transition length by rolling the edges or handles of videos and overlapping them.
With over dozen transition modes, selecting the right transition improves the overall quality of work. Choosing between the video transition and how to bring clarity between two clips is usually challenging for beginners.
Step- 3 Inspector Panel
Furthermore, locating the Inspector Panel implies other applications like smoothness, duration, and specific transition features. Additionally, ensure that the timeline settings, such as the resolution and frames of every clip, are compatible.
And selecting the transitions is entirely dependent on individual preferences; however, it’s best to use them according to video content and motion effects.
By now, it has become easy to locate and apply changes to the existing transition, and choosing the type of transition that brings smoothness to your projects is essential.
Case no 5- When video formats are not compatible
Method 1- When the File is corrupted
But after converting the media, sometimes it appears that “Media Offline” or “The file has no audio or video streams,” depicting video is either corrupted or the software does not support the video format.
The best solution is to remove the media from media storage and again importing into Resolve.
Method 2- Using the right formats
Although DaVinci Resolve supports a wide range of formats, selecting formats carefully for seamless quality is essential. It supports the MP4 and MOV media formats, and a WinX HD video converter is best for Windows users.
Also, the ProRes Codec files are acceptable by Resolve, but it usually consumes ample storage for better function. After editing the video formats, you can import multiple videos for transition. And latest versions are necessary, so it’s best to choose the Cineform codec for editing and storage.
Bonus tip: How to Add Transitions in DaVinci Resolve correctly

DaVinci Resolve provides more than a dozen transitions, and understanding the proper techniques is essential for smooth, crunchy, quality videos. After importing good-quality video clips, follow the underlined steps for smooth transitions.
Step 1- Activating the Trim Edit Mode
After importing the clips, ensure that the video clips have enough room for trimming and overlapping. For this, a few seconds of clips overlap to bring smoothness. And overlapping is essential for clips that are not adjacent to each other, and color-grading brings similarity.
Step 2- Click on the Effects
And use the Effects Library and edit tool to maintain the video clips’ length and timing. Avoid using too-long or too-short transitions, for this will halt the overall productivity of your work.
Step-3- Navigate and apply transitions
Drag and drop the appropriate transition between the clips with sound timeline effects. You can drag with Ctrl+T (for Windows users) and Command+T (for MacBook users) for default transitions.
Note: If you only add video transitions, then make sure to click on the Unlink Button from the horizontal menu bar.
Using Custom Transitions
Adding transition is simple yet complex for professionals with multiple transition effects; however, it will bring smoothness to compositions. You can also create custom transitions for your special projects by selecting the Fusion Cross Resolve and adding tools for blurs and zooms.
However, Glitch and Fusion transitions provide smoothness to marketing videos. So, it’s essential to use the resolve transitions according to the content.
When editing in DaVinci Resolve, accurately monitoring your video playback is crucial, especially when troubleshooting transitions. A high-quality camera monitor ensures you immediately spot any frame-level issues, helping you guarantee smoother editing workflows and perfect transitions.
Frequently Asked Questions
How can I make fade transitions in DaVinci Resolve?
For this, place two video clips or images in one place and select the Cross Dissolve or any other transition from the Effects Library. You can adjust the length of clips, making them overlap perfectly and adequately applying the crossfade.
So, aligning and overlapping the two video clips and adjusting their transition length and place is essential.
Why can’t I put the transition between the clips?
It’s common yet essential to understand that approximately 30 frames must transition from both clips for a proper transition. When joining the two adjacent clips, ensure the video clips have the appropriate length because, during the transition, it will cut the joining frames of clips.
Also, when specific clips need the proper ins and outs, adding transitions becomes exhausting. So, ensure that every video clip is perfect for performing the video transitions with its minimum duration length.
Why are transitions not running smoothly on my video clips?
The transitions are essential to bringing clarity and smoothness to work, but sometimes, due to dense resolutions and high-motion effects, it needs to be simplified. Also, Cross Dissolve and other transitions may pop up with the same issue. It’s essential to optimize your playback resolutions and make sure there’s enough space for the handles.