.png)
If you’re reading this article, it is confirmed that you need help on how to export stems in Logic. Well, you’re not the only one who isn’t sure about the entire process. In fact, many users find themselves helpless when it comes to exporting stems correctly. Unlike other tools, exporting stems in Logic is a complicated procedure. You need to check your settings to avoid making mistakes.
What’s good about this article? You will learn the meaning of stems and why you must export them. Most importantly, it will teach you 4 different methods to export your stems using Logic Pro or Logic Pro X.
In addition, 3 bonus tips await you on exporting other audio files, such as MIDI and AUX in Logic. Besides, all the tutorials in this article are supported by screengrabs, so you can know you’re following the steps correctly.
So what are you waiting for? Let’s get scrolling.
What are Stems in Logic?
If you are an intermediate music producer or a newcomer to this field, you must have heard much about the term stems. People often get confused with this word or take it as an interchangeable term for tracks, which is incorrect.
In the world of music production, a stem is an element or a single part of a song that is exported as a single file. Imagine you have produced a song and used different instruments in it. You have assigned a new track for each instrument, such as drums, violin, and guitar, as well as recorded vocals.
So, if you export a single file, like the drum piece, from the cluster of audio elements (instruments and tracks), it will be called a stem. Therefore, stems are various files with or without effects that you can export simultaneously from Logic.
Why Should You Export Stems in Logic?
There are many reasons for exporting stems in Logic Pro or Pro X. First, stems allow engineers to mix and master the entire song by working individually on each element. So, if you’re the main person behind the production, stems can help you focus on fixing every single element used in the song. As a result, you will be able to have a better version of the song.
The second reason you should export stems when using Logic is the ease of collaboration. If you’re working with a sound engineer, they might ask for stems rather than the entire project for mixing and mastering. This will allow the engineer to work on the elements without messing around the project settings.
The third reason for exporting stems is using single or multiple elements for live performance. The stems can work as a backing track, allowing you to sing the words along with the music.
4 Techniques How to Export Stems in Logic Pro or Pro X
Whether you are using Logic Pro or Logic Pro X, you can use these 4 methods to export stems. Each method consists of different steps you need to follow as they are. So let’s begin.
Method 1: Exporting All Stems as Your Audio Files in Logic
In this tutorial, you will learn how to export the total number of stems together as audio files. This method will help you save your stems in WAV files in the raw/original audio format. Assuming you have all the stems open in Logic, here’s what you need to do.
- Step 1: Once you can see all the stems in the interface, play the entire file to make sure no track is muted unintentionally. If it is muted, but you didn’t do it, it won’t be exported as your stem in your Mac.
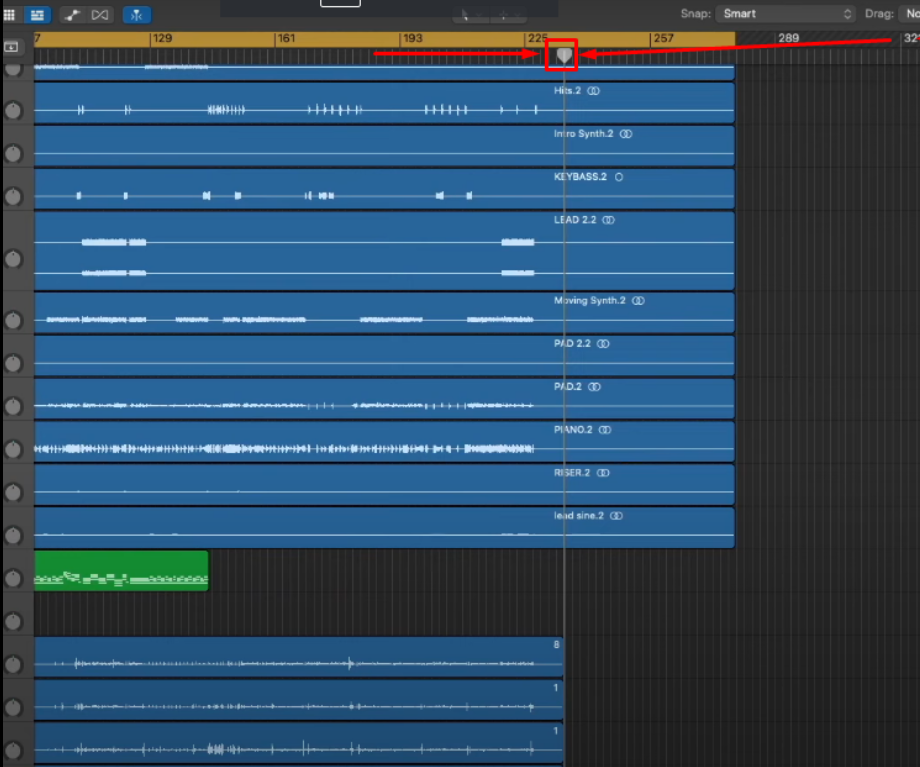
- Step 2: After confirming, you may see the ‘Playhead’ in the middle of the audio files like this.
Therefore, you must ensure it is placed right in the beginning where ‘1’ is mentioned on the scale. To do that, take the cursor on the playhead and drag it at the beginning of the scale (exactly at 1).
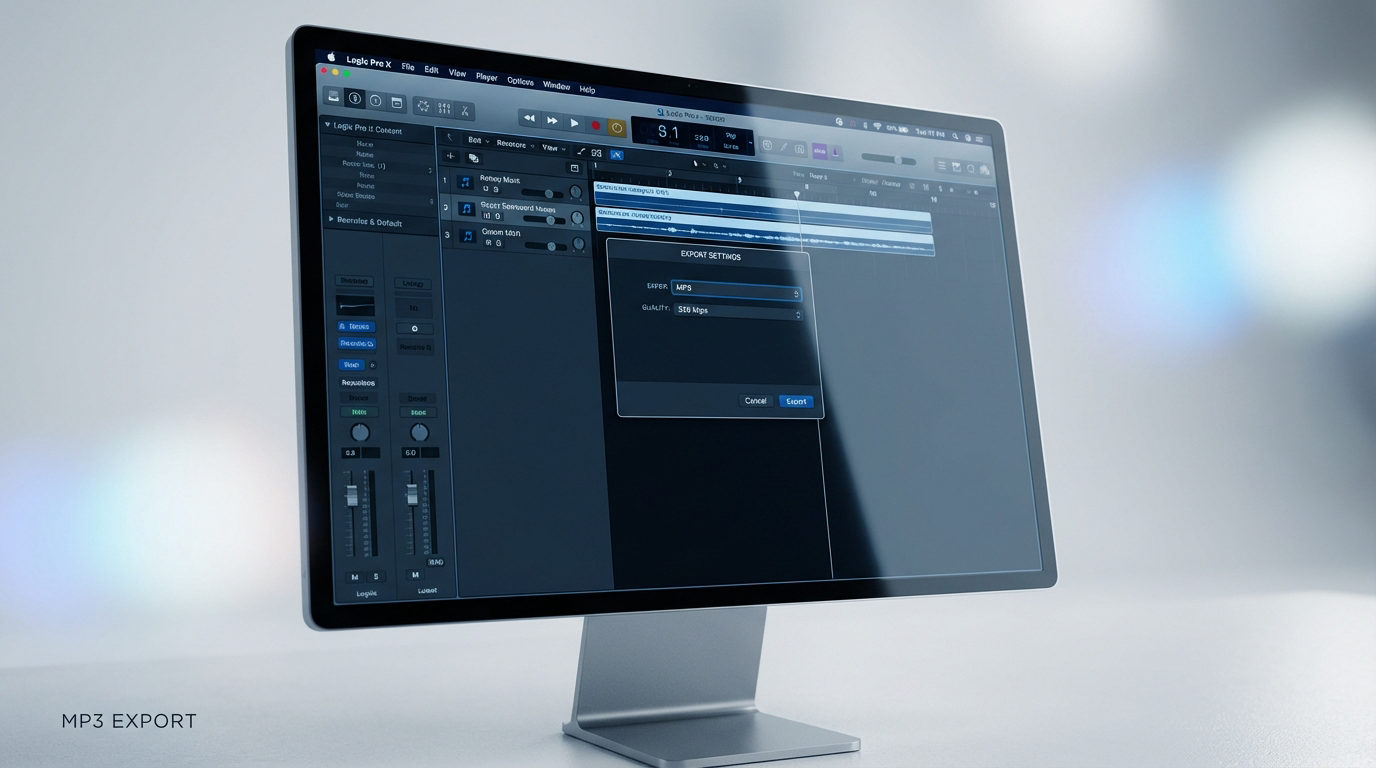
- Step 3: Look at the top menu and click the ‘File’ tab. Scroll down to the ‘Export’ and click the ‘All Tracks as Audio Files’ option.
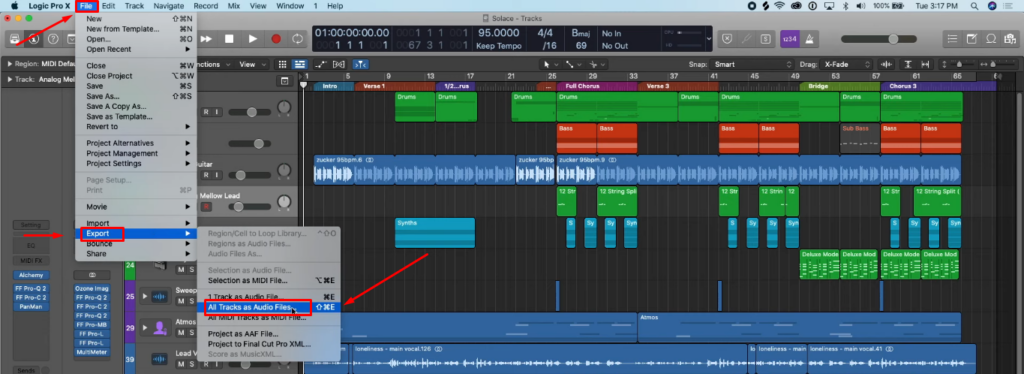
- Step 4: This will take you to the export settings in Logic by opening a dialog box.
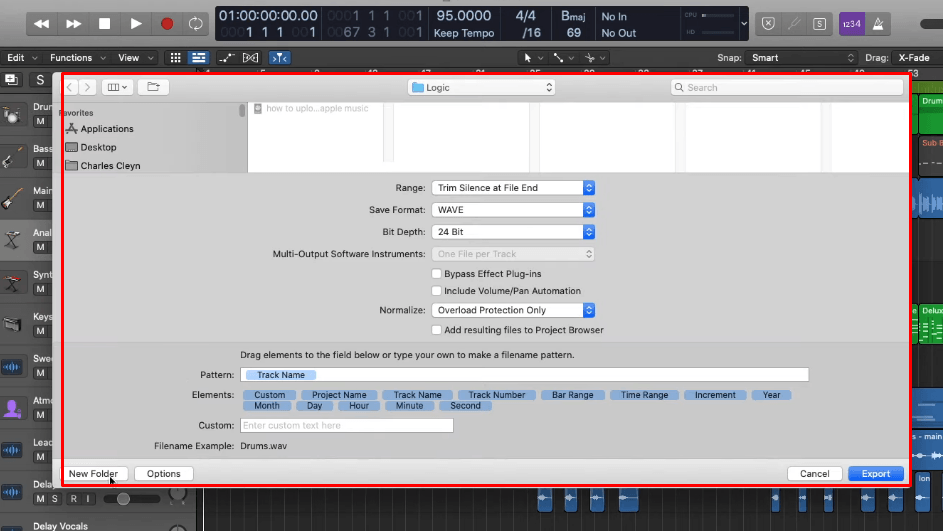
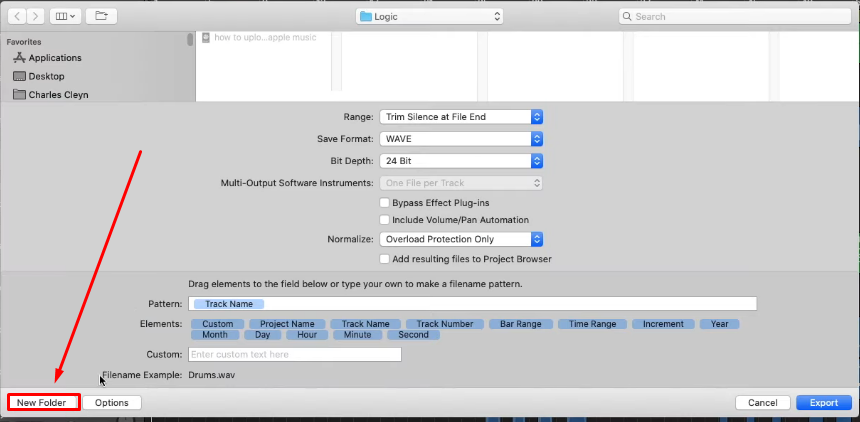
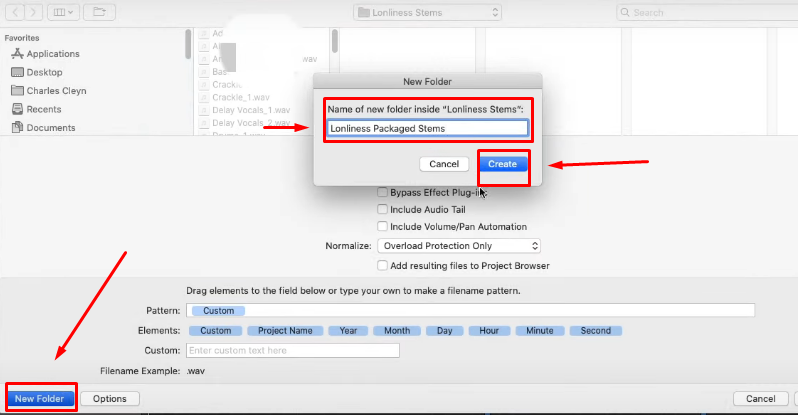
- Step 5: Since you need to export stems, it is essential to create a new folder so you can easily obtain the files the next time you need them. Click the ‘New Folder’ button at the bottom of the dialog box and type your preferred name.
As you can see in the screenshot below, the folder is named ‘Loneliness Stems.’ However, feel free to keep your own name.

- Step 6: For this method, the range is selected as ‘Trim Silence at File End.’ Whereas the file format is ‘Wave’ and 24-bits is the chosen ‘Bit Depth.’
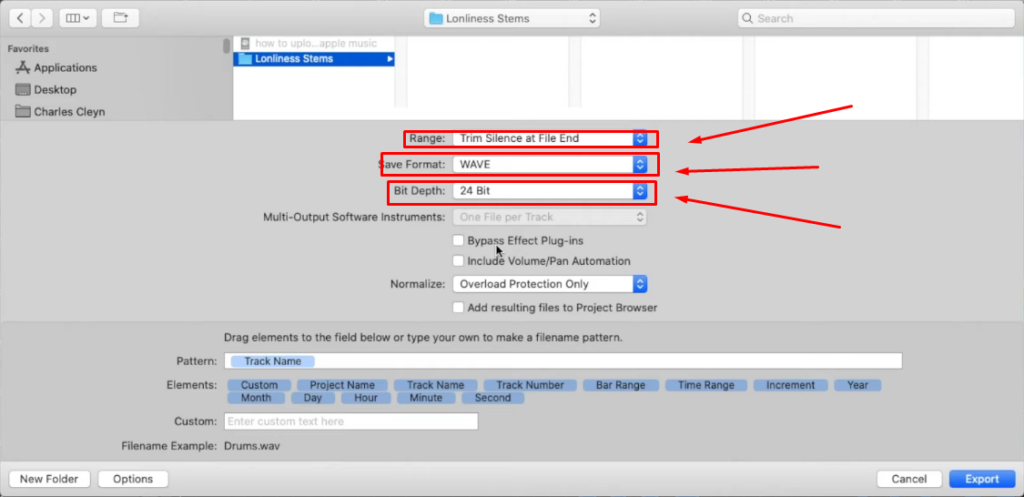
This means that all stems will be exported without including the silent parts if they are present at the end. Moreover, all the files will have 24-bit quality and be saved in wave format.
- Step 7: Next, leave the ‘Bypass Effect,’ ‘Volume/Pan,’ and ‘Project Browser’ options unchecked. Also, select ‘Overload Protection Only’ from the ‘Normalize’ dropdown menu.
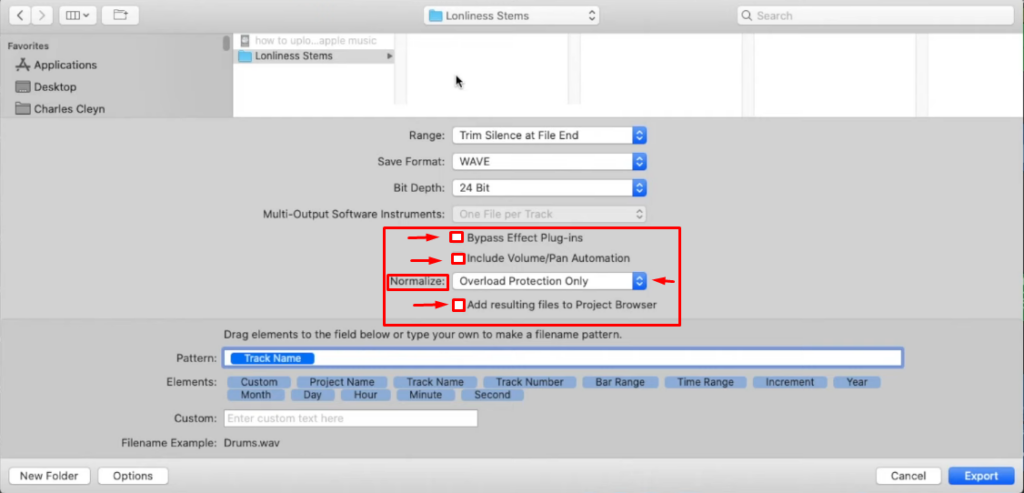
Sticking to these settings means the stems will be exported in their original form (without any effects or plugins if used or panning).
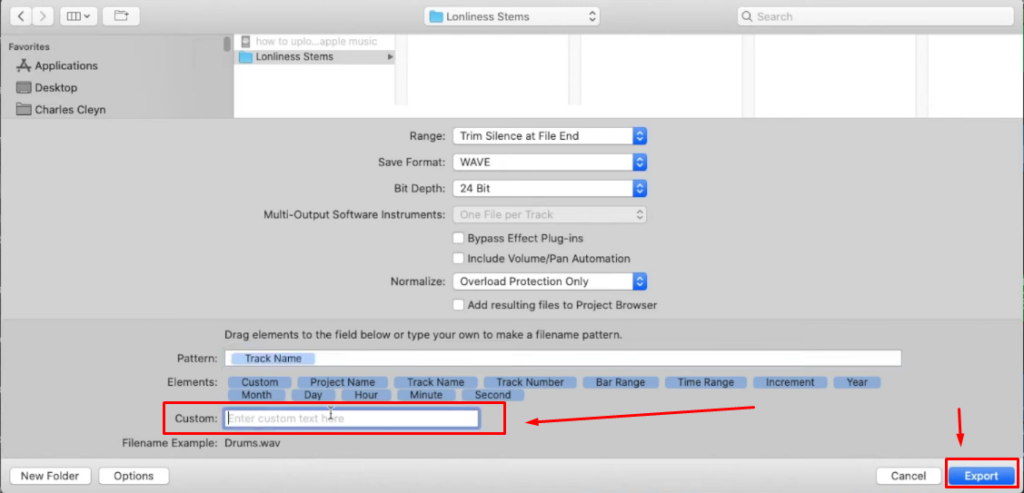
- Step 8: In the ‘Custom’ text field, you can name the stem before exporting it to your computer. But since you are exporting all the files in one go and assuming that the tracks are already named, such as ‘drums’ or ‘guitar solo,’ there is no need to use this option. Just click the ‘Export’ button to begin the progress.
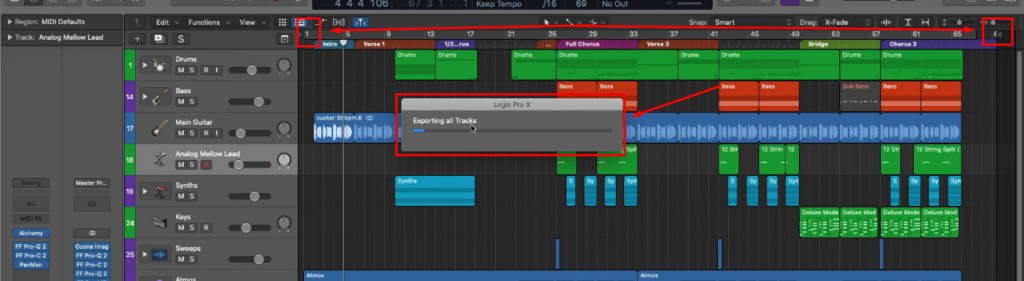
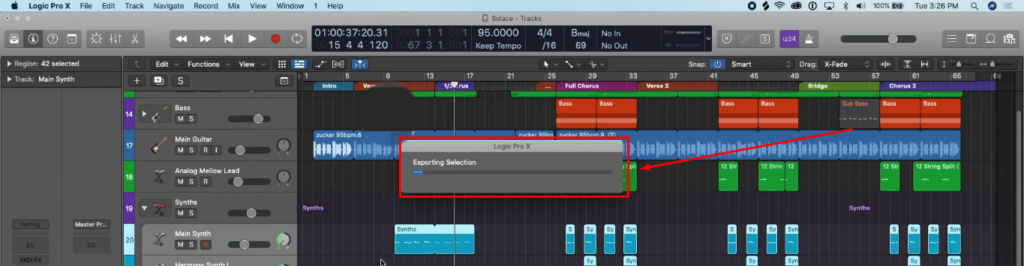
- Step 9: As soon as you press the Export button, Logic will begin the process from the selected points, as seen in the screenshot.
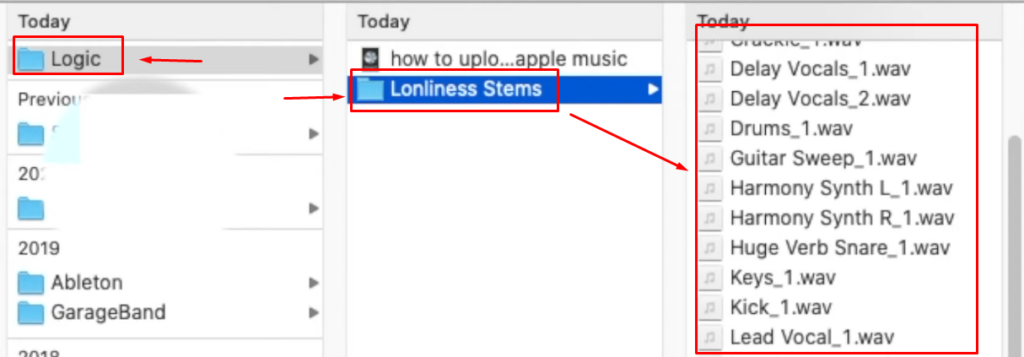
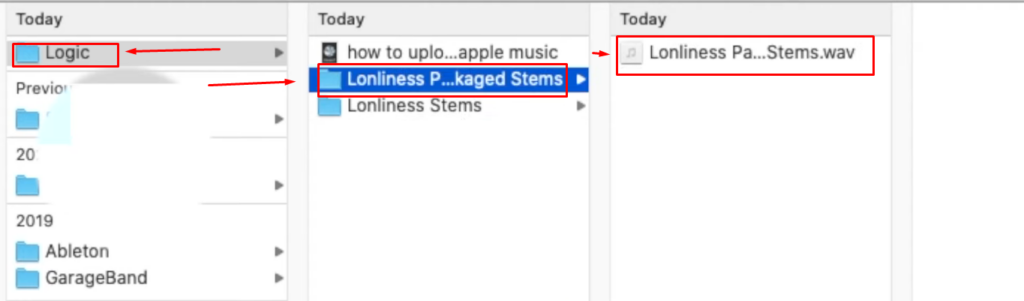
- Step 10: Now locate the folder in your Mac to see all the exported stems.
Method 2: Export Stems Packages as Your Audio Files
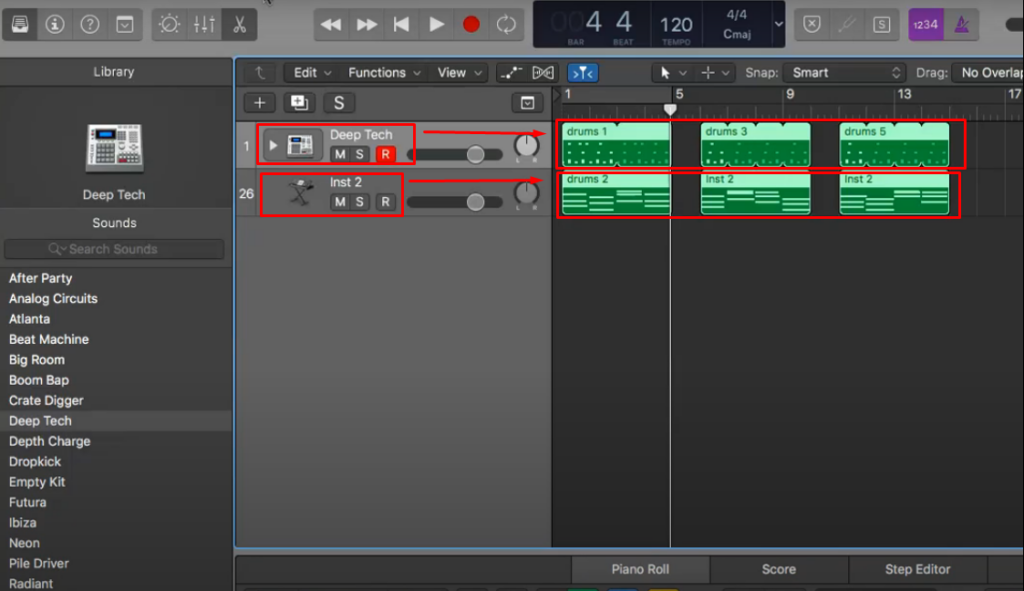
The second method teaches you to export stem packages as audio files. Stem packages are groups of the same instrument you create during the music production. For example, a stem package for drums will be ‘hi-hats,’ ‘snare,’ ‘drum rolls,’ and more.
Exporting stem packages will save the entire variations of drums used in the song in one single track. The same goes for other instruments, such as synths, guitars, etc.
- Step 1: Open your project files in Logic.
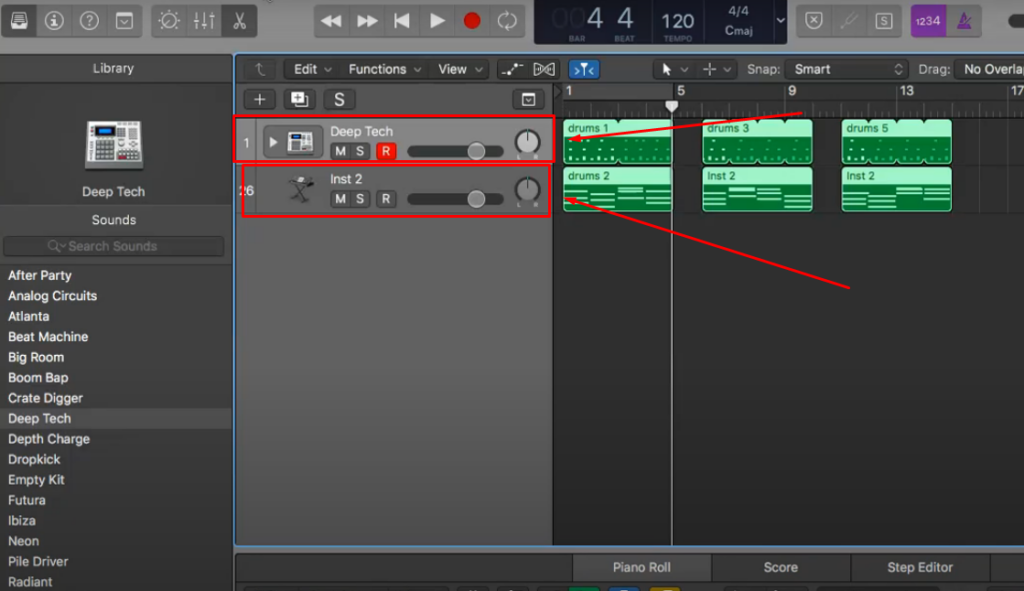
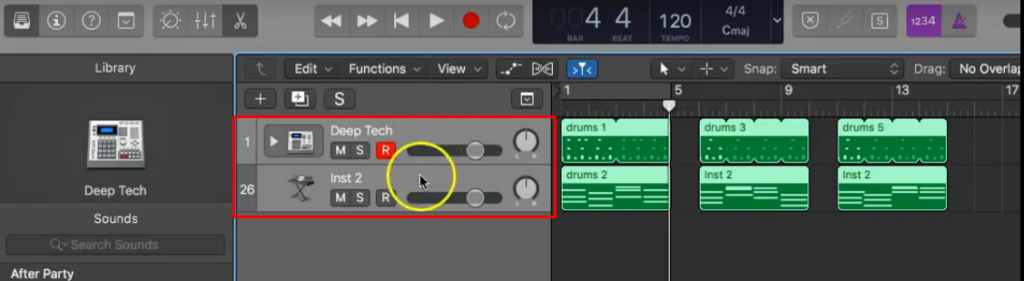
- Step 2: On the left side of the main screen, you will find different tracks with instruments. And all packaged/grouped instruments will have a dropdown arrow icon like this.
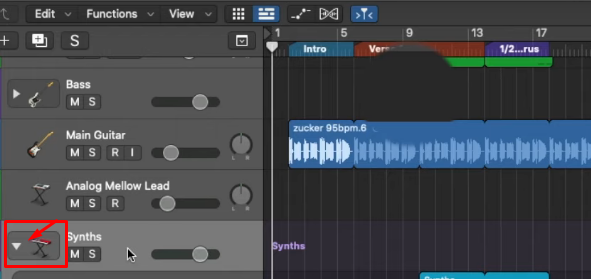
- Step 3: Click the icon to see all the packaged variations of that specific instrument. For instance, you can see that after clicking the dropdown error of the track ‘Synths,’ Logic shows a number of Synth’s pieces used in the song.
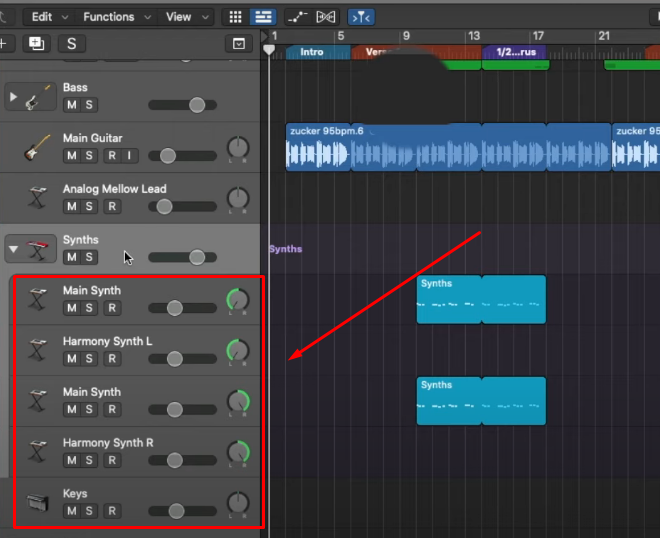
So, the goal is to export this specific package to your computer.
- Step 4: Select all the packages of the same instrument.
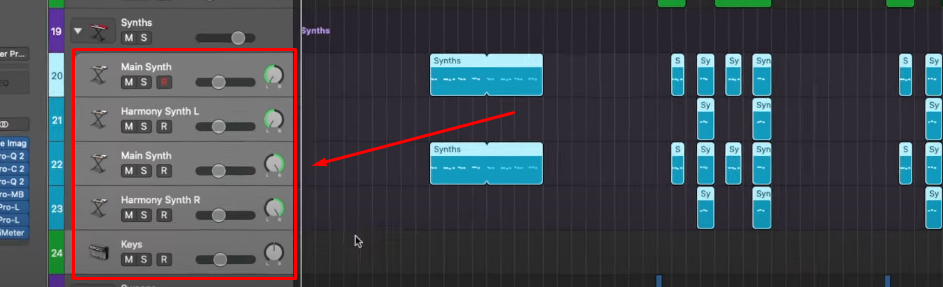
- Step 5: Go to the ‘File’ tab. Hover on the ‘Export’ option and click the ‘Selection as Audio File’ option. While performing this action, double-check if all the desired packages are selected. Any missed track will not be part of the export process.
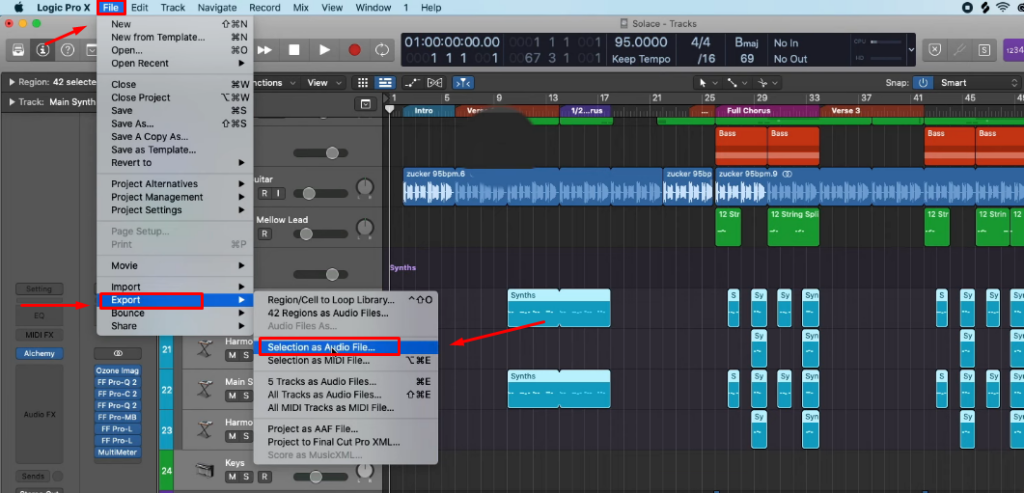
- Step 6: As soon as you choose the option, the ‘Export’ dialog box will appear on your screen. So, click on the ‘New Folder’ button and name the folder of your stems package. Then click the ‘Create’ button.
- Step 7: You can leave the export settings as default or amend them as per your requirement. Then hit the ‘Export’ button.
- Step 8: Logic will take a couple of seconds or minutes, depending on your file size, to complete the export process.
- Step 9: Locate the directory where you saved the stems package. Open the folder that you named earlier during the export process. And you will see the stems package WAV (or other audio formats you selected) in the folder.
Method 3: Exporting Stems with Effects and High Audio Quality
This method on how to export stems in Logic comes with a few changes in the export settings. In the previous two tutorials, you haven’t played much with the plugins and tools found in the export settings tab. However, this method shows you some advanced ways to export stems, whether saving a stem package or all the tracks.
- Step 1: Launch your Logic Pro or Logic Pro X and make sure it shows all the recorded tracks.
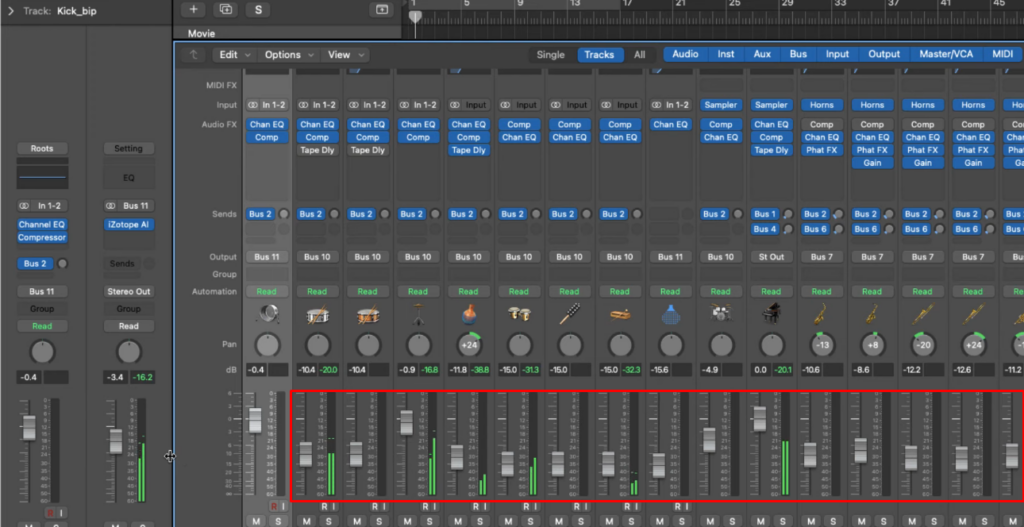
- Step 2: The next thing you must do is organize the tracks in a way that you can easily figure out what track has what instrument. One of the ideal ways to do it is to start organizing by placing all the drum tracks at the top.
And then slip the bass tracks in. Next are piano or synthesizers, vocals, guitars, etc. And once you’re done, assign colors to similar instruments. For instance, you can make all the drum tracks purple.

- Step 3: Next, go to your Logic mixer and play the song. Make sure none of the tracks are clipped; otherwise, the stems will be messed up. In case you find any clipping issues, correct them immediately before moving forward.
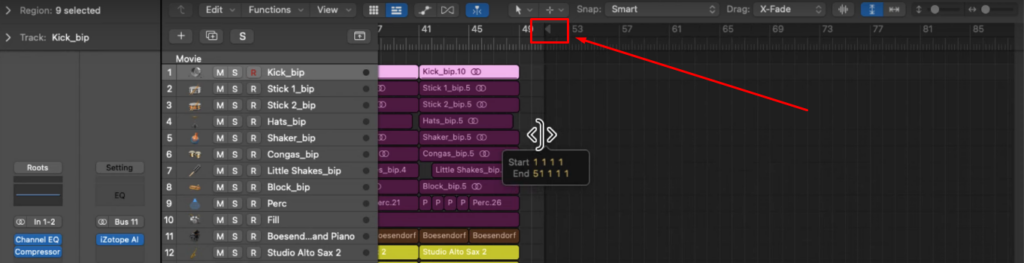
- Step 4: Go back to the main tracks area and look for the ‘Project End Locator.’ It will appear like two arrows in the opposite direction ‘<>.’
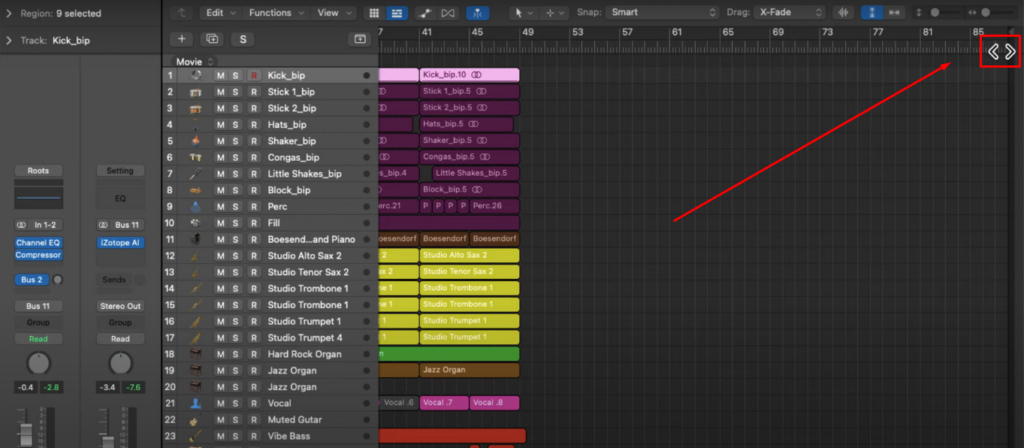
- Step 5: Click and hold the locator icon and pull it back to the bars where all the tracks end. It is a good idea to place the locator 2 or 3 bars away from all the longest tracks. Doing so ensures that effects like reverb or echo will be included in the stems after export.
- Step 6: Reassure that all tracks are labeled correctly.
- Step 7: Next, go to the ‘File’ tab, choose ‘Export,’ and select the ‘All Tracks as Audio Files’ option.

- Step 8: Here’s the most intensive part of this method – the export settings.
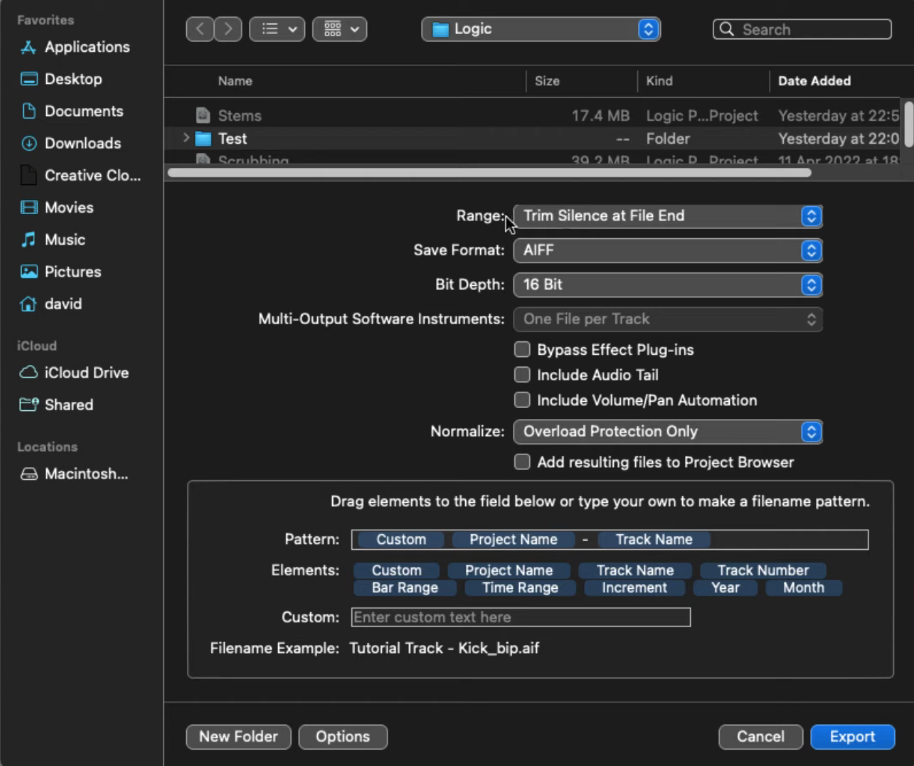
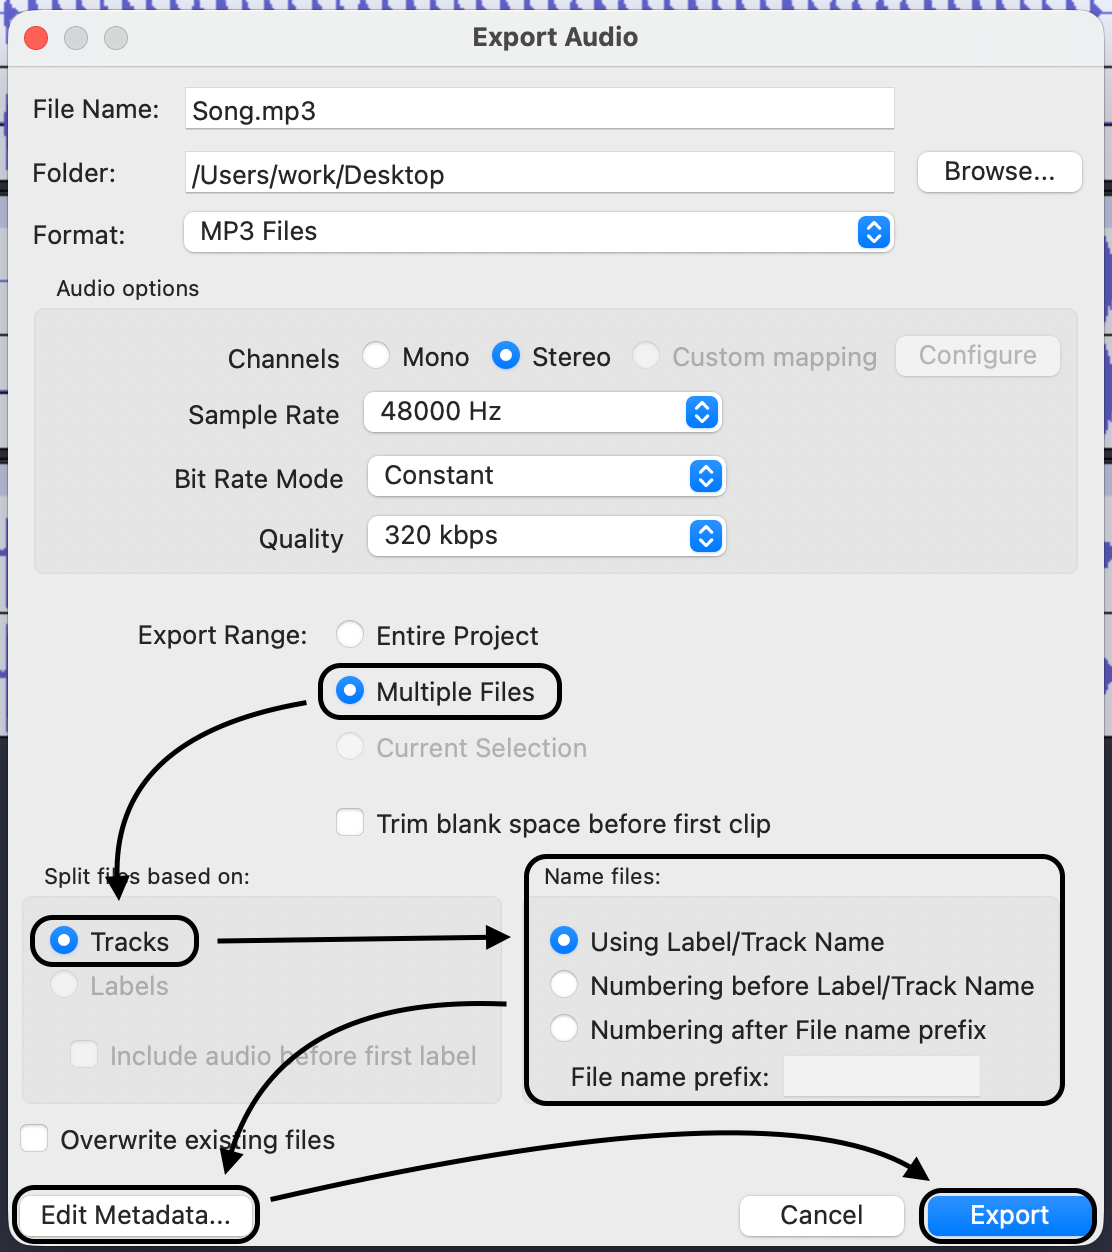
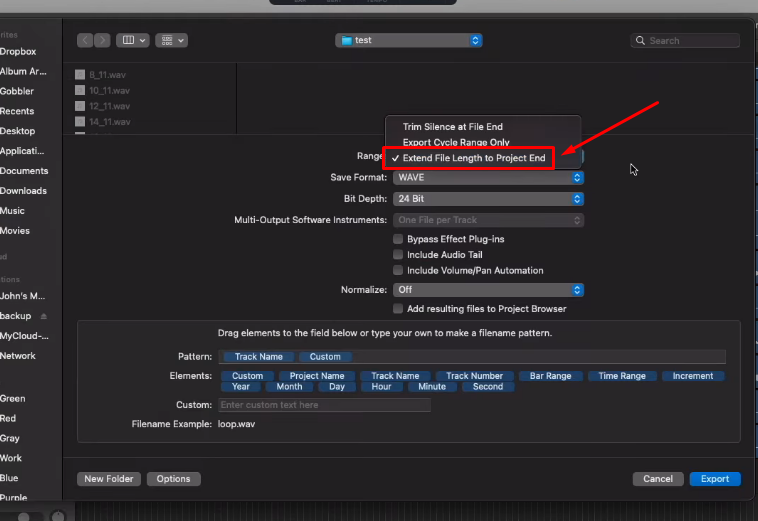
Click on the ‘Range’ dropdown menu, and you will see three options.
- Trim Silence at the FIle End
- Export Cycle Range Only
- Extend File Length to Project End
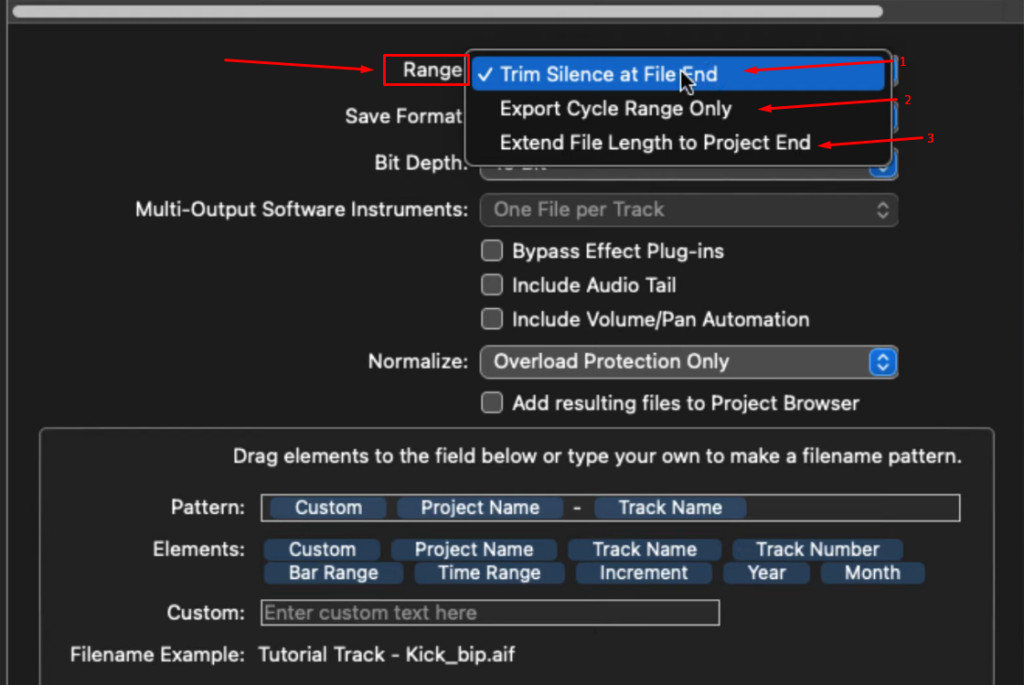
As you know that the ‘Trim Silence at the File End’ option will exclude the silent areas of the song present at the tail (see Method 1 step 6). The other two options will export the entire song without excluding any parts. However, if you choose these two options, you will need to mark the starting and ending points.
- Step 9: Right below the ‘Range’ lies the ‘Save Format’ option. In this dropdown menu, you will see three options:
- AIFF
- WAVE
- CAF
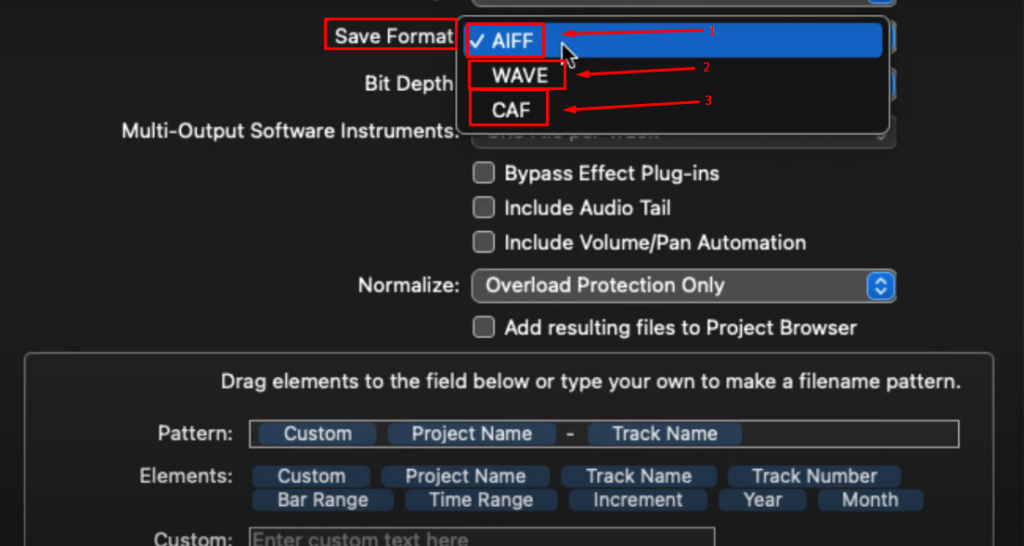
Normally, the WAVE format is used to export stems. Nevertheless, some producers or sound engineers may also request to send AIFF versions of stems. The CAF audio format is popular among Mac users, and it plays on most Mac versions starting from Mac OS 10.14 and later versions. But experts suggest either export stems in WAV or AIFF.
- Step 10: The next option is ‘Bit Depth.’

As you can see in the above screenshot, Logic gives you four bit depth options – 8-bit, 16-bit, 24-bit, and 32-bit. Selecting a lower bit depth decreases the quality, whereas opting for a higher bit depth enhances the overall sound quality. The most recommended are 16-bit and 24-bit. However, if you choose 24-bit, the file size will be more compared to choosing 16-bit.
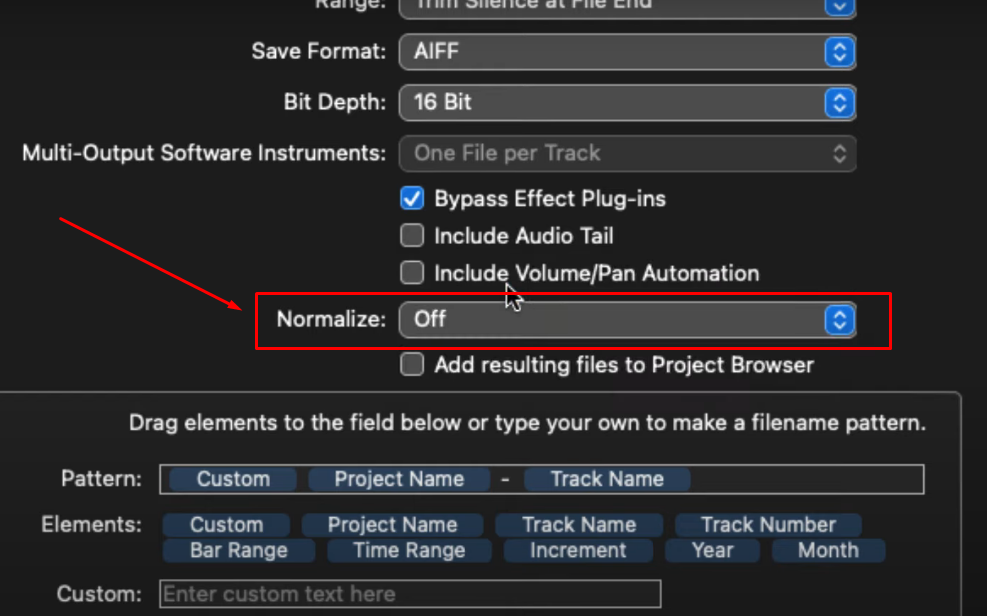
- Step 11: The next option you will see is the ‘Bypass Effect Plug-ins.’
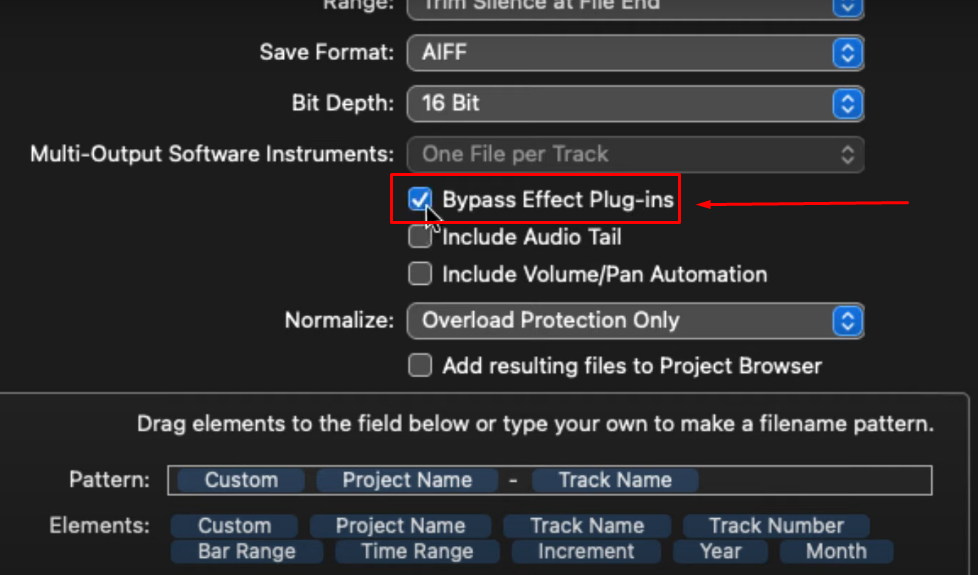
If you checkmark this, it will export stems with all the applied effects. Again, it depends on your requirements whether you want the raw version of your files or the one with effects. Generally, it is suggested to choose the Bypass option for better and more professional sound quality. But, if you are requested to send the original version, you can always uncheck this option.
- Step 12: Now, you will see two more options with a checkmark box. The ‘Include Audio Tail’ and ‘Include Volume/Pan Automation.’ You can leave the audio tail box unchecked; otherwise, the stems will have a long-running silence until the track reaches its tail. Likewise, leave the volume/pan automation option unchecked if you haven’t done any panning (adjusting the Left/Right sound levels).
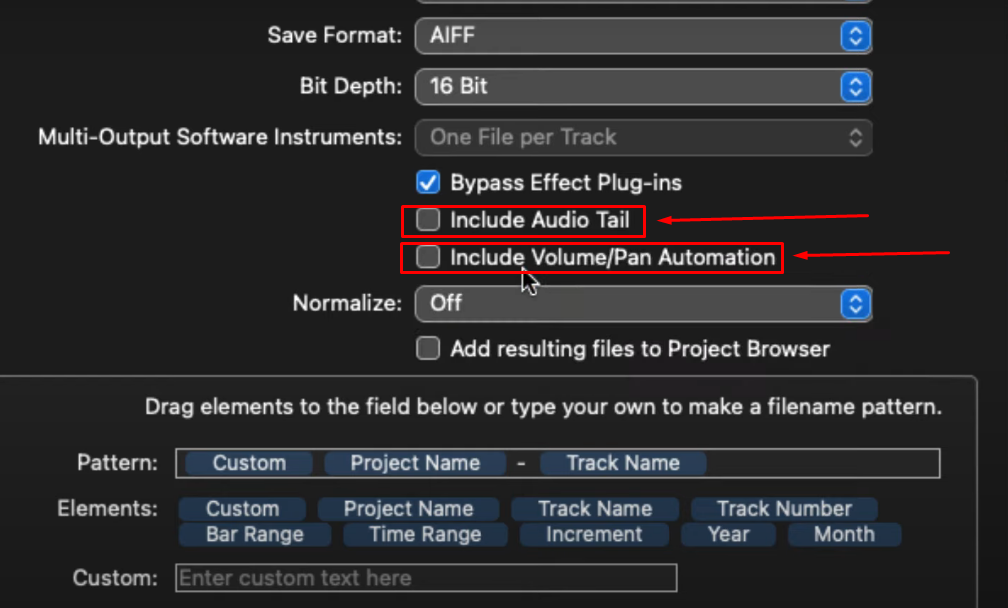
- Step 13: Just under the checkboxes, you’ll see the ‘Normalize’ feature with a dropdown menu. Click on the dropdown menu and choose ‘Off.’ Also, leave the ‘Project Browser’ option unchecked.
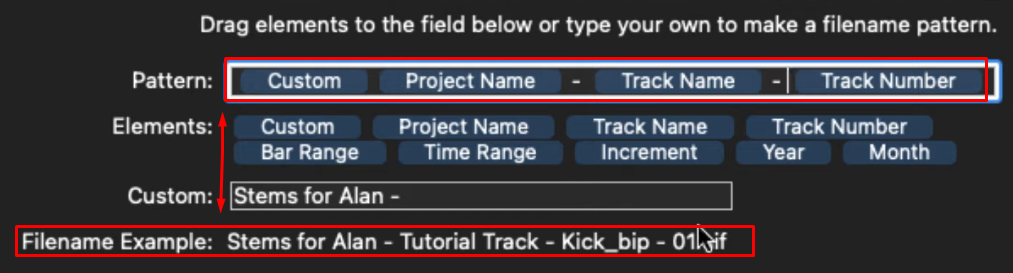
- Step 14: Once you’re done with the above steps, let’s begin keeping the name of the tracks. In Logic, you can use the ‘Filename Pattern’ option to generate names in a selected pattern automatically. This way, it gets easier to find the stems on your computer.
To do that, click on the available options in the ‘Elements,’ such as ‘Custom,’ ‘Project Name,’ ‘Track Name,’ and ‘Track Number.’ After the selection, the options will appear in the ‘Pattern’ section. Now, feel free to give a name of your choice using the textbox next to ‘Custom,’ and Logic will use the pattern for all the stems.
- Step 15: When everything is done, click the ‘Export’ button.

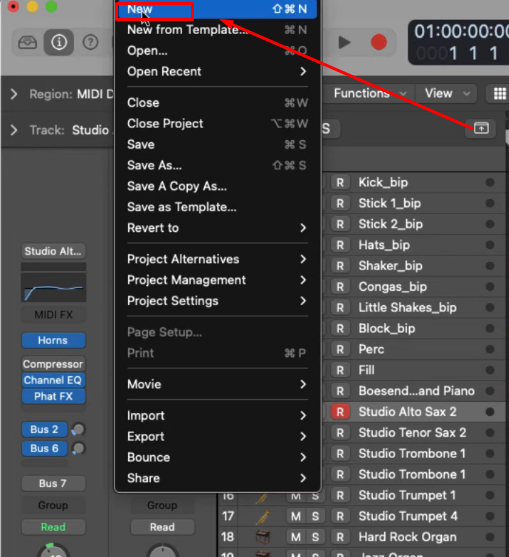
- Step 16: To check the sound quality and effects in your exported stems. Click the ‘File’ tab and select ‘New’ to create a new project.
- Step 17: Open the folder where you exported all your stems. Select, drag, and drop all of them from the folder into the blank project.
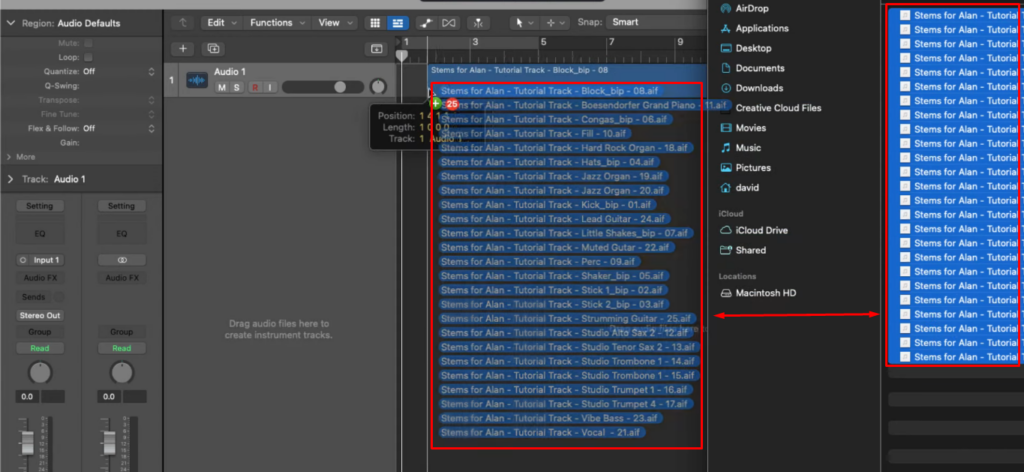
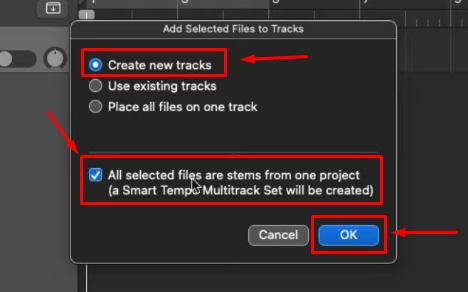
- Step 18: A dialog box will pop up, so choose the ‘Create new tracks’ option and also checkmark the ‘Smart Tempo Multitrack Set’ option. Then, click ‘OK.’
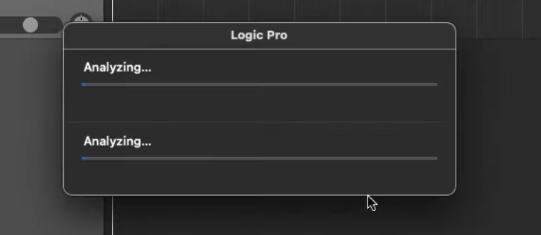
- Step 19: Logic Pro will take some time to analyze and import the stems.
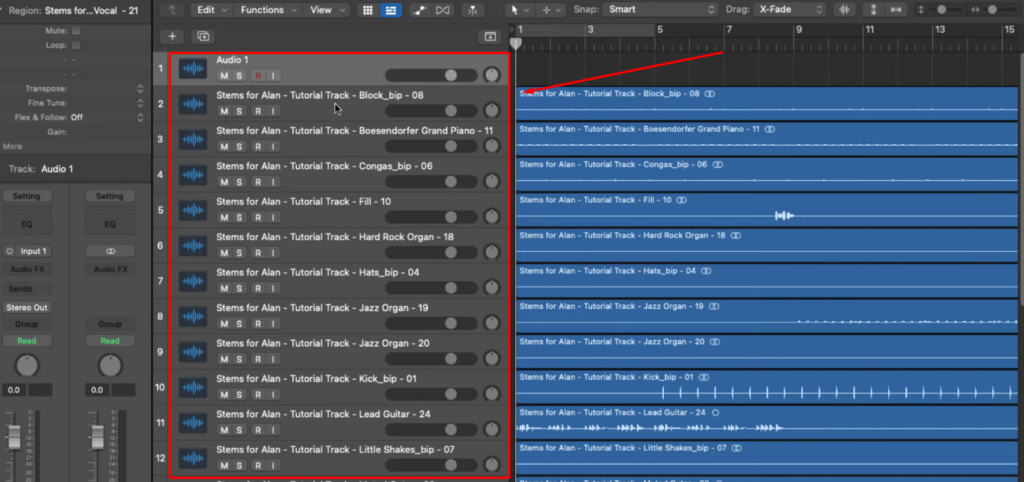
- Step 20: You should be able to see all the stems in distinctive tracks. So play them all to check whether or not they have effects, and once confirmed, feel free to use them the way you want.
Method 4: Exporting Stems with Extend File Range
In this method of how to export stems in Logic, you will learn to export all stems using the range ‘Extend File’ range option. Although it’s a simple process, you still need to select the correct areas of the song to save stems accurately. So here’s the step-by-step tutorial.
- Step 1: Open your project stems in Logic and make sure all the tracks are labeled correctly.

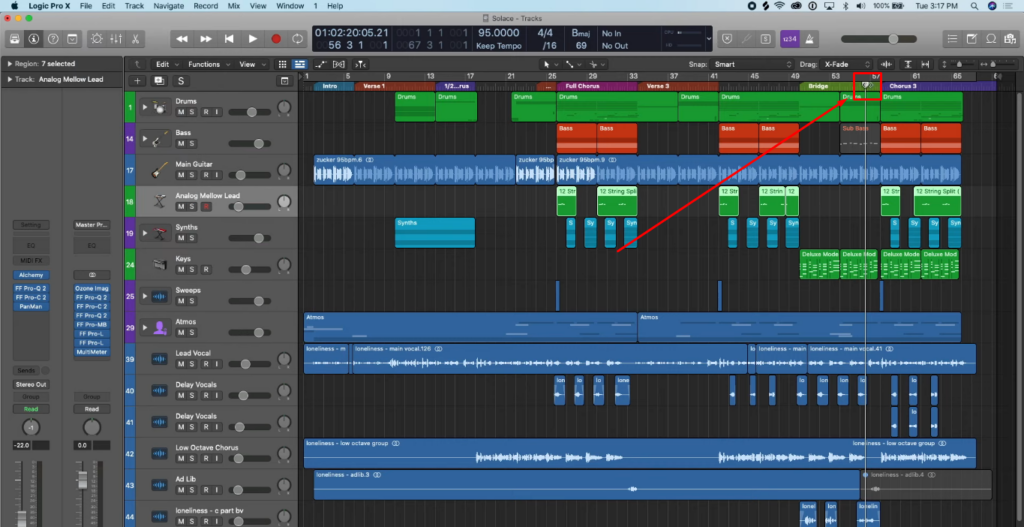
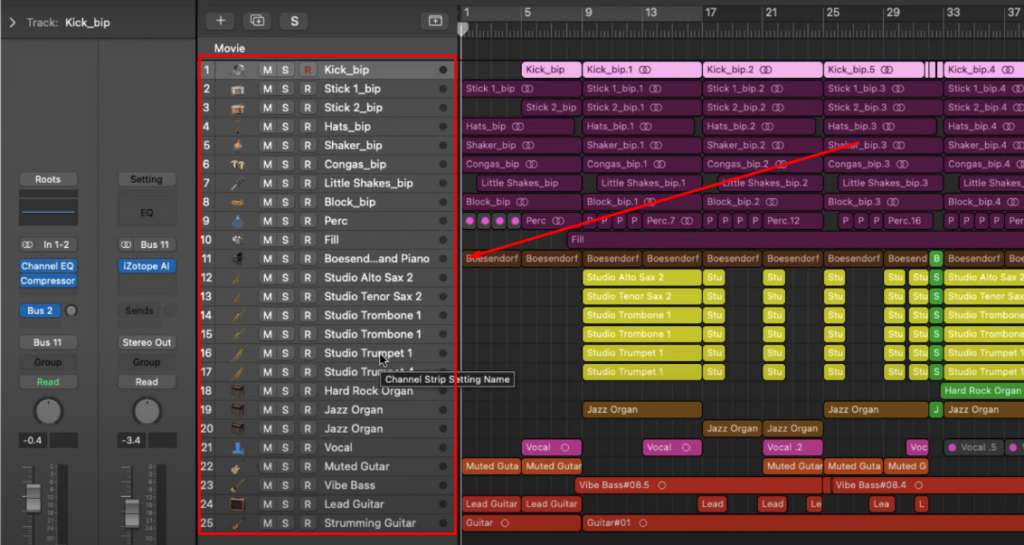
- Step 2: Go to the end of the project, where you can see the most extended tracks. Notice which are the longest tracks and where they end.
- Step 3: Now figure out the tails of the longest tracks and ensure no sound inputs (in the form of WAVE or MIDI) are present in them. For instance, in this screenshot, you can see that the ‘yellow square’ shows the tails of the track, which are empty. Whereas the ‘red box’ defines all the tracks with audio signals.
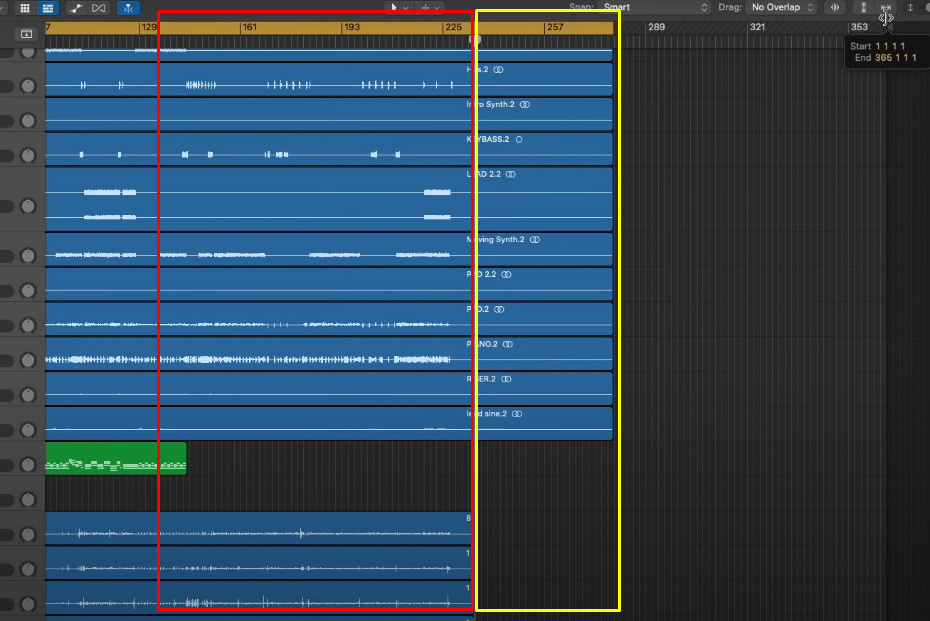
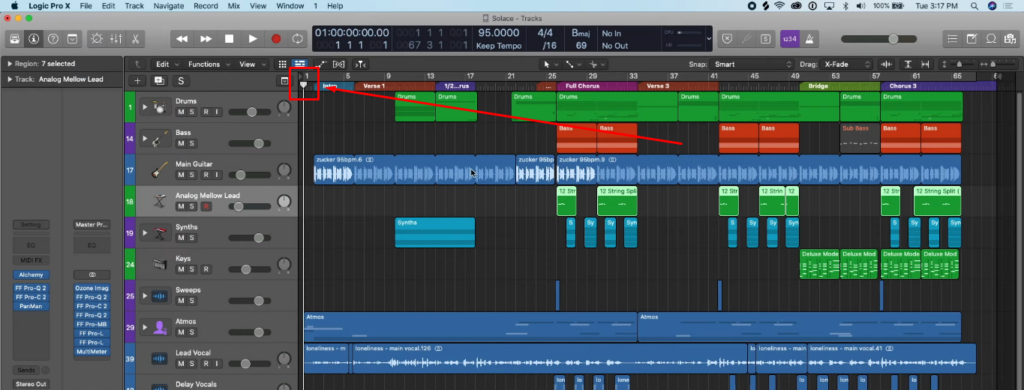
- Step 4: Once assured, position the ‘playhead’/’marker’ on the area where the second longest track ends while the empty tail of all the longest tracks begins.
- Step 5: Next, pull back the ‘Project End Locator’ and place it exactly on the area where the playhead lies. Then hit the ‘Command + E’ on your Mac to see the export settings.
- Step 6: From the ‘Range’ dropdown menu, select ‘Extend File Length to Project End.’
- Step 7: Make sure your audio format is set to ‘WAVE’ at 24-bit. The ‘Bypass Effect Plug-ins’ and ‘Include Audio Tail’ are unchecked. Whereas the ‘Include Volume/Pan Automation’ is checked. Also, set ‘Off’ to the ‘Normalize’ option.

- Step 8: Create a new folder, rename the pattern, and click the ‘Export’ button.
Bonus Tips: 3 More Ways to Export Files in Logic
Below are two more ways to export your audio files from Logic Pro or Logic Pro X.
a. Exporting Individual Regions of Your Song
So you have all the instruments recorded in Logic. And now you want to export specific parts of a single track in different parts (regions). Well, this method will show you how to do it.
- Step 1: Launch Logic Pro and open your project.
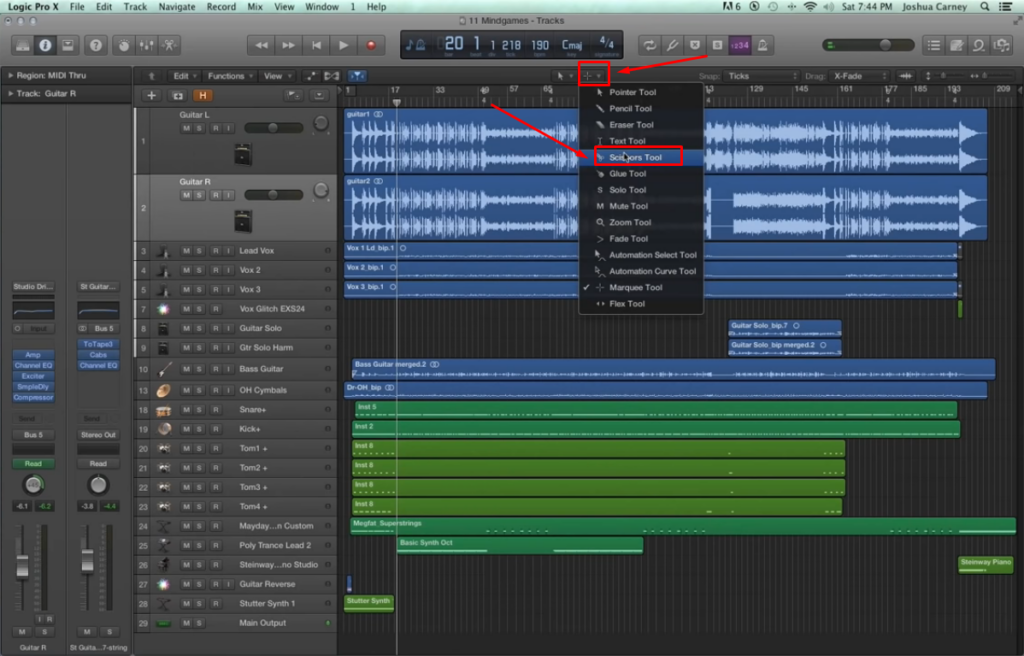
- Step 2: When all the files are analyzed, take your cursor to the tools icon right above the scale and the ‘Snap’ option.
- Step 3: Click the Tools dropdown menu and select ‘Scissors Tool.’
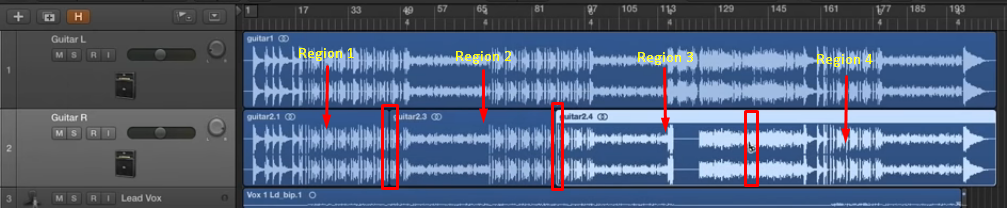
- Step 4: Select the track from the track section (left side of the screen) from which you want to export regions. For example, the ‘Guitar R’ track. Then, use the scissors tool to make the cuts on the track. Remember, each cut represents a region. So if you have divided the track into 4 different parts, Logic will take it as 4 different regions.
- Step 5: Now, right-click the first region, hover on ‘Export,’ and click the ‘Export as Audio File’ option.
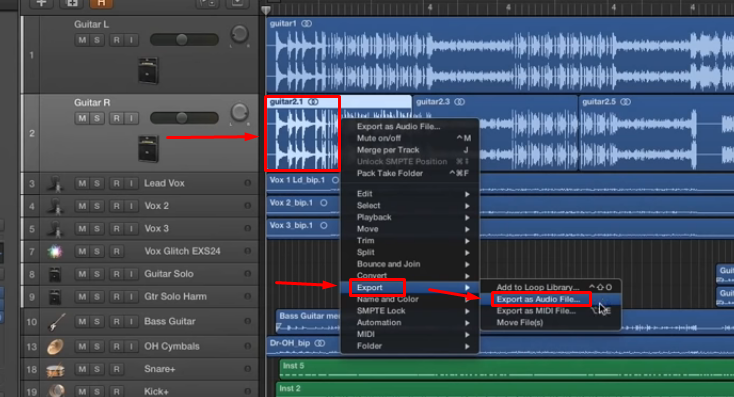
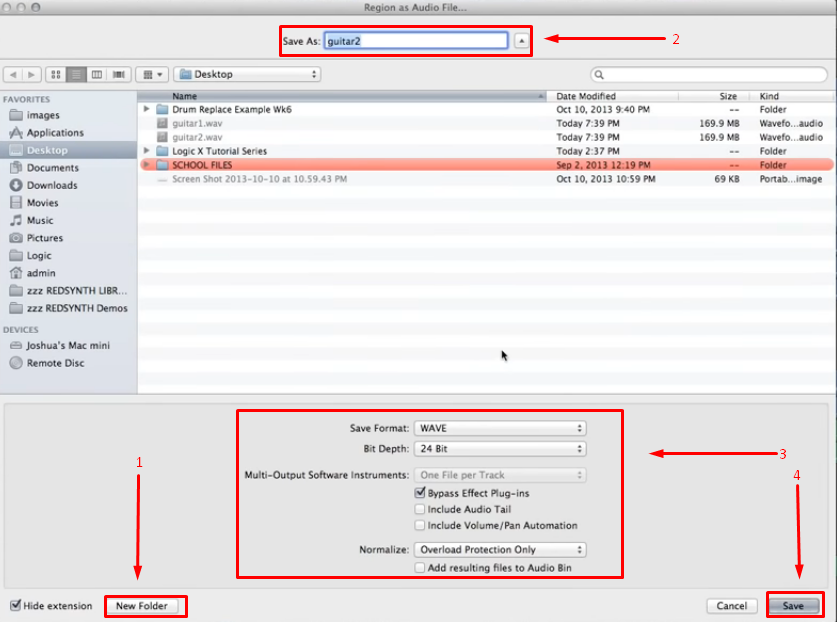
- Step 6: Create a new folder and rename the region in the ‘Save As’ text box. Also, don’t forget to adjust your export settings as needed. And hit the ‘Save’ button.
b. Exporting a Solo AUX Track from Logic
In Logic Pro or Logic Pro X, applying effects on a raw track creates an AUX file at the back end. If the AUX file for that specific track is deleted or removed, the track loses all its effects. And all you can hear is the original tone of the instrument. Therefore, AUX files play a key role in music production.
However, most of the time, the AUX file of the original track is invisible in the front track panel. So, when you try to export the track that already has effects, the software saves the original sound of the instruments rather than the one with effects. It is because you export simple tracks instead of AUX.
So here’s a quick guide to exporting AUX files in Logic Pro.
- Step 1: After opening your existing project in Logic, play any track to see if it is recorded with effects. In most cases, the track should have effects when playing it in Logic.
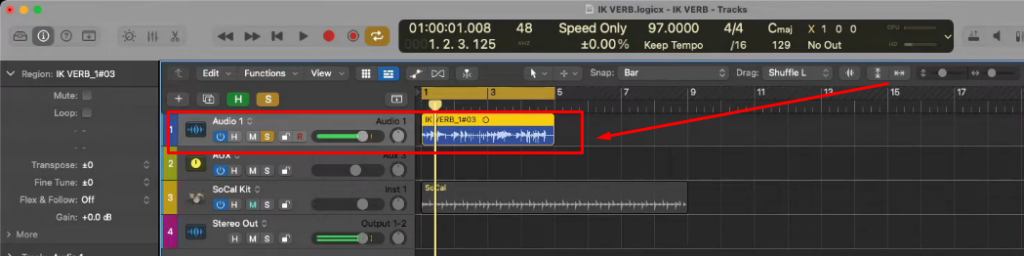
However, if you simply export this track (without using the stems method), you will only get the raw sound. You might get confused because the same track will have effects on the software. This is because you haven’t exported the AUX file, and to do that, follow the next step.
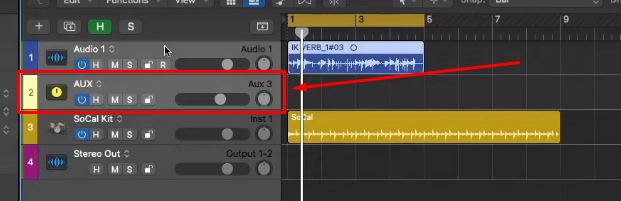
- Step 2: Whenever you create a new BUS (track), Logic automatically assigns an AUX channel. But that channel is not automatically visible on the panel, so you can’t export it.
Therefore, go to your mixer, right-click on the designated AUX, and choose ‘Create Track’ from the menu.

As soon you do that, you will notice a new AUX track appearing below the main track. It will be empty, so don’t panic because you are doing right.
- Step 3: Select the AUX track and press Command + E to see the export settings to export the file.
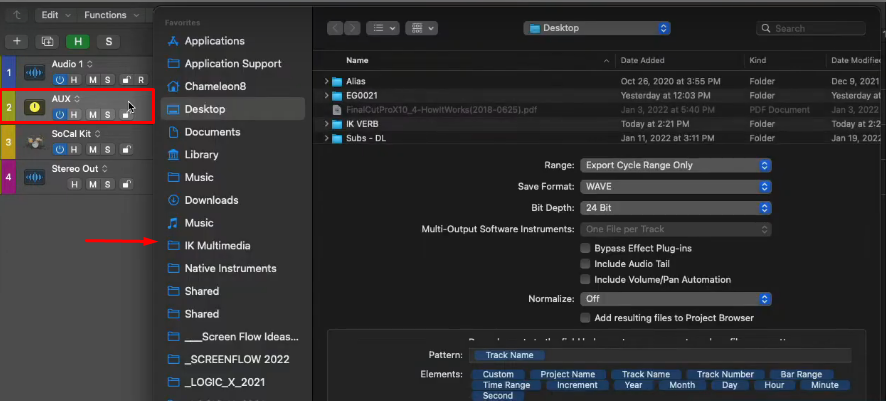
Play the exported track, and you will hear the instrument or vocals with effects this time.
c. Exporting MIDI Files in Logic
Logic Pro and Logic Pro X boh are robust music production tools that you can use to create and edit MIDI files. But the problem arises when new users are unable to export MIDI files from this software. So, if you’re facing a similar issue, just follow the steps below.
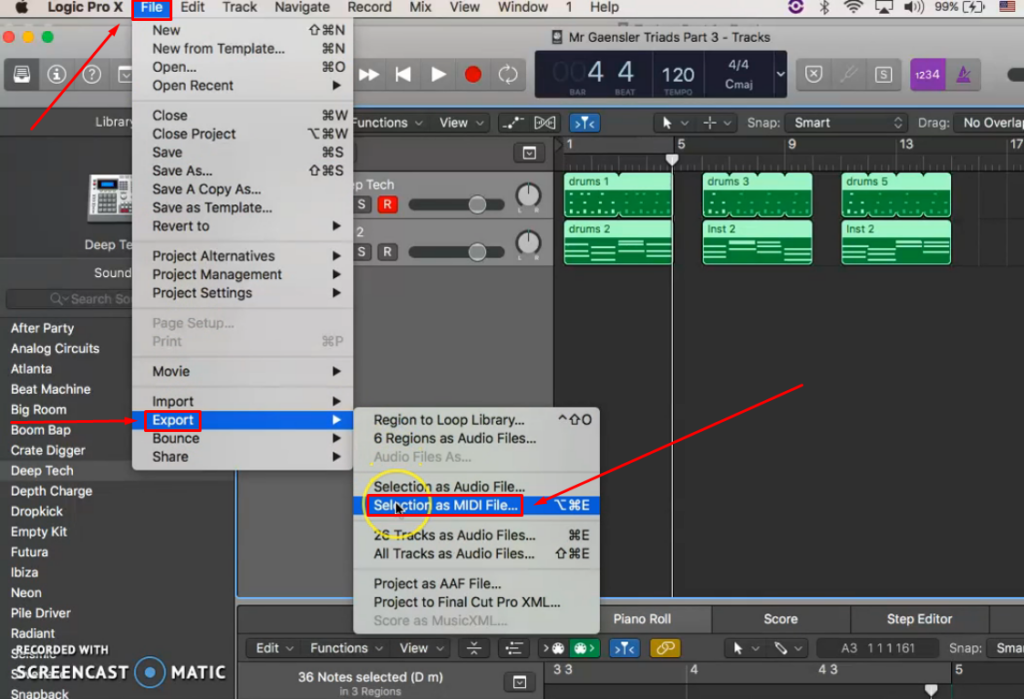
- Step 1: After recording your MIDI files in Logic, make sure none of your tracks are on mute. As you can see in this screenshot, there are two MIDI tracks with disabled ‘mute’ and ‘solo’ functions.
- Step 2: You will observe that only one of the tracks will be highlighted. That means you have clicked this track, and Logic has selected it. Now, if you look at the second track, you can clearly see that it is unselected due to the color difference.
- Step 3: To select both tracks, click on the first track. Then, hold the Command + Shift key on your keyboard and make a click on the second track. Doing so will highlight both tracks, confirming that multiple tracks have been selected.
- Step 4: Go to the ‘File’ tab, move your cursor to the ‘Export’ menu, and click the ‘Selection as MIDI File’ option.
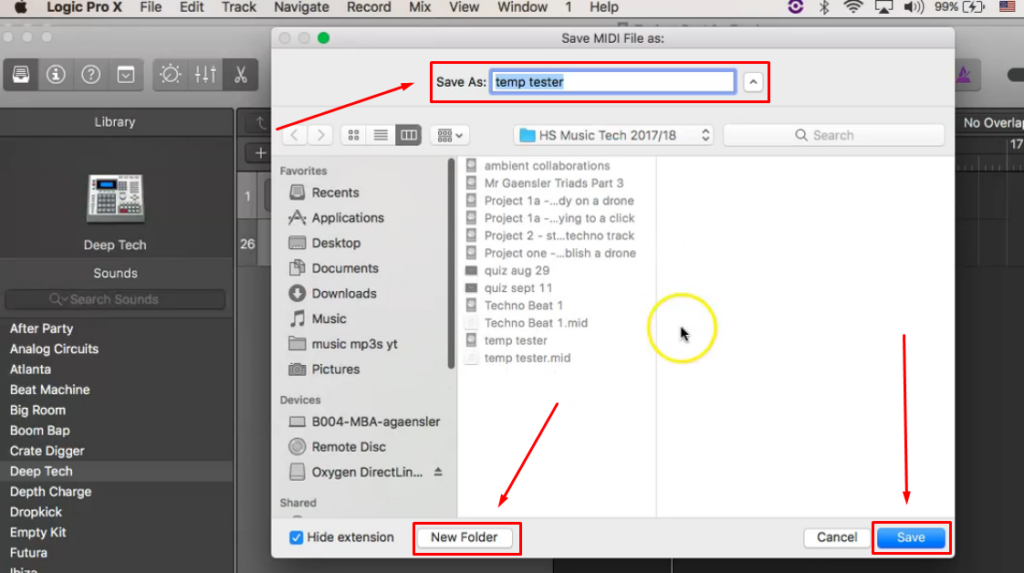
- Step 5: A new window will open to save your selected MIDI files. Click the ‘New Folder’ button to make a folder in your desired location. Next, rename the track (optional) by editing the text in the ‘Save As’ text field. Lastly, click the ‘Save’ button to export MIDI files on your Mac.
Conclusion
If you know how to export stems in Logic, you can transfer all the important beats, melodies, and vocals in one go. However, it is vital to understand the export settings to save stems with or without FX and in your desired sample rates and bit depth.
There are 4 easy ways to export stems. The first way is to export single or multiple stems as audio files. The second way encourages you to export stem packages. Third, Logic lets you export stems with excellent audio quality. Moreover, you can also transfer stems through the extend file range option.
Alternatively, you can export files in Logic without using the stems method. For example, you can export regions or parts of your track on your computer. If you want, you are also allowed to export a solo AUX track, as well as multiple MIDI files.
After mastering your Logic stems, it’s crucial to ensure any voice-over or tutorial audio clearly reaches your audience. A reliable wireless lavalier microphone gives you crystal-clear sound, making your Logic production tutorials even more professional.
FAQs
Q1. How do I send Logic stems to someone?
After sending stems from Logic to your computer, you can save them in a USB flash drive and give them to the mixing engineer or bandmate. You can also email stems after sending them from Logic to your Mac.
Q2. What do wet stems mean?
Wet stems are audio files with audio effects. For instance, if you have added reverb to your acoustic guitar rhythm and sent it, you have exported a wet guitar rhythm stem.
Q3. What is the meaning of dry stems?
Dry stems are files exported in their original sound (without any effects). For example, exporting rhythm guitar stem without reverb effect.
Q4. What is a vocal stem?
A stem that only has a person’s voice is called a vocal stem.