Adobe Illustrator is a powerful software that helps you create and edit artwork on your computer. When you print your artwork, you might see small lines called “crop marks” or “trim marks” at the corners. These marks show where to cut the paper to remove the extra edges and keep only the artwork. Luckily, Illustrator has a feature that automatically adds these marks for you, so you don’t have to do it manually.
However, if you don’t want the crop marks in your final printout, you can easily remove them. In this guide, we will first put some light on what the crop marks are. Then, we will discuss some key steps to remove, trim or shorten these crop marks easily.
What are Crop Marks in Illustrator
Crop marks, also referred to as trim marks, are important elements in the print production process. In Adobe Illustrator, these marks are visual indicators for accurately trimming printed documents. They are placed at the corners of the artwork and help define the boundaries of the final printed piece. Moreover, crop marks aim to guide printers or print shops on where to cut or trim the paper after printing.
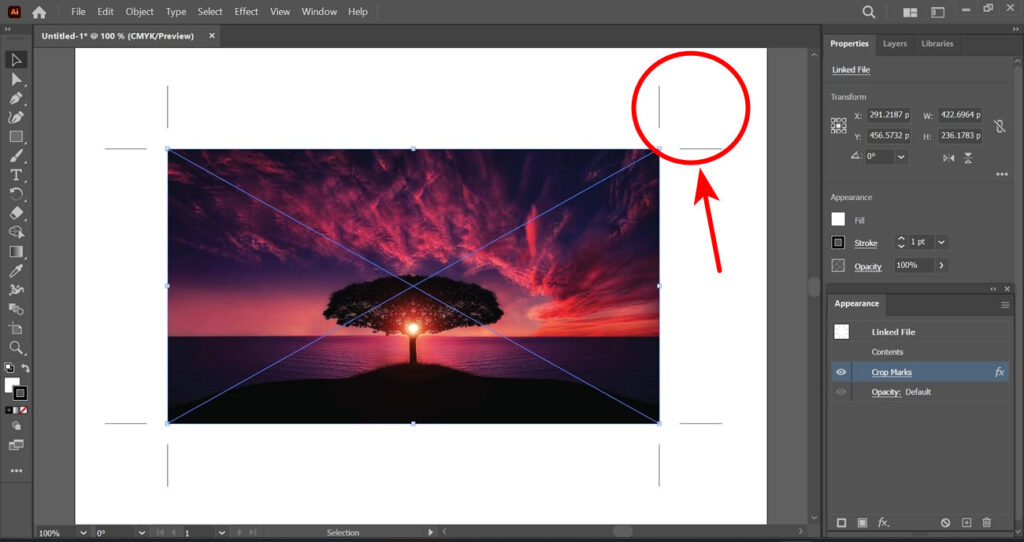
However, in Adobe Illustrator, you can customize the appearance of crop marks according to your requirements. You can adjust their length, thickness, and color from the document edges. When preparing a print document, you can include crop marks directly in the output file. In Adobe Illustrator, you can also create crop marks manually using the Line tool or plugins to automate the process.
By manually creating crop marks, you draw lines at the corners of the document, typically extending beyond the trim size by a specific length. These marks can be duplicated and adjusted as needed.
How to Remove Crop Marks in Illustrator
Now that you understand crop marks and their role in Adobe Illustrator, let’s explore how you can easily remove them. By following a few simple instructions as discussed below, you will be able to get a final printout without the presence of these marks:
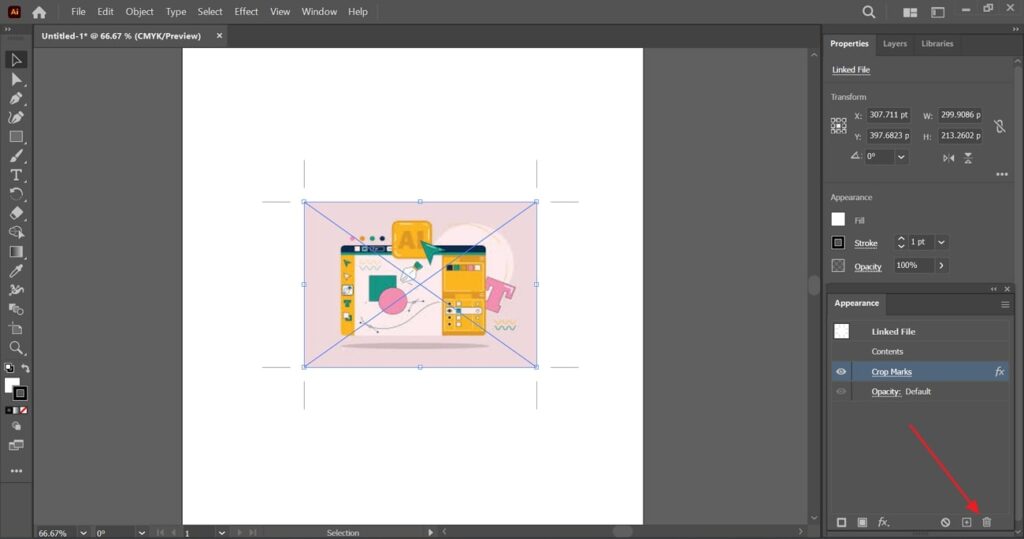
Instructions: Open the Adobe Illustrator tool along with the image that you want to remove crop marks on. Now, hit the image and head to the “Appearance Panel” on the right side. Click on the “Crop Marks” option and then press the “Delete” icon at the bottom right corner. This will delete all the crop marks on your image.
Bonus Tip: Creating, Trimming/Shorten, Extending, and Rotating Crop Marks in Illustrator
However, if you want to put extra effort into customizing your crop marks in Adobe Illustrator, our bonus tip covers you. You can adjust the length of the crop marks to make them shorter or longer, depending on your preference. Additionally, you can extend the crop marks beyond the document’s edges if needed.
Furthermore, you can rotate the crop marks to align them with the angles of your artwork. Read the below instructions very carefully for a better understanding of how to get desired results in Adobe Illustrator.
Creating Crop Marks
First, we will look at how to create crop marks in Adobe Illustrator for better customization options. These instructions are detailed and provide great help to users:
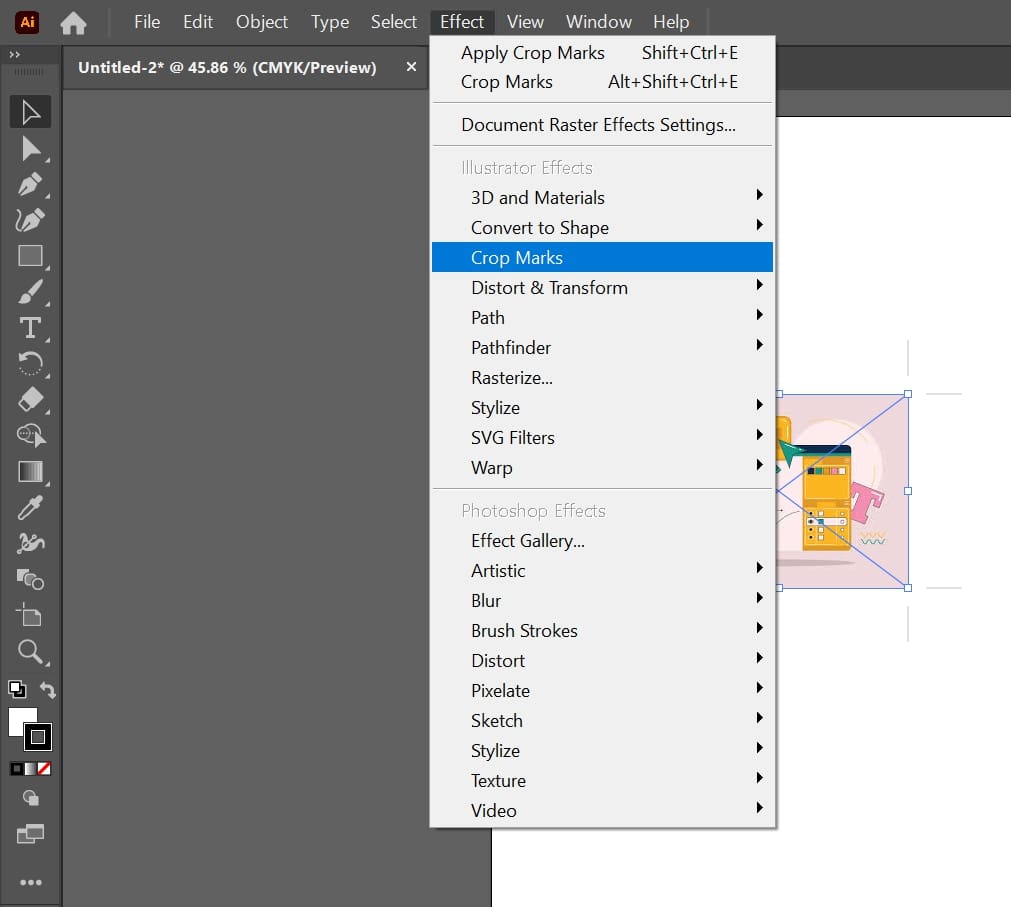
Instructions: Access the Adobe Illustrator tool on your desktop. Next, tap the “File” tab at the top left corner and choose the “Place” option from the drop-down menu. Afterward, import the required image and tap on that image in the tool. Following this, head to the “Effect” tab in the top toolbar, and then from the provided list, click “Crop Marks” to create them on your image.
Trimming/Shortening Crop Marks
Now, let’s move to the next part. Here, we will help you trim or shorten the already inserted crop marks on the images. Follow each instruction with utmost care:
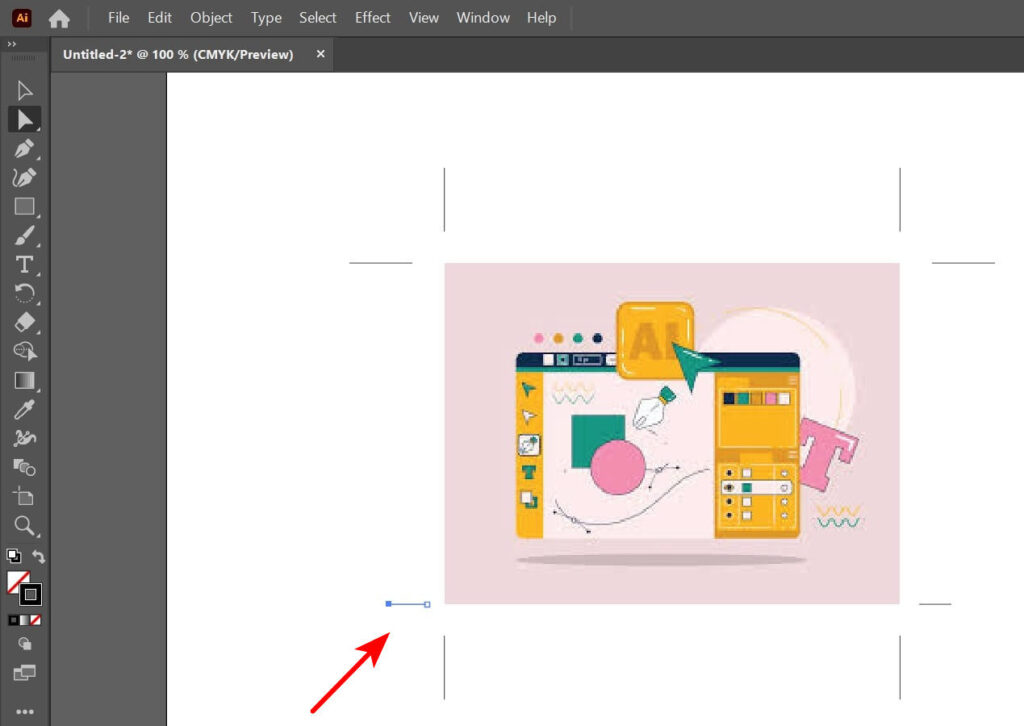
Instructions: Once you have created the crop marks in the last part, tap on “Object” in the top toolbar. Following this, from the drop-down menu, proceed with the “Expand Appearance” option. This will enable a square line box around your image. Then, choose the “Direct Selection” tool from the left sidebar, and place it on the path line to trim or shorten it.
Extending Crop Marks
After you have shortened it, let’s now extend the path lines. This will help users who want an extended crop mark line around their image:
Instructions: Continuing from the last step, here, again, select the “Direct Selection” tool. Then, place it on the line of the path and extend the line from the last edge. This will increase the length of the line quickly.

Rotating Crop Marks
This last part will assist you in guiding the right steps to help you rotate the crop marks at will. For that, have a look at the below-outlined instructions:
Instructions: As you have already imported the image and made certain adjustments, this time, learn to rotate the crop marks in a jiffy. Place the “Direct Selection” cursor at the outer crop mark and rotate it accordingly.

Conclusion
Ultimately, we have covered the best method to remove crop marks from images in Adobe Illustrator. By following the simple steps outlined, you can easily find a clean obtainable result without any unwanted marks. Additionally, we shared a bonus tip that provides valuable knowledge on extending, shortening, rotating, and creating crop marks effortlessly.
With these techniques, you have the power to customize the appearance and positioning of your crop marks to suit your specific needs. Now, you can confidently prepare your artwork for printing, ensuring a professional and polished result.
Frequently Asked Questions
1. What is Generative Recolor in Adobe Illustrator?
Generative Recolor is an exciting feature powered by Adobe Firefly that uses AI to help you change the colors of your artwork quickly and easily. It is available within the Adobe Illustrator tool and allows you to input simple text prompts to generate various color variations in seconds. However, note that Generative Recolor is currently in beta and unavailable commercially.
Moreover, with this tool, you can enhance your designs by adding new color schemes or updating existing ones to match specific themes or styles. Enter a text prompt, click “Generate,” and explore the AI-generated options to personalize your artwork or design work.
2. What enhancements are made to the Layers Panel in Adobe Illustrator in 2023?
Adobe Illustrator has introduced improvements to the Layers panel, providing users with enhanced flexibility and control when searching for layers and objects. One notable enhancement is the addition of the Guide filter, which allows users to search specifically for objects with guides enabled.
Furthermore, users can apply multiple filters simultaneously for efficient layer and object management. These enhancements make it easier for users to navigate and organize their artwork in Adobe Illustrator.
3. What is the Retype Beta, and how does it work?
The Retype beta feature in Adobe Illustrator allows you to easily determine the fonts used in raster images and outline texts without any uncertainty. When you encounter a font somewhere and want to know what it is, you can take a photo and bring it to Illustrator.
Retype will analyze the image and identify the font for you. Once you have identified the font, you can instantly apply it to your text and try it out in your design. This feature saves time and helps you achieve the desired typography in your artwork.
4. Can I save my artwork in the WebP format using Adobe Illustrator?
Well, actually, yes, Adobe Illustrator supports exporting artwork in the WebP format. WebP images are designed to have smaller file sizes without compromising image quality. This makes them ideal for websites and mobile apps, where faster loading times are important.
With WebP, you can choose between lossless and lossy compression options, balancing image quality and file size based on your needs.
5. How has Adobe Illustrator improved its Image Trace tool for better results?
Adobe Illustrator has enhanced its Image Trace tool, providing users with more options and improved outcomes. Now, you can preview different image trace styles before selecting the desired options. Meanwhile, this is a significant improvement compared to the previous version, where only a text title was available to gauge the likely result.
The new and improved auto-detection feature in the Image Trace tool ensures better outcomes. However, converting raster images into vectors results in more accurate and high-quality results.














.png)


