



































.png)
 简体中文
简体中文 
So, you want to record great videos right from your phone? Whether it’s a family memory or your first vlog, your camera app makes recording quick. You can start filming within seconds without installing another app. But before you press record, a few settings deserve attention. This guide covers the exact steps for iPhone and Android. It also reveals one common quality problem beginners often discover too late.

What You Need Before You Start Recording
You don’t need a special app or extra gear to get started. The built-in Camera app on both iOS and Android is capable enough for high-quality video right out of the box. This guide covers both platforms side by side, so whether you’re on an iPhone or an Android device, you’ll know how to record, configure the right settings, and avoid the most common quality mistakes before your next shoot.
How to Record a Video on iPhone
Recording video on an iPhone takes just a few taps. Here’s the complete workflow using the native Camera app:
- Open the Camera app from your home screen or by swiping left from the lock screen.

- Swipe to Video mode by swiping left from Photo mode, or tap the “Video” label in the mode selector at the bottom of the screen.

- Confirm your resolution and FPS before pressing record. These settings live in Settings and stay saved between sessions (the section below walks through them).

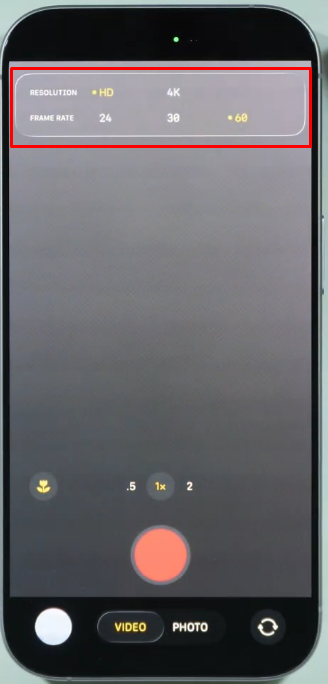
- Tap the red Record button to begin. The timer appears at the top of the screen.


- Tap the red button again (it becomes a square icon) to stop recording.

- Find your clip in the Photos app under the Recents album or the dedicated Videos album.
Note: iPhone 13 and later models include Cinematic mode in the Camera app’s mode selector. It simulates a shallow depth-of-field effect and automatically shifts focus between subjects, which works well for interviews or short-form narrative content. iPhone 15 Pro and Pro Max users also have access to ProRes recording for maximum quality and color grading latitude. ProRes files are significantly larger, so treat it as an intentional choice, not a default setting.
Adjusting iPhone Video Settings
These settings apply to every recording session once saved. Take a few minutes to configure them before your first serious shoot.
- Go to Settings → Camera → Record Video.

- Choose your resolution and frame rate:
- 1080p at 30fps is the default and handles everyday content, social uploads, and casual clips without eating storage.
- 4K at 30fps delivers noticeably sharper footage and gives you room to reframe or crop during editing without losing quality.
- 4K at 60fps is the right choice for smooth motion: sports, fast-moving subjects, or dynamic walking shots.
- 1080p at 120fps or 240fps (Slo-mo mode) creates dramatic slow-motion playback for action sequences.

- Note the storage estimate. Apple displays the approximate file size per minute below each option. 4K at 60fps can consume up to 400MB per minute, which adds up fast on a 128GB device.
- Confirm stabilization is active. Enhanced Stabilization is on by default on supported iPhones. You can verify or adjust it within the same Settings → Camera → Record Video screen → Enhanced Stablization.

Pro Tip: Shoot 1080p at 30fps for content headed straight to social media, and reserve 4K for anything you plan to archive, reframe, or edit. The quality gap is real, but 1080p footage is excellent for most purposes and keeps your storage free for more takes.
How to Record a Video on Android
Android’s camera interface varies by manufacturer, but the core recording workflow is consistent across Samsung, Google Pixel, OnePlus, Infinix, and most other brands.
- Open the Camera app from your home screen or app drawer.

- Switch to Video mode by swiping to the Video tab or tapping “Video” in the mode bar at the bottom of the screen. The label and swipe direction vary slightly by device.

- Tap the red Record button to start. A timer and stop button appear on screen.

- Tap the Stop button (square icon) to end the recording.

- Find your clip in the Gallery app or Google Photos, typically under “Videos” or “Recents.”
Manufacturer differences worth knowing:
- Samsung devices include a Pro Video mode, accessible from the “More” section in the Camera app’s mode bar. It gives you manual control over ISO, shutter speed, white balance, and even microphone input levels. A significant step up for anyone who wants hands-on control.
- Google Pixel phones apply automatic video stabilization in standard Video mode and offer Audio Magic Eraser within Google Photos after the fact, which can reduce or remove ambient noise from a completed clip. Pixel’s microphone processing is among the strongest native audio handling on any Android device.
Adjusting Android Video Settings
The path into settings is short regardless of which Android device you use.
- Open the Camera app and switch to Video mode.
- Tap the Settings icon (gear icon, usually in a top corner of the screen).

- Select Video Resolution or Video Quality to choose your recording format.

| Setting | What It Does |
|---|---|
| Resolution: 1080p | Good balance of quality and file size; reliable for social content and everyday use |
| Resolution: 4K | Maximum sharpness; larger files; best for archiving or editing |
| Frame Rate: 30fps | Natural-looking motion; the standard for most video content |
| Frame Rate: 60fps | Smoother motion; ideal for action, sports, or panning shots |
| Video Stabilization / EIS | Reduces camera shake during handheld recording; keep this on |
Note: Samsung devices list “Video Stabilization” as a separate toggle inside camera settings. On Google Pixel phones, stabilization is applied automatically in standard Video mode and does not require a manual switch.
Essential Video Settings to Configure Before Every Shoot
These five decisions apply regardless of which phone you’re using, and they account for the largest share of quality variation between a mediocre clip and a polished one.

- Resolution: Match it to your end use. Shoot 1080p at 30fps when the footage is heading to social media or quick sharing. Choose 4K at 30fps when you want footage you can crop, reframe, or archive without quality loss. Higher resolution gives you more flexibility later, but it comes with a real storage cost.
- Frame rate: Match it to your subject’s motion. 30 frames per second produces natural-looking motion and suits talking-head videos, interviews, travel footage, and most everyday content. 60 frames per second creates smoother movement and is the better choice for sports, fast action, or any scene where your subject moves quickly through the frame.
- Stabilization: Always leave it enabled. Whether your phone uses optical image stabilization (OIS), electronic image stabilization (EIS), or a combination of both, the result is meaningfully steadier handheld footage. The only reason to disable it is when recording on a dedicated gimbal, which provides its own stabilization and can conflict with in-camera processing.
- Storage format: Know your compatibility needs. Both iOS and Android default to HEVC/H.265, which reduces file size by roughly 40 to 50 percent compared to H.264 while preserving the same visual quality. This format is right for most users. If you plan to transfer footage to older computers or editing software that does not yet support HEVC, switch to H.264 (MP4) in your camera format settings.
- Lock exposure and focus before you record. Before pressing record, tap and hold on your subject until the AE/AF lock indicator appears on screen. This prevents the camera from hunting for a new focus point or re-exposing mid-scene, which is one of the most distracting artifacts in phone video.
Why Phone Audio Often Disappoints and How to Fix It
You can frame everything perfectly and adjust every setting. Still, your final clip may sound strangely hollow. In most cases, the microphone causes that disappointing audio problem.

Built-in phone microphones are tiny and usually record sound from everywhere. They sit along the bottom edge or back of your phone. These microphones mainly support calls and quick voice recordings. They were never designed specifically for recording videos. So, they capture nearby sounds along with your subject’s voice. This includes traffic, room echo, air conditioner noise, and finger vibrations. When your subject stands several feet away, the problem gets worse. The microphone captures the surrounding room almost as clearly.
Here’s how to address it practically:
- Reduce the distance: The closer the phone is to the speaker, the more the mic picks up their voice relative to ambient noise. Moving from six feet away to three feet makes a noticeable difference without extra equipment.
- Eliminate wind exposure: Outdoors, even a light breeze causes a low rumble that the built-in mic cannot block. Turn your back to the wind, find a sheltered position, or stand close to a building or natural windbreak.
- Use an external clip-on microphone: This is the single highest-impact audio upgrade available to phone video creators and requires no technical knowledge to use.
The Hollyland LARK A1 shows how simple this setup can be. Plug its receiver into your phone’s USB-C or Lightning port. Then clip the transmitter near the speaker’s mouth. There’s no app to open or Bluetooth pairing to figure out. You don’t need to install any drivers either. Its 3-level Intelligent Noise Cancellation feature starts working in single click. It filters background hum and ambient noise before reaching your phone.

Hollyland LARK A1 - Affordable Wireless Microphone
A perfect starter mic for creators on a budget. It’s simple to use and features effective noise cancellation.
Key Features: 48kHz/24-bit | 3-Level Noise Cancellation | 54-Hour Battery
For bloggers wanting a cable-free, long-range, and compact mic, the Hollyland LARK M2 is worth considering. It weighs just 9 grams and is about button-sized. That tiny design makes it easy to move while recording. You also get up to 40 hours with its charging case. So, you can keep recording without constantly thinking about battery life.
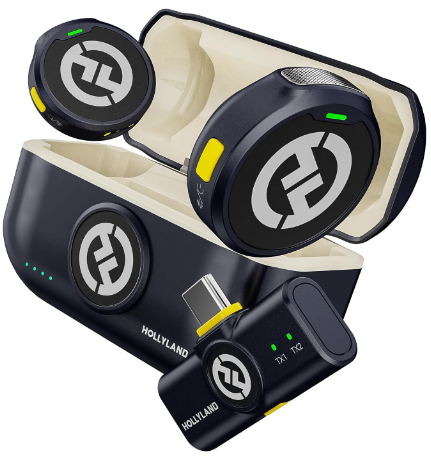
Hollyland LARK M2 - Mini Lavalier Microphone
An incredibly lightweight and compact wireless button microphone that captures high-fidelity audio.
Key Features: 9g Button Size | 48 kHz/24-bit | 40 Hours Battery
Audio is almost always the fastest-return upgrade in phone video because it doesn’t change how you shoot. You plug in, clip on, and record.
Practical Tips for Better Phone Video Quality
Good settings get you most of the way there. These five habits close the remaining quality gap.

- Light your subject from the front: Phone sensors struggle with backlit scenes, and the fix is almost never a settings adjustment. Face toward a window, a lamp, or open shade so the light source illuminates your subject rather than sitting behind them.
- Stabilize shots physically: In-camera stabilization handles minor movement well, but a tabletop tripod or phone grip eliminates shake entirely for static shots. For handheld recording, tuck your elbows close to your body to reduce arm movement.
- Shoot horizontally for most content: Landscape orientation suits YouTube, video calls, website embeds, and most editing timelines. Shoot vertically only when the final destination is Reels, TikTok, or YouTube Shorts.
- Clean your lens before every shoot: A fingerprint on the lens won’t show up in a thumbnail, but it produces visible haze, softness, and lens flare in your footage. A two-second wipe with a cloth takes care of it, and most users skip this step entirely.
- Give yourself handles at the start and end: Begin recording three seconds before the action starts and continue three seconds after it ends. This preserves clean edit points and prevents accidental cut-offs at the beginning or end of a take.
FAQs
Q: Can I record a video on my phone without the camera app?
Yes. Instagram, TikTok, Snapchat, and most social platforms include in-app cameras that let you record and post without leaving the app. But these apps typically record at lower resolutions or apply heavier compression than the native Camera app. For the best quality footage you can repurpose across platforms, record with the native camera first and upload from your gallery.
Q: Why does my phone video look blurry or grainy?
Blurry footage usually means the camera refocused mid-clip. A tap-and-hold AE/AF lock on your subject before pressing record prevents this. Grainy footage is almost always a low-light problem. The sensor raises ISO to compensate for darkness, which introduces digital noise. Add more light to the scene, and confirm you are recording at 1080p or 4K in your camera settings.
Q: How much storage does a phone video take up?
One minute of 1080p 30fps video uses approximately 130 MB. 1 minute of 4K 30fps uses approximately 350 MB. Shooting in HEVC/H.265 format cuts both figures roughly in half. A 10-minute interview recorded at 1080p 30fps in HEVC uses around 650 to 650 MB, which most modern phones manage comfortably.
Q: Why does my phone audio sound muffled or distant on video?
The built-in microphone is positioned for phone calls, not recording. It captures the full room rather than isolating the speaker, and distance makes this worse. Moving the phone closer to your subject helps immediately. For reliable results, an external clip-on microphone like the Hollyland LARK A1 places a dedicated mic near the speaker’s mouth and applies automatic noise cancellation to cut ambient sound.
Conclusion
Recording good phone videos starts with a few simple choices. Your camera app already gives you everything needed to begin. Pick the right resolution and frame rate before recording. Stabilization can also make handheld footage look much cleaner. Then, give your audio the attention it deserves. A better microphone can change the recording more than expected. Once these habits become natural, editing clips feels much easier. Your phone can then take you from recording to editing.
