.png)
If you are trying to figure out how to use labels and markers in Audacity, you are in the right place. While industry-standard DAWs (Digital Audio Workstations) like Premiere Pro or Logic Pro refer to these visual navigation points as “markers,” Audacity officially categorizes them within a dedicated Label Track.
Regardless of what you call them, they do the exact same job. Think of labels as digital bookmarks attached directly to your audio timeline. Instead of scrubbing endlessly through a two-hour recording to find a specific moment, labels let you jump instantly to the exact second you need.
Incorporating markers into your editing workflow is one of the easiest ways to speed up post-production. Here are the top three ways audio engineers and creators use them:
- Flagging Mistakes and Bad Takes: Drop a marker the exact second a podcast guest coughs, stumbles over a line, or restarts a sentence. You will know exactly where to make your cuts later.
- Identifying Podcast Chapters: Mark specific topic changes, interview questions, or ad breaks to easily generate accurate, timestamped show notes for your listeners.
- Splitting Long Recordings: Highlight individual songs from a live concert or standalone chapters of an audiobook. You can then use these markers to export the massive timeline into entirely separate audio files with a single click.
The Two Types of Labels in Audacity
Audacity offers two distinct types of markers depending on how you need to organize your timeline. Understanding when to use a Point Label versus a Region Label is key to a faster workflow.
Here is a quick breakdown of how these two label types differ:
| Feature | Point Labels | Region Labels |
|---|---|---|
| What it Marks | A single, exact timestamp on your timeline. | A specific duration with a clear start and end point. |
| Best Used For | Noting mistakes, sync claps, or specific timestamps. | Highlighting a whole song, a full interview question, or a segment to export. |
| Visual Appearance | A single circle/chevron icon on the label track. | Two connected brackets spanning across the highlighted audio. |
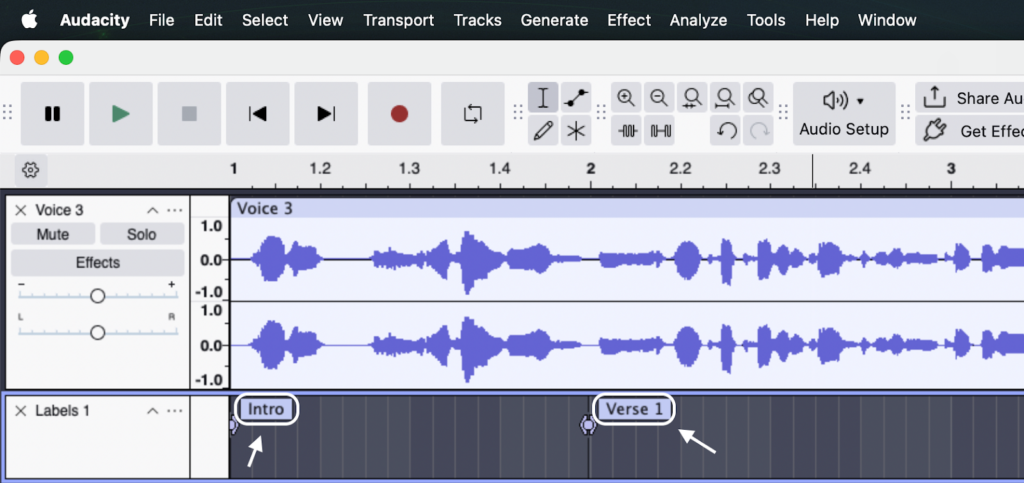
Point Labels
Think of point labels as sticky notes for your audio. They do not highlight any actual audio; they simply drop a pin at a precise millisecond.
If you are editing a podcast and hear a dog bark or a mispronounced word, you drop a point label. This allows you to visually scan your timeline and find the exact moments that need attention without having to re-listen to the entire track.
Region Labels
Region labels act like a highlighter for your audio waves. Instead of marking a single second, they define a complete chunk of audio.
This is the label you need when preparing to split a long recording into multiple files. By wrapping a region label around a specific song or a standalone interview segment, you tell Audacity exactly which boundaries to use when you are ready to export.
Step-by-Step: How to Add Labels and Markers in Audacity
Adding markers in Audacity is simple once you learn the core keyboard shortcuts. Whether you need to flag a single audio glitch or highlight an entire interview segment, here is exactly how to create your labels.
How to Add a Point Label
Point labels are perfect for marking a single, exact timestamp. Use this method to flag sudden noises, mistakes, or specific timestamps you want to return to later.
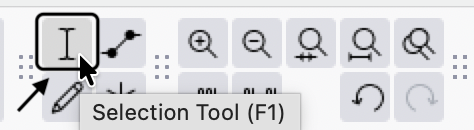
- Select the Selection Tool (the “I-beam” icon) from your top toolbar and click on the exact spot in the audio track where you want to place the marker.

- Go to Edit > Labels > Add Label at Selection in the top menu, or use the keyboard shortcut Ctrl+B (Windows) / Cmd+B (Mac).
- Type a descriptive name into the new text box that appears on the Label Track below your audio, then press Enter.
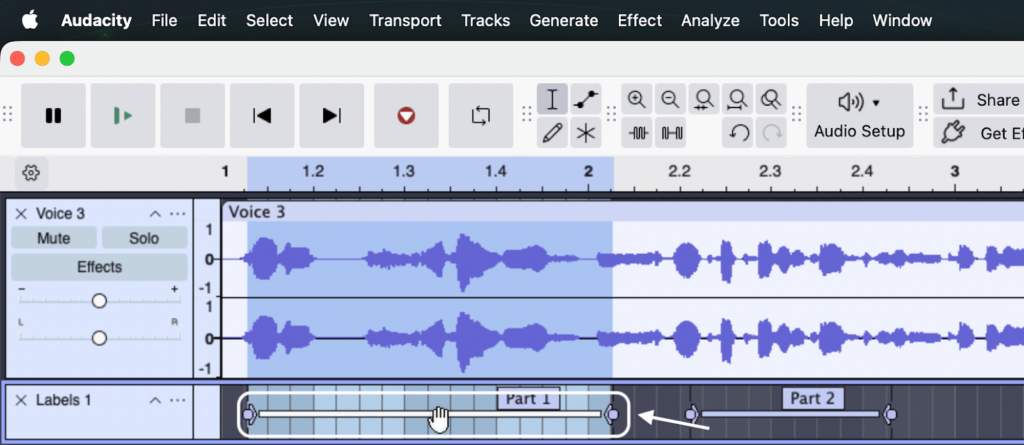
How to Add a Region Label
Region labels allow you to mark a duration of time with a distinct start and end point. This is the best method for highlighting a full song, a complete podcast chapter, or an entire take.
- Using the Selection Tool, click and drag across your timeline to highlight the specific section of audio you want to mark.
- Press the keyboard shortcut Ctrl+B (Windows) or Cmd+B (Mac) to create the region boundary.
- Type a name for the highlighted region (e.g., “Part 1” or “Part 2”) and press Enter to secure the label.

Dropping Markers While Recording (Live Marking)
If you are recording a long podcast episode or voiceover, stopping to write down the timestamps of your mistakes is a huge waste of time. Instead, Audacity lets you drop markers on the fly while the recording is actively running.
Pro Tip: To drop a live marker, press Ctrl+M (Windows) or Cmd+M (Mac) while recording.
Audacity will instantly create a point label at that exact moment without interrupting your audio capture. This is a massive help for podcasters, allowing you to quickly flag conversational flubs, loud background noises, or great quotes in real-time.
How to Edit, Move, and Delete Labels
Once you create a Label Track, you will inevitably need to adjust your markers. Whether a marker is slightly off-beat or you need to clear out resolved mistakes, managing your labels is a quick process.
Here is how to modify your existing markers:
- Moving a Label: If your marker isn’t exactly where you want it, hover over the label’s pin on the timeline. Click and drag the circle (for point labels) or the chevron (for region labels) left or right to adjust its position.
- Renaming a Label: Need to update a marker’s name? Simply right-click the label text box to edit the text directly. Hit Enter to save your new label name.

- Deleting a Label: To remove a marker entirely, click inside the label’s text box, highlight the text, and press Backspace twice. Alternatively, you can right-click the label and choose Delete Label from the dropdown menu.

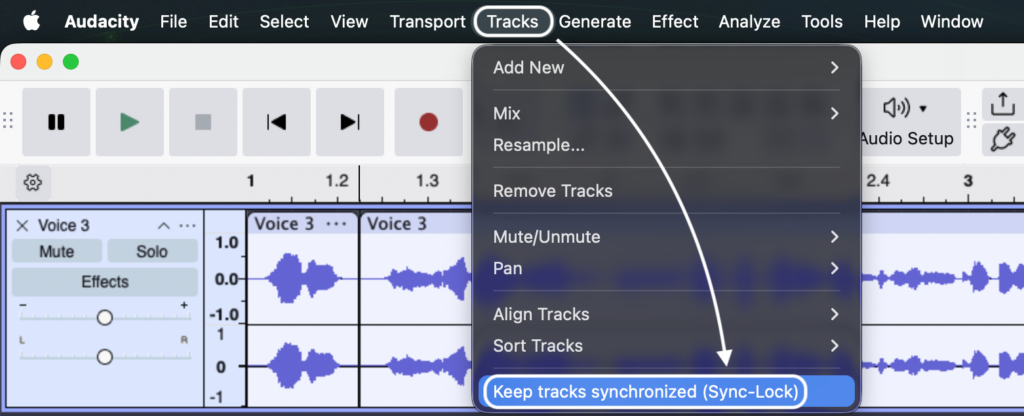
The Golden Rule of Editing: Use Sync-Lock Tracks
A common mistake new Audacity users make is deleting a chunk of audio without locking their tracks. If you delete a bad take from your audio timeline, your carefully placed markers will stay exactly where they were. This leaves your entire Label Track completely out of sync.
To prevent this, you must enable Sync-Lock Tracks.
Go to Tracks > Sync-Lock Tracks in the top menu, or click the clock icon in your Edit Toolbar. When this is active, a clock watermark appears on your tracks. Now, when you highlight and delete a section of audio, Audacity will automatically shift your markers backward by the exact same duration. This keeps your entire project—and all your labels—perfectly aligned.
Advanced Workflow: Splitting Tracks with “Export Multiple”
If you only learn one advanced feature in Audacity, make it Export Multiple. This is the most powerful workflow associated with region labels, and it will save you hours of tedious copying and pasting.
Imagine you have a single, continuous one-hour recording. This could be a live concert featuring five different songs or a long podcast interview you want to break down into distinct, bite-sized chapters. Instead of manually highlighting each section, pasting it into a new project, and exporting them one by one, you can use your labeled regions to export everything instantly.
Here is how to split your long timeline into multiple MP3 or WAV files in seconds:
- Create and name your region labels: Highlight your specific audio segments and press Ctrl+B (Windows) or Cmd+B (Mac) to create region markers around each song or chapter. The text you type into the label box will become the final output file name, so be specific.

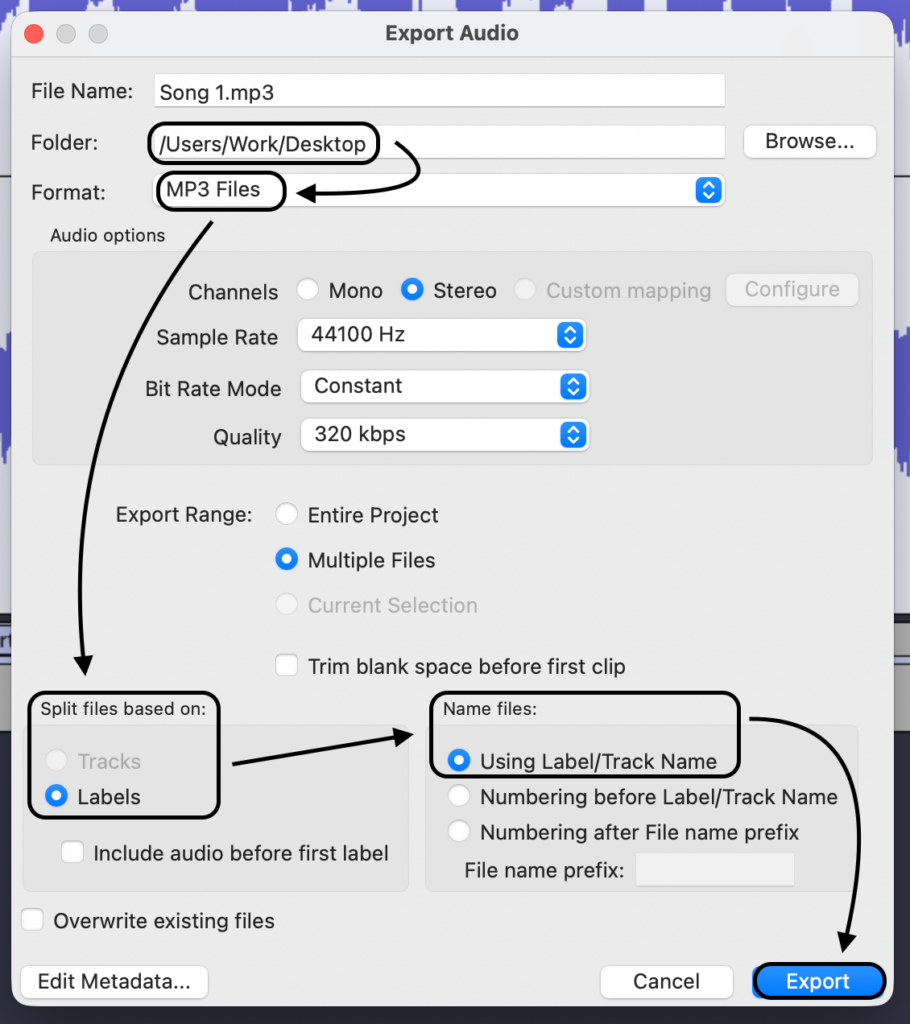
- Open the Export Multiple tool: Navigate to the top menu bar and click File > Export Audio. Select Multiple Files.

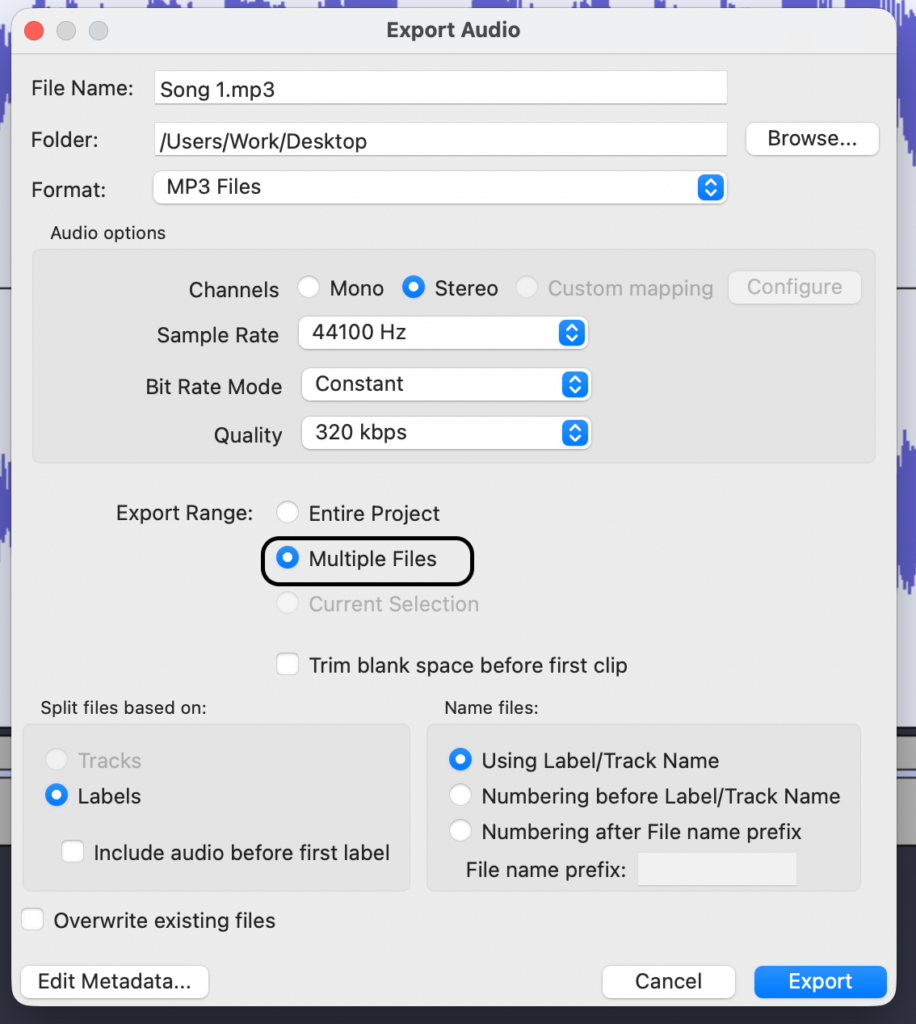
- Choose your audio format: Select your desired format (such as MP3 or 24-bit WAV) and choose the destination folder on your hard drive where you want the files saved.
- Split files based on labels: In the export dialog box, look for the “Split files based on” section. Select the radio button for Labels.
- Set the file naming rules: Under the “Name files” section, choose Using Label/Track Name. This ensures your exported files automatically adopt the exact names you typed into your markers.
- Click Export: Audacity will process the timeline and instantly generate a separate, perfectly cut audio file for every single labeled region.
Pro Tip: Better Source Audio = Less Time Dropping “Fix-It” Markers
Audacity markers are incredible tools for organizing content. However, if you spend hours dropping point labels just to hunt down and fix distorted audio or aggressive volume spikes, you are wasting valuable time.
The fastest editing workflow is capturing perfect audio at the source. When you don’t have to perform damage control, you can use markers strictly for creative organization.
For creators looking to cut their Audacity editing time down significantly, upgrading your recording hardware is the best first step. The Hollyland LARK MAX 2 removes the stress of unpredictable audio levels before you even open your editing software.


By upgrading your recording gear, you can bypass the most tedious parts of audio editing:
- 32-bit Float Recording: This feature ensures your audio never distorts, even during sudden screaming, loud laughter, or unexpected noises. You will completely eliminate the need to manually mark and fix clipped audio peaks in your timeline.
- Studio Quality (48kHz/24-bit audio): Start your edit on the right foot. Capturing uncompressed, professional-grade sound means you are dragging pristine, broadcast-ready files directly into your Audacity workspace.
- Live Monitoring via OWS Earphones: Catch problems before they become editing nightmares. The LARK MAX 2 allows you to monitor your audio live using their new OWS earphones, ensuring perfect mic placement and clear sound before you ever hit record.
Stop using labels for damage control. Capture perfect source audio, rely on markers purely for content organization, and get your final export out the door faster.
Frequently Asked Questions (FAQ)
What is the keyboard shortcut for markers in Audacity?
To add a static marker to a paused or stopped track, press Ctrl+B (Windows) or Cmd+B (Mac). If you want to drop a marker on the fly while actively recording, press Ctrl+M (Windows) or Cmd+M (Mac).
Can I import or export a list of labels in Audacity?
Yes. You can easily save your label track as a plain text file, which is perfect for sharing timestamps with other editors or clients. Go to File > Export > Export Labels to save your list. To bring a saved list of markers into your current project, navigate to File > Import > Labels.


Why are my labels out of sync with my audio?
Your labels will lose sync if you cut, delete, or paste portions of your audio without locking the label track to the audio track. To fix this, enable Sync-Lock Tracks. Go to Tracks > Sync-Lock Tracks in the top menu (or click the clock icon in the Edit Toolbar). Once activated, any time you shift or cut your audio, your markers will automatically move with it.

Conclusion & Next Steps
Mastering label tracks is one of the fastest ways to improve your Audacity workflow. Instead of blindly scrubbing through long timelines, you can instantly locate mistakes, organize podcast chapters, and use the Export Multiple feature to split massive recordings into individual, ready-to-publish files with a single click.
However, the best editing shortcut is capturing pristine audio from the start.
If you want to spend less time dropping markers to fix clipped audio and more time actually creating, it is time to upgrade your recording workflow. By switching to a system with 32-bit Float Recording—like the Hollyland LARK MAX 2—you eliminate distortion entirely, no matter how loud or unpredictable your environment gets.
Ready to stop fixing mistakes and start producing studio-quality content? Explore the Hollyland LARK MAX 2 in the Hollyland store and take your audio production to the next level.