.png)
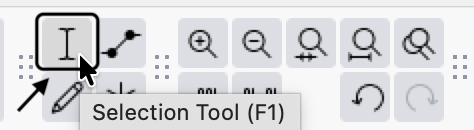
What is a Bitcrusher Effect? (And Why Audacity Doesn’t Have One Built-In)
If you are wondering how to use a bitcrusher effect in Audacity, you might have already noticed a slight problem: the software doesn’t actually have one built-in. But don’t worry, getting that gritty, “lo-fi,” or retro 8-bit video game sound is still completely doable.
A bitcrusher is a digital audio effect that intentionally degrades your audio resolution. By stripping away the high-fidelity polish of a modern recording, it leaves behind a raw, mechanical texture. To understand how a bitcrusher manipulates your audio, you need to look at its two primary components:
- Bit Depth Reduction: This lowers the dynamic range (volume levels) of your audio. Forcing a smooth audio wave into fewer available volume increments creates harsh digital clipping, resulting in aggressive fuzz and distortion.
- Sample Rate Reduction (Downsampling): This lowers the frequency resolution (how many times per second the audio is sampled). Dropping the sample rate introduces “aliasing”—a distinct metallic ringing sound that strips away high-end clarity.
Audacity focuses on clean audio editing and standard mixing rather than complex, real-time sound design. Because of this, it lacks a default bitcrusher. While you can manually degrade audio by exporting it at lower settings, applying a true bitcrusher effect in real-time requires you to install third-party VST plugins or Audacity-native Nyquist (.ny) scripts.
Method 1: Installing Free VST Bitcrusher Plugins (Recommended)
Adding a third-party VST plugin is the best way to get a versatile, professional-sounding Audacity bit crusher. Unlike manual editing, VSTs give you a graphical interface to tweak your distortion, downsampling, and bit depth in real-time.
For the best results, we recommend grabbing a free, high-quality VST. Tritik Krush is a favorite because it blends harsh digital bitcrushing with warm, analog-style drive filters. Alternatively, Kilohearts Bitcrush offers a dead-simple interface perfect for dialing in retro video game sounds.
How to Install VSTs in Audacity
- Download the free VST plugin file (typically a .dll file for Windows or a .vst / .component file for Mac). https://www.tritik.com/product/krush/ / https://kilohearts.com/products/bitcrush
- Install the plugin via the included installer or drag and drop the plugin file to the Audacity Plug-Ins folder (usually found at C:\Program Files\Audacity\Plug-Ins on Windows).
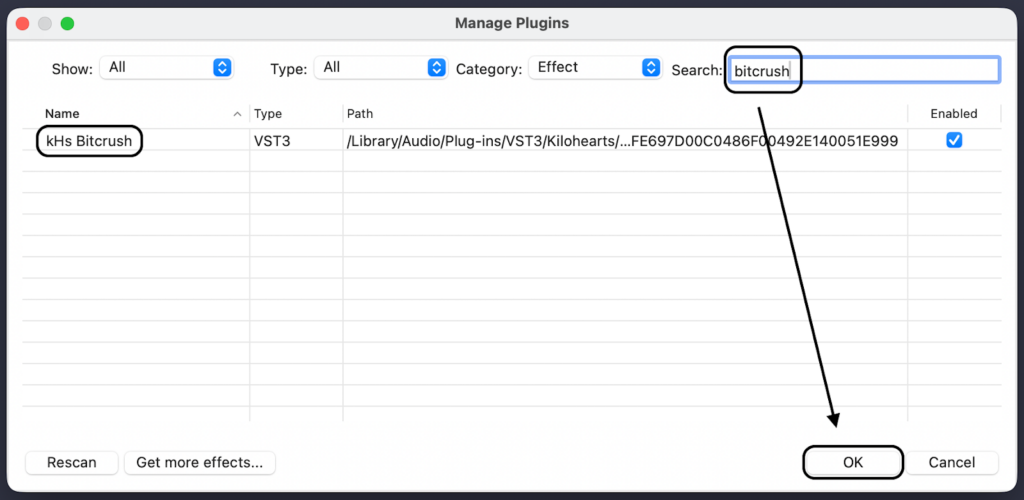
- Open Audacity, navigate to the top menu bar, and go to Effect > Plugin Manager.
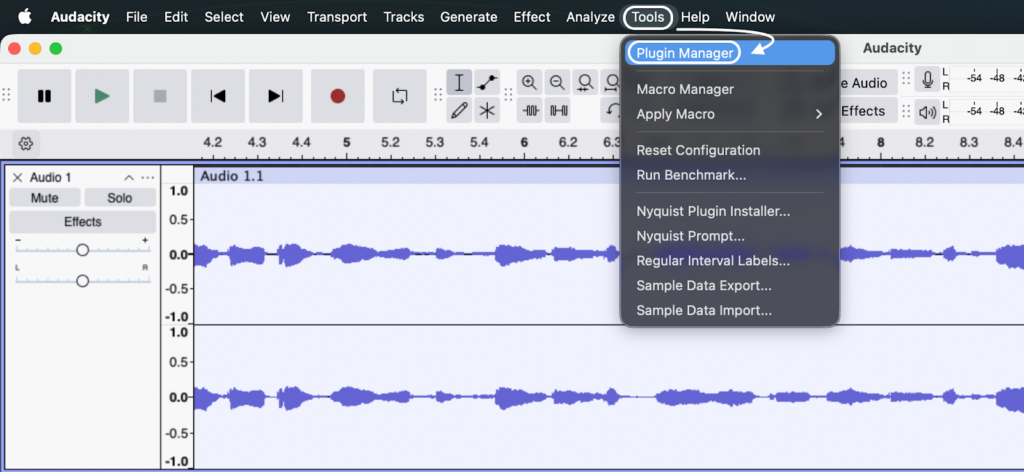
- Find the new plugin in the provided list, click Enable, and hit OK.
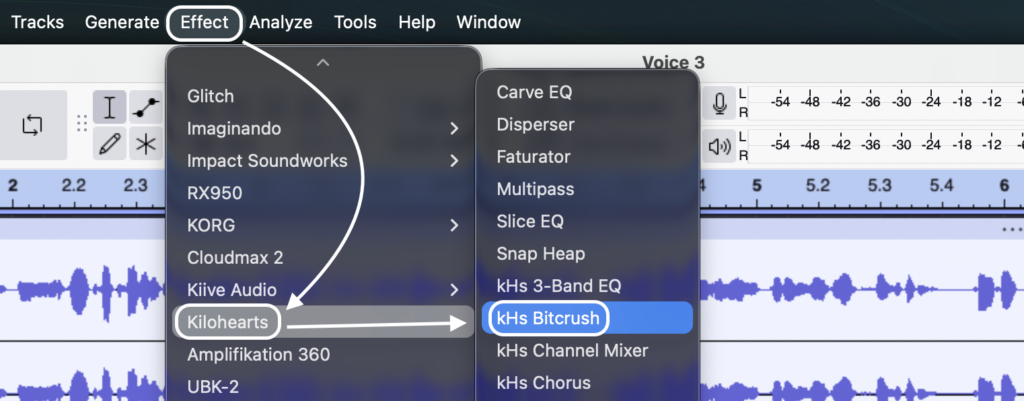
After hitting OK, your new bitcrusher will be permanently available in your Audacity Effects drop-down menu. Simply highlight the audio track you want to degrade, open the plugin, and start crushing your audio.
Method 2: Using Audacity Nyquist Plugins (.ny files)
If you prefer to avoid third-party software and want a completely native solution, Nyquist plugins are your best option. Nyquist is Audacity’s built-in scripting language, allowing developers to code custom audio effects stored as lightweight .ny files.
To achieve that classic lo-fi degradation, look for legacy Nyquist scripts like Decimator.ny or Alias. These scripts strip away audio resolution by aggressively targeting your sample rate and bit depth. Because they are native to Audacity, you simply drop the downloaded .ny file into your Plug-Ins folder and activate it through the Plugin Manager.
Here is how the two formats compare when applying bitcrusher effects to your audio:
| Plugin Type | Ease of Install | UI / Visuals | CPU Usage |
|---|---|---|---|
| VST Plugins | Moderate (Requires matching 32/64-bit versions and folder routing) | High (Features graphical interfaces, visual waveforms, and custom knobs) | Moderate to High |
| Nyquist Plugins (.ny) | Very Easy (Drag, drop, and enable directly in Audacity) | Low (Uses Audacity’s default text sliders and input boxes) | Extremely Low |
Method 3: The Manual “Export & Import” Hack (No Plugins Required)
What if you don’t want to install any plugins at all? You can still achieve a convincing bitcrusher effect using Audacity’s native export settings. This method forces the software to compress your audio into a lower resolution and sample rate, permanently “crushing” the file.
Here is exactly how to manually degrade your audio for that retro sound:
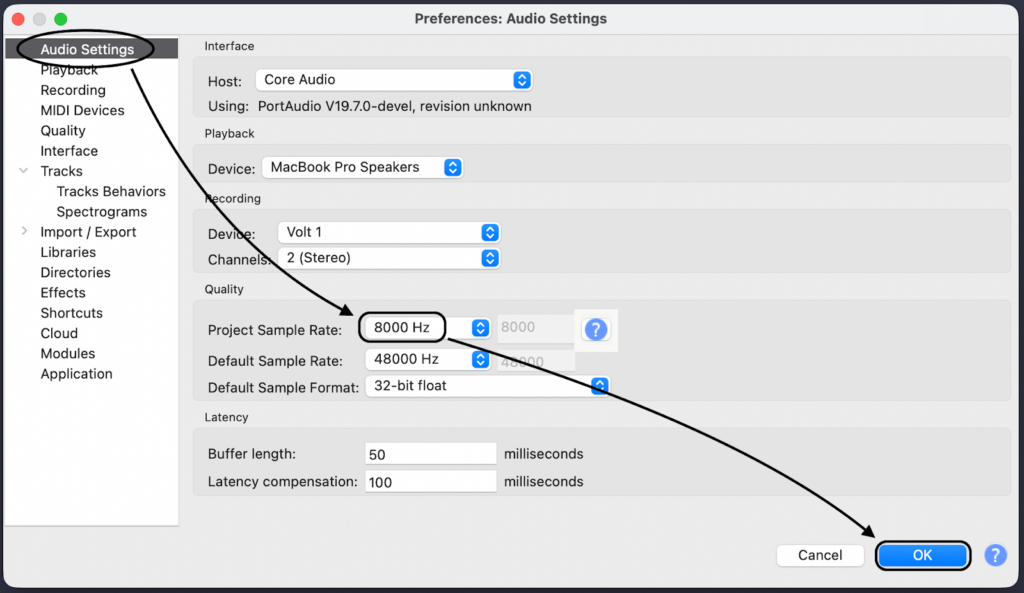
- Lower the Sample Rate: Go to Audacity > Preferences > Audio Settings. Find the Project Sample Rate drop-down menu and change it from the default (usually 44100Hz or 48000Hz) down to 8000Hz (or even lower for extreme ringing).

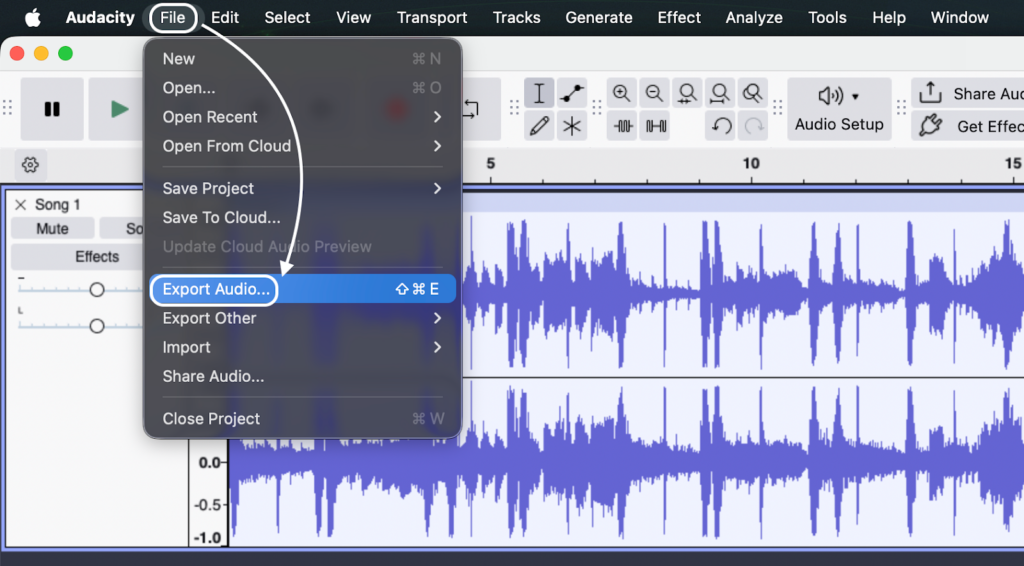
- Export the Audio: Go to File > Export Audio.
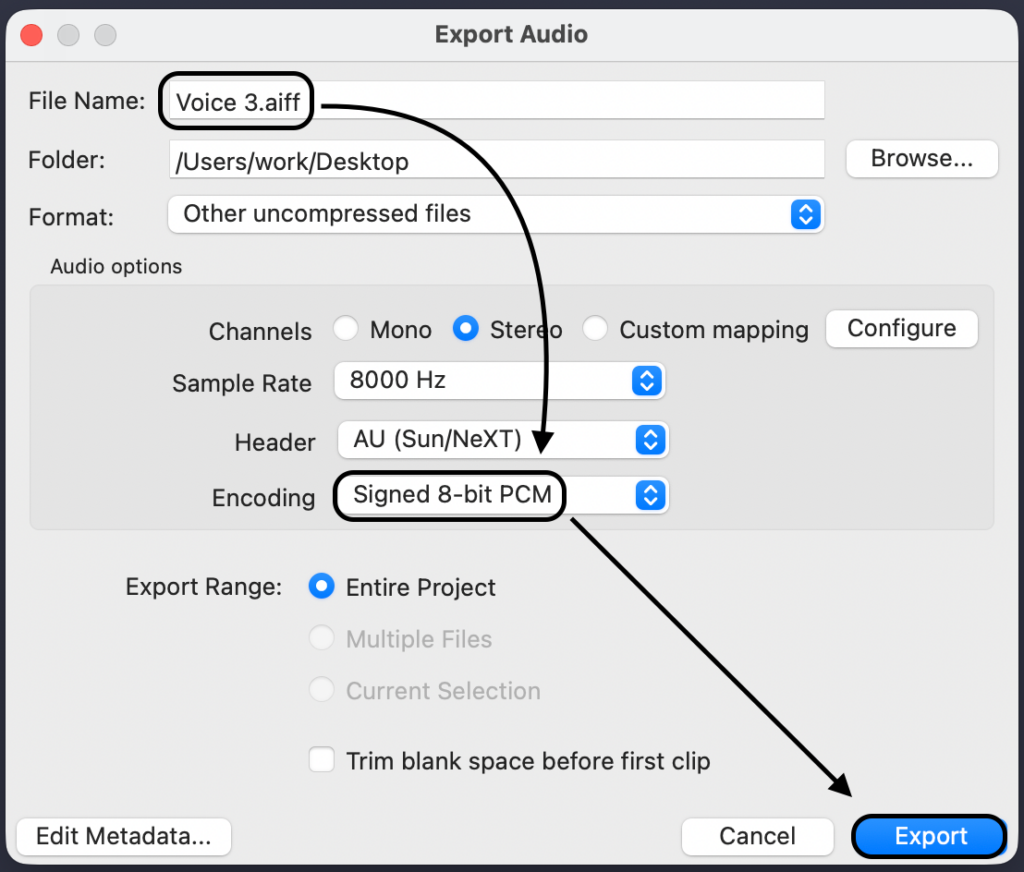
- Change the Export Format: In the export window, click the Save as type dropdown and select Other uncompressed files.
- Set the Bit Depth to 8-Bit: Under the format options, change the Encoding to Signed 8-bit PCM. Name you file and click Export.
- Re-Import the Track: Drag and drop your newly exported .wav file back into Audacity.
When you play the re-imported track, you will immediately hear the fuzzy digital clipping of the reduced bit depth combined with the muffled ringing of the lowered sample rate.
Be careful: This manual method is a form of destructive editing. Because you are physically exporting the file at a lower quality, you cannot tweak the parameters later like you can with a live VST plugin. Always duplicate and mute your original audio track before performing this hack so you have a backup.
Pro Tips for Creative Sound Design & Clean Source Audio
A golden rule of audio engineering is that intentional distortion sounds incredible, but accidental digital clipping ruins a take. To get the best results from an Audacity bit crusher, your source audio needs to be pristine before you start editing.
Using a flagship wireless mic like the Hollyland LARK MAX 2 is ideal for creators who want total control in post-production. Because it features 32-bit Float Recording, your audio never distorts—even with loud screaming or sudden noises.


You can capture studio-quality 48kHz/24-bit audio with professional Environmental Noise Cancellation (ENC) on location. You can even monitor it flawlessly via their new OWS earphones. This gives you a perfectly clean, unclipped canvas to intentionally “crush” and degrade in Audacity later.
Once you have your clean audio ready, use these techniques to make your bitcrushed tracks sound professional:
- Blend the Wet and Dry Signals: Don’t just apply a 100% crushed effect to your main vocal or instrument. If your VST plugin has a “Mix” or “Wet/Dry” knob, dial it back to 30-50%. This preserves the clarity of the original audio while adding a gritty texture underneath.
- Tame Harsh Highs with EQ: Sample rate reduction naturally introduces aggressive high-frequency digital artifacts. After applying your bitcrusher effect, add a Low-Pass Filter or use Audacity’s Graphic EQ to roll off harsh frequencies above 4kHz to 6kHz. This instantly softens the distortion, giving your audio a warm, authentic 8-bit vibe.
- Automate for Impact: Instead of leaving the bitcrusher on for the entire track, try applying it only to specific words, a drum fill, or a song intro. Highlight the specific audio section in Audacity before applying the VST to create instant contrast and grab the listener’s attention.
Frequently Asked Questions (FAQ)
How do I make audio sound like an 8-bit retro game in Audacity?
To achieve that classic 8-bit retro game sound, combine an Audacity bit crusher VST with a low-pass filter. First, use the bitcrusher to heavily reduce the sample rate (down to around 8000Hz) and drop the resolution to 8-bit. Then, apply an EQ or low-pass filter to cut off the piercing high frequencies, leaving you with a warm arcade tone.
Why isn’t my VST plugin showing up in Audacity?
If your newly installed plugin is missing, you likely need to enable it via the Plugin Manager (found under the Effect menu) by finding the plugin and clicking Enable. Another common culprit is an architecture mismatch. Ensure you downloaded the 64-bit version of the VST if you are running a 64-bit version of Audacity.
Is bitcrushing the same as distortion?
Bitcrushing is a specific type of digital distortion, but it behaves differently than traditional analog overdrive. While analog overdrive adds warm harmonics by pushing an audio signal past its peak, a bitcrusher creates harsh clipping by intentionally degrading the digital resolution and sample rate.
Conclusion & Next Steps
Audacity might not come with a native bitcrusher, but adding one takes only a few minutes. While manual export hacks work in a pinch, installing a dedicated VST plugin offers the ultimate creative flexibility for dialing in that perfect retro, lo-fi sound.
Ready to start degrading your audio the right way? Download a free VST and drop it into your Audacity plugin folder to test it out today.
Remember, the golden rule of audio degradation is that it must be intentional. Before you hit the post-production desk, make sure you are capturing pristine, unclipped source audio. Secure your recordings with reliable wireless gear like the Hollyland LARK MAX 2. By utilizing its 32-bit Float Recording, you guarantee your raw audio never accidentally distorts—giving you the perfect clean canvas to crush later.