.png)
Nothing destroys a perfect voice-over recording faster than “wet” mouth sounds. You can have the best microphone in the world, but lip smacks and saliva crackles can make your audio sound amateurish instantly. While proper microphone technique helps, sometimes post-production is the only way to save a take.
If you are specifically looking for how to use the De-Clicker plugin in Audacity, you have likely already discovered that the native tools aren’t doing the job.
“Mouth clicks” are those sharp, high-frequency sounds caused by saliva snapping or your tongue parting from the roof of your mouth. Unlike constant background hum, these artifacts are difficult to remove because they often happen during your speech, not just in the silence.
Many beginners make the mistake of trying to fix this with Audacity’s pre-installed tools, only to find their audio quality degraded. It is vital to distinguish between the two primary tools available to you:
- Native “Click Removal” Effect: This comes pre-installed in Audacity. However, it is designed primarily for digital spikes and vinyl crackle. It is rarely effective for organic mouth sounds and can leave your voice sounding robotic.
- Paul-L’s “De-Clicker” (Nyquist Plugin): This is a third-party script developed specifically for audio restoration. It targets the subtle, wet artifacts in human speech with much higher precision, removing the click without damaging the tone of your voice.
In this guide, we will walk you through exactly how to install this essential non-native plugin, the specific settings to use for voice, and how to turn a “noisy” recording into a professional broadcast.
Step 1: How to Download and Install the De-Clicker Plugin
The biggest hurdle for new Audacity users is that the De-Clicker tool is not included in the standard installation. It is a custom script developed by “Paul-L” that you must manually install.
If you look in your Effect menu and only see “Click Removal,” you are looking at the wrong tool. Here is how to get the right one.
1. Download the .ny File
You first need to acquire the script file. This is usually hosted on the official Audacity Forum or reliable audio repositories.
- Search for “Paul-L De-Clicker plugin” or visit the Audacity Forum.
- Download the file named De-Clicker.ny.
- Note: This is a script file, not a program like an .exe or .dmg. You cannot double-click it to install it; you must move it manually.
2. Move the File to the Plug-Ins Folder
Once you have the .ny file in your downloads folder, you need to move it to the directory where Audacity looks for effects.
For Windows Users:
- Copy the De-Clicker.ny file.
- Navigate to your Audacity installation folder. This is typically:
- C:\Program Files\Audacity\Plug-Ins
- Note: If you are using the 32-bit version, check C:\Program Files (x86)\Audacity\Plug-Ins.
- Paste the file into this folder. You may need to provide Administrator permission to complete this action.
For macOS Users:
- Copy the De-Clicker.ny file.
- Open Finder, click Go in the top menu, and select Go to Folder…
- Type in the following path and hit Enter:
- ~/Library/Application Support/audacity/Plug-Ins
- Paste the file here.
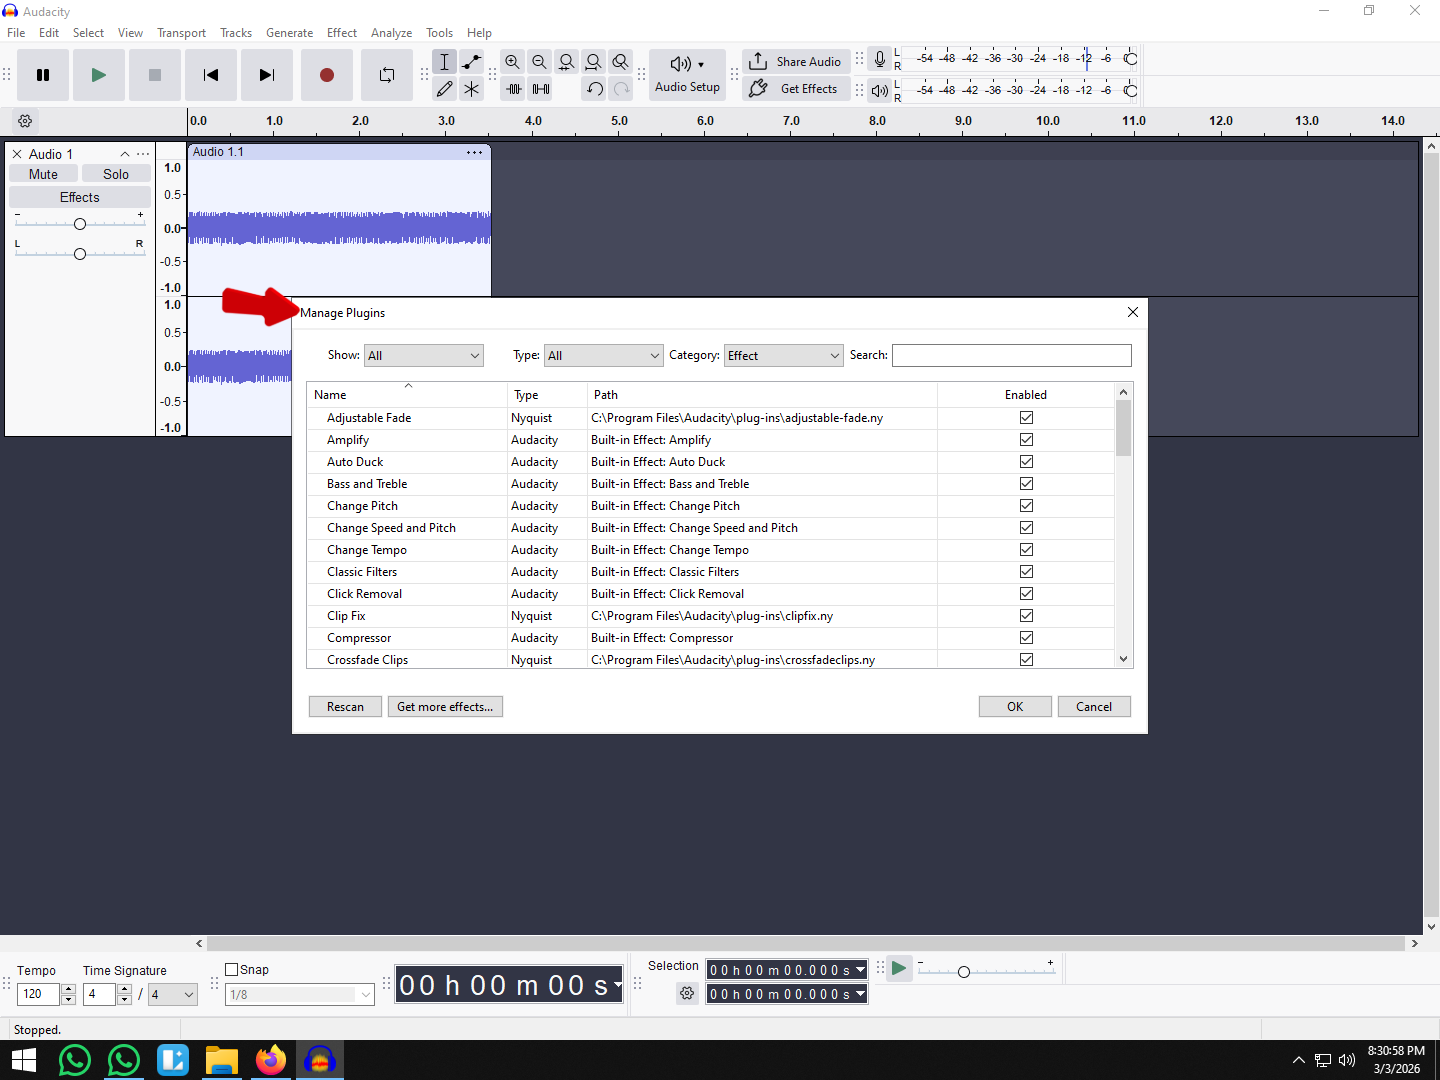
3. Activate the Plugin in Audacity
Moving the file is only half the battle. You must tell Audacity to recognize the new tool.
- Launch (or restart) Audacity.
- Navigate to the top menu and select Tools > Plugin Manager (in older versions, this may be under Effect > Add / Remove Plug-ins).
- In the dialog box, look for De-Clicker in the list. It will likely say “New” or “Disabled” next to it.
- Click on De-Clicker to select it, then click the Enable button.
- Click OK to close the manager.
The plugin will now appear in your Effect menu, usually located in the bottom section under the dividing line where third-party plugins are grouped.
Step 2: Best Settings for the De-Clicker Plugin (Cheat Sheet)
When you first open Paul-L’s De-Clicker plugin, the interface can look complicated. It features multiple sliders and technical terms that aren’t present in Audacity’s native effects. However, you don’t need to understand the math behind every slider to get a clean recording.
Most users only need to adjust the Sensitivity Threshold and the Number of Passes. If you set the sensitivity too high, you risk removing the “attack” of your consonants (making you sound like you have a lisp). If you set it too low, it won’t catch the mouth noises.
Use the cheat sheet below as a safe starting point for spoken word audio (podcasts, voice-overs, and dialogue).
Recommended Settings for Voice
| Parameter | Recommended Start | What It Does |
|---|---|---|
| Sensitivity Threshold | -20.0 dB | The most critical setting. It determines how “loud” a click must be to be detected. If the plugin misses clicks, lower this number (e.g., -30 dB). |
| Number of Passes | 2 | How many times the plugin scans the audio. 2 passes are standard; higher numbers take longer to process but are more thorough. |
| Frequency Step | 15 | Controls how granular the analysis is. A lower number scans more frequencies (slower) but is more precise. |
| Step Durations | Default | Leave these at the default values unless you are an advanced audio engineer. |
| De-Essing | Optional | This plugin includes a built-in De-Esser. If your “S” sounds are harsh, check the “Apply De-Essing” box. |
Understanding the Key Sliders
1. Sensitivity Threshold
Think of this as a gatekeeper. At -10 dB, the gate is high; only the loudest, most obvious clicks will be removed. At -30 dB, the gate is low; the plugin will start attacking quieter sounds.
- Warning: If you push this too far (e.g., -40 dB or lower), the plugin may mistake parts of your actual words (like ‘T’ and ‘K’ sounds) for clicks and delete them.
2. Frequency Step
This setting balances speed vs. accuracy. A step of 10 to 20 is the “Goldilocks” zone for vocals. If you are editing a 2-hour podcast, setting this too low will make the processing time extremely long.
3. De-Essing Capability
While primarily a De-Clicker, this tool is surprisingly effective at taming sibilance (sharp “S” sounds). However, for professional results, it is usually better to run a dedicated De-Esser plugin after you have finished de-clicking, rather than trying to do both at once.
Pro Tip: Don’t “Apply” Blindly
Never apply the De-Clicker to your entire track immediately.
- Highlight a small 5-10 second section of audio where you hear mouth noise.
- Click the “Preview” button in the bottom left of the plugin window.
- Listen carefully. Did the clicks vanish? Did your voice start sounding robotic or muffled?
Only once you have verified the settings on a short clip should you press OK to process the full track.
Step 3: Applying the Effect and Verifying Results
Once you have your settings configured, you need to apply the effect carefully. While it is tempting to select your entire podcast episode and blast it with the De-Clicker, this “scorched earth” approach can damage the natural transients of your voice and takes a significant amount of computing time.
Selective Processing vs. Whole Track
For the best results, use a targeted approach.
- Identify Problem Areas: Listen through your track and highlight only the sections where mouth noise is audible (usually between sentences or during quiet consonants).
- Apply to Selection: Highlight the specific region and apply the De-Clicker. This preserves the audio quality of the rest of your recording.
- Whole Track (Light Mode): If you must process the whole track (e.g., for a consistently “wet” sounding speaker), use much gentler settings (lower sensitivity) to avoid making the voice sound robotic.
Visual Verification: Using the Spectrogram View
Your ears can be deceived, but your eyes cannot. The standard Waveform view (the blue squiggly lines) is excellent for seeing volume, but it is terrible for spotting clicks. To actually see the mouth sounds, you need to switch views.
How to Switch to Spectrogram:
- Click the down arrow next to the Track Name on the left side of the interface.
- Select Spectrogram from the dropdown menu.

What to Look For:
In this view, time is on the horizontal axis, and frequency (pitch) is on the vertical axis.
- The Click: A mouth click looks like a bright, thin vertical line that shoots from the bottom (bass) to the top (treble). It looks distinct from the horizontal “clouds” of your voice.
- The Fix: After applying the De-Clicker plugin, that vertical line should disappear or fade significantly into the background color.
Note: If the vertical line disappears but the audio sounds muffled, your Threshold is likely too aggressive. Undo the action (Ctrl + Z), lower the sensitivity, and try again.
Alternative Method: Using Native “Click Removal” vs. Manual Repair
Even the best plugins aren’t magic bullets. Sometimes Paul-L’s De-Clicker misses a subtle lip smack, or conversely, it processes the audio too heavily, dulling the crispness of your voice.
When the third-party plugin fails, you have two native options within Audacity: the automated Click Removal tool and the surgical Repair tool.
1. Native “Click Removal” (Best for Digital Spikes)
Many users confuse Audacity’s built-in Click Removal effect with the downloadable De-Clicker plugin. They are not the same.
The native tool is designed primarily for digital spikes and crackles—think of the noise from a scratched vinyl record or a bad cable connection. It looks for sharp, vertical jumps in the waveform.
- Why it fails on mouth sounds: Mouth clicks (saliva noises) are often “soft” and organic. They blend into the vocal frequencies rather than spiking sharply. Consequently, the native tool often ignores them entirely.
- When to use it: If your audio has loud, sharp popping noises or static crackle, try this before the De-Clicker.
- Go to Effect > Noise Removal and Repair > Click Removal.

- Adjust the Threshold (lower detects more clicks) and Max Spike Width.

2. The “Repair” Tool (Best for Precision Editing)
For stubborn clicks that no plugin can remove without damaging the voice, you must use the Repair tool. This is a destructive, manual process, but it yields the most natural results because it uses interpolation to “redraw” the damaged waveform based on the surrounding audio.
How to use the Manual Repair tool:
- Identify the Click: Switch your track view to Spectrogram (Click the track name > Spectrogram). Clicks appear as bright, vertical lines.
- Zoom In: You need to zoom in significantly. Use Ctrl + Scroll (Windows) or Cmd + Scroll (Mac) until you can see the individual sample dots on the line.
- Select the Artifact: Highlight only the click.
- Note: The Repair tool only works on selections of 128 samples or fewer. If you select too much audio, the option will be greyed out.
- Apply Repair: Go to Effect > Noise Removal and Repair > Repair.

- Shortcut: Once you have used the effect once, you can simply highlight the next click and press Ctrl + R (Windows) or Cmd + R (Mac) to repeat the repair instantly.
Pro Tip: How to Prevent Mouth Clicks Before You Record
While the De-Clicker plugin is a powerful rescue tool, the “Golden Rule” of audio engineering is simple: Prevention is always better than cure. Relying heavily on post-production plugins can make your voice sound robotic or processed.
To save yourself hours of editing time, try these techniques to eliminate “wet” mouth sounds at the source.
The “Green Apple” Trick & Hydration
Mouth clicks are often caused by dehydration or “sticky” saliva.
- Hydrate Early: Drink water 30 minutes before you record, not just during the session.
- Eat a Granny Smith Apple: This is an industry secret among voice actors. The tartness and pectin in green apples help cut through the mucus in your mouth, instantly reducing the smacking sounds caused by sticky saliva.
- Mic Position: Position your microphone slightly off-axis (not directly in front of your mouth). This reduces the direct impact of plosives and sharp transients.
Upgrade Your Input Source
Sometimes, the issue isn’t just your voice—it’s how your hardware captures it. Low-quality microphones often struggle with clarity, forcing you to boost gain and compression later, which only amplifies unwanted background clicks.
For professional-grade recordings that require significantly less cleanup, we recommend the Hollyland LARK MAX 2.

Hollyland LARK MAX 2 - Premium Wireless Microphone System
A premium wireless microphone for videographers, podcasters, and content creators to capture broadcast-quality sound.
Key Features: Wireless Audio Monitoring | 32-bit Float | Timecode
Using a high-end wireless system like the LARK MAX 2 solves audio issues before they reach your computer:
- Studio Quality (48kHz/24-bit): It captures your voice with incredibly high fidelity, ensuring a distinct separation between your vocal frequencies and unwanted noise.
- 32-bit Float Recording: This feature is a lifesaver for editing. It captures a massive dynamic range, preventing distortion even if you speak loudly. This ensures your source audio is pristine and “healthy” before you even open Audacity, reducing the need for aggressive restoration plugins.
Frequently Asked Questions (FAQ)
Is the De-Clicker plugin for Audacity free?
Yes. The De-Clicker plugin (developed by Paul-L) is completely free and open-source. Unlike expensive VST plugins from companies like iZotope or Waves, this is a community-created Nyquist script. You do not need to pay a subscription or unlock a license to use its full feature set.
Why is De-Clicker not showing up in my effects menu?
This is the most common issue users face. If you cannot see “De-Clicker” in the bottom half of your Effect menu, it is usually due to one of two reasons:
- You haven’t enabled it yet: Installing the file isn’t enough. You must go to Tools -> Plugin Manager, locate “De-Clicker” in the list (it will likely say “New”), select it, and click Enable.
- Wrong Folder Location: The .ny file must be inside the specific Plug-Ins folder. If you placed it in the general Audacity program folder, the software will not detect it.
Can De-Clicker remove background noise?
No. The De-Clicker tool is designed specifically for transients—short, sharp spikes in audio like mouth smacks or digital ticks. It is not designed to handle constant background noise like air conditioner hum, computer fans, or room hiss.
If you try to use De-Clicker for background noise, you will likely cause digital distortion. Instead, use Audacity‘s native Noise Reduction effect for constant hums, and save De-Clicker for the wet mouth sounds.
Does this work on Mac M1/M2 chips?
Yes. Because the De-Clicker is a Nyquist script (a simple text-based code file ending in .ny) rather than a compiled binary VST, it is generally compatible with Apple Silicon (M1, M2, M3) computers. Ensure you are running the latest version of Audacity for macOS to avoid any architecture conflicts.
Conclusion
Getting pristine audio in Audacity often requires going beyond the default tools. By installing the De-Clicker plugin and mastering the threshold settings, you can rescue recordings that would otherwise be ruined by mouth noises, saliva sounds, and digital artifacts.
Remember, audio restoration is a game of compromise. Follow these final rules of thumb:
- Less is More: Always apply the effect with subtle settings first. It is better to leave a tiny bit of background noise than to aggressively process the track and make your voice sound robotic.
- Test First: Never apply the effect to a whole 60-minute track blindly. Select a 5-second clip, apply the effect, and listen critically.
- Trust Your Ears: If the “Repair” tool works better for a single loud click, use that instead of a global filter.
While plugins can save a bad take, the best strategy is to capture clean audio from the start. Post-production is significantly faster when your input source is high-fidelity. If you are ready to upgrade your recording setup, check out the Hollyland LARK MAX 2. With its 32-bit Float Recording, it captures rich, distortion-free vocals that require significantly less cleanup in Audacity—letting you spend more time creating and less time editing.