.png)
The biggest hurdle for many aspiring musicians is the price tag. Professional Digital Audio Workstations (DAWs) like Pro Tools or Ableton Live can cost hundreds of dollars and require months to master.
Audacity removes that barrier entirely.
If you want to know how to use Audacity for YouTube music recording and editing without spending a dime, you are in the right place. Audacity is free, open-source, and provides the essential toolkit needed for production without the monthly subscription fees.
Its most critical feature for musicians is Multitrack Recording. This allows you to import an instrumental backing track on one layer and record your vocals or instruments on a separate layer, giving you full control over the mix.
Can You Get Professional Results?
There is a common misconception that you need “industry-standard” software to sound good. This is false. While paid software offers advanced tools for electronic music composition, Audacity is fully capable of producing studio-quality audio for acoustic covers, voiceovers, and podcasts.
However, software is not magic. It follows the “Golden Rule” of audio engineering: Garbage In, Garbage Out. If your raw recording is distorted or noisy, no amount of editing will fix it. Your focus must first be on capturing a clean signal.
Essential Gear: Getting Studio Sound Before You Hit Record
To get professional results, you need a hardware chain that captures clean audio from the start. Here is the essential toolkit for the YouTube musician:
1. The Computer
You don’t need a supercomputer. Since Audacity is lightweight, almost any Windows, Mac, or Linux machine purchased in the last 5–7 years will work. Just ensure you have enough hard drive space for large, uncompressed WAV files.
2. Headphones (Monitoring)
You need to hear your backing track without the microphone picking up the sound from your speakers (this is called “bleed”).
- Closed-Back Headphones: These cup your ears and stop sound from escaping.
- In-Ear Monitors (IEMs): These are great for a low-profile look on video.
3. The Microphone (Your Input Source)
This is the most critical component. For YouTube music—whether it’s covers or acoustic sessions—you need a microphone that handles high dynamic range. It needs to capture everything from a whisper to a belt without the audio “breaking up.”
For creators who need professional specs without the complexity of an expensive interface, the Hollyland LARK MAX 2 is our top recommendation.

Hollyland LARK MAX 2 - Premium Wireless Microphone System
A premium wireless microphone for videographers, podcasters, and content creators to capture broadcast-quality sound.
Key Features: Wireless Audio Monitoring | 32-bit Float | Timecode
Why the Hollyland LARK MAX 2 is ideal for Audacity users:
- 32-bit Float Recording (The “Safety Net”): Beginners often ruin great takes because they sing too loud, causing the audio to “clip” (distort). The LARK MAX 2 features 32-bit float recording, which captures such a massive dynamic range that it is virtually impossible to clip. If you scream into the mic and the waveform looks like a solid block in Audacity, you can simply lower the volume in post-production and the clean audio is still there.
- Wireless Audio Monitoring: Recording vocals over a backing track requires you to hear the music and your own voice simultaneously to stay on beat. The LARK MAX 2 includes OWS (Open Wearable Stereo) earphones. These allow you to monitor your audio in real-time with zero latency.
- YouTube-Ready Specs: YouTube’s standard audio sample rate is 48kHz. Many budget USB mics default to 44.1kHz, which can cause sync issues. The LARK MAX 2 records natively at 48kHz/24-bit, matching your video timeline perfectly.
Step 1: Setting Up Audacity for YouTube Standards
Before you hit record, you must configure Audacity to match YouTube’s technical requirements. If you use the wrong settings now, your audio might drift out of sync with your video later.

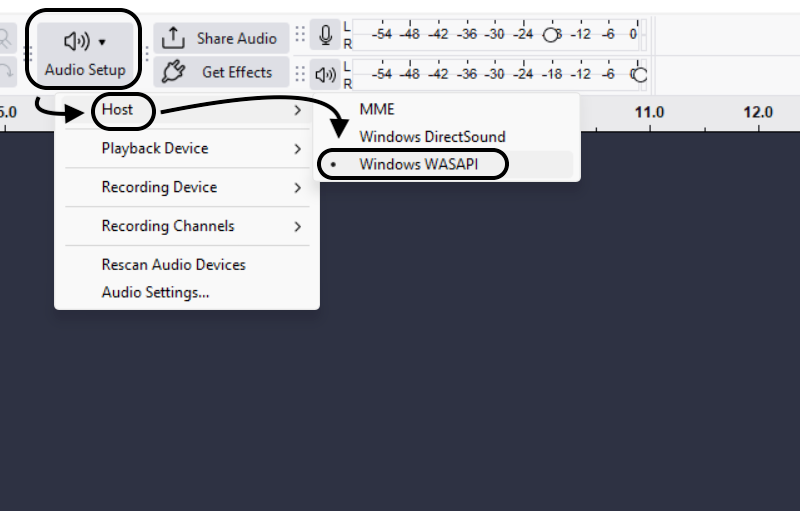
Go to the Audio Setup button in the top toolbar:
- Project Rate (Hz): Set this to 48000 Hz. While CD music uses 44,100 Hz, 48kHz is the standard for video. Using this rate ensures your audio renders perfectly with your video footage.
- Recording Channels:
- Choose Mono for single vocals (lead vocals or podcast intros). This ensures your voice comes out of both speakers equally.
- Choose Stereo for instruments with natural wideness (like acoustic guitar or piano) or if using a stereo mic setup.
- Audio Host:
- Windows: Select MME or Windows DirectSound.
- Mac: Select Core Audio.

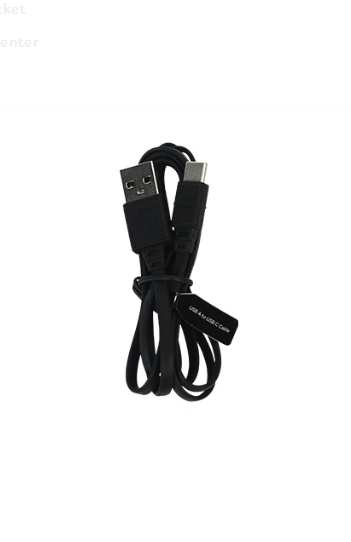
- Recording Device: Select your microphone. If using the Hollyland LARK MAX 2, plug the receiver in via USB-C and select it as your input source. This ensures Audacity captures the digital signal directly.
Step 2: How to Record Vocals Over a Backing Track
For YouTube covers, you rarely record your voice and the music on a single track. Instead, you use Multitracking. This allows you to mix your vocals separately from the instrumental.


Crucial Step: Go to Edit > Preferences > Recording (or Audacity > Preferences on Mac) and check the box that says “Hear other tracks while recording (overdub).” If you don’t do this, you won’t hear the music while you sing.
Once that is set, follow this workflow:
- Import Your Backing Track: Drag and drop your instrumental file (MP3 or WAV) directly into the gray workspace.
- Create Your Vocal Track: Do not record directly onto the backing track. Go to Tracks > Add New > Mono Track.

- Put on Headphones: You cannot use speakers. Your mic will pick up the music and ruin the recording. If you are using the Hollyland LARK MAX 2, connect the OWS earphones to the receiver to hear yourself and the music wirelessly.
- Hit Record: Click on your new empty Mono track. Press the Red Record Button (or Shift + R). Sing along, and hit Spacebar to stop.

Step 3: Editing Your Music (The “Make It Sound Pro” Chain)
Raw recordings often sound flat. To get that polished “studio sound,” you need to apply effects in a specific order. This is called your Signal Chain.
1. Noise Reduction (Clean the Canvas)
Remove background hiss (computer fans, AC) first. If you don’t, later effects will make the noise louder.
- Highlight a few seconds of silence in your recording.
- Go to Effect > Noise Removal and Repair > Noise Reduction and click “Get Noise Profile.”

- Select your entire track (Ctrl+A / Cmd+A). Go back to the effect.
- Set “Noise Reduction (dB)” to 6–12 and “Sensitivity” to 6. Click OK.

2. Equalization / EQ (Shape the Tone)
EQ balances the frequencies. You want to remove muddy lows and boost crisp highs.
- Go to Effect > EQ and Filters > Filter Curve EQ.

- Cut the Mud: Drag the line on the far left down. Cut frequencies below 80Hz–100Hz. These are low rumbles that clash with the bass in your backing track.
- Boost the Air: Slightly raise the line on the right side (around 5kHz) by 2–3dB for clarity.

3. Compression (Even Out the Volume)
Compression makes the quiet parts louder and the loud parts softer, keeping your volume consistent.
- Go to Effect > Volume and Compression > Compressor.

- Threshold: -12dB to -18dB (Adjust until you see the waveform change).
- Ratio: 2:1 or 3:1 (Gentle compression).
- Make-up gain: Checked.

4. Reverb (Add Space)
Raw vocals sound like they were recorded in a closet. Reverb places your voice in a virtual room.
- Go to Effect > Delay and Reverb > Reverb.

- Click Presets & Settings > Factory Presets and choose “Vocal I” or “Vocal II.”
- Pro Tip: If it sounds too echoey, lower the “Room Size” or “Wet Level.” You want to feel the space, not drown in it.

Step 4: Mastering and Exporting for YouTube
You aren’t ready to upload just yet. YouTube applies its own processing to videos, so your audio needs to be compliant.
Loudness Normalization
You need to ensure your track is at the maximum volume possible without distorting.
- Select your entire project.
- Go to Effect > Volume and Compression > Normalize.

- Set the Peak Amplitude to -1.0 dB.
- Why -1.0 dB? This leaves a small safety buffer (headroom) so your audio doesn’t distort when YouTube converts it to different streaming formats.
Exporting (Avoid MP3s)
Most creators make the mistake of exporting as an MP3. Do not do this. YouTube compresses every video. If you upload an MP3 (already compressed) and YouTube compresses it again, your audio will sound watery and low-quality.
- Go to File > Export Audio

- Save as type: WAV (Microsoft) signed 16-bit PCM (or 24-bit).
- Sample Rate: Ensure this is 48000 Hz.

Use this high-quality WAV file in your video editor to sync with your footage.
Common Pitfalls: Why Your Recording Might Fail
Pitfall 1: Latency (The “Out of Sync” Vocal)
Sometimes the vocal track sounds slightly behind the beat, even if you sang perfectly. This is “latency”—a delay between what you hear and what the computer writes to the disk.
The Fix:
You don’t need to re-record.
- Zoom in closely on the start of your vocal track.
- Hover over the top of the clip (the “Clip Handle”) until the hand icon appears.
- Drag the clip slightly to the left to align the start of your words with the beat of the backing track.
Pitfall 2: Clipping and Distortion
Clipping happens when you sing too loud. The waveform hits the top edge of the track and flattens out. It sounds like harsh crackling. With standard microphones, this damage is permanent.
The Solution: 32-bit Float
If you have a dynamic singing style, hardware is your best safety net. This is where the Hollyland LARK MAX 2 shines.
Because it uses 32-bit Float Recording, it is mathematically impossible to clip the audio file during recording. If you scream into the mic and the waveform looks distorted in Audacity:
- Select the track.
- Go to Effect > Volume and Compression > Amplify.

- Enter a negative number (e.g., -10 dB) and click Apply.

The “clipped” peaks will reappear, perfectly clean. This feature alone can save an entire video shoot from being scrapped.
Frequently Asked Questions (FAQ)
Can I record directly from YouTube into Audacity?
Yes. Set your Audio Host to Windows WASAPI and your Recording Device to Speakers (Loopback). This records whatever sound is coming out of your computer.
What is the best sample rate for YouTube music?
48,000 Hz (48kHz). While Spotify music is 44.1kHz, video workflows prefer 48kHz to match the frame rate of the camera footage.
How do I remove vocals from a song in Audacity?
You can try the Vocal Reduction and Isolation effect. However, be realistic: the results are rarely perfect. You will often hear “ghostly” artifacts, or the effect might accidentally remove drums and bass along with the vocals.
Is Audacity good for professional music production?
It is excellent for recording and editing live audio (vocals, guitars). However, it lacks MIDI sequencing and virtual instruments. If you need to program electronic beats or use software synthesizers, you will eventually need a full DAW like Reaper or Ableton.
Conclusion
Audacity proves that you don’t need a monthly subscription to produce professional-grade music for YouTube. With its multitrack capabilities and extensive plugin support, it offers everything a creator needs to turn a raw idea into a polished cover.
Remember, the software is only as good as the audio you feed it. To guarantee your raw files are studio-ready, consider upgrading your input source. The Hollyland LARK MAX 2 is the ideal companion for the solo YouTube musician; its 32-bit float recording acts as a safety net for your best takes, and the wireless monitoring keeps your performance tight.
Master your hardware first, and your workflow in Audacity will become faster, easier, and infinitely more professional. Now, go hit record.