.png)
Learning how to create a robot voice effect in Audacity requires more than just slapping a filter on a track. To transform a human voice into a machine, you have to deconstruct the natural qualities of speech. Humans have dynamic range, breath, and fluctuating pitch. Robots do not.
To sound robotic, you must artificially flatten these variances and introduce metallic resonance. Whether you are modding a game, producing a sci-fi podcast, or aiming for a “Dalek” style villain, the process relies on three non-negotiable components:
- A Clean, Dry Source: You cannot process a recording with room echo. Compression and delay effects amplify background noise, so your source audio must be free of natural reverb.
- Tight Delay (Comb Filtering): This creates the signature metallic texture. By duplicating the audio track and offsetting it by just 10 to 30 milliseconds, you create a “buzzing” interference pattern.
- Pitch Correction: Robots don’t ask questions; they execute commands. Removing natural human inflection creates the necessary monotonous, mechanical delivery.
Step 0: Recording the Source Audio (Crucial)
Before you touch a single slider, you need to understand the golden rule of audio processing: “Garbage In, Garbage Out.”
Robot effects act like a magnifying glass. If your original recording has background hiss, room echo, or distortion, the effect will amplify those flaws by 10x. A clean sci-fi voice will turn into a muddy mess of static if the source isn’t pristine.
For the best results, your source audio needs two things:
- Monotone Delivery: Deliver your lines with a flat, rhythmic cadence. Software can change pitch, but it cannot easily remove the natural “sing-song” inflection of human speech.
- High Dynamic Range: Sci-fi voice acting is unpredictable. You might go from a cold, logical whisper to screaming “SYSTEM FAILURE” in seconds.
The Hardware Solution: Avoiding Distortion
Capturing those sudden loud outbursts without ruining the take is difficult with standard microphones. If you shout into a standard mic, the waveform “clips” (flattens out), causing harsh digital distortion that no plugin can fix.
To capture usable source audio for heavy effects work, we recommend the Hollyland LARK MAX 2. It solves the two biggest problems in creative voice design:

Hollyland LARK MAX 2 - Premium Wireless Microphone System
A premium wireless microphone for videographers, podcasters, and content creators to capture broadcast-quality sound.
Key Features: Wireless Audio Monitoring | 32-bit Float | Timecode
- 32-bit Float Recording: This is a safety net for voice actors. If you scream a command and the audio levels spike, standard recorders would clip and ruin the file. The LARK MAX 2’s 32-bit float technology captures such a massive dynamic range that you can simply lower the volume in post-production to recover the clean audio—no re-takes needed.
- Studio-Grade Fidelity: Audacity needs high-quality data to process effects smoothly. The LARK MAX 2 records at 48kHz/24-bit, providing a dense, rich signal. This gives the software enough digital information to stretch, pitch-shift, and distort the voice without creating unwanted artifacts.
Method 1: The “Metallic Echo” Technique (Best for Beginners)
This is the quickest way to turn a human voice into a cold, metallic machine. This method mimics the hardware used for classic sci-fi villains by using native Audacity tools to create constructive interference.
Follow this workflow to achieve that signature robotic ring:
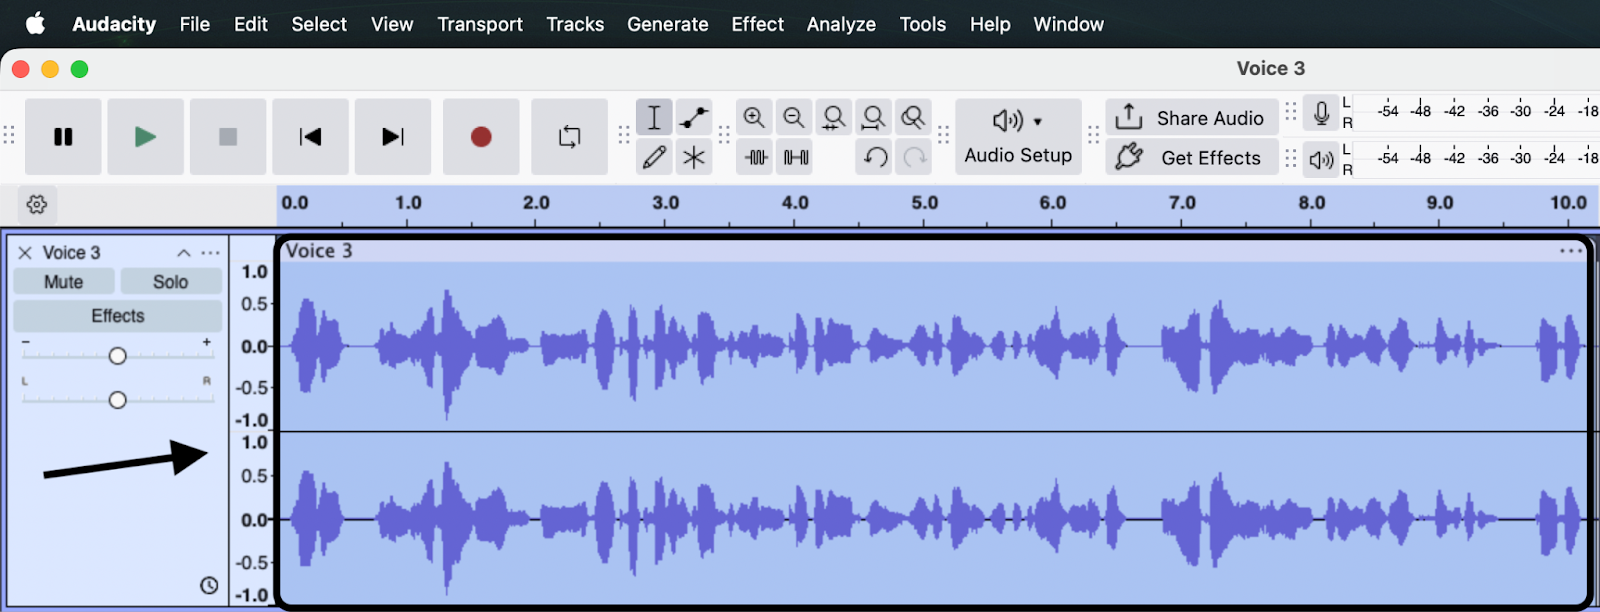
- Record or Import Audio: Start with a clean, dry vocal track (mono tracks work best).
- Duplicate the Track: Select your audio and press Ctrl+D (Windows) or Cmd+D (Mac). You should now have two identical tracks stacked on top of each other.
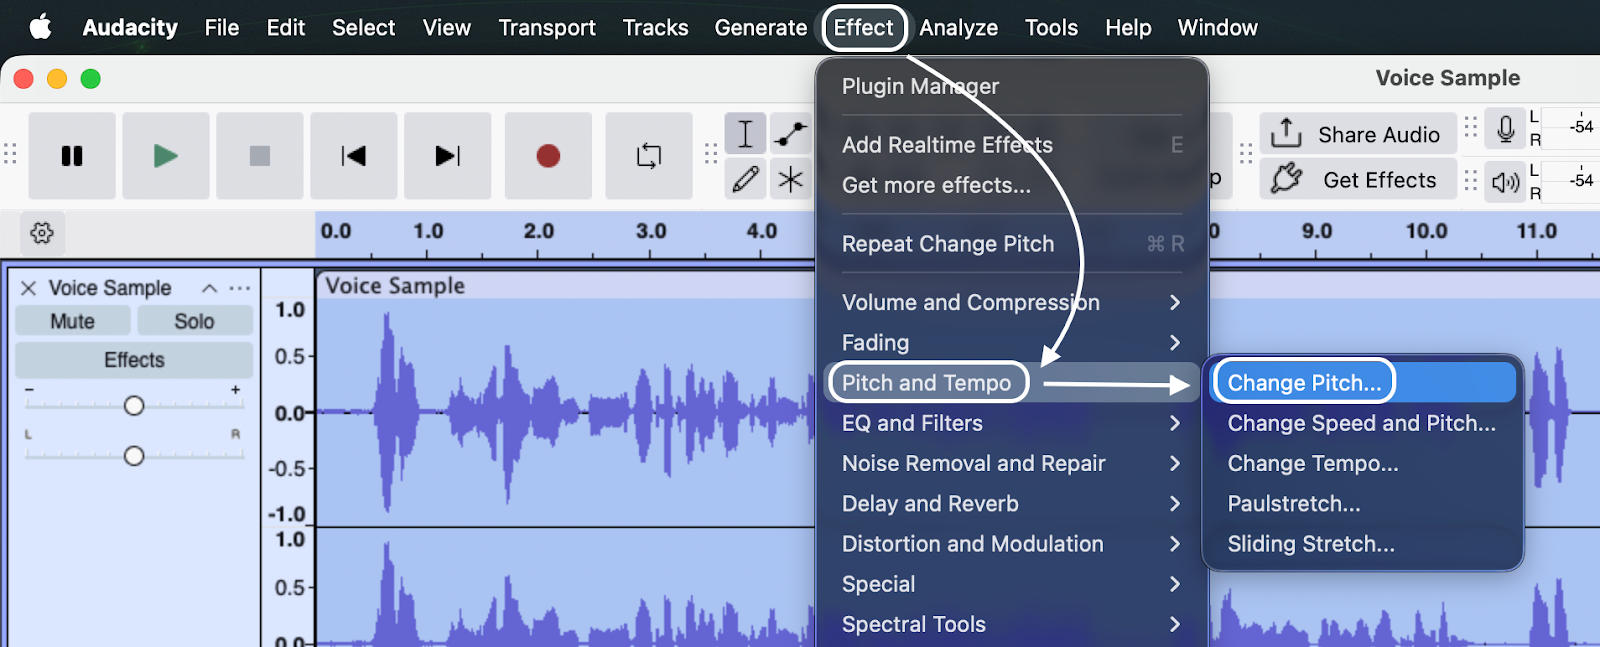
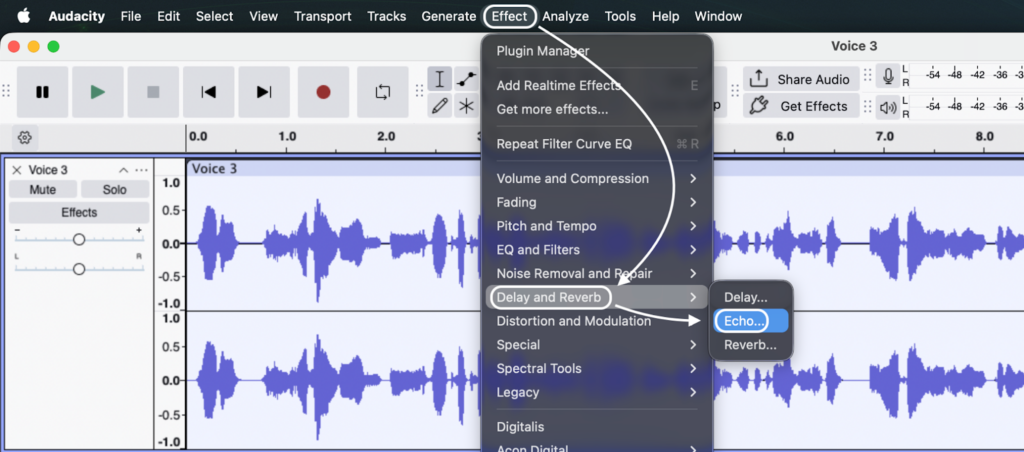
- Apply “Echo” to Track 2: Mute the top track so you can hear what you are doing. Select the bottom track (the duplicate), go to Effect, and choose Echo.
- Input Specific Settings: This is the important part. Enter these values exactly:
- Delay time (seconds): 0.015
- Decay factor: 0.6
- Note: If the delay is too long (e.g., 0.1), it will sound like a canyon echo. It must be extremely short to sound robotic.

- Pitch Shift (Optional): To make the robot sound larger or more menacing, keep the second track selected and go to Effect > Pitch and Tempo > Change Pitch. Lower the pitch by roughly -10% to -15%.


- Mix and Export: Unmute the top track. Play both together. The combination of the clean voice and the delayed/pitched voice creates the final effect.

Why “0.015”?
You might wonder why we use exactly 0.015 seconds. This creates a phenomenon called Comb Filtering. When a copy of a sound is delayed by such a tiny amount (15 milliseconds) and played over the original, the sound waves interfere with each other.
To the human ear, this mathematical interference sounds distinctly metallic and artificial.
Method 2: The “Computerized Sci-Fi” Technique (Tremolo)
While the echo method creates a metallic resonance, the Tremolo method simulates a digital, glitchy texture. This technique is ideal for creating the voice of a spaceship computer, a hologram transmission, or a disembodied AI assistant.
Technically, Tremolo rapidly modulates volume (loud-quiet-loud). However, when you push this modulation speed beyond normal limits, it stops sounding like a pulse and creates a synthetic “buzz.”
Step-by-Step Workflow
- Select Your Track: Click the header of your vocal track to highlight the entire waveform.
- Open the Effect: Navigate to Effect > Distortion and Modulation > Tremolo.

- Adjust the Frequency:
- Ignore the default settings (usually set to a slow pulse).
- Set Frequency (Hz) to 40 or 50.
- Why this works: Standard tremolo operates at roughly 2–5 Hz. By cranking this to 50 Hz, you modulate the volume 50 times per second, creating a computerized “growl” rather than a rhythmic wobble.
- Set the Wet Level:
- Set Wet Level to 40% – 50%.
- Important: Do not set this to 100%. If the effect is fully “wet,” the audio can become choppy and unintelligible. Keeping 50% of the original signal ensures your words remain clear while retaining the robotic texture.
- Apply and Listen: Click Preview. If the voice sounds too deep or muddy, increase the Frequency slightly. If it sounds too “buzzy,” lower the Wet Level.

Method 3: Using Free VST Plugins (Advanced)
The native Echo and Tremolo methods are excellent for creating sci-fi monsters or glitchy AI, but they often fail to capture the smooth, musical “singing robot” sound popularized by artists like Daft Punk.
For a professional, intelligible result, it is far more efficient to use third-party VST (Virtual Studio Technology) plugins.
Recommended Free Plugins
- TAL-Vocoder (Best for Vintage Robot Sounds): This is widely considered the industry standard for free vocoding. It emulates vintage 80s hardware, giving your voice that classic, thick analog texture. It is significantly easier to use than Audacity’s built-in tool.
- GSnap (Best for “Auto-Tune” Style): If you want a robotic voice that retains the human character but snaps perfectly to a musical grid (the “T-Pain” effect), GSnap is the go-to choice. By setting the Retune Speed to the fastest setting, you strip away all natural human vibrato, resulting in a cold, mechanical pitch.
How to Install and Use VSTs
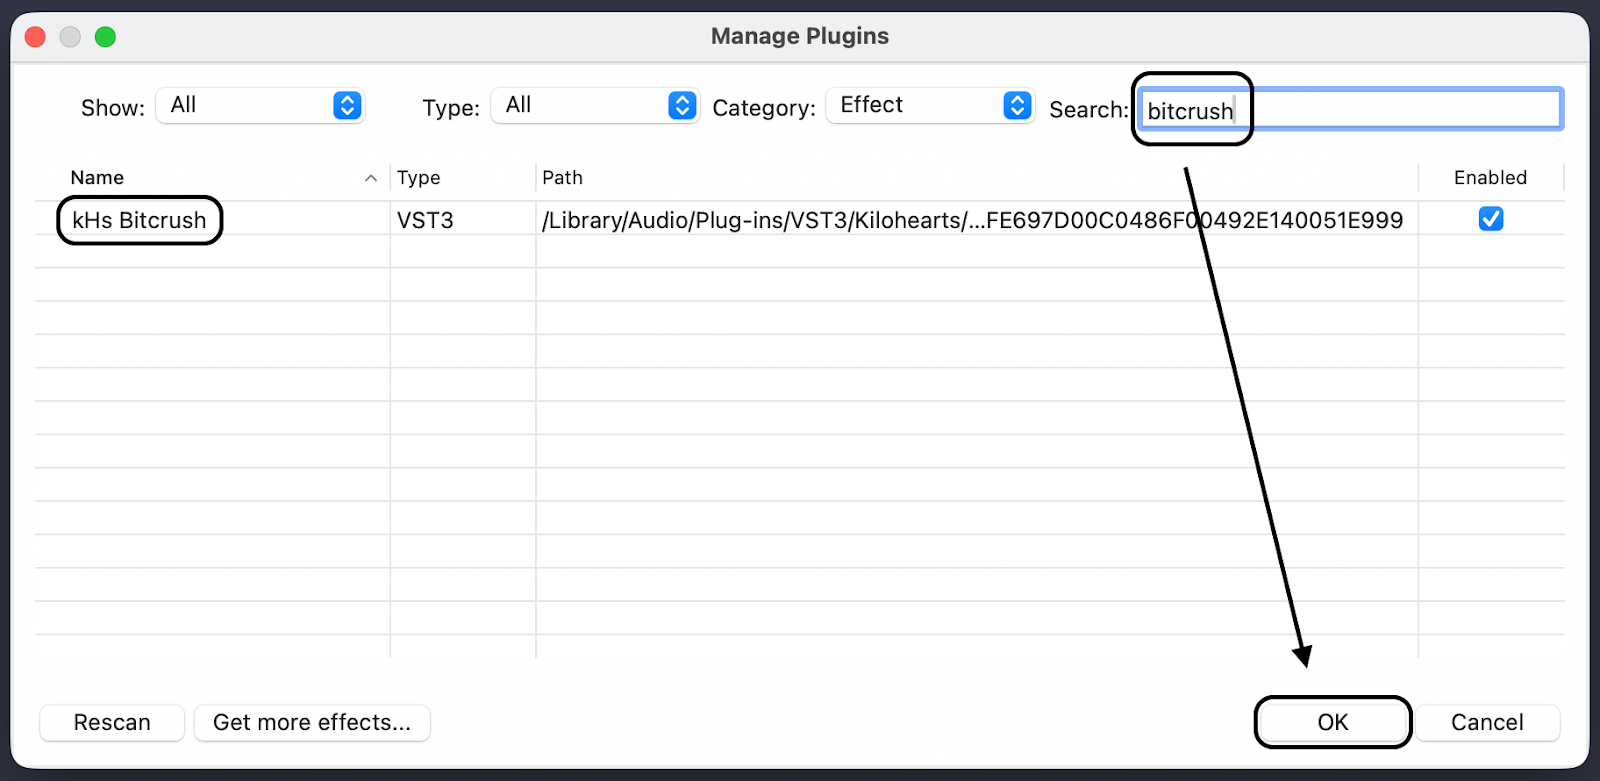
Audacity supports VST plugins, but you have to enable them manually.
- Download and Install: Move the VST file (.dll or .vst) to Audacity’s Plug-Ins folder.
- Enable the Plugin: Open Audacity, go to Tools > Plugin Manager, select your new plugin, click Enable, and hit OK.


- Apply: Select your track and find the plugin in the Effect menu.
Warning: Audacity applies VST effects destructively. This means once you click “Apply,” the file is permanently changed. Always duplicate your track before adding VSTs so you have a backup.
Refining Your Robot Voice: EQ and Compression
Applying delays and modulation creates the texture of a robot, but the audio often still sounds too “human” because of its natural warmth. To sell the illusion, you need to strip away the bass and artificially flatten the volume.
Shaping the Tone with Filter Curve EQ
Real-world robots or sci-fi AI often sound like they are speaking through a limited-frequency speaker or a radio.
- Select your track and go to Effect > EQ and Filters > Filter Curve EQ.

- Cut the Lows (High Pass): Drag the line on the left side down to remove everything below 100Hz (or up to 200Hz for a “telephone” sound). This removes the natural “mud” and warmth of the human voice.
- Boost the Presence: Create a slight bump (boost) between 2kHz and 4kHz. This frequency range controls intelligibility and gives the voice a harsh, metallic “bite.”

Flattening Dynamics with Compression
Human speech naturally fluctuates in volume based on emotion. Machines do not. To make your voice sound mathematically consistent, you need to crush the dynamic range using compression.
- Go to Effect > Volume and Compression > Compressor.

- Threshold: Lower this to roughly -20dB to -25dB. You want the compressor to catch almost every word you speak.
- Ratio: Set this high, around 4:1 or 6:1. This forces the volume to stay consistent, making the voice sound processed and relentless rather than expressive.
- Make-up Gain: Set this to 0db to bring the overall volume back up.

Common Mistakes to Avoid
Creating a convincing robot voice is a delicate balance. Even with the perfect Audacity settings, a bad source recording or poor performance will ruin the illusion.
1. The “Bathroom” Effect (Too Much Reverb)
Robot voices need to sound sterile and dry. If you record in an untreated room with natural echo (like a kitchen), applying Audacity’s Delay or Echo effects will multiply that room noise. The result isn’t a metallic robot; it’s a muddy mess.
- The Fix: Record in a closet full of clothes or use a “dead cat” windshield to isolate your voice.
2. Speaking Too “Human”
Audacity is an audio editor, not an acting coach. Many beginners speak with their normal, melodic human inflection and expect the software to remove it.
- The Fix: You must perform the robot voice. Deliver your lines in a monotone, staccato rhythm. If you sound like a boring GPS navigation system before you add effects, you are doing it right.
3. Clipping the Input
Sci-fi robot voices often involve shouting commands. The problem is that screaming into a microphone usually causes clipping—where the waveform hits the ceiling and distorts. Once a file is clipped, applying compression will only make it sound worse.
- The Fix: Watch your gain levels or upgrade your hardware. This is where the Hollyland LARK MAX 2 is a major asset. Its 32-bit Float Recording captures such a huge dynamic range that it is virtually impossible to clip the audio. If you scream “DESTROY!” and the levels peak, you can simply lower the volume in post-production and the waveform will be restored.
Frequently Asked Questions (FAQ)
How do I make my voice sound like a Dalek in Audacity?
To achieve the iconic “Dalek” ring-modulator sound, use the Metallic Echo technique (Method 1).
- Acting is Key: Speak in a staccato, rising inflection rhythm.
- Apply Delay: Use the “Delay” effect with a time of 0.010 to 0.015 seconds.
- Distort: Apply a slight Distortion effect (Hard Clipping) to give it that harsh, aggressive edge.
Does Audacity have a built-in vocoder?
Technically, yes, but it is not beginner-friendly. Audacity includes a “Vocoder” effect, but it requires a complex setup involving stereo tracks split into a “carrier” and a “modulator.” For most users, this process is frustrating. We strongly recommend downloading a free VST plugin like TAL-Vocoder instead.
Why does my robot voice sound fuzzy?
This “fuzz” is usually your Noise Floor being amplified. Robot effects—specifically Compression and Distortion—make quiet sounds louder. If your original recording has even a faint background hiss, the processing will turn that hiss into loud static.
- The Fix: Use a Noise Gate before adding robot effects, or record with high-quality equipment like the Hollyland LARK MAX 2 to prevent hiss in the first place.
Conclusion
Creating a convincing robot voice in Audacity isn’t just about pressing a single button; it is a blend of performance, engineering, and creative processing. If you are struggling to get the perfect sound, remember the “Golden Formula” of vocal effects:
- 50% Acting: Deliver lines with a monotone, rhythmic cadence.
- 25% Recording Quality: Heavy effects will amplify every ounce of background hiss.
- 25% Audacity Effects: The specific settings you choose for Delay, Tremolo, and EQ.
Don’t be afraid to experiment with the settings. Adjusting the Delay time by just a few milliseconds can change your character from a retro 1960s sci-fi robot into a menacing, modern AI.
Finally, remember that digital effects are only as good as the audio you feed them. To ensure your robot voice sounds metallic and clean rather than fuzzy and distorted, rely on high-fidelity gear like the Hollyland LARK MAX 2. Its 32-bit Float Recording gives you the pristine, distortion-free foundation required for professional sound design.