



































.png)
 简体中文
简体中文 
You pressed record, delivered a great take, and played it back to find the waveform barely visible and the audio almost inaudible. Quiet recordings in Logic Pro almost always trace back to one specific point in the signal chain, not a broken microphone. This guide walks through every stage from your Mac’s system audio settings to Logic Pro’s channel strip, so you can isolate and fix the problem in minutes.

Why Quiet Recordings Happen in Logic Pro — The Signal Chain Explained
Audio passes through four separate stages before becoming Logic Pro’s waveform. First comes the microphone hardware, followed by the audio interface or USB device. Then macOS processes the signal before Logic Pro receives it. Finally, the signal reaches Logic Pro’s track channel strip. If one stage has low levels, recordings can sound quiet. The fix should happen where that level drops. Checking later stages won’t solve an earlier level problem.
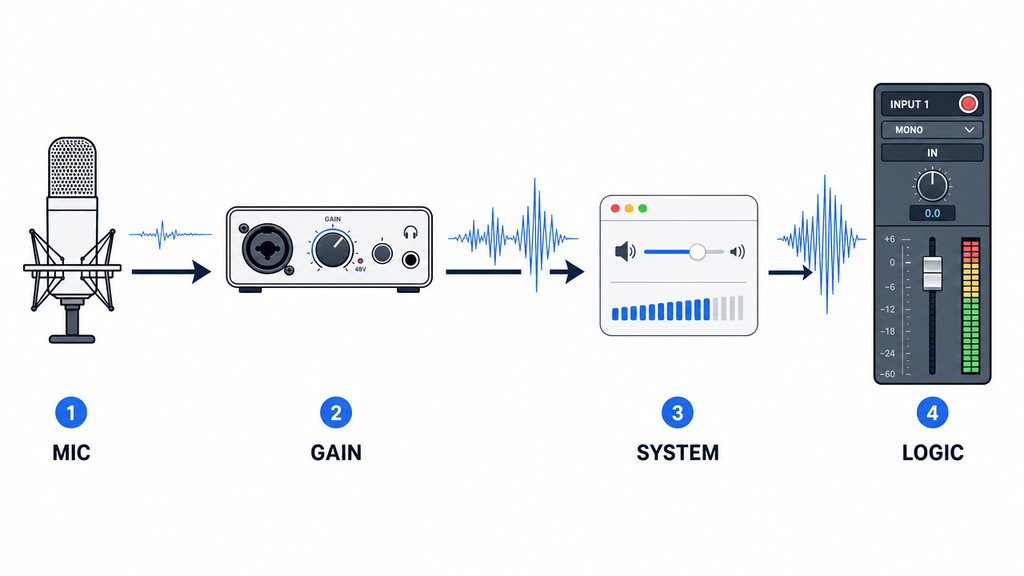
Mic → Interface → macOS System Audio → Logic Pro Input → Channel Strip
This is why jumping straight to Logic Pro settings often fails. If your interface preamp gain is set too low, no amount of fader adjustment will recover a clean signal. Similarly, if macOS has the input device volume pulled down, Logic Pro receives an already-attenuated signal before any track setting is applied.
Work through each step below in sequence. Most quiet-recording problems resolve by Step 4 or Step 5.
Step 1: Check Your Mac System Audio Input Level
macOS maintains its own input volume control that acts on the signal before Logic Pro ever receives it. If this slider is set too low, recordings will be quiet regardless of your interface settings or Logic Pro channel strip configuration.
How to check and adjust:
- Open System Settings from the Dock (the gray gear icon). On macOS Monterey or earlier, open System Preferences instead.
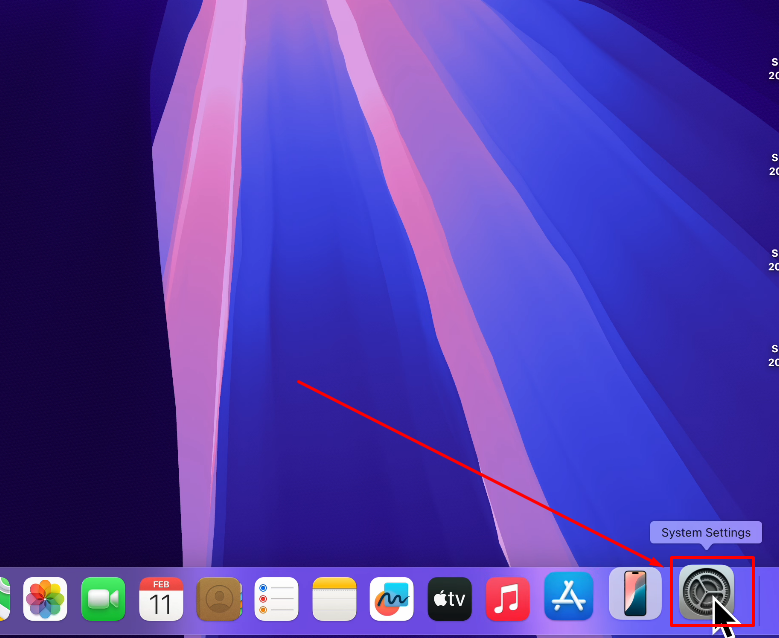
- Click Sound in the left sidebar.
- Scroll to the Input section.
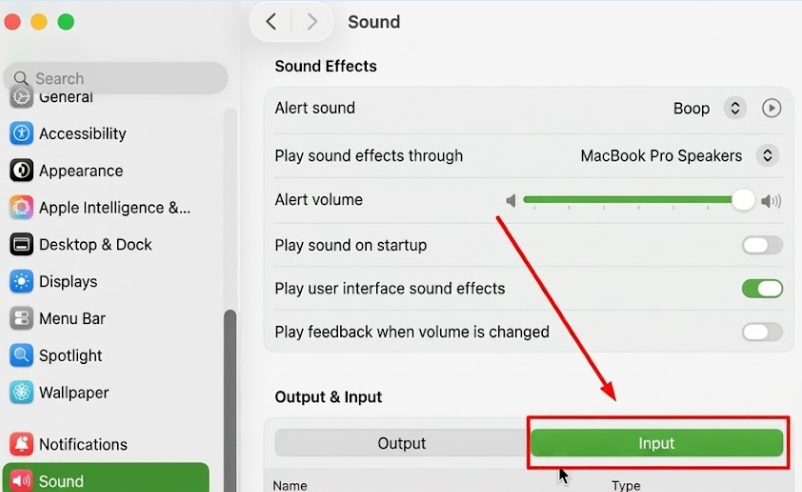
- Select the input device you are using. Your audio interface, USB microphone, or USB wireless receiver.
- Speak at your normal volume and watch the Input Level meter. You should see clear movement.
- If the Input Volume slider is below 70–80%, drag it toward the right.

Note: On many audio interfaces, the macOS input volume slider has no effect. The interface’s own preamp gain knob controls the level directly. If moving the slider produces no change in the meter reading, this is expected behavior. Proceed to Step 4 to adjust preamp gain at the source.
What to confirm? If the input meter shows no movement when you speak, the wrong input device may be selected in this panel. Confirm the device name matches your actual microphone or interface before moving on.
Step 2: Set the Correct Input Source in Logic Pro Preferences
Logic Pro manages its own audio device selection independently from macOS. Even if your audio interface appears in System Settings, Logic Pro may be routing audio from a completely different device.
How to configure the correct input device:
- Open Logic Pro.
- In the menu bar, go to Logic Pro → Settings → Audio.

In Logic Pro X (version 10.6 and earlier), go to Logic Pro → Preferences → Audio.
- Click the Devices tab.
- Under Input Device, open the dropdown and select your audio interface or USB microphone. If this shows Built-in Microphone and you are using an external interface, this is very likely the source of your quiet signal.
- Under Output Device, select your monitors or headphones.

- Click Apply Changes if prompted. Logic Pro will reinitialize its Core Audio connection.
Note: Audio interfaces must use a Core Audio-compatible driver to work with Logic Pro. Most modern USB interfaces, such as Focusrite Scarlett, Universal Audio Volt, and PreSonus AudioBox, are class-compliant and work natively on Mac without additional software. Some Windows-first interfaces require a separate macOS driver download from the manufacturer’s website.
The most common version of this mistake: the microphone is connected to an interface, but Logic Pro’s Input Device dropdown still shows Built-in Microphone. Logic Pro records the Mac’s internal mic at a low level while the external interface and microphone go completely unused.
Step 3: Arm the Track and Check the Input Assignment in Logic Pro
Selecting the correct input device in preferences addresses the source, but each Logic Pro track must also be assigned to the right physical input channel before it can capture the signal.
How to arm and configure your track:
- In the Tracks view, click the audio track you want to record on to select it.
- Click the Record Enable button. The red R on the left side of the track header. The header pulses red when the track is armed.

- Press I on your keyboard to open the Inspector panel on the left side of the screen.

- In the channel strip inside the Inspector, find the Input slot near the top.
- Click the Input slot and choose the correct physical input channel. If your microphone is connected to Channel 1 on the interface, select Input 1. Channel 2 on the interface maps to Input 2, and so on.

- Enable the Input Monitoring button (a small I icon on the track header) to hear the live signal while the track is armed.

Pro Tip: The track fader controls playback volume only. It has no effect on how loudly the signal is captured. If you are raising the fader expecting louder recordings, you are adjusting the wrong control. Watch the channel strip’s input level meter instead. That reflects what Logic Pro is actually recording.
Common mistake: The microphone is plugged into Input 1 on the interface, but the Logic Pro track is assigned to Input 3. The meter shows nothing, and the recording is completely silent.
Step 4: Turn Up the Gain on Your Audio Interface
The audio interface preamp gain knob is the most frequent cause of quiet recordings in Logic Pro. It controls how much the microphone’s raw signal is amplified before it reaches your Mac. A low gain setting here leaves the entire signal too weak. macOS, Logic Pro, and your track fader then receive that weak signal. None can cleanly recover enough level later.

How to set preamp gain correctly:
- With your Logic Pro track record-enabled (Step 3), keep the channel strip’s level meter visible in the Inspector.

- Find the gain knob on your interface for the channel your microphone is connected to. It is usually labeled with a channel number and may have an LED halo ring.
- Speak or play at your typical performance volume.
- Slowly turn the gain knob clockwise while watching the Logic Pro input meter.
- Aim for signal peaks landing between -18 dBFS and -12 dBFS during the loudest parts of your performance.
- Watch for the clip indicator at the top of the channel strip meter (a red dot or LED). If it lights up, pull the gain back slightly and click the indicator to reset it.
Safe Gain Range: Target peaks between -18 dBFS and -12 dBFS during the loudest moments, with average levels sitting around -24 dBFS to -18 dBFS during normal speaking or playing. This keeps the noise floor low while leaving adequate headroom for dynamic peaks.
Recording with the gain set too low and compensating in Logic Pro afterward will amplify background noise and hiss alongside the signal. Gain lost at the preamp stage cannot be fully recovered in post without a cost to audio quality.
USB microphones have a built-in preamp and no external gain knob. Check the microphone for an onboard gain dial, or use the manufacturer’s companion software to adjust input level. The Logic Pro track fader still does not affect what is captured.
Step 5: Enable Phantom Power (+48V) for Condenser Microphones
Condenser microphones require 48 volts of phantom power from the interface to operate. Without it, a condenser mic produces an extremely low or near-silent signal, and increasing the gain knob alone will not resolve the problem. If you have a condenser microphone and the signal barely registers even with the gain turned up, phantom power is very likely disabled.

How to enable phantom power:
- Look for a button labeled +48V, Phantom, or 48V on your audio interface. It is typically near the gain controls on the front panel, or on the rear panel of rack-format interfaces.
- Press it to engage phantom power. Some interfaces apply it to all channels simultaneously; others offer per-channel control.
- If your interface uses companion software such as Focusrite Control or Universal Audio Console, phantom power may also be toggled inside the app.
- After enabling phantom power, wait five to ten seconds for the condenser microphone to initialize, then re-check the Logic Pro level meter.
Phantom power by microphone type:
- Condenser microphones (large and small diaphragm): Require +48V phantom power
- Dynamic microphones (SM7B, SM58, etc.): Do not require phantom power; enabling it will not cause damage
- Ribbon microphones: Check manufacturer specifications carefully before enabling phantom power. It can permanently damage many ribbon microphones
- USB microphones: Powered via USB; phantom power is not applicable
Note: If you are using the Hollyland MELO P1 (a 1-inch large-diaphragm condenser microphone with onboard DSP), phantom power from your interface is not required and will have no effect on its output level. The MELO P1 draws power through its USB connection and manages gain internally. Toggling +48V on your interface will not affect it.
Step 6: Diagnosing Quiet Recordings from a Wireless Microphone in Logic Pro (Hollyland LARK MAX 2)
Wireless microphone systems introduce an additional gain stage between the transmitter and the DAW that is easy to overlook during troubleshooting. Users often adjust every setting inside Logic Pro without improvement because the root cause is actually the receiver’s output gain, a control that exists entirely outside of Logic Pro.
The Hollyland LARK MAX 2 is a compact wireless lavalier system that connects to a Mac directly via USB-C, registering as a USB audio device in macOS. If you are experiencing quiet recordings with this setup, work through the following steps:
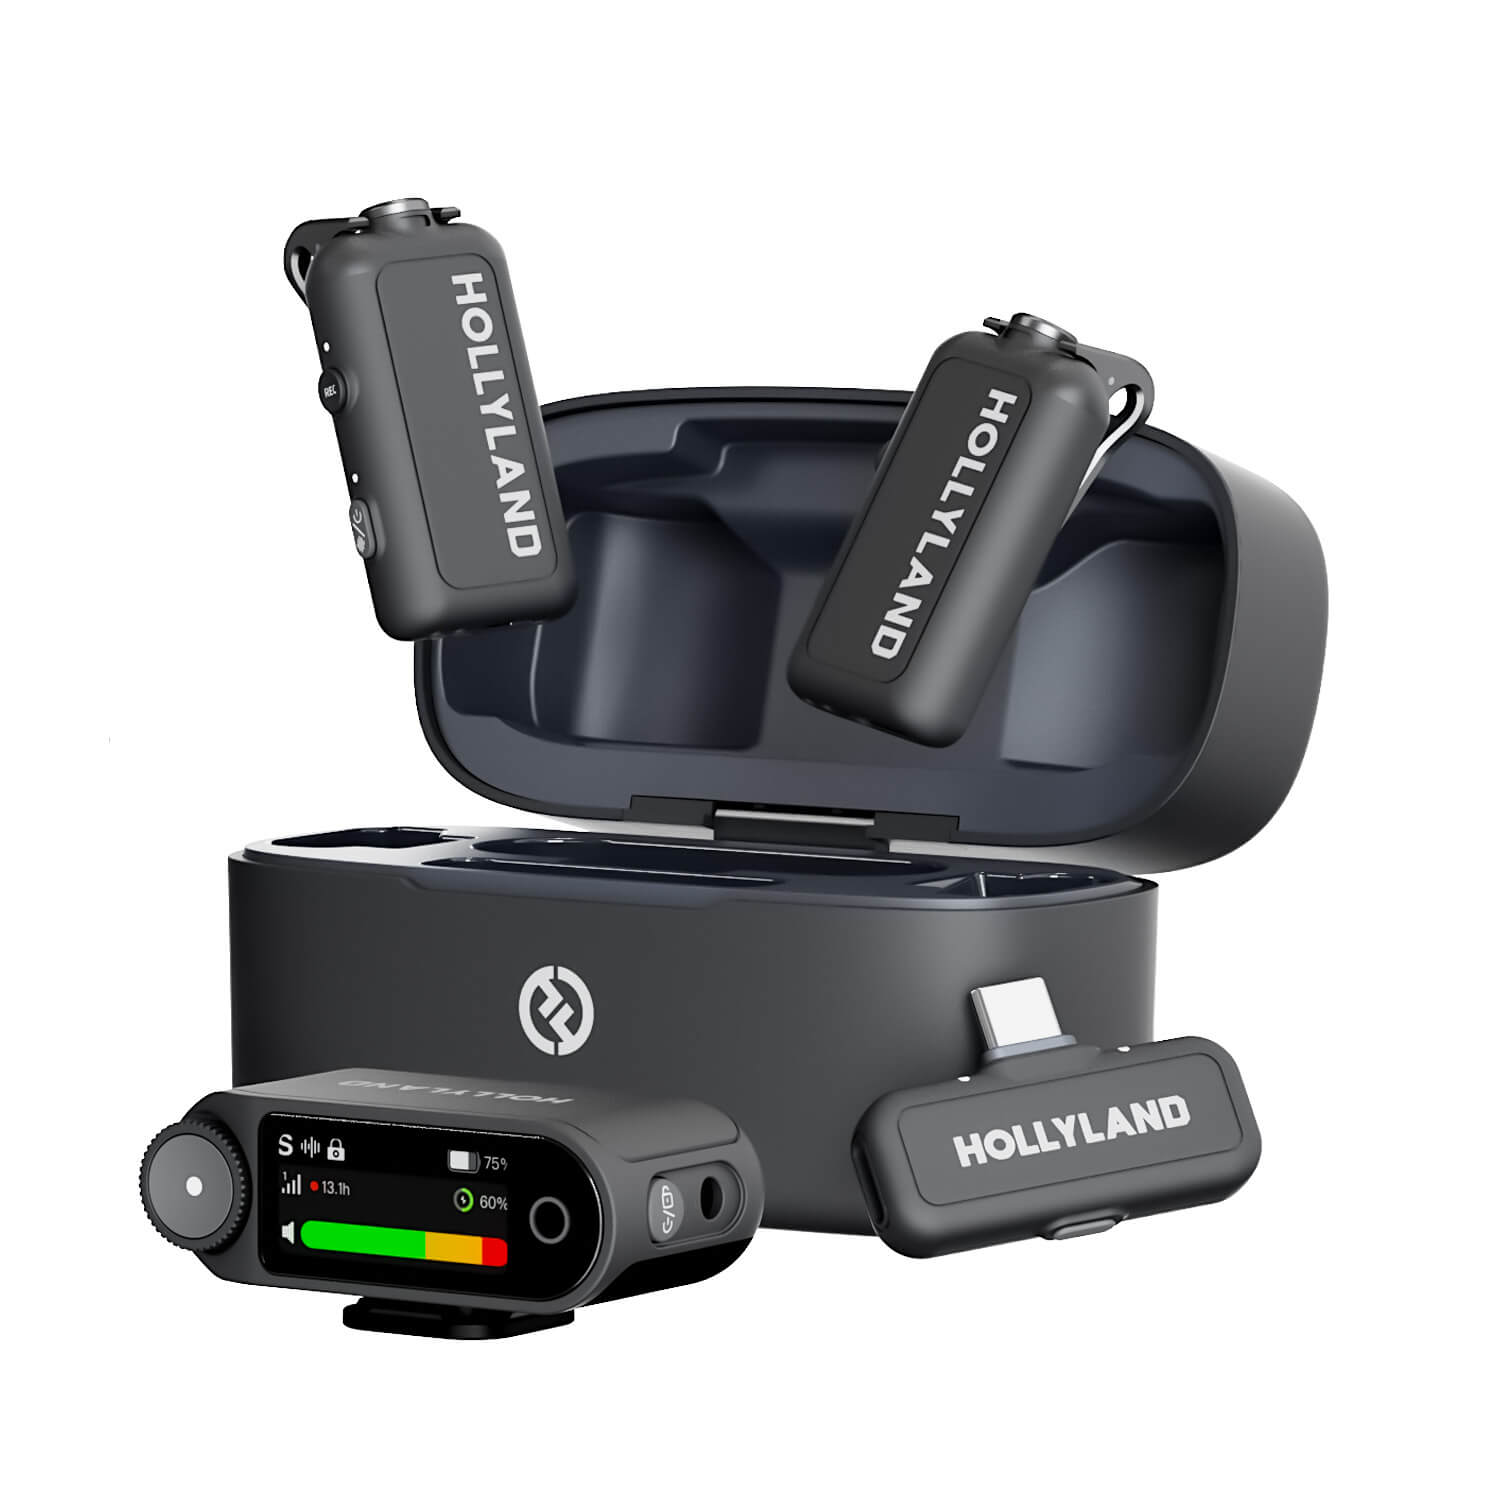
Hollyland LARK MAX 2 - Premium Wireless Microphone System
A premium wireless microphone for videographers, podcasters, and content creators to capture broadcast-quality sound.
Key Features: Wireless Audio Monitoring | 32-bit Float | Timecode
Diagnostic steps for the LARK MAX 2:
- Confirm the receiver is recognized by macOS. Connect the LARK MAX 2 Camera receiver to your Mac using its USB-C port. Open System Settings → Sound → Input and verify that LARK MAX 2 appears in the device list and is selected as the active input. If it does not appear, try a different USB-C cable or port, then reconnect.
- Adjust the receiver’s output gain. The LARK MAX 2 Camera receiver includes an output gain control accessible through its touchscreen display. Press the function button and rotate the wheel to navigate to the output Mic gain setting and increase the level.


This directly raises the signal that macOS and Logic Pro receive from the receiver. Confirm the change is reflected in the Logic Pro channel strip meter. This is the primary adjustment for quiet recordings from this setup.
- Read the LED signal indicators. The LARK MAX 2 receiver displays the wireless link status on the touchscreen display. Full signals indicate a healthy transmitter-to-receiver connection. Contrarily, a weak wireless link may result in intermittent or reduced signal levels in Logic Pro. Move the transmitter closer to the receiver and reduce physical obstructions between them.

- Check the AI Noise Cancellation setting. The LARK MAX 2 features AI Noise Cancellation. You can activate or deactivate noise cancellation by pressing the power button once on the transmitter.

Conversely, you can use the HollyAudio app to toggle On / Off the noise cancellation function. The app also lets you adjust noise-canceling (NC) levels.

In both cases, the transmitter indicator turns solid green once noise cancellation is active.
At maximum strength, the algorithm can attenuate lower-amplitude signals, making the overall recording appear quieter or thinner. Try switching to a lower NC mode or disabling it temporarily to determine whether it is contributing to the level reduction.
- Use the 32-bit Float internal recording as a recovery option. Even if the output signal routed to Logic Pro is too low to rescue cleanly, the LARK MAX 2 records internally to its onboard storage in 32-bit Float format. This preserves the full dynamic range of the captured audio with no clipping or amplified noise floor. If your Logic Pro recording is too quiet to use, import the internal recording directly from the receiver’s storage into Logic Pro as your primary audio file.
Just press the “REC” button on the LARK MAX 2’s transmitter to start recording 32-bit Float audio internally. Once the function is active, the LED indicator will turn solid red.

Note: Before recording, always confirm in Logic Pro → Settings → Audio → Devices that the Input Device is set to LARK MAX 2 and not Built-in Microphone.
Step 7: Boost and Correct Low Levels Inside Logic Pro (Gain Staging)
After resolving hardware and routing issues, use the following Logic Pro tools to fine-tune or correct the level of a captured recording. These are post-capture correction methods, not substitutes for recording at the right level from the start.
Three ways to boost a low-level recording in Logic Pro:
- Gain plugin: Click an empty insert slot on the channel strip in the Mixer or Inspector and navigate to Utility → Gain. Use the Gain slider to add clean gain to the signal. This is the most flexible method and supports automation.
- Region Gain: Select an audio region in the timeline. In the Inspector (press I), locate the Region Gain parameter and drag it upward to increase the level of that specific clip without affecting the channel strip or other regions on the same track.
- Normalize Region Gain: Right-click an audio region in the timeline and select Normalize Region Gain. Logic Pro automatically increases the clip’s gain until the loudest peak reaches the target level. Use this with care — it raises background noise in direct proportion to the signal boost.
Important: If the original recording was captured at a very low level, boosting it in Logic Pro will amplify noise, hiss, and room tone alongside the intended signal. Fix the gain at the interface first (Step 4) and use these tools only as finishing adjustments on recordings that were already reasonably close to the correct level.
Step 8: Check Software Monitoring Settings and Latency Confusion
Before making further changes, play back what Logic Pro actually captured. Many users find the recording is at a perfectly usable level once they listen back — the issue was with how the live monitoring signal sounded during the take, not with the recorded audio itself.
Software monitoring routes your live signal through Logic Pro’s processing before sending it to your headphones, introducing buffer latency. Direct monitoring routes the signal through the audio interface at near-zero latency, bypassing Logic Pro entirely. If monitoring sounds quiet or delayed while tracking, confirm Software Monitoring is enabled at Logic Pro → Record → Software Monitoring. Also check whether your interface has a direct monitor blend knob — if it is turned fully toward “Playback,” you will hear no live signal through the interface during recording.
Note: The LARK MAX 2 includes OWS (Open Wearable Stereo) wireless earphones for live monitoring directly from the transmitter, bypassing Logic Pro’s software monitoring path entirely. If the OWS signal sounds weak or thin, check the transmitter gain and wireless link quality before troubleshooting further inside Logic Pro.

Frequently Asked Questions
Why is my microphone input level maxed out in Logic Pro but the recording is still quiet?
The gain is almost certainly too low at the audio interface preamp stage. Raising the Logic Pro fader or input slider cannot recover signal that was lost before it entered the DAW. Turn up the preamp gain knob on your interface until peaks sit around -12 dBFS during normal performance, then reassess.
My mic worked fine in GarageBand but sounds quiet in Logic Pro. Why?
Logic Pro won’t automatically copy audio settings from GarageBand. First, check whether Logic Pro has selected your correct hardware. Go to Logic Pro > Settings > Audio > Devices first. Then, make sure the correct Input Device is selected. If everything looks right but recordings still sound quiet, macOS might be processing your audio. Keep Logic Pro open and check the orange microphone icon. You’ll find that Mic Modes icon in the macOS menu bar. Click it, then switch Voice Isolation over to Standard. Voice Isolation heavily filters frequencies from musical inputs and interfaces. This can seriously reduce the gain on those audio sources.
Why is my microphone still very quiet even with the gain knob turned all the way up?
There are three likely reasons your microphone sounds unusually quiet. Your condenser mic might need phantom power enabled first. Check whether the +48V setting is currently switched on. Your microphone or interface might also have its PAD switch enabled. An attenuator button could also be lowering the incoming audio level. Another possibility is a damaged or loose XLR/TRS cable connection. Make sure the cable sits securely inside its socket. If Logic Pro has the wrong channel assigned, there’s no audio. That situation causes silence instead of simply making audio quieter. Start by checking phantom power before anything else.
Can I fix a quiet recording in Logic Pro after the fact?
Yes, using the Gain utility plugin or the Region Gain parameter in the Inspector. But boosting a very low-level recording also raises the noise floor. If you recorded with the Hollyland LARK MAX 2, check the receiver’s internal 32-bit Float backup recording, which may offer a significantly cleaner version with more recoverable dynamic range.
Why does my wireless mic record quietly in Logic Pro even though the levels look fine on the transmitter?
The transmitter level and receiver output gain are separate stages. Check the receiver’s physical output gain/pad settings to ensure the digital signal sent over USB-C isn’t attenuated. Also, verify inside Logic Pro > Settings > Audio > Devices that the Input Device is explicitly set to your wireless receiver and not the Built-in Microphone. Global macOS System Settings do not need to be altered, as Logic Pro manages its own active audio hardware routing.
Conclusion
Most quiet recordings in Logic Pro usually come from two things. Interface preamp gain is often the main issue here. Missing phantom power can also affect condenser microphones. Go through the signal chain one step at a time. Start with the Mac system input, then check Logic Pro settings. Next, check the track input assignment and interface gain. After that, check phantom power and wireless receiver output. Keep Logic Pro’s channel strip meter visible during every check. This makes it easier to spot where levels drop.
