



































.png)
 简体中文
简体中文 
Recording your own singing voice at home is completely achievable, even if you have never set up a microphone before. A thin, echoey bedroom take can sound pretty rough. A clean vocal needs a few smart choices from you. Start with decent gear and a properly treated recording space. Then set your gain correctly before recording your vocals. Good monitoring also helps you hear every detail clearly. This guide walks you through every step in order, using the Hollyland MELO P1 as the hands-on tutorial subject throughout.

What You Actually Need to Record Singing
Before buying gear, learn how your recording signal chain works. It shows where your voice goes after entering the microphone. For home recording, that chain usually follows this simple order:

Microphone → Gain control or audio interface → Headphones (for monitoring) → Recording device or DAW
Every link has a job. Remove any one of them and the recording suffers: too quiet, too distorted, or impossible to monitor in real time.
Must-Have Equipment
- Microphone: Specifically a condenser microphone, which captures the full detail and warmth of a singing voice far better than a built-in phone or laptop mic.
- Gain control or audio interface: Adjusts the microphone signal to a usable level before it reaches your recording software. Without proper gain staging, recordings clip (distort) or come out faint.
- Headphones or monitoring earbuds: Lets you hear yourself in real time during the session. Essential for pitch accuracy and timing.
- Recording device and DAW: A phone, tablet, or computer running a recording application such as GarageBand, Audacity, or a mobile app.
- Pop filter: Mounts between your mouth and the mic capsule to catch plosive air bursts on hard “p” and “b” consonants.
Optional Additions
- Shock mount: Decouples the microphone from stand vibrations.
- Boom arm or mic stand: Positions the mic at a consistent, hands-free height.
- Acoustic panels or portable reflection filter: Reduces room echo directly around the mic capsule.
The Hollyland MELO P1: An All-in-One Starting Point
For beginners who want to skip the process of sourcing and matching separate components, the Hollyland MELO P1 collapses the entire signal chain into a single kit. The package includes three components:
- A 1-inch large-diaphragm condenser microphone: The same mic type used in professional vocal studios
- A 55g dual-DSP smart audio mixer: Handles gain control and audio interfacing, eliminating the need to purchase a separate interface
- Monitoring earbuds: Connect directly to the mixer for real-time zero-latency playback
The mixer also supports 32-bit Float recording and AI Noise Cancellation, two features that significantly reduce setup complexity and in-session mistakes for beginners. This guide uses the MELO P1 as the hands-on hardware subject throughout every connection, configuration, and recording step that follows.
Note: Even with an all-in-one kit, you still need a recording application on your phone or computer. Free options like GarageBand and Audacity are covered in detail later in this guide.
How to Set Up Your Recording Space
Your recording space has more influence over the final sound than almost any single piece of equipment. A high-quality microphone in an untreated room will faithfully capture everything about that room, including its reflections, echoes, and ambient noise. Get the space right before adjusting any settings.

Steps to Prepare Your Recording Space
- Choose the smallest furnished room available. Smaller rooms produce shorter reflections that are easier to control. A walk-in closet typically outperforms a large carpeted bedroom.
- Load the room with soft materials. Carpet, heavy curtains, rugs, sofas, duvets, and hanging clothing absorb sound energy. Hard surfaces, such as bare walls, tile floors, and window glass, reflect it back toward the microphone.
- Hang a thick blanket directly behind and around the microphone position. A moving blanket or duvet acts as a low-cost reflection filter and is one of the highest-impact changes you can make without spending money.
- Avoid positioning the mic between two parallel walls. Standing waves build up between opposing flat surfaces and introduce uneven frequency response into the recording. Placing the mic in a corner, facing out into the room, helps break up that buildup.
- Identify and eliminate noise sources before pressing record. Turn off HVAC systems, fans, and air purifiers. Close windows. Silence phone notifications. Let anyone in the house know a session is in progress.
- Run a short silence recording first. Record 30 to 60 seconds without singing and listen back on headphones to catch any hidden hum, creak, or ambient rumble you may have missed.
What AI Noise Cancellation Can and Cannot Do
The MELO P1’s AI Noise Cancellation reduces steady-state background sounds effectively: HVAC hum, street traffic, desk fans, and similar consistent ambient sources. You can enable and adjust this feature in the HollyAudio App, which we cover in the next section.
What noise cancellation cannot fix is room reverb. Reverb enters the microphone as part of the captured signal before any processing takes place, meaning it becomes part of the recording. Acoustic treatment addresses the source; noise cancellation addresses the symptom. Use both together for the best result.
Choose the Right Microphone for Recording Vocals
Choosing a microphone for vocal recording comes down to two main categories: Condenser and dynamic. Understanding the difference helps you select the right tool for a home recording environment.
Condenser vs. Dynamic: Key Differences
| Condenser Microphone | Dynamic Microphone | |
|---|---|---|
| Best suited for | Studio vocals, quiet home environments, nuanced performances | Live performance, loud stage environments, broadcast |
| Sensitivity | High — captures fine tonal detail and breath texture | Lower — less reactive to ambient sound |
| Room noise pickup | Picks up room reflections more readily | More forgiving in untreated spaces |
| Typical application | Home studio, bedroom recording, podcasting, acoustic sessions | Stage performance, live room, loud instrument miking |
Why a Large-Diaphragm Condenser Is the Standard for Home Vocals
A large-diaphragm condenser (LDC) microphone is the professional standard for vocal recording because its large capsule, typically one inch or larger, captures a wider frequency range with more warmth and natural detail than smaller capsule types. The result is a vocal recording that sounds full, present, and realistic.
For polar pattern, home vocal recording almost always calls for a cardioid pickup pattern, which captures sound from directly in front of the capsule while rejecting sound from behind. This pattern naturally reduces background noise and room reflections from the rear of the recording position.
SPL Headroom and Why It Matters to Singers
SPL (Sound Pressure Level) headroom is the maximum loudness a microphone can handle before the signal begins to distort. Singers with wide dynamic ranges, shifting between soft intimate phrases and fully projected belted notes, need a mic with sufficient headroom to handle those peaks cleanly.
The Hollyland MELO P1 uses a 1-inch large-diaphragm condenser capsule rated at 132 dB Max SPL. That figure means the mic handles powerful, belted vocals at close proximity without distortion. For context, 132 dB provides significant headroom beyond typical home performance levels, covering the full range from near-whisper softness to strong stage-level projection.
Because condenser mics are more sensitive to ambient sound than dynamic mics, the MELO P1’s AI Noise Cancellation (adjustable inside the HollyAudio App) is particularly valuable. It counteracts the condenser’s natural sensitivity to background noise in spaces that are not fully acoustically treated.
Connect and Configure Your Microphone
The following steps walk through the complete MELO P1 connection and configuration workflow. Complete each step in order before moving on to the recording software setup.
Power On the MELO P1 Microphone and Smart Audio Mixer
Start by switching off the Hollyland MELO P1 microphone and Smart Audio Mixer. Hold each power button for 3 seconds to turn them off. Follow this step even when both devices are already powered on. Then, hold the power buttons on both devices for 6 seconds.
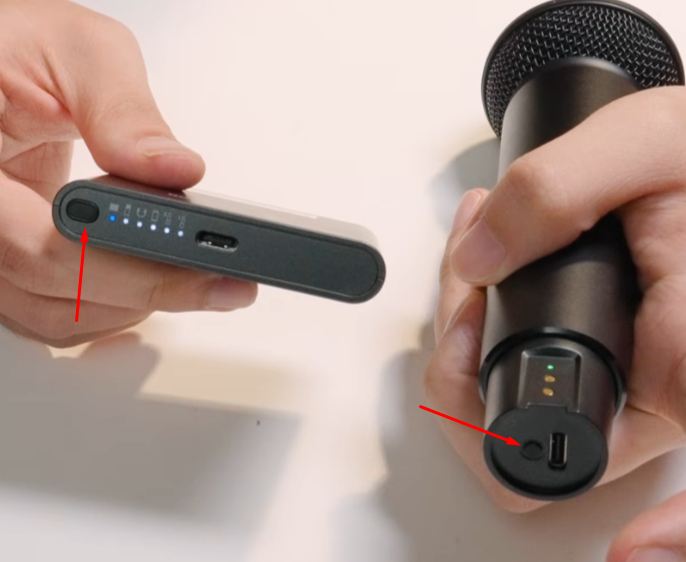
Keep holding them until their indicator lights start flashing.
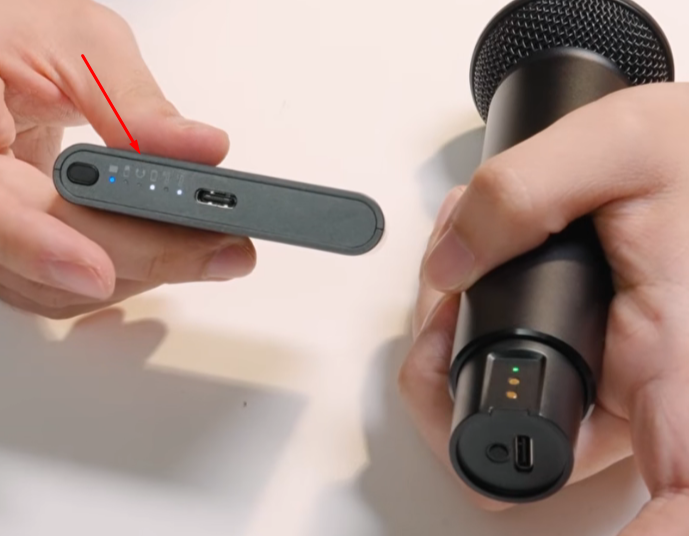
The flashing process takes around 6 seconds. When the light flashes quickly, release the buttons. Both devices are now in pairing mode.
Connect the MELO P1 Wireless Monitoring Earphones
Place the Hollyland MELO P1 wireless monitoring earphones back inside the charging case. Make sure they fit correctly into their slots.
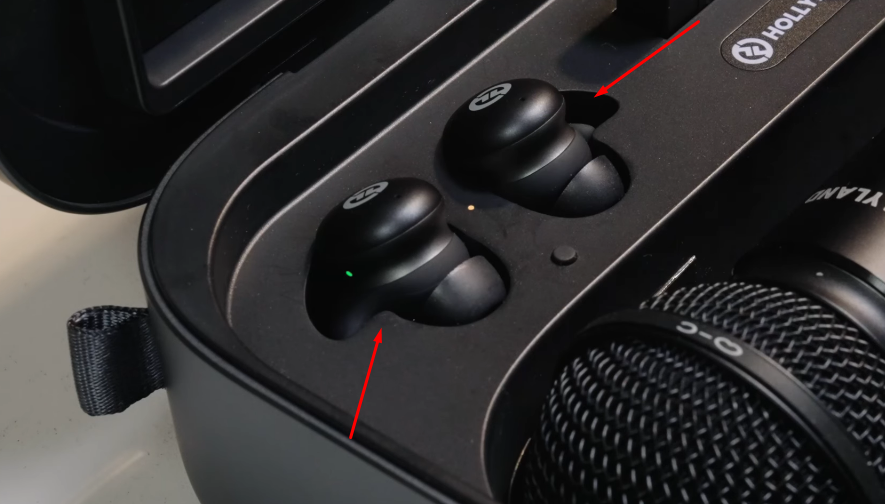
Press the function button inside the charging case 3 times consecutively.
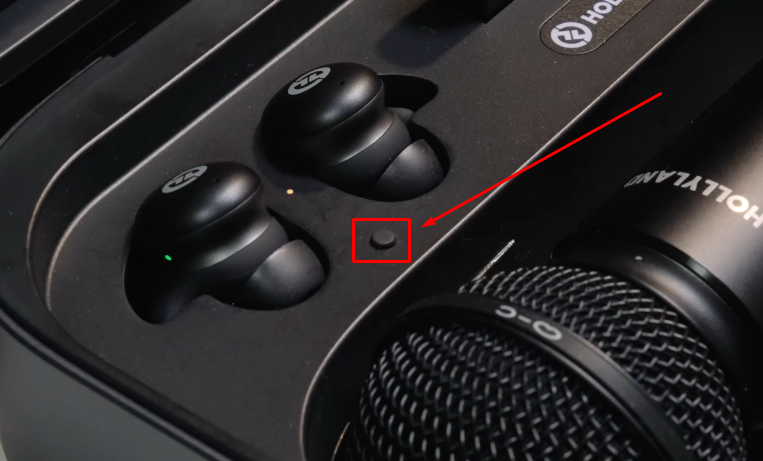
The indicator light near the button will turn white, confirming that the earphones are ready to be paired with the Smart Audio Mixer via 2.4GHz wireless monitoring mode for real-time audio monitoring. If the indicator light turns blue, it means the earphones are in Bluetooth mode and ready to be connected to your smartphone and function as regular Bluetooth earphones.
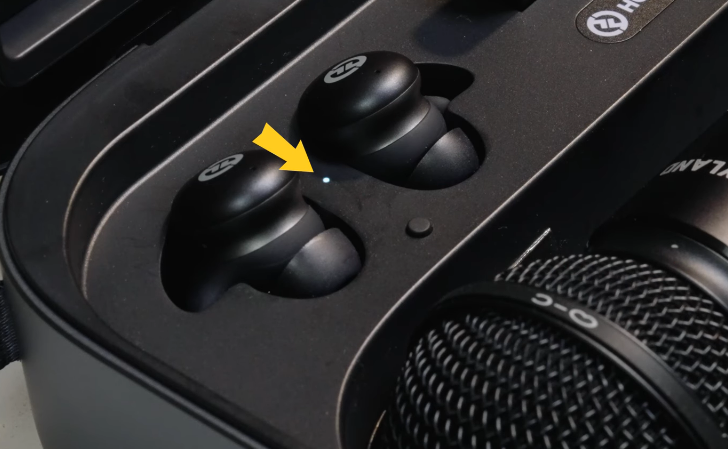
Once connected, the earbuds provide zero-latency monitoring, meaning you hear your voice in real time through the earbuds as the microphone captures it.
This hardware-level monitoring bypasses your recording software entirely, which is why there is no perceptible delay. Software-based monitoring introduces latency that causes pitch drift and timing errors during a vocal performance. The MELO P1’s direct monitoring eliminates that problem.
Connect the Mixer to Your Recording Device
Connect the MELO P1 mixer’s output to your smartphone or computer. The mixer is compatible with both smartphone and laptop/desktop recording applications.
For iPhone users and USB-C Android devices, connect the mixer’s output to your phone using the appropriate cable. For Mac or PC users, connect via the USB output. Once connected, your operating system recognizes the MELO P1 as an available audio input device, which you will assign inside the recording software in the next section.

Open the HollyAudio App and Configure Settings
Download and open the HollyAudio App on your smartphone. This is where the MELO P1’s software-based configuration takes place.
- Navigate to the Vocal Preset screen inside the app.
- Browse the preset library and select a vocal recording preset that fits your voice type or recording style. Presets handle basic EQ shaping automatically, so you do not need manual EQ knowledge to achieve a well-balanced starting tone.
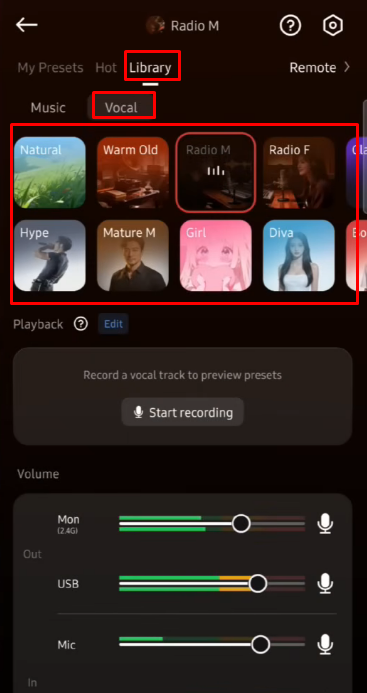
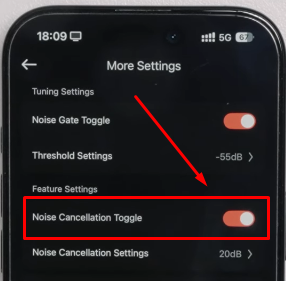
- Locate the AI Noise Cancellation Toggle to enable or disable the AI noise cancellation feature.
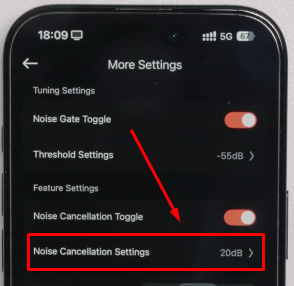
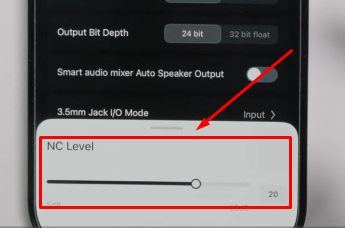
Tap Noise Cancellation Settings to increase the intensity for noisier environments or reduce it for quieter rooms. Start at a moderate level and adjust by ear — applying too much noise cancellation can introduce audible artifacts on the signal.
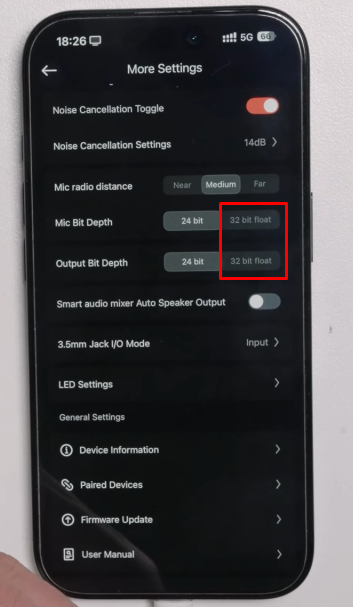
- Find and activate the 32-bit Float recording mode setting. With 32-bit Float enabled, the captured audio retains enough dynamic range that gain mistakes can be corrected in post-production without any permanent quality loss.
Set Input Mic Volume
On the HollyAudio app, go to the Input section and adjust the Mic volume to set the input levels to avoid clipping in your recordings. Before locking in a setting, sing at your loudest expected performance volume while watching the LED level meter on the mixer.
- Green and yellow indicator lights: Signal level is healthy. This is the target range.
- Red indicator light: Signal is clipping. Turn the gain knob down until the red disappears.
- No light or barely visible green: Signal is too quiet. Turn the gain knob up.
Calibrate gain at your loudest vocal moment, not your speaking voice or comfortable singing volume. Singers commonly set gain at moderate volume, then clip when they hit a powerful high note or push through a chorus. Always test the peak.

(Optional) Connect an Instrument via the 3.5mm Input
Singer-songwriters who want to record vocals and an acoustic guitar or keyboard simultaneously can plug the instrument directly into the 3.5mm instrument input on the MELO P1 mixer. This routes both the vocal from the condenser mic and the instrument through a single recording chain, eliminating the need for a second microphone or a separate audio interface.

Set Up Your Recording Software
With the MELO P1 connected and configured, you need a recording application to capture the signal. The following free options cover the most common platforms.
GarageBand (iPhone and Mac)
GarageBand is free, pre-installed on most Apple devices, and requires minimal configuration for vocal recording.
- Open GarageBand and start an Empty Project.

- Add a new track and select Audio Recorder (for mobile users).

Or, Mic or Line (for Mac users) as the track type.

- In the track’s input settings, select the MELO P1 mixer as the input source — it will appear as a connected USB audio device.
- Set the Sample Rate to 48 kHz in the project settings to match the MELO P1’s native output.
- Confirm the track is set to Mono — vocal recordings are captured in mono at the input stage.
- Arm the track for recording, then press the main record button to begin.
Audacity (Windows, macOS, Linux)
Audacity is free, open-source recording software available across all major desktop operating systems.
- Open Audacity and go to Edit > Preferences.

- Select Audio Settings, and under Recording Device, select the MELO P1 from the dropdown menu.

- Set the Project Rate in the bottom toolbar to 48000 Hz.
- Click the Audio Setup option at the top and select Audio Settings. From the Default Sample Format dropdown menu, choose 32-bit Float.


- Set the recording channel to 1 channel (Mono).

- Click Record or press R to begin capturing audio.

Mobile Recording Apps (Android)
For Android users, apps including BandLab, n-Track Studio, and RecForge II support multi-track recording with external USB audio devices. The core setup steps are consistent across all three: connect the MELO P1, select it as the active input source in the app’s audio settings, set the sample rate to 48 kHz, and create a mono audio track before pressing record.
Microphone Technique for Singers
Placement and performance awareness directly shape the character, balance, and consistency of a vocal recording. A correctly configured signal chain still produces a poor result if the singer is standing in the wrong position or performing without sensitivity to mic dynamics.

Mic Placement Steps
- Set the microphone at lip height or slightly above, angled slightly downward toward the mouth. This reduces the severity of plosive bursts compared to a straight-on angle aimed directly at the center of the lips.
- Position yourself 6 to 12 inches from the capsule. Closer distances (4 to 6 inches) increase warmth and low-frequency body through the proximity effect. Greater distances (10 to 12 inches) produce a more natural, room-present sound. Choose based on the tone character you want.
- Place the pop filter 2 to 3 inches in front of the capsule, not flush against it. The filter should sit squarely between your mouth and the mic, not pressed up against the mic body.
- Mark your position for consistency. Use tape on the floor, a mark on the boom arm, or a fixed reference object to return to the exact same spot on every take. Inconsistent distance creates volume variation between takes that is difficult to correct in editing.
- Angle slightly off-axis by turning your head a few degrees if plosives are still audible in playback despite the pop filter being in place.
Performance Tips for a Cleaner Take
- Use body distance as a secondary volume tool. On loud, belted phrases, step back slightly. On soft, quiet passages, step forward slightly. The MELO P1’s 132 dB SPL headroom gives you a generous margin, so the adjustments needed are subtle.
- Watch the LED level meter throughout technique rehearsal. The MELO P1’s meter responds in real time as you move and vary your dynamics. Observing this before recording trains you to understand how body position affects the captured signal.
- Avoid touching the mic stand once positioned. Vibrations from gripping or adjusting the stand transfer into the capsule. Set your position, then remove both hands before rolling.
- Keep both monitoring earbuds in during placement practice. Real-time monitoring through the MELO P1’s earbuds lets you hear tonal changes, proximity effect shifts, and distance variations as they happen — far more informative than reviewing a playback after the fact.
- Take breaths turned slightly away from the capsule. Breath noise directed straight into a large-diaphragm condenser is audible and adds unnecessary cleanup work in editing.
Record Your Vocals: Step by Step
The equipment is connected, the gain is set, the room is prepared, and the software is running. Here is the complete session workflow from first test take to finished recording.

- Run a short test take before committing. Record 15 to 20 seconds at full performance volume. Stop and listen back on your monitoring earbuds before moving forward.
- Check the waveform in your DAW. A healthy vocal recording occupies approximately 50 to 70 percent of the available track height. A waveform that fills to the top edges of the track is clipping. A nearly flat line means the gain is too low.
- Confirm the LED level meter is responding correctly. Sing through the loudest moment of the song and verify the MELO P1’s LED meter stays in green and yellow during that peak. Adjust gain if needed before beginning a proper take.
- Record full takes from start to finish. For beginners, recording complete run-throughs is more effective than punching in section by section. Full takes preserve natural phrase energy, pacing, and breath pattern. Multiple complete takes can be compared and comped after the session.
- Take vocal breaks after every two to three takes. Vocal fatigue degrades pitch accuracy, consistency, and tone. A few minutes of rest after each set of takes costs almost no time and protects the quality of everything that follows.
- Label each take immediately in the DAW. Rename the audio file before moving on, such as Take 1, Take 2, Best Chorus, etc. Unlabeled takes become indistinguishable when you return to them the following day.
- Aim for at least three complete takes. The best performance is rarely the first one. Multiple versions give you compositing options during the editing stage.
Note: Because the MELO P1 records in 32-bit Float, a take that unexpectedly peaks into the red can often be recovered in post by lowering the clip gain in your DAW. The audio data is not permanently destroyed the way it would be at 16-bit or 24-bit depth. This reduces re-take pressure significantly for beginners still calibrating their gain monitoring in real time.
Review, Edit, and Export Your Vocal Track
Listening Back and Basic Editing
After recording three or more complete takes, review everything on closed-back headphones, not laptop speakers. Laptop speakers compress and mask problems that are immediately obvious on headphones.
- Select your best take or identify the strongest phrases from each version to assemble into a composite.
- Trim dead silence at the beginning and end of each audio clip to remove unnecessary lead-in and tail.
- Reduce loud breaths between phrases. Either select breath regions in the DAW and lower their volume using clip gain, or delete isolated breath sounds that are distractingly prominent.
- Normalize the peak level to approximately -1 dBFS using your DAW’s built-in normalization function. This sets a consistent loudness ceiling without altering the internal dynamics of the performance.
- Listen once more after edits to check for unnatural cuts or abrupt volume changes before exporting.
Avoid applying reverb, compression, or EQ at this stage unless you have a clear understanding of what each process does to a vocal signal. Those are mixing topics. Applying them without context frequently damages an otherwise clean recording. Save them for a dedicated mixing session or a separate guide.
Export Format
- WAV: The correct format for any project that will be mixed, mastered, or handed off to another engineer. WAV is lossless and preserves the full quality of the recorded session.
- MP3: Appropriate only for final distribution, social media sharing, or demos where file size is a practical constraint. Export at 320 kbps minimum.
Export at 48 kHz / 24-bit WAV as a standard delivery format, or retain the original 32-bit Float file if your downstream software supports it.
Common Mistakes That Make Vocal Recordings Sound Bad
- Recording in an untreated room.
Fix: Hang a thick blanket behind the mic, add soft furnishings to the space, or record inside a clothing-filled closet before touching any equipment settings. - Setting gain at speaking volume, then belting during the take.
Fix: Calibrate gain at your maximum performance volume. Always test the LED meter during the loudest phrase of the song, not during a casual soundcheck. - Positioning too far from the microphone.
Fix: Stay within 6 to 12 inches of the capsule. Excessive distance produces a distant, airy sound and increases sensitivity to background noise. - Not using headphone monitoring during recording.
Fix: Plug the monitoring earbuds into the MELO P1 before pressing record. Recording without real-time monitoring leads to pitch drift, missed timing cues, and avoidable re-takes. - Wrong input device selected in the DAW.
Fix: After connecting the mixer, confirm that the DAW’s audio input is set to the MELO P1, not the laptop’s built-in microphone. This is one of the most common reasons a recording sounds identical to a voice memo. - Clipping the signal without a bit-depth safety net.
Fix: Enable 32-bit Float mode in the HollyAudio App. At standard bit depths, a clipped take is permanently damaged. With 32-bit Float, transient overshoots can be corrected in post without degrading the audio. - Exporting in a lossy format before mixing is complete.
Fix: Save and export in WAV throughout the entire production process. Convert to MP3 only as a final delivery step, never as an intermediate format.

Frequently Asked Questions
Can I record singing on my phone without extra equipment?
Yes. Every smartphone includes a built-in microphone capable of capturing audio. But built-in mics are omnidirectional, heavily processed by the device’s firmware, and designed for speech rather than music. The result is a thin, distant-sounding recording. For anything beyond a quick voice memo, connecting a dedicated microphone like the Hollyland MELO P1 via USB or USB-C makes an immediate, audible difference in quality.
Do I need an audio interface to record vocals?
A standalone audio interface is the conventional way to connect a condenser microphone to a phone or computer. But it is not strictly required if you have an integrated solution. The Hollyland MELO P1 includes a built-in dual-DSP smart audio mixer with gain control, which performs the same core interfacing function as a standalone unit without the additional purchase or separate setup process.
What sample rate should I use for vocal recording?
Set your DAW or recording app to 48 kHz to match the MELO P1’s native output. For bit depth, use 32-bit Float if your software supports it. This matches the mixer’s recording format and gives you the most flexibility during editing. If 32-bit Float is unavailable in your DAW, 24-bit at 48 kHz is the correct fallback setting.
How do I reduce echo when recording in a bedroom?
Add absorptive materials as close to the microphone as possible. Hang a thick blanket directly behind the mic position. Place the mic in a room corner to disrupt standing waves between parallel walls. Recording inside a walk-in closet filled with clothing is one of the most effective free solutions available. Keep bare walls, glass surfaces, and hard floors outside the immediate recording area.
Can I record vocals and guitar at the same time?
Yes. The Hollyland MELO P1 includes a 3.5mm instrument input on the mixer, allowing you to connect an acoustic guitar or keyboard directly while the built-in condenser microphone captures the vocal simultaneously. Both signals pass through the dual-DSP mixer before reaching the recording device, making it a practical single-device solution for singer-songwriters.
Conclusion
High-quality vocal recording does not require a professional studio. It requires five things done correctly. An appropriate microphone, an acoustically prepared space, calibrated gain, real-time monitoring, and a well-organized recording session. With those five elements in place, you can get clean, usable vocal takes from any room.
From here, the natural next steps are exploring basic vocal mixing techniques, setting up bedroom acoustic treatment on a budget, or learning how to record vocals and guitar simultaneously. The Hollyland MELO P1 is the all-in-one kit used throughout this guide and a strong starting point for each of those topics.
