.png)
Grace notes add expressive flourishes to your MuseScore compositions, letting you embellish melodies with Acciaccaturas and Appoggiaturas. Whether you’re adding a sharp little flourish or a softer touch, knowing how to add Grace notes brings more expression to your music. In this guide, we’ll navigate MuseScore’s Grace Notes palette and handy shortcuts to show you how to place and adjust Grace notes. We will also cover some advanced tips on working with Grace notes, perfect for both newcomers and seasoned artists.
Let’s start with an overview of the Grace Note itself.
What are Grace Notes in MuseScore
Grace notes are ornamental, cue-sized notes that enrich a melodic line without affecting the bar’s beat count. They borrow their value from a parent note and serve as expressive embellishments. In MuseScore, you’ll encounter two main varieties: the short Grace note, or Acciaccatura, marked by a slash through its stem and played as a quick crush note; and the long Grace note, or Appoggiatura, shown without a stroke and typically taking half the parent node’s value. These ornaments let composers and arrangers introduce flair and nuance into their scores.

Adding a Single Grace Note to Your Score
MuseScore gives you two simple ways to ornament a note with a single Grace note: the visual Palette and keyboard shortcuts. Both approaches insert an Acciaccatura or Appoggiatura at the exact pitch of your chosen note, ready for styling or slur attachment.
Add Grace Notes Using the Palette
First, open MuseScore and create a new score. Then, on the left side of the window, locate the Palettes panel. If it’s not visible, go to View > Palettes or press F9 to make it appear. Next, expand the Grace Notes section. If you’re not seeing it, switch to the Advanced workspace by clicking the dropdown in the bottom-left corner of the Palettes panel and selecting Advanced.
If you use MuseScore 4 or newer versions, you only have the Default workspace. In this case, you first need to open the Pallets panel, click Add Pallets, and then choose Grace Notes.
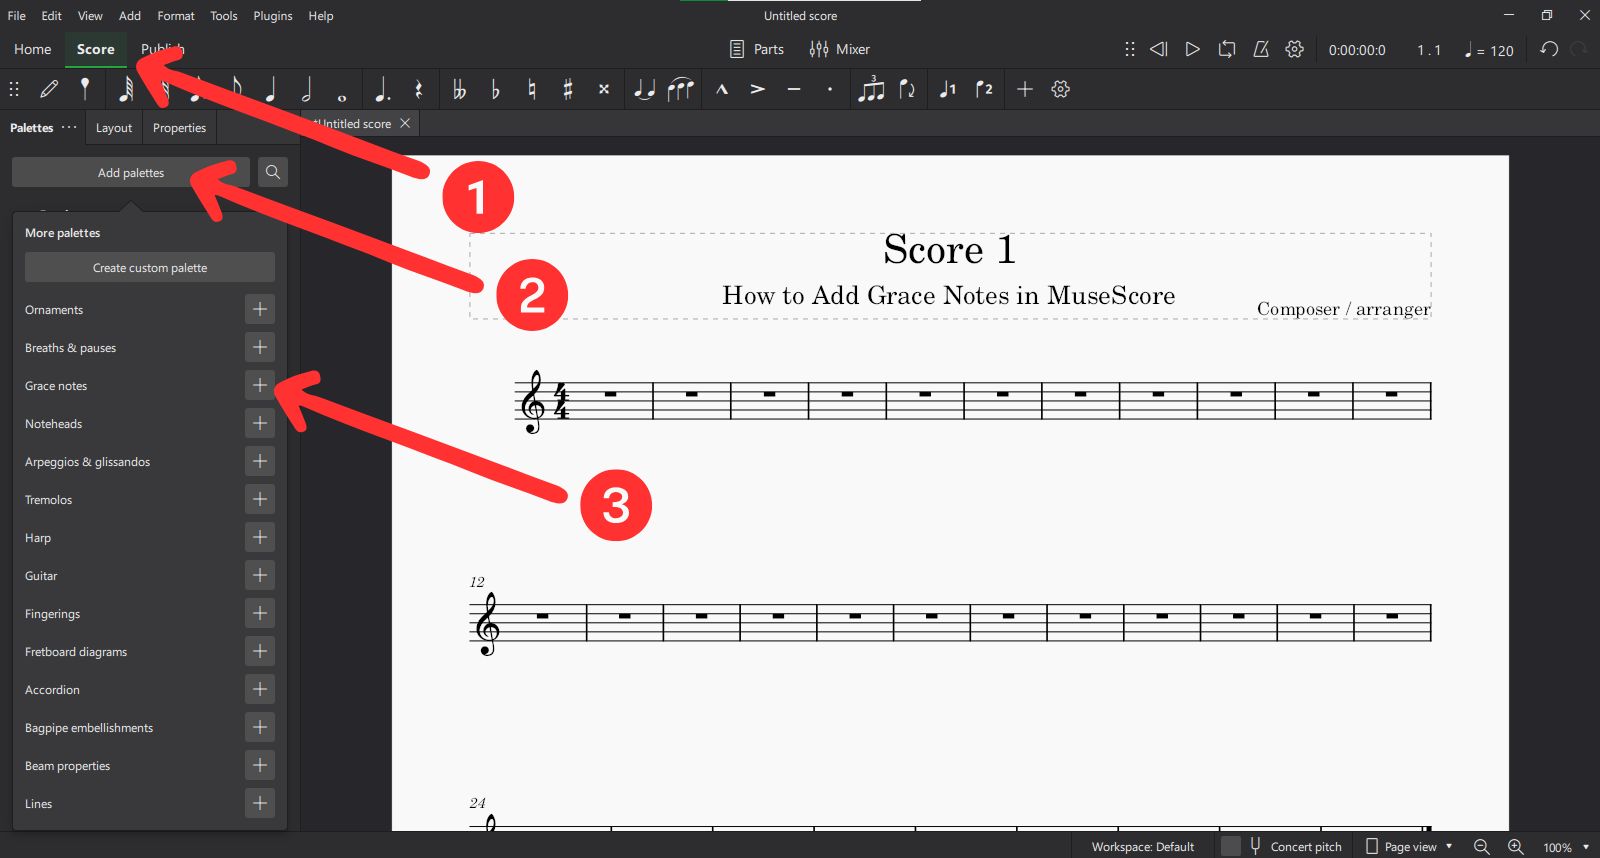
Then, in your score, click once on the regular note (the “main” note) that you want to precede with a Grace note. The selected note will turn blue, indicating it’s active.
Now, in the Grace Notes palette, drag the desired Grace note icon and drop it onto the selected note in your score. Alternatively, you can click the Grace note icon in the palette once with the main note still selected (blue).
Finally, you’ll see that MuseScore will insert a cue-sized note just before the selected note.
- If you choose an acciaccatura, a small slash will appear through the stem.
- If you choose an appoggiatura, it will appear without the slash.
To stack multiple Grace notes, simply repeat the process: click another Grace note icon with the same main note selected.
Insert an Acciaccatura or Appoggiatura Using Keyboard Shortcuts
Shortcuts keep your hands on the keys and speed up ornamentation. First, select the target note again. Now, to add an Acciaccatura (slashed Grace Note), you can press the forward slash key (/) on your keyboard. MuseScore will instantly insert a slashed Grace note at the same pitch as the selected note, just like in the previous method.
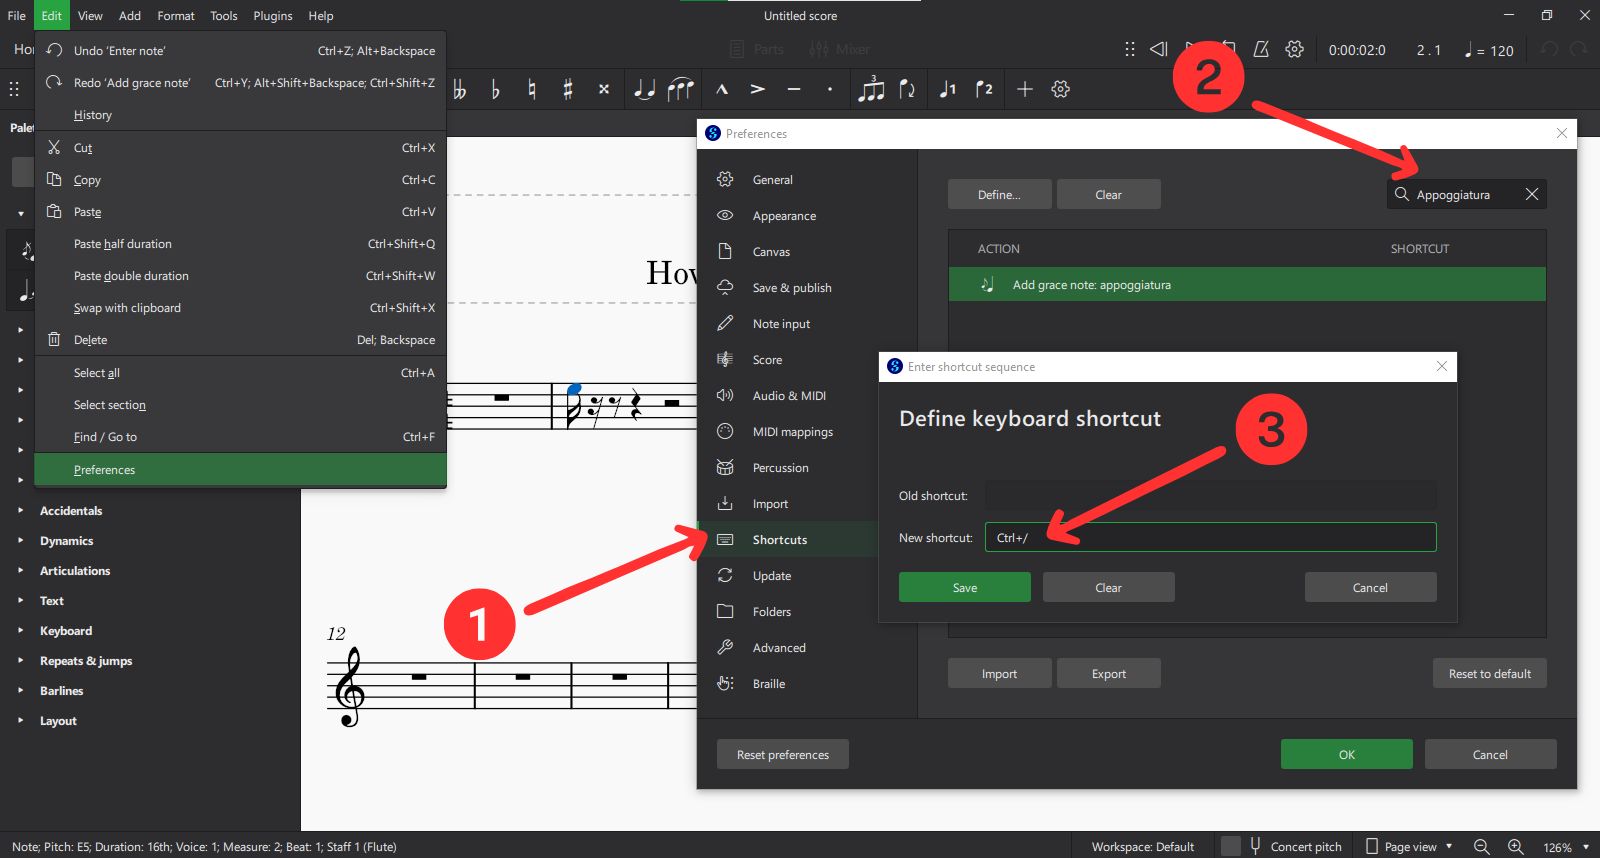
For adding an Appoggiatura, on the other hand, MuseScore does not have a built-in shortcut by default. To do that, you must set a custom shortcut under Edit > Preferences > Shortcuts, and then you can use that key.
To set one, click Edit > Preferences (or MuseScore > Preferences on Mac). Then, navigate to the Shortcuts tab. Search for “Appoggiatura”, then assign a custom key (e.g., Ctrl+/). Finally, you’ll be able to press your new shortcut to add an appoggiatura to the selected note.
With these methods in your toolkit, you’re ready to to move on to advanced tips in the next section.
Advanced Tips & Best Practices for Grace Notes
Once you understand how to add Grace notes in MuseScore, you can take things further by adjusting how they look and behave. This section covers practical tips that help you style Grace notes better, work faster, and get more control over how they show up in your score.
Adjust Default Grace Note Size Before You Add
If you want all your Grace notes to be smaller or bigger than the default size, don’t wait until after adding them. Go to Format > Style > Sizes.

There, you can set the size before adding any Grace notes, so you don’t have to fix them one by one later. This helps keep things clean and saves time, especially if you’re working on a long piece.
Use Inspector Settings to Pre-Style Grace Notes
When you add a Grace note, it might appear slightly off or not styled the way you want. Before adjusting each one manually, you can use the Inspector (on the right side of the screen in MuseScore 3) to apply consistent settings. Click on a Grace note, then go to the Chord or Note section in the Inspector. From there, you can change things like horizontal position, stem direction, vertical spacing, and more. In MuseScore 4 and higher versions, this option is under Score > Properties.

This is especially useful when working with Grace note chords or multiple Grace notes in a row.
Know When to Add Slurs with Your Grace Notes
MuseScore won’t automatically add a slur between the Grace note and the main note. But adding one by hand can improve the musical feel and make the phrase clearer. To do this, click the Grace note, then press S on your keyboard, or use Add > Lines > Slur from the top menu.

A Slur is helpful when you want to show that the Grace note is connected to the main note smoothly, especially in expressive or melodic lines.
Conclusion
Adding Grace notes in MuseScore transforms a plain melody into a polished, expressive line. You’ve learned how to place individual ornaments using the Palette or keyboard shortcuts and fine-tune their appearance.
With these tools in hand, you can work more fluidly, dragging or keying in embellishments without losing your creative flow. As you practice, experiment with different sizes, offsets, and slur placements to find the style that best matches your musical vision. Now, open your next MuseScore project and let your music sparkle with well-placed Grace notes.
FAQ
How do I delete a Grace note I no longer need?
Simply click on the small Grace note so it highlights, then press Delete (or Backspace) on your keyboard. The ornament will vanish without affecting the rest of your chord or phrase.
How can I add a run of Grace notes or build Grace-note chords?
To create a quick run, select your main note and keep clicking or dragging icons from the Grace Notes palette, or tap the forward slash key (/) repeatedly. For chords, first add one Grace note, then hold Shift and press the letter of the pitch you want (A–G), or press Alt+1-9 to add specific intervals above. This stacks multiple ornaments neatly before your main note.