.png)
High quality audio production is crucial in live streaming. To achieve high quality stream, you need live streaming software such as OBS (Open Broadcaster software) which has various functions like video encoding and blending. OBS Studio is free software that you can download from its free download page: https://obsproject.com/download and launch in your system or device. It facilitates the streaming of both audio and video content to prominent online platforms, including Facebook, Twitch, and YouTube.

OBS Studio is globally renowned software for screen recording and live streaming with an extensive feature set. OBS has a sophisticated audio mixer equipped with in-built filters which helps users to upgrade their streaming and recording by removing background noise, thereby enhancing overall audio quality. OBS filters include noise gate, noise suppression, gain, compressor, limiter and others. However, when set properly, noise gate is very effective in limiting unwanted sounds from reaching designated audiences.
Noise gates are known valuable tools in audio engineering and content production. These settings play a crucial role in ensuring that the desired sound source is optimized. So, if you are a podcaster, live streamer, musician or a studio engineer, noise gate settings can help you to produce clear sounds and maintain professionalism in your audio recordings and broadcasts. In this era where audio quality is paramount, noise gate settings and mic settings can help you to deliver a clean and immersive auditory experience to your audience. However, you need to set the noise gate optimally to achieve best results.
Understanding the noise gate settings in OBS
To be a pro in any sound/audio production, you need to understand how noise gate settings can clean up your audio and keep away those background noises that you do not want in them. Noise gate settings in OBS can improve the sound coming from microphone audio as its settings are designed to minimize or eliminate background noise from the microphone audio during live streaming or recording and ensure that the audience only hears the voice of the broadcaster without interference from unwanted background noises.
Noise gate settings will not only eliminate uncontrollable background noises such as keyboard clicks or street traffic but also serves to prevent any inadvertent sounds you might make in close proximity to your microphone, such as throat clearing. Noise gate can help to shield your audience from these unwanted sounds. Also, noise gate assesses audio levels, determining whether they reach a sufficient threshold to activate and allow audio passage. When audio levels are insufficiently low, the noise gate stays closed, effectively blocking any audio from reaching your viewers’ or listeners’ ears.
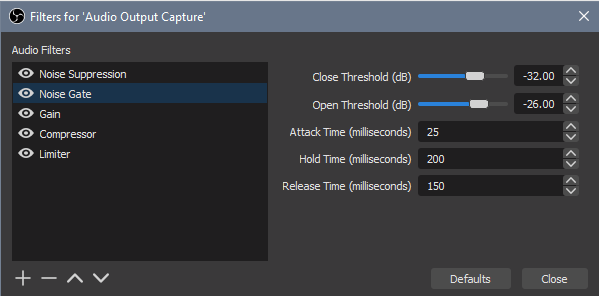
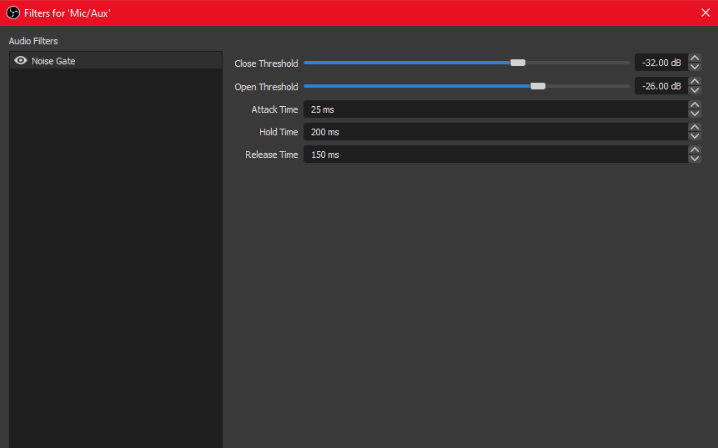
To achieve the best noise gate settings in OBS, you need to configure parameters like the threshold levels; closed and open thresholds, attack, hold and release times so that you will isolate the desired audio that you want your audience to hear. Each of these parameters plays a crucial role in shaping the behavior and effectiveness of a noise gate. The specific functions and availability of these parameters may vary depending on the noise gate hardware or software you are using. Understanding how to manipulate these settings can help you achieve precise noise reduction or creative audio processing in your projects.
The functions of these parameters include:
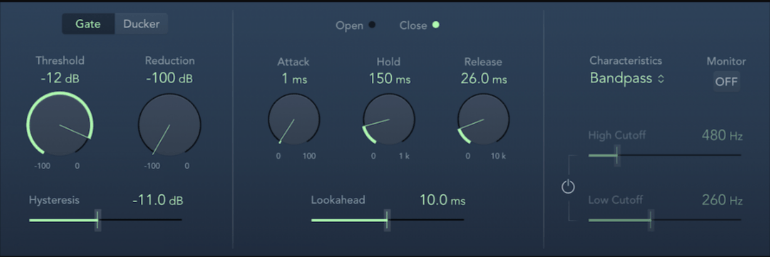
Threshold: Threshold levels determine when the gate opens and closes.
- Close Threshold: This is the level at which the gate remains fully closed, meaning no audio passes through. When the input signal falls below this threshold, the gate is in its “closed” state, and no sound is allowed to pass.
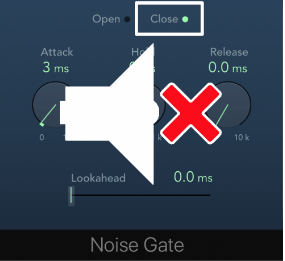
- Open Threshold: The open threshold determines the level at which the gate starts to open, allowing audio to pass through. When the input signal exceeds this threshold, the gate begins to “open,” letting the audio pass through.
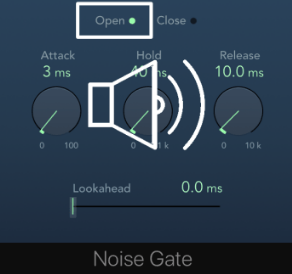
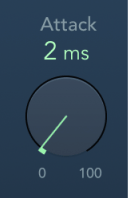
Attack Time: The attack time is the duration it takes for the gate to fully open once the input signal crosses the open threshold. A shorter attack time results in the gate opening quickly, allowing the audio to pass through almost immediately. A longer attack time introduces a gradual fade-in, which can sound more natural.
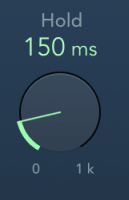
Hold Time: The hold time determines how long the gate remains fully open after the input signal exceeds the open threshold. It is essentially a delay before the gate starts to close again. Hold time can be useful for maintaining a consistent level of sound in cases where rapid fluctuations in audio are undesirable.
Release Time: The release time is the duration it takes for the gate to fully close after the input signal falls below the closed threshold. A shorter release time results in the gate closing quickly after the input signal drops below the threshold, which can lead to abrupt cutoffs. A longer release time introduces a gradual fade-out, which can sound more natural and avoid abrupt audio cuts.
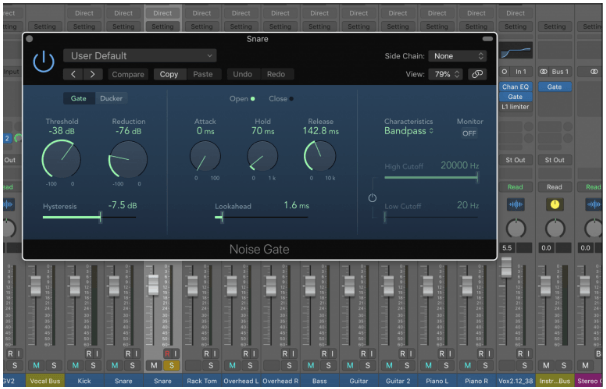
Other useful parameters of the noise gate settings are hysteresis, sidechain, filters, monitor, gate/ducker, look ahead and open/close.
The functions of these parameters include;
Hysteresis: Hysteresis is a parameter that introduces a buffer zone around the threshold level. It prevents the gate from opening and closing rapidly when the audio signal hovers around the threshold.
Sidechain: Side chaining is a feature that allows you to use the characteristics of a different audio source to trigger the gate. Instead of gating based on the input signal, you can use an external audio source to control when the gate opens and closes.
Filters: Some noise gates offer filter options, such as high-pass and low-pass filters. These filters allow you to modify the frequency content of the signal that triggers the gate. For example, you can use a high-pass filter to make the gate more responsive to higher-frequency content while ignoring low-frequency noise.
Monitor: The monitor function lets you listen to the audio that’s being gated or processed in real-time. It allows you to audition the gated signal and make adjustments to the gate settings while listening to the result.
Gate/Ducker: Some noise gates can also function as duckers. A ducker reduces the level of one audio source (the “ducked” signal) when another audio source (the “trigger” signal) reaches a certain threshold.
Look Ahead: Look-ahead is a feature that allows the noise gate to anticipate the incoming audio and react slightly in advance. This can help reduce the initial transient noise or clicks that may occur when the gate opens.
Open/Close: These parameters control the attack and release times of the gate. “Open” typically corresponds to the attack time, determining how quickly the gate opens when the input signal exceeds the threshold. “Close” typically corresponds to the release time, determining how quickly the gate closes after the input signal falls below the threshold.
Steps in setting the Noise gate filter in OBS
The first step in achieving best noise gate settings in OBS is to install the OBS in your system. Then you follow these steps to achieve the best noise gate setting that suits your needs.
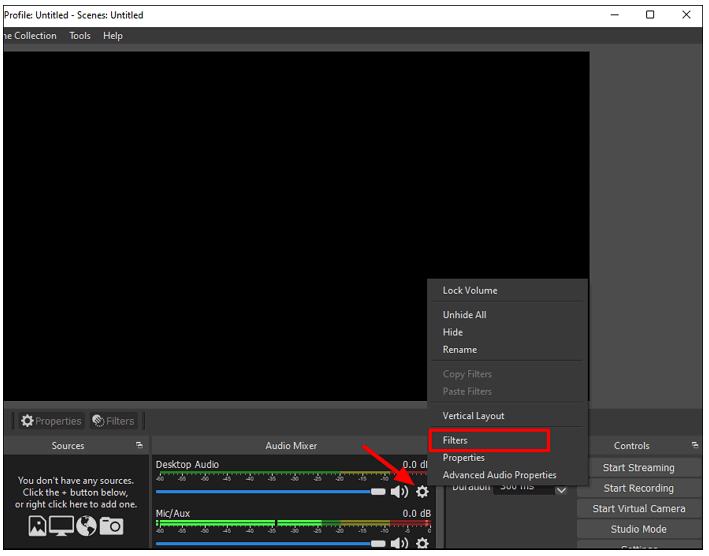
Step 1- Find the “Audio Mixer” section in the primary interface, then click the gear icon to access the audio configuration. Opt for the “Filter” selection and pick the audio filters you wish to apply.
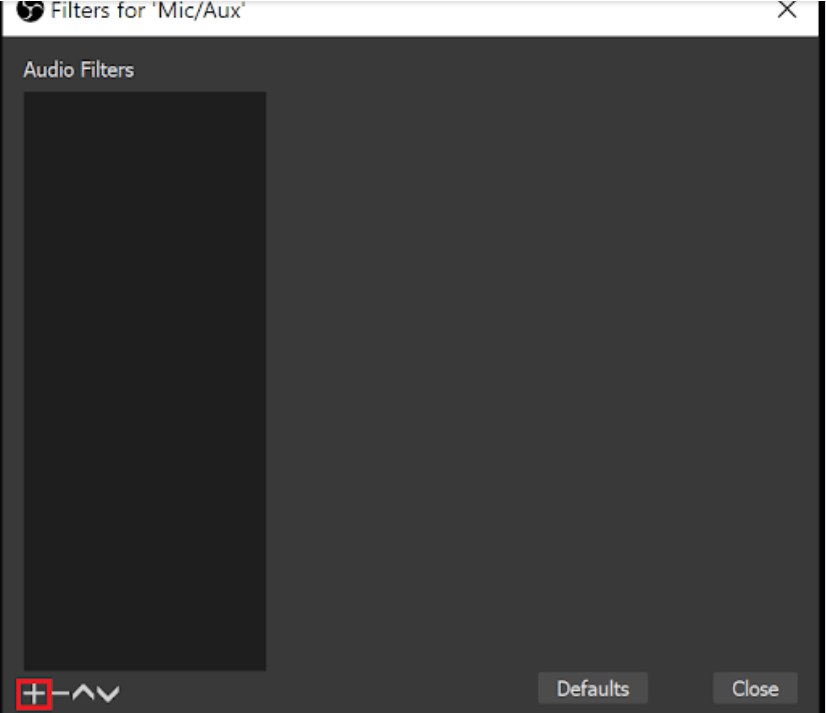
Step 2 – Select the filter from the list by clicking the “+” icon located in the lower-left corner.
Now that you have gotten to this level, you can start by setting the parameters to achieve best audio
Step 3- Set the threshold levels, with the closed threshold just above the noise floor and the open threshold slightly above the desired signal level.
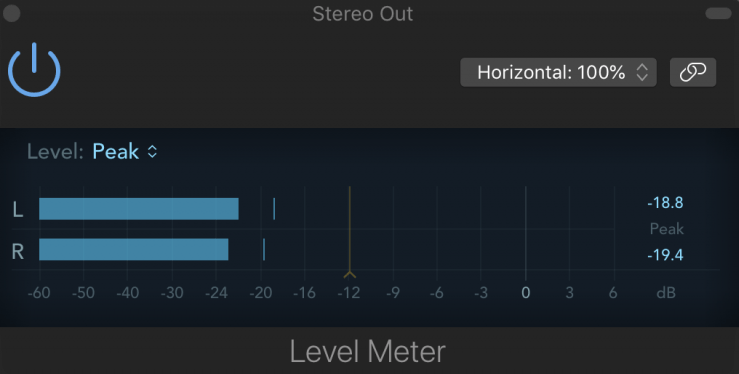
A simple method for determining the appropriate threshold setting is to monitor your meters.
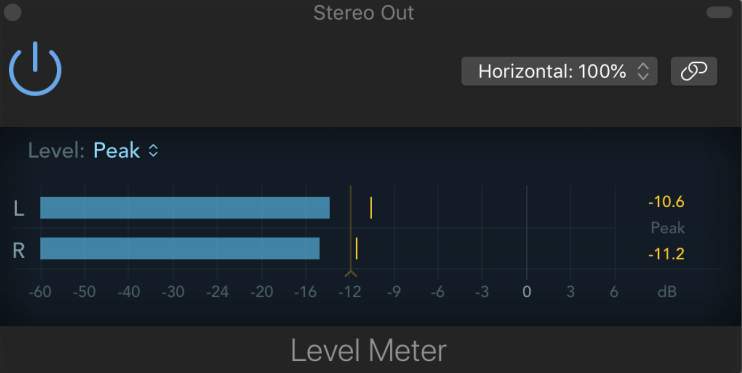
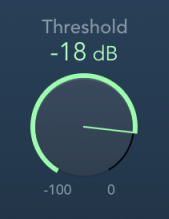
An example is a snare track with drum level at approximately -11 dB, but with a sound bleed from the kick drum, registering at about -19 dB.
By setting the threshold to -18 dB, we can eliminate the undesirable kick drum noise while keeping the snare sound unaffected.
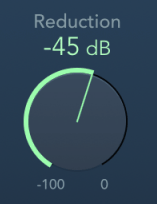
Step 4- set the reduction level. Lower reduction level results in a quieter background noise. The specific reduction level largely depends on personal preference, so feel free to experiment and find what sounds most natural to you. You have the flexibility to set the reduction to a point where there is still some intentional bleed if desired, say -45Db.
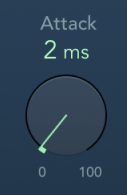
Step 5 – Set the attack. A fast attack is better when using a noise gate in OBS. Therefore, it is better to start with anything below 5mins and continue from there if necessary.
Step 6- Set the hold time. To achieve best sounds, start with 100ms and adjust until you get best results.
Step 7– Set the release. To avoid having a release time so lengthy that the gate remains open indefinitely, begin with a release time of 300ms and assess the sound quality. You can extend it if the fade-out appears too abrupt or shorten it if you are encountering undesirable noise.
Step 8 – Adjust the hysteresis. Hysteresis is the amount by which the volume must dip below the threshold in decibels before the gate shuts.
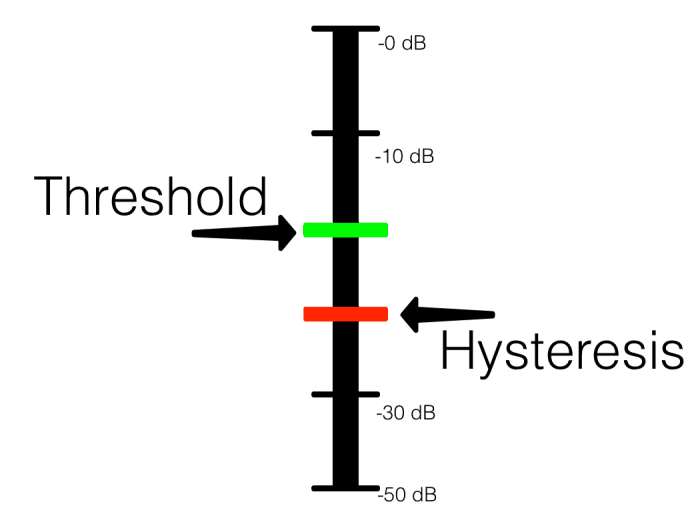
Starting with a hysteresis of -6 dB to help strike the right balance is advisable.
Step 9 – Set the sidechain. Setting up a sidechain in a noise gate involves routing an external audio source to control when the gate opens and closes.

When the gate is applied to the bass guitar but set up with side-chaining from the kick, it serves to synchronize the bass guitar’s rhythm with the kick drum, creating a tighter and more cohesive low-end foundation.
Step 10: Ducking. This technique is employed to manage an excessively loud instrument. Ducking operates in contrast to gating; instead of increasing the volume of a track when it crosses the threshold, it effectively reduces the volume.
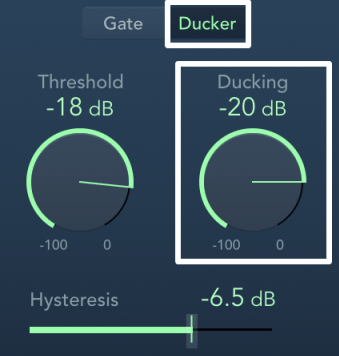
To enable the volume reduction effect, activate the noise gate’s “Duck” feature and insert it onto the track where you want to lower the volume (Track A). Connect the sidechain input of the gate to the track that will act as the control signal (Track B). Then, adjust the Threshold setting to trigger the volume reduction precisely when you desire it.
Step 11– Set the lookahead.
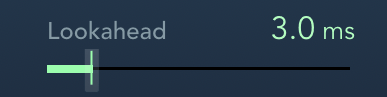
The lookahead parameter anticipates the future loudness of an instrument, allowing the gate to proactively prepare to open when necessary. This foresight reduces the likelihood of cutting off the initial portion of a sound, making it particularly useful when dealing with vocals and drums.
Step 12 – Set the filters. This functions by instructing the gate to disregard specific frequency content instead of eliminating it entirely.
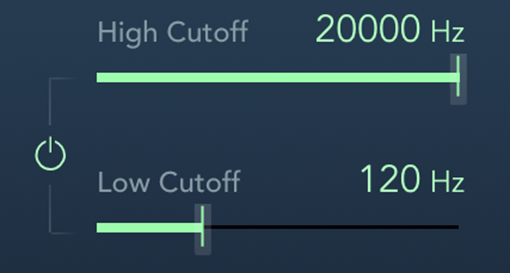
When you filter out certain frequencies, the gate will not respond to them, meaning they will not trigger the gate to open. For instance when you employ a high-pass filter, you are signaling the gate to ignore the kick drum frequencies, ensuring that the gate does not open in response to them.
Even with optimal noise gate settings in OBS, using a high-quality wireless lavalier microphone can significantly enhance your audio clarity and reduce background noise. A good wireless lav mic captures pristine sound right at the source, making your streaming and recording sessions much easier to manage and ensuring professional-grade audio every time.