.png)
Mac’s auditory excellence and cutting-edge technology have provided a seamless experience. With built-in output or “built-in audio jack,” it effectively brings creativity to your work. However, you will encounter the perplexing issue of “built-in output missing,” which will halt and bring frustration.
With this issue, it becomes difficult to seamlessly enjoy your audio and negate or restore the Mac’s lost functionality. So, this step-by-step guide will help analyze the reasons and how you can implement the solutions. Furthermore, it is essential for smooth functionality to empower them with the knowledge to understand and restore the lost glory.
Fixes to Built-in Output Missing on Mac
When encountering the issue of Mac’s “built-in output missing,” it will halt your work’s overall functionality and creativity. Also, the solutions are simple, but analyzing the reasons is crucial for overall stability. So, before going through the answers, it’s essential to understand why these issues arise and how to implement the solutions.
Why there is the issue of Built-in Output Missing on Mac
Mac’s error of missing built-in output is an error when it cannot pick up the internal audio. It usually happens when you are using an outdated version of the device, and it’s unable to recognize or perform well. So, hereunder are the reasons to understand the potential reasons why this issue pops up in the first place:
Outdated Mac version
If you are using the outdated version of Mac, you will encounter “Built-in Output missing” to halt your work creativity.
Issue due to NVRAM or PRAM
When you are experiencing the issue of output missing, it is because there’s an issue with NVRAM (non-volatile random access memory) or PRAM. It happens due to bugs or glitches that cannot be removed by restarting the computer.
Corrupted Files
The “.plist files” contain critical information and ensure the smooth functioning of the device. However, sometimes the problem arises when you have corrupt audio files, “.plist files,” that will hinder the overall work experience. So, hereunder are the reasons why the files become corrupted:
- Outdated files may become faulty and corrupted.
- The most probable cause is when trying to write down the file to drive, it becomes defective, but the chances are rare.
Dust Particles
The most probable reason for the missing output is the older Mac audio port when the red light indicator shows something is interfering. It happens when dust particles accumulate in the hole, which does not allow built-in speakers to work efficiently.
External Power Speaker
This problem may have sometimes started when plugged into an external power speaker amplified to a power jack.
The auditory problems are usually hardware or software issues that can be removed after careful understanding and seamlessly implementing solutions. So, after analyzing the reasons behind the error, “built-in output missing,” you can effectively restore audio functionality.
How to fix the Built-in Output missing on Mac
Apple’s macOS systems have gained recognition because of their professional communication and entertainment. However, for the abovementioned reasons, it stopped functioning efficiently, and it became necessary to implement solutions. Moreover, for better auditory excellence, follow the enlisted step-by-step solutions:
Updating the Mac
The first thing is to ensure that the Mac is running on the latest version and you are constantly updating it after some time. So, follow the hereunder guide to check which version you are currently using:
- First, tap “Apple Icon” from the top-left corner of your account and click “About this Mac.”
- From the next window, you can check the current version of the Mac
Furthermore, click on the “App Store” from your smartphone and select “Get” from the right-bar side of the next window. With this, if there is any system update, it will pop up here, and click on it to get it started.
Also, if you are unsure about the version, click “About this Mac” and check for any latest updates. However, remember that before updating or installing the latest version, ensure you have backed up all the data.
You should also remove any external devices connected to your Mac. For instance, if you have connected Hollyland Lark M2’s receiver to your Mac, an external speaker, external disks, or any gadget, ensure that you remove it before you proceed to update to the latest version. Although it is not a compulsory act, the practice of disconnecting any external hardware from a Mac before updating is advised by users in the Apple community.


Zapping or Resetting NVRAM or PRAM
NVRAM or PRAM uses and stores particular types of information for sound, time, and display settings. An important parameter is that it appears in older PowerPC Macs, and issues due to these RAMs are rare and can be solved by resetting or zapping these memories.
Furthermore, it also stores information about recent fatal attacks and can significantly solve your audio problems. Follow the steps to reset and restore your lost functionality:
- First, ensure to save your current work, if there is any, and shut down your Mac
- Also, disconnect any external devices and press the power button until your Mac turns on
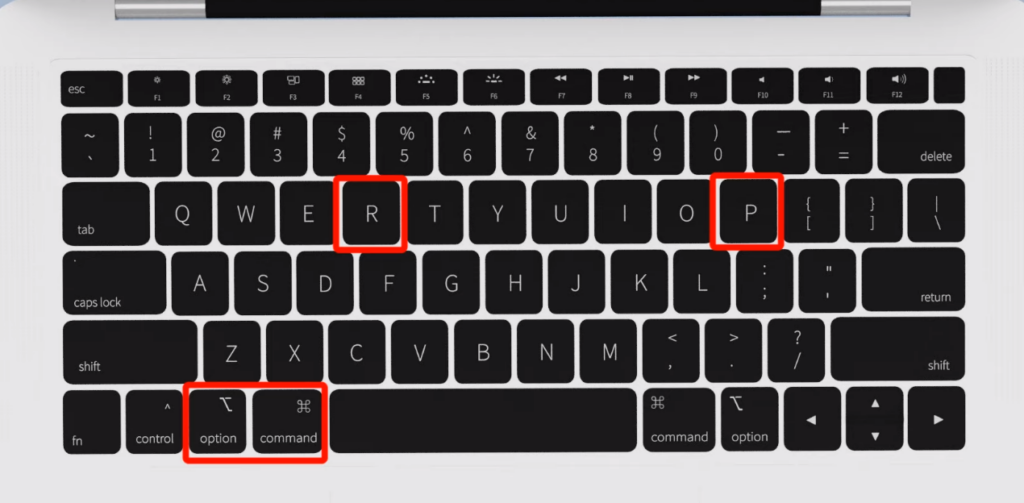
- Then, during restarting, press and hold the “Command+ Option key + P and R keys” till the Apple Logo appears
So, by zapping the RAMs, you will turn your startup display, Audio Preferences, and Time Zone to the default setups. Furthermore, it will reset or remove the Mac core audio problems that are difficult to analyze and remove.
Check your Sound Preferences
When built-in internal speakers are missing the output, ensure that you have selected the right speakers as an output. It’s the most straightforward problem that results from neglection, so let’s follow the enlisted guidelines:
Step 1- Open System Preferences
- First, you must disconnect any USB, Thunderbolt, or 3.5mm audio ports
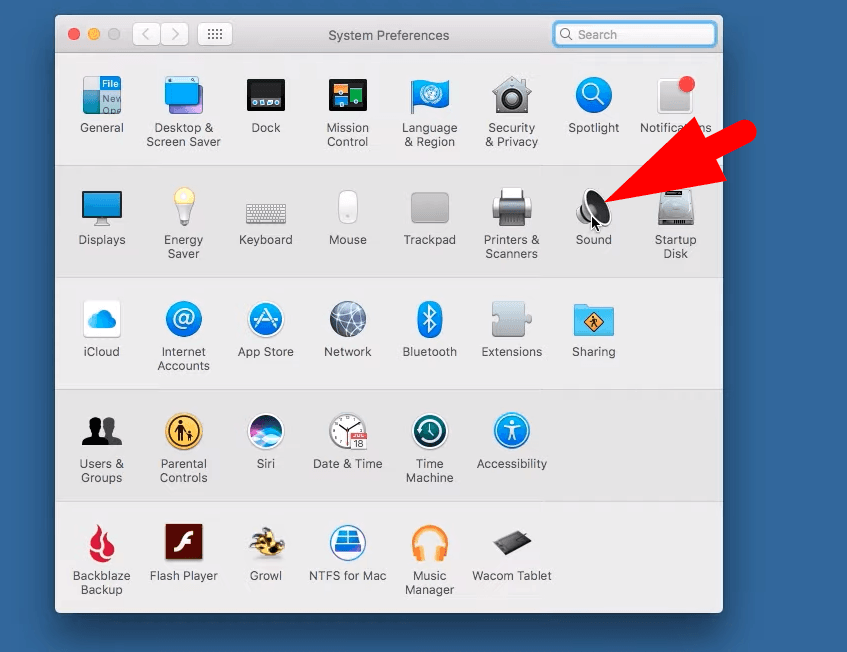
- Then navigate and click the Apple Menu button from the top-left corner, select System Preferences
Step 2- Sound Settings
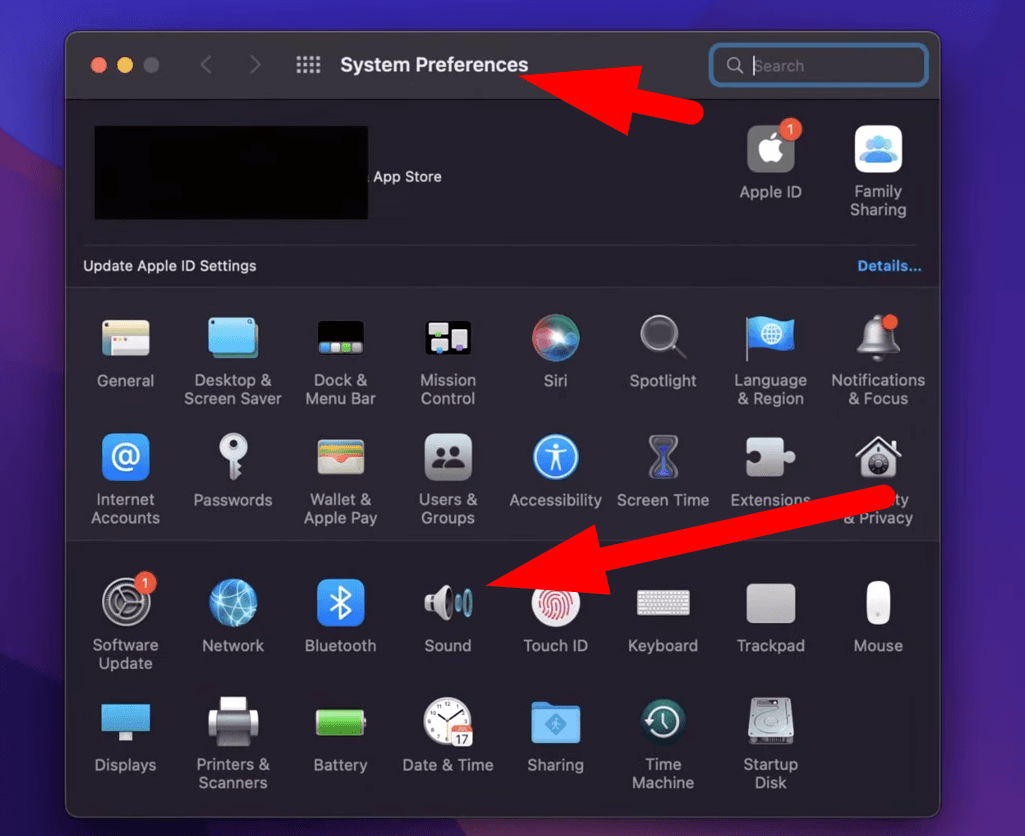
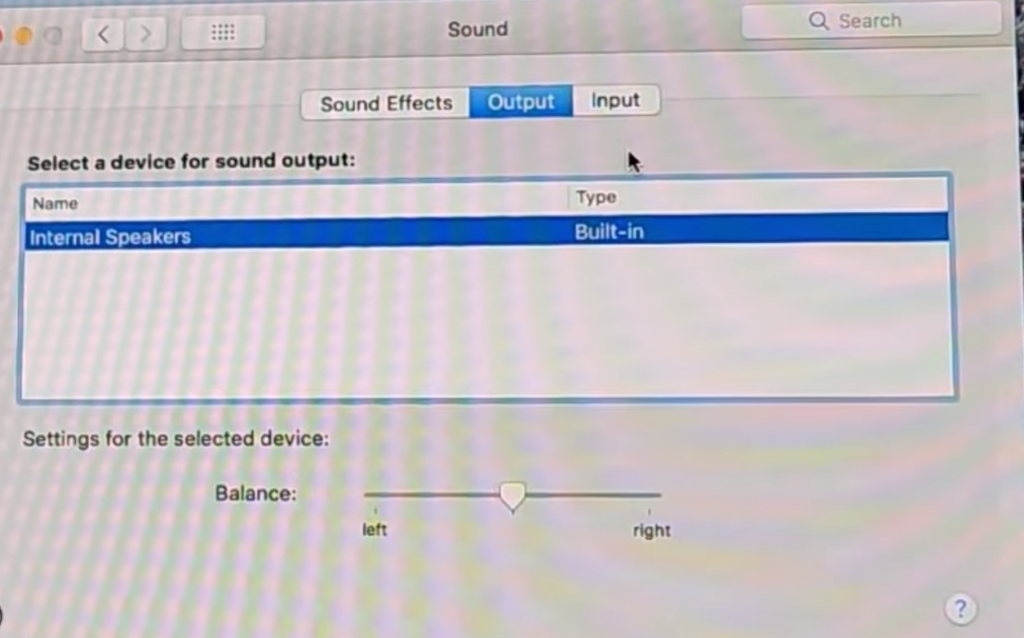
- After that, select “sound” settings and built-in speakers as the default output.
Step 3- Set Built-in Audio
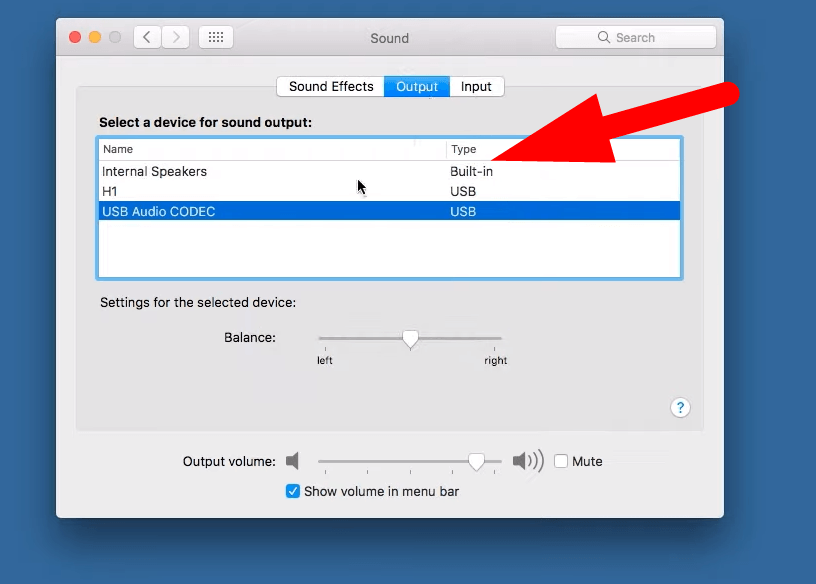
- Also, check for internal speakers under the input or output tabs.
Furthermore, deselect the “Mute” button if it is selected, and also move the sound slider to the right. With this, you will turn the volume to the highest and check again if the speakers start working without issues. After selecting the built-in speakers as an output, you can seamlessly enjoy your audio again.
Removing the corrupted files
Sometimes, the problem arises when you have corrupt audio files, “.plist files,” and you must remove them for a seamless experience. Therefore, follow the guidelines to remove and generate new “.plist files.”
- First, create a safe folder on the desktop.
- Then go for the “Finder Window,” select “Macintosh HD,” and open the Library.
- After that, select Preferences and open Audio.
- Copy the files to your desktop’s newly created folder as a backup and delete all the audio files.
- Then open the System Preferences Audio Panel and force generate the new uncorrupted plist (preferences list) files to the folder.
- Check if the built-in speakers work excellently, and delete the desktop backup folder if everything works.
By this, you can seamlessly remove the corrupted audio files to bring back the Mac’s lost glory. However, if the error persists after removing the files, you can apply other methods mentioned.
Setting the Built-in Output
Cleaning the digital jack is the simplest and most effective method to clear the sound from the built-in output. A red light indicator will come from the audio, indicating the clogged dust particles.
When you open the “Audio” from system preferences, there will be ‘digital optical output.’
Step 1- Check for Output
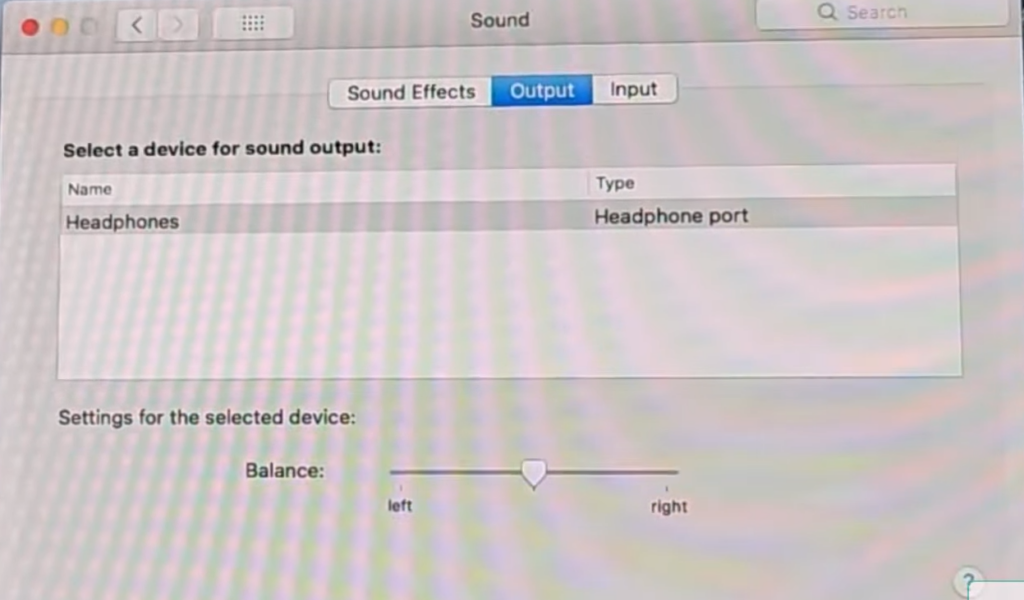
- Insert the “Headphone Port” into the audio jack and wiggle it until the headphone option appears.
Step 2- Built-in Output
- Then, remove the headphones, and the “built-in output” option will return automatically.
- After repeating the process several times, you can retrieve and seamlessly enjoy your audio.
Restart the sound controller.
After pressing the volume keys on the keyboard, the stop or cross sign pops up, depicting that you cannot perform this function. Also, the menu bar audio icon is greyed out, and the volume slider is disabled.
It usually happens after updating the operating system, installing a new device, or switching between audio devices.
- First, from the Mac’s preferences, go to sound and check for built-in audio options.
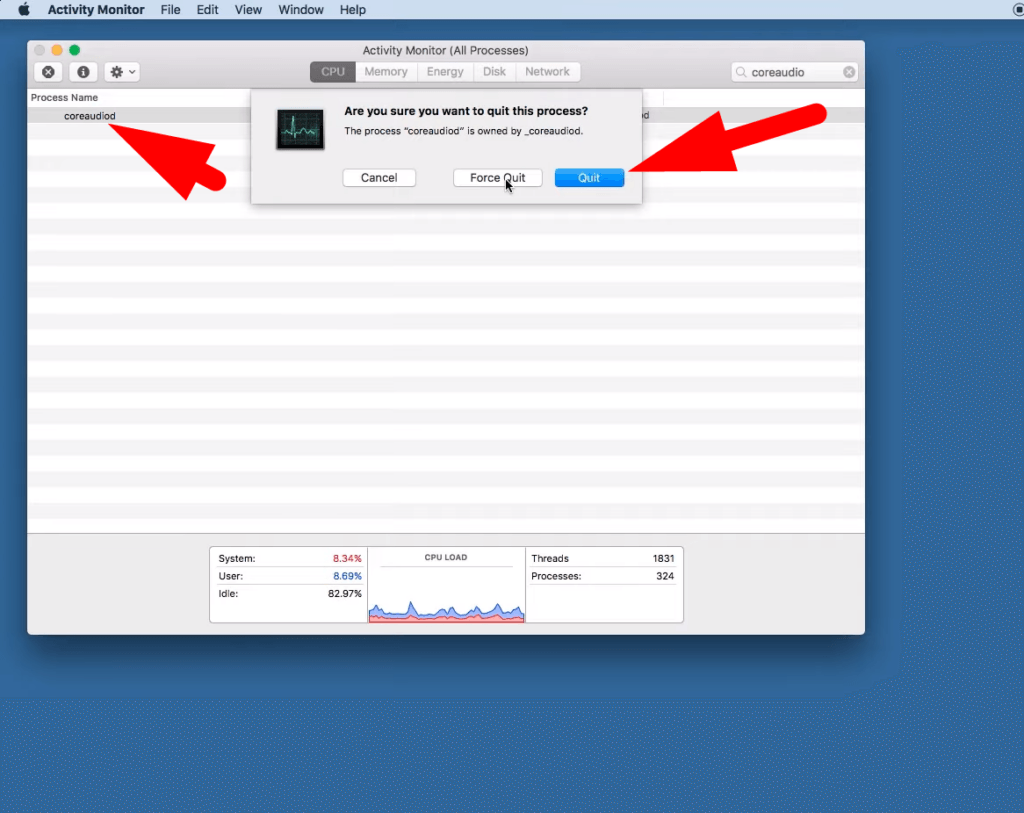
- Also, go to Applications Utilities and click “Activity Monitor” to delete the “Call Radio d Process.”
- After that, click on the search bar from the top-left corner and type “core audio.”
- Right-click and choose “Force Quit” the core audio
- Then click to restart the Core Audio, which will open the audio without errors.
Furthermore, you can also solve the issue of “built-in output missing” by using the “Terminal Command.”
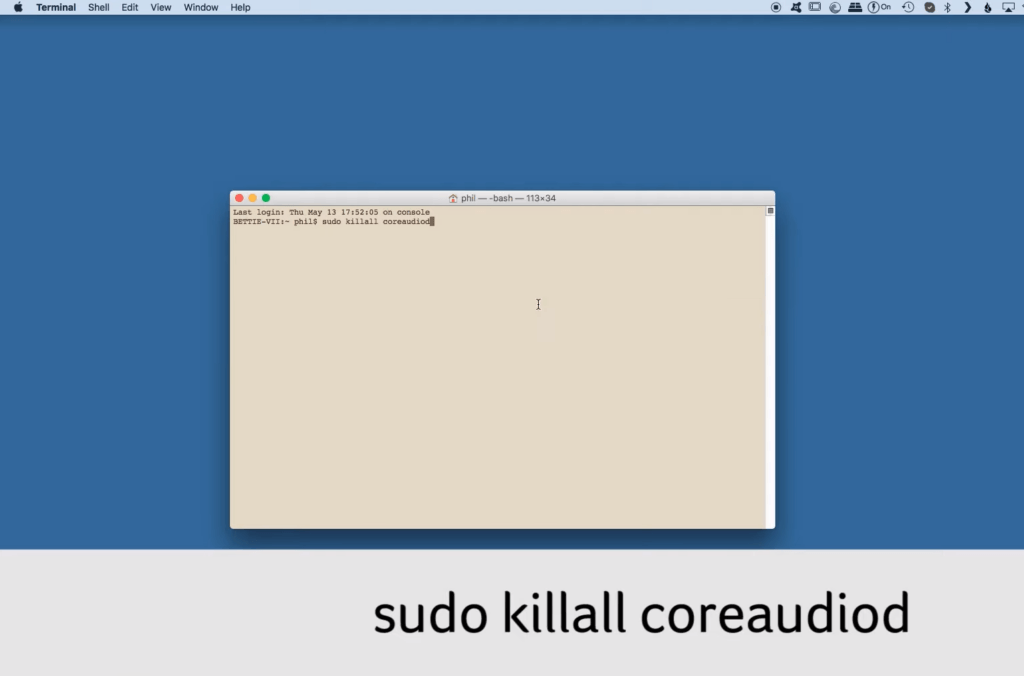
- First, click the “Launchpad icon,” then type “terminal” in the search bar
- Click on the terminal and paste the following command “sudo killall CoreAudio,” and then hit the return key
- After that, restart your Mac from the Apple Menu window and click “Restart” your computer
- Then, check again if the error is removed and the output is working efficiently without any issues.
Resetting the Problematic Apps
Sometimes, you need help hearing the audio from built-in speakers due to bugs and technical glitches in specific apps. You can ensure the issue of the app by opening different apps, and it can be removed by following the steps:
- Go to “Voice & Video” from the selected application and ensure you have set the correct input or output devices.
- Then, check additional settings from the drop-down menu.
- After that, click on the “Apple Icon” from the top-left corner of your screen and click on “Force Quit” your app.
- Before restarting the app, head to “System Preferences” and click “Built-in Audio” for a seamless audio experience.
Conclusion
The frustrating encounter of missing built-in output can be resolved by simple methods, from restarting to updating to the latest version. However, the issues range from software to hardware, and understanding the type is essential in developing the roadmap for solutions. Also, relying on the abovementioned guidelines allows you to enjoy the unobstructed and crystal-clear sound seamlessly.
After applying the above methods, if the issue persists, then it’s better to go for hardware solutions. However, after software solutions, increase the volume to bring lively entertainment.
Frequently Asked Questions
Why does my Mac permanently mute?
When your Mac has no sound, it’s probably for two reasons. First, you have not selected the output source, and second, you have accidentally muted your Mac. These issues can be resolved by clicking the Apple Menu bar and selecting System Settings.
After that, click Sound and open Output. You can add a built-in or digital output to enjoy your crystal-clear sound. Moreover, deselect the mute button and move the volume toggle to the right for a higher music experience.
How do you enable audio or internal speakers on macOS?
To seamlessly enjoy your music, you must enable the internal audio as your output source. For this, you have to follow the simple guidelines:
- From the Apple’s Finder Window, click on the “Go.”
- Then select “Utilities” and choose “Audio MIDI Setup.”
- After that, right-click on the “Built-in Output” and tap “Use this as the default sound output.”
By this, a small sound icon will appear depicting its default audio output, and you can change it by following the same method.