.png)
Mac computers are known for their professional features. In a survey, 13,700 people were asked about their favorite work-related computer system. Seventy-five percent voted for Mac.
These numbers indicate that Mac is a popular choice for online meetings and content creation. That means its built-in microphone plays a vital role in users’ professional and academic lives. Imagine what would happen if the mic gets turned off. It sounds scary, but many users face problems with their internal microphones on Mac. However, adjusting a few settings can help resolve such issues.
So, in this article, you will explore ways to turn on the microphone on a Mac. You can follow the step-by-step instructions to enable the mic by increasing the volume, permitting apps to use the microphone, and allowing the Mac Safari browser to use it on different websites.
Method 1: How to Turn On the Microphone on Mac at System Level
Let’s start with the basics. Sometimes, users accidentally decrease the microphone input volume on their Mac computers. Since there may be no intentions involved, they think their device has become faulty due to some hardware or software issues.
In such scenarios, it is wise to check the system’s overall audio input rather than rushing to a technician. Because, most of the time, increasing the input volume of the mic on Mac can enable its functions.
So, here’s how it’s done.
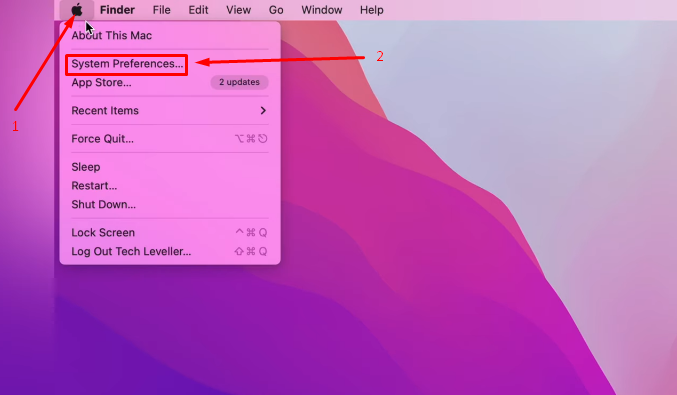
- Step 1: Open your Mac and click on the “Apple” logo on the top-left corner of the screen
- Step 2: When you see the menu, click on the “System Preferences…” option to enter the main settings
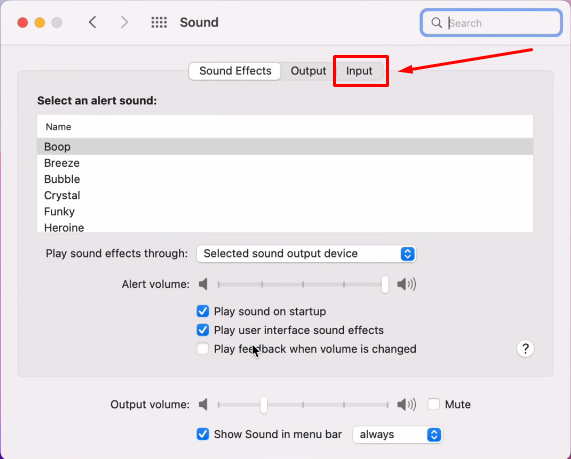
- Step 3: The system preferences tab shows various icons, and each of them serves as a gateway to tweak specific settings. So, look for the “Sound” option with a little speaker icon and click on it

- Step 4: A new window will pop up with three different tabs on the top, so choose “Input” to view settings related to audio input devices
- Step 5: Under the “Select a device for sound input” area, click on the microphone name that is marked as “Built-in”

It means you are choosing the internal Mac microphone to adjust the settings. However, if you have connected external mics, they will also appear in this area. So make sure to select the right mic.
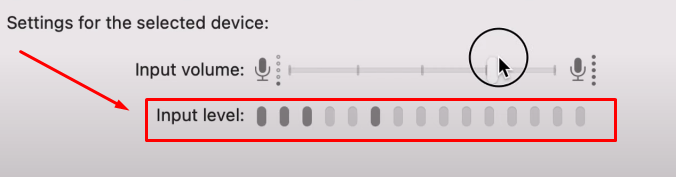
- Step 6: After clicking on the built-in microphone, go to the “Input Volume” option below and check the position of the volume bar slider
If it’s on the extreme left, it means the microphone won’t pick up the sounds since the input volume is set to zero.

- Step 7: Now, to turn on the mic, click and hold the slider button and drag it to the right side of the volume bar


- Step 8: Once done, speak and notice the “Input level” bar. If it’s bouncing back and forth when you start and stop speaking, it means that your MacBook microphone is now turned on
Method 2: How to Turn On the Microphone on Mac for Multiple Apps
If the input volume is full on Mac but some apps are unable to use the mic. It might be possible that the microphone is disabled for certain software and programs installed on your macOS. Therefore, you will need to turn on the mic for applications to make it work.
Here’s how you can do it quickly.
- Step 1: On your home screen, look for the “System Settings” icon on the dock and click on it

Alternatively, you can click the “Apple” logo on the top of the screen and select the “System Settings…” option to enter the main settings.

After that, a new window will open with several options and their icons on the left side of the screen. Each option’s main settings will be visible in the right panel (the bigger portion of the screen, as you can see in the screenshot below.

NOTE: If you can’t find the “System Settings…” option, look for “System Preferences…” Both options are the same but may have different names, depending on the macOS version.
- Step 2: Find the “Privacy & Security” app on the left panel and click on it to view more options
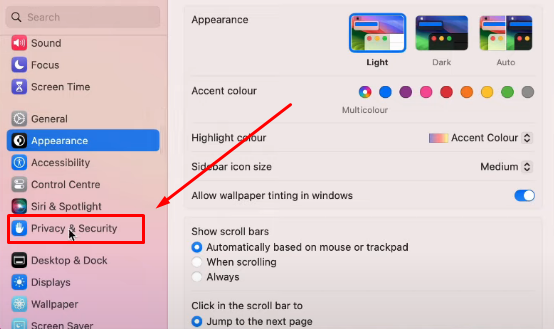
- Step 3: Locate the “Microphone” icon on the right panel and click it

Here, you will see different applications along with a toggle switch. If the toggle is disabled, it means the microphone will remain turned off for that specific app.
- Step 4: Click on the toggle switch for each application (or as per your requirements) to allow microphone access

- Step 5: Go back to your home screen and open the app. This time, your Mac’s microphone should be working.
Method 3: How to Turn On the Microphone for Mac Safari
If the microphone still does not work on the Safari browser despite turning the volume to full and permitting apps on your Mac, it might be due to incorrect browser settings. For example, you may have blocked or denied access to some websites. Therefore, you will need to reconfigure those settings.
So, to turn on the microphone on Mac for Safari, follow the steps below.
- Step 1: Open your Safari browser and go to “Setings”

A new window will appear with different options on the top. And, by default, Safari’s “General” settings may show up.

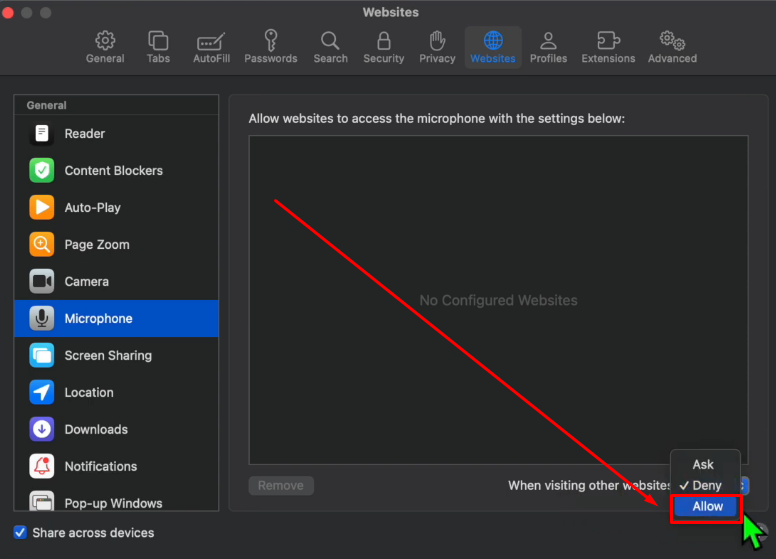
- Step 2: Click on the “Websites” option (the globe icon) to view a list of relevant settings in the left panel

- Step 3: Now, scroll down and click on the “Microphone” option

- Step 4: Once you do that, look at the bottom-right corner of the interface. You will see the “When visiting other websites” option with a dropdown menu. If “Deny” is selected, it means the mic will be disabled for all the sites you visit

- Step 5: So, click on the dropdown menu and choose “Allow” from the list
- Step 6: Then visit websites, such as Zoom or Skype, from the Safari browser to ensure the microphone is now turned on
NOTE: You can also choose the “Ask” option from the dropdown menu if you want Safari to ask your permission to utilize the microphone every time you visit a website.
Pro Tip: If your Mac’s microphone is still turned off, we suggest that you visit the nearest Apple store for expert help. Depending on the fault or damage, they may charge you $299 or more. You can also see the Apple Support website to get an estimate for the repair.

Contrarily, you can purchase a brand new MFi-certified external microphone, like the Hollyland Lark M2, at an affordable price and avoid the hassle. Lark M2 is a wireless microphone with universal compatibility and works flawlessly with Apple devices. Its unique button-size shape makes it appealing and easy to wear. Despite being an incredibly small microphone, it captures audio wirelessly up to 1000ft at 48kHz/24-bit quality. Its advanced features, like Environmental Noise Cancellation and 10-hour battery life, make it an ideal choice for Zoom meetings, streaming, and social media content creation.

Hollyland LARK M2 - Mini Lavalier Microphone
An incredibly lightweight and compact wireless button microphone that captures high-fidelity audio.
Key Features: 9g Button Size | 48 kHz/24-bit | 40 Hours Battery
Conclusion
Sometimes, the problem lies within the built-in mic settings, which disable the microphone’s functionality. But users think that the microphone on their Mac systems has gone faulty. However, increasing the volume from the system preferences can fix this issue and turns on the microphone on Mac for audio recordings and video calls. Likewise, ensuring the installed applications have permission to use the internal microphone can resolve the problem. Plus, you can also change mic settings on Safari to enable it for the websites you use frequently for online meetings and conferences.
If you frequently use your Mac to record clear audio for online meetings, interviews, or streaming, investing in a compact wireless lavalier microphone can greatly enhance your sound quality. Easy to connect and highly portable, it allows you to comfortably capture crisp audio directly to your Mac, simplifying your audio setup.
Frequently Asked Questions about How to Turn On the Microphone on a Mac
Q1. Where is the microphone located on a Mac?
On most of the MacBooks, it is practically invisible. It is tiny in size. Nevertheless, the position may vary.
If you use a MacBook Pro or Air, the mic is usually placed around the keyboard. Or, just below the speakers. But what if you have the newer versions? Relax! Here’s where the mic is:
- MacBook Pro (2018 and after): The microphone is located at the top of the keyboard. It is usually on the left portion.
- MacBook Air: You can find it underneath the casing, just near the speakers. However, this placement may not be universal for versions.
Q2. Can I turn on the microphone on MacBook Pro when the lid is closed?
MacBooks with T2 chips have hardware features that work differently and upgrade the usual microphone functions. Let’s understand it by highlighting a fact. Remember, one of the special features of these new machines is improved security and privacy. They turn off the built-in mic when the laptop lid is closed. As a result, no one can spy on your conversations. Therefore, if you use your Mac in clamshell mode, the built-in Microphone will automatically be disabled.
Q3. How do I check my mic on my Mac?
Click on the Apple icon at the top left corner of your screen to make a new menu appear. From there, go to System Preferences. When you enter that, you can find the Sound option that is under Hardware and click on it. A new window will open. There, you will see the Input tab. Click on it. You will see a list of devices. Pick the microphone that you want to use so that your Mac will start using it for sound input.
Q4. How to enable voice typing in Mac?
The process of enabling Dictation on the Mac is also very easy. Initially, you have to open System Preferences. Then, you need to click on the Keyboard option. In the keyboard settings, you can find and click on the Dictation tab. You will have an option next to the word “Dictation.” Next, choose to turn it on. Moreover, confirm to check the box “Use Enhanced Dictation.”