.png)
A lot of people wonder if AirPods work as a mic for videos. They connect fast to iPhones, iPads, and Macs. But the problem shows up when the mic fails with the camera app. This is a common issue many users face. On Windows computers, it can also be tricky. You need to change some sound settings first. Once done, the mic works fine. Learning how to use AirPods this way can boost sound quality. It helps when filming moments or making content. For those asking how to use AirPods as a microphone when recording video, the steps vary by device.
So, let’s explore the methods!
How to Use AirPods as a Microphone for Better Video Recording?
This section shares detailed steps to use your AirPods instead of the built-in mics of your devices. Not only iPhone or Mac, but you can also connect AirPods to Windows PC for audio recording.
On iPhone
You will need a third-party app called Filmic Pro to make your AirPods work like a mic on your iPhone.
- Step 1: First, you should connect the AirPods to your iPhone. To do that, unlock your iPhone and swipe down the screen from the top-right corner to open the Control Center (on iPhones without the home button)

- Step 2: Look for the “Bluetooth” icon in one of the titles that appear on the screen and tap and hold it until the title expands on it

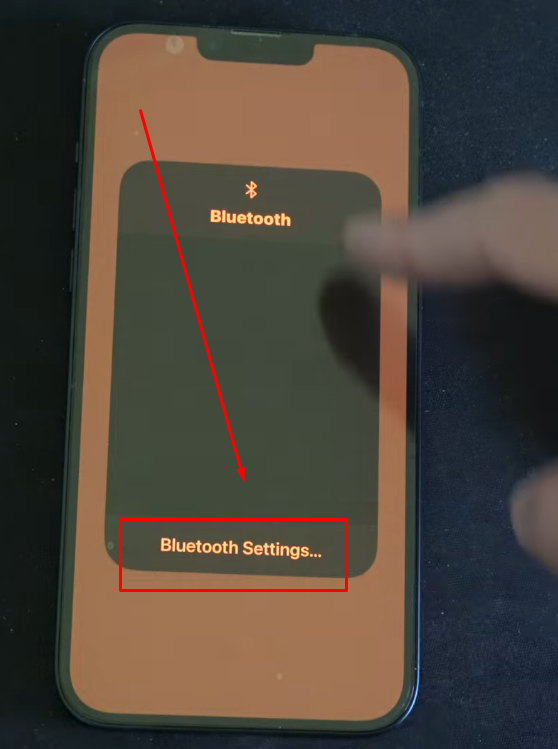
- Step 3: Tap and hold the “Bluetooth” option again and choose “Bluetooth Settings…”
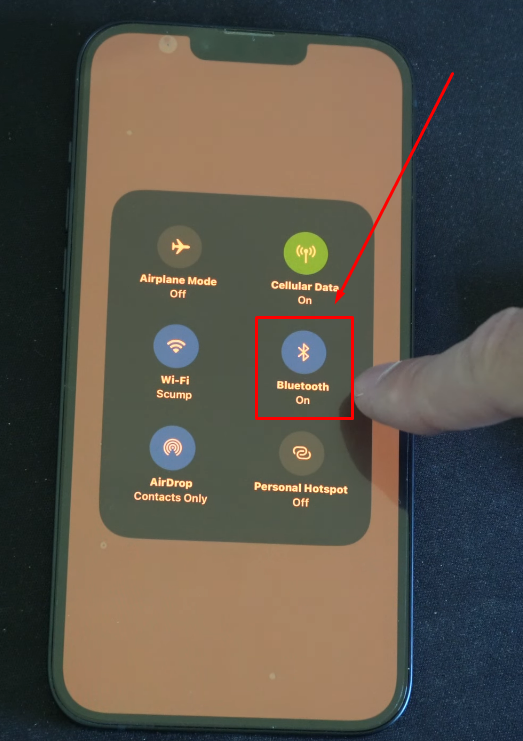
- Step 4: If the Bluetooth option is not turned on, tap on the Bluetooth toggle button next to it. If the toggle is already enabled, you can leave it as it is.
In both scenarios, you will notice that your iPhone will start searching for devices.

- Step 5: While your phone looks for nearby Bluetooth devices, grab your AirPods and open the lid

Doing so should pair the AirPods and iPhone, indicated by a light (white light).
Alternatively, you can press the pairing button at the back of the charging case of your AirPods in case it doesn’t pair on its own.
- Step 6: To confirm pairing, tap the “Connect” button when it pops up on your iPhone’s screen

- Step 7: Once done, you may need to set up Siri by following the “Siri prompts” that will show up on your screen

- Step 8: Download and install the “Filmic Pro” mobile application on your iPhone from the App Store

- Step 9: Open the Filmic Pro app and give necessary permissions, such as microphone and camera usage, if the permission prompts appear on the screen
- Step 10: Open the video camera using the Filmic Pro app and tap on the “Settings” option (represented by a gear icon) on the screen

- Step 11: You will see several options once you select settings. So tap on the “Audio” tile that has a soundwave icon

- Step 12: When the “Audio” menu opens up, go to the “Bluetooth Microphone” option and tap on the toggle to enable it

- Step 13: Tap on the arrow keys on the screen in the same audio menu to select your AirPods
- Step 14: To improve the audio quality of the recordings captured through your AirPods, choose the highest quality sample rate and bit depth, such as 44 or 48 kHz and 24-bit

And you’re all set to use your AirPods as a mic to record videos through Filmic Pro.
On Mac
Using AirPods on your Mac for video recordings and calls can be a convenient way to communicate without relying on your system’s internal mic.
Here’s how you can use your AirPods as a microphone on your Mac:
- Step 1: Open the lid of your AirPods charging case
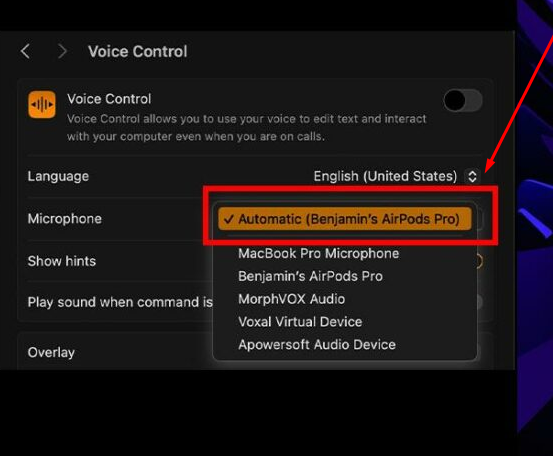
- Step 2: On Mac, go to your “System Settings” (or System Preferences)
- Step 3: Select “Bluetooth” and your “AirPods” from the list, and click “Connect”
- Step 4: Return to the main “System Settings” menu and click on the “Voice Control” option to confirm your AirPods are selected
- Step 5: Now, open the QuickTime Player on your Mac
- Step 6: Click the “File” tab and choose “New Movie Recording”
- Step 7: Click on the “Microphone” input option next to the “Record” button
- Step 8: In the list of microphones, select your “AirPods” and make sure it is checked

Now, you should be able to use the AirPods as a microphone on Mac’s QuickTime Player when recording videos.
On PC (Windows 10/11)
The good news is that you can use the AirPods on your Windows desktop or laptop as a microphone. However, your system must have Bluetooth to pair and record audio from AirPods for recordings and communication.
- Step 1: Insert both AirPods into the charging case and keep the lid open

- Step 2: Press the pairing button at the back of the charging case and wait for the indicator light to turn white


- Step 3: On your Windows computer, click on the start button and select “Settings” (represented by a gear icon)


- Step 4: Look for the “Bluetooth & devices” option in the left sidebar and click on it

- Step 5: Now, pay attention to the options on the right side of the screen. Go to the “Bluetooth” option and click on the toggle button to turn on Bluetooth on your device

- Step 6: Next, click on the “Add device” button (represented by a “+” sign) under the “Bluetooth & devices” menu. This option should be right above the Bluetooth toggle button

- Step 7: On the “Add a device” window, click on the “Bluetooth” option

After that, you will notice that your AirPods will appear in the “Add a device” window with a “Connecting” status
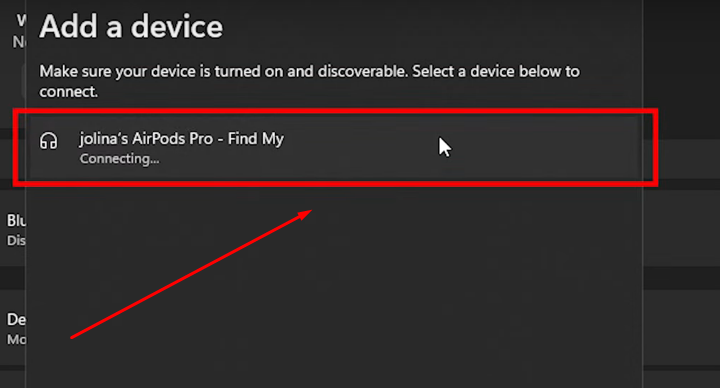
Once the connection is successful, the status will change to “Connected.”

Now, to select the AirPods as a microphone:
- Step 8: Go to the “Sound Settings” on your computer
In Windows 11, you can locate this option by clicking the “Search” icon (magnifying glass) on the taskbar. Then, search for the “Sound Settings” option.


- Step 9: In “Sound Settings,” look for the “Headset” option under the “Input” section

It should be unchecked at the moment.
- Step 10: Click on the “Headset” option to select it, and then click on the “small arrow” icon

- Step 11: To confirm your AirPods can be used as a microphone, click on the “Start Test” button to test your mic (AirPods, in this case)

- Step 12: Speak and stop the test. If your AirPods are capturing sound, you should be able to see the percentage of the audio received by your system

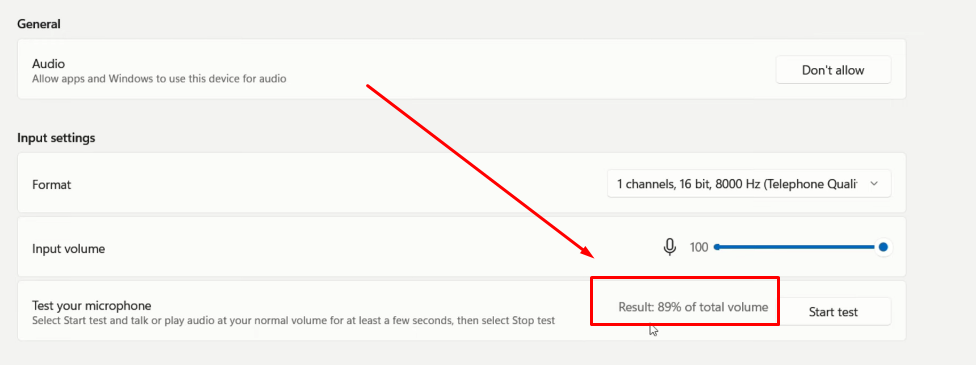
Upon getting a good percentage, such as 80% to 100%, you should now be ready to record videos with audio captured by your AirPods’ microphone.
Pro Tip: AirPods can enhance the audio quality of your videos, but they may not provide crystal-clear sound. That’s why creators use wireless microphones, like Hollyland Lark M2, to capture excellent audio for their vlogs, YouTube videos, livestreams, and Zoom calls.


Lark M2 is a button-sized wireless lavalier microphone system with exceptional features. It comes with powerful transmitter (TX) and receiver (RX) units, with universal compatibility and MFi certification, signifying smooth connectivity with various devices, including iPhones, iPads, MacOS, Windows computers, and cameras. With up to 10 hours of operating time and Environmental Noise Cancellation (ENC) functionality, Lark M2 ensures stable and noise-free wireless transmission up to 1000ft.
Conclusion
AirPods can work as a mic for recording videos. But the steps depend on the device being used. On iPhones or iPads, the default camera app might not help. A better choice is to use apps like Filmic Pro. These apps can pull sound straight from the AirPods. On a Mac, things are more direct. Just pair the AirPods and use QuickTime Player. Set the mic input to AirPods before recording. Windows takes more effort, but still works. Change your sound settings to get the mic going. Once it’s set up, it runs smoothly.
Frequently Asked Questions about Using AirPods as a Microphone for Video Recording
Q1. Is it possible to record voice using AirPods?
Yes, AirPods can record voice for many basic uses. They work well for voice notes and casual recordings. You can also use them during online meetings or classes. Podcast beginners can record simple audio using AirPods easily. The built-in mic captures sound clearly in quiet places. Though not professional, the quality is fine for daily use. Just pair them with your device and start recording quickly. No wires make it more convenient and easier.
Q2. Can AirPods Pro be used to record vocals?
AirPods Pro can record vocals, but only for simple tasks. You can use them for quick notes or casual clips. They are not ideal for clean or rich audio recording. Serious vocal work needs better tools with pro features. External mics like lavaliers work much better for this. These give more clarity and better sound depth overall. So, use AirPods for fun but not for real production. They’re fine for light use, not for serious work.
Q3. Are AirPods a good choice for music production?
AirPods should not be used for making music seriously. They are made for listening, not for recording or mixing. The sound lacks the detail that producers usually need to hear. Audio quality drops when trying to record using them. You may miss small details in your music tracks. For better results, use headphones made for studio work. Those give a clearer sound and more control during editing. AirPods are okay for fun, not for real production needs.
Q4. Why might the microphone on AirPods stop working?
Several reasons can cause the AirPods’ mic to stop working. Low battery or Bluetooth issues are common problems to check. Restarting your phone can fix simple pairing problems quickly. You should also clean your AirPods if dirt is blocking sound. Go to Bluetooth settings and check the mic settings again. Updating your device software can also help solve this issue. If nothing helps, contacting Apple Support is the next best step. They can check for hardware problems too.
Q5. How can the AirPods microphone be tested properly?
Open your Bluetooth settings and find your connected AirPods there. Tap the small info icon next to your AirPods name. Scroll to the mic setting shown in the menu. Switch from automatic to left or right side mic. This helps the device focus on one AirPod for sound. It’s useful when one side is not working well. Try recording after setting the mic side manually. This is a quick way to test the mic.