.png)
.png) Français
Français .png) Deutsch
Deutsch .png) Italiano
Italiano .png) 日本語
日本語 .png) Português
Português  Español
 Rust is different from most survival games. It has smooth controls and a clean gameplay loop. Players keep coming back because the world keeps expanding. Since its release, the game has had more than 300 updates. New maps, events, and fresh content arrive each month. The team behind Rust works non-stop to keep it exciting. But many players still get stuck on one small thing. Changing the microphone can be confusing at first. It’s easy to assume the game settings handle this. That’s where most get it wrong.
The actual fix is outside the game. On Windows, the device settings need a quick change. For PS5 users, the Control Center is the place to go. Keep reading to learn how to change a microphone in Rust the right way.
Part 1: How to Change Microphone in Rust on PC?
There are two methods to change the microphone in Rust. However, both methods are related to your Windows “Sound” settings. So far, no in-game options to change the mic input exist.
Method 1: Select Microphone Input from Windows Sound Settings
- Step 1: Turn on your PC and make sure you’re not playing Rust when performing these steps
- Step 2: Connect the external microphone to your PC
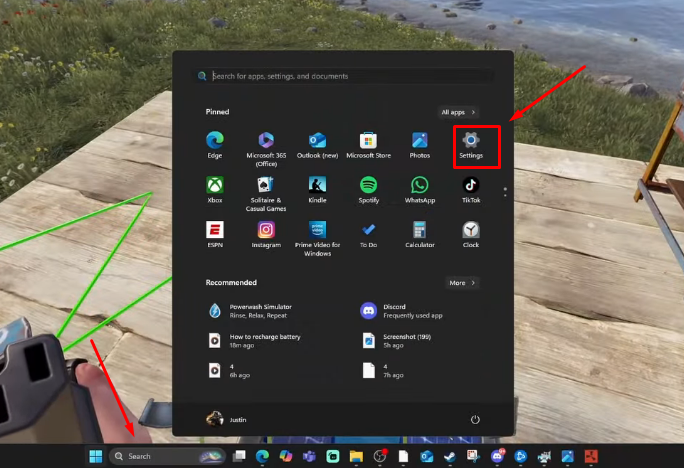
- Step 3: Click on the “Start” button and click on the “Settings” icon to view the options. Alternatively, you can type “Settings” in the search field next to the “Windows” icon on the taskbar and select “Settings” (represented by a gear icon)
- Step 4: Locate the “Sound” option (represented by a speaker icon) and click on it. You may also find the “Sound” option under the “Recommended settings” section, as seen in this screenshot

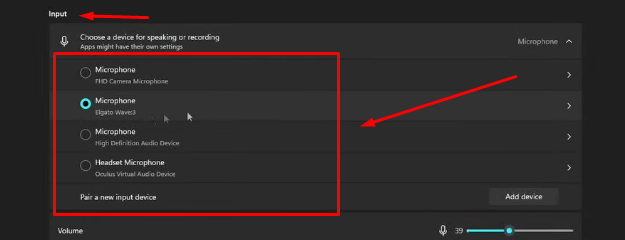
- Step 5: On the next page, you will see all the main settings related to sound on the right side of the screen. So, scroll down to the “Input” section. Locate the “Choose a device for speaking or recording” sub-section. Then, click on the microphone that you desire to use in Rust
- Step 6: Launch Rust and start playing the game. You should now be able to communicate with the newly selected microphone
Method 2: Allow Microphone Access on Your Device and Choose a Default Microphone
- Step 1: Go to your “Windows” settings from the Start menu by clicking the “gear icon”
- Step 2: Navigate to the “Privacy” option and click on the “Microphone” option
- Step 3: Look for the “Microphone access for this device” options and click on the toggle button next to it. Then, enable the “Allow apps to access your microphone” option

- Step 4: Toggle on the “Allow desktop apps to access your microphone” option
- Step 5: Now, right-click on the speaker icon at the bottom-right corner of the task bar and choose “Sounds”
A new window will pop up with various tabs.
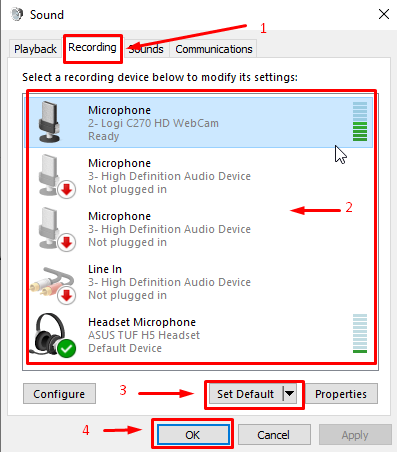
- Step 6: Click the “Recording” tab to see the audio input devices
- Step 7: Under the “Select a recording device below to modify its settings” section, look for the device (microphone or headset) you want to use as a default device
- Step 8: Make a single click on the microphone name to select it. Then, click the “Set Default” button in order to change the mic
- Step 9: Once done, click the “OK” button
Part 2: How to Change Microphone in Rust on PlayStation 5?
Here’s how to switch the microphone from your wireless controller mic to the headset or vice versa when playing Rust on PS5.
- Step 1: Press the “PS” button on your controller to open the Control Center menu at the bottom of your screen
- Step 2: Go to the “Mic” option (represented by a microphone icon) and select it by pressing the “X” button
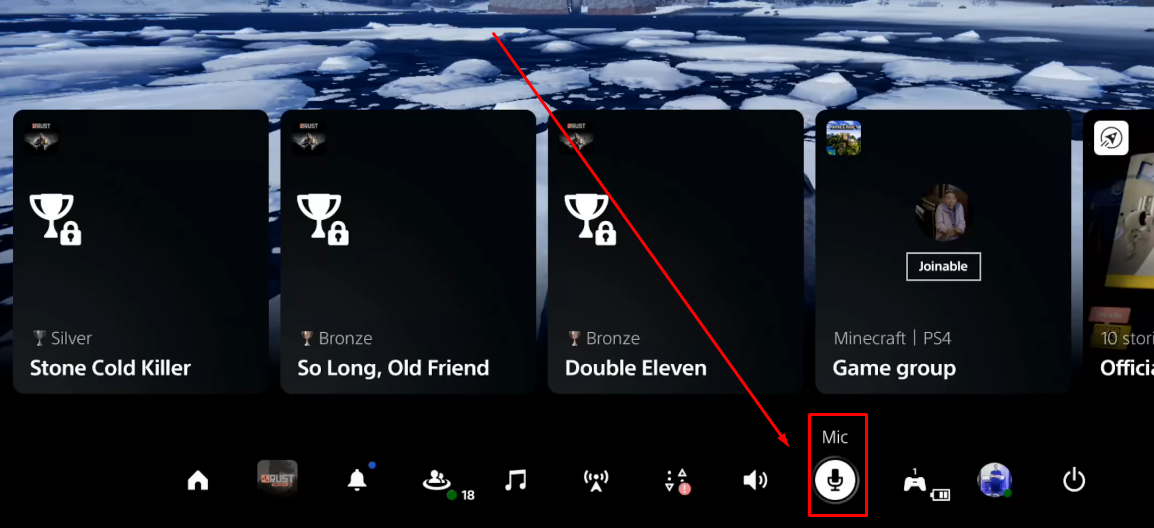
- Step 3: When the Mic menu appears on your screen, you will be able to see the current microphone selected as your default communication device. For instance, if you have connected a USB Headset, then its name should appear next to the “Mic” option

- Step 4: To change the mic, press the “X” button on the “Mic” option and choose “Wireless Controller”

If the wireless controller is already selected as a microphone, you can choose the headset as your primary microphone device. This way, you can speak to your friends and teammates using the headset’s built-in mic.
- Step 5: After changing the mic, select the “Adjust Mic Level” option to ensure the microphone level is set correctly. Otherwise, your friends may not be able to hear you clearly in Rust

- Step 6: Speak into the mic while focusing on the “Input Volume” bar. If the level doesn’t surpass the “Too low” area, select the “Microphone Level” option and increase the level until the “Input Volume” bar enters the “Good” area


Pro Tip: Whether you do livestreams, create content on YouTube, or love making vlogs, using a wireless microphone improves the audio quality of your videos. Many creators rely on small-sized wireless lavalier microphone kits, like the Hollyland Lark M2S.

Hollyland LARK M2S - Wireless Hidden Microphone
An ultra-discreet wireless microphone featuring a clip-on transmitter for an “invisible” fit.
Key Features: No-Logo Fit | Ti+ Design | 48 kHz/24-bit
Lark M2S sets a unique benchmark in the world of content creation with its state-of-the-art and modern features. It’s a small yet powerful microphone system for wireless communication. With its titanium clip-on, anyone can easily attach it to their clothing without worrying about dropping it while focusing on making vlogs, livestreaming, or covering live events. What’s more? Made with a logo-free design, this 7-gram lightweight mic is ideal for professional and casual environments. But that’s just the tip of the iceberg. You get a whole bunch of impeccable features, including 1000ft wireless range, 9-hour battery life, and Environmental Noise Cancellation (ENC).
Conclusion
Rust remains one of the most popular survival games around. Many players still try to fix their mic settings inside the game. That usually leads to confusion. The real fix is through your device settings. On Windows, go to Sound Settings and choose your input. You can also allow mic access and set one as the default. If you’re using a PS5, open the Control Center menu. Then, pick either the headset mic or the one on your controller. Once done, you’re good to go. That’s how to change a microphone in Rust in just a few quick steps.
Frequently Asked Questions about Changing a Microphone in Rust
Q1. Why is voice chat not working in Rust console?
Your mic might not work in Rust if the game isn’t allowed to access it. You’ll need to open Windows settings and go to Privacy, then Microphone. Make sure access is turned on for both apps and desktop programs. Restart the game and test again. If that doesn’t fix it, open Steam and go to your Library. Right-click Rust, then head to Properties and verify the game files. If voice chat still doesn’t work, try adjusting in-game mic settings or updating your audio drivers for better results.
Q2. How can voice chat be toggled in Rust?
Sometimes, voice chat fails when you’re stuck in party chat. Make sure the game is set to in-game audio, not party mode. The green mic icon in the center should be active. Use a headset with a built-in mic if possible. On PS5, press the controller’s center button to switch the mic on or off. Always double-check your settings before talking. Using in-game chat gives better communication during matches and helps avoid issues when trying to speak with others nearby.
Q3. Why is push-to-talk not working in Rust?
Push-to-talk might fail if your mic isn’t the default device. Try testing it through Steam voice settings. If that works, your mic is fine. Sometimes the V key may be stuck or not responsive, so make sure it isn’t jammed. Restarting the game can also help. If none of that works, reinstalling Rust could solve the issue. Just save your keybinds before doing that. Often, the problem is with the mic, not the key itself, so checking mic settings is always a good start.
Q4. How do you whisper to other players in Rust?
Whispering in Rust is done by using the voice chat button. The default key for talking is V, but it can be changed in the settings. When holding the key, your voice reaches only nearby players. This makes it useful for private talk during close encounters. You don’t need any special tools or settings for whispering. Just press the voice key and speak normally. Anyone close enough will hear you clearly, while others farther away won’t hear anything at all.
Q5. What is the way to change chat mode in Rust?
To switch chat modes in Rust, press Tab while the chat is open. This will let you change between global chat and team chat. Global chat lets everyone see your messages. Team chat limits messages to only your squad. It’s a good idea to pick the right mode depending on who you want to talk to. This switch is helpful when you need privacy or want to avoid sharing info with strangers. Keep tapping Tab until your message goes to the correct group.