.png)
FaceTime helps people connect with clear, smooth audio. It works well on iPhones, iPads, and Mac computers. These devices have better built-in mics than most others. As a result, your voice often sounds crisp and clean. Still, external mics can take things up a notch. They offer stronger sound and better clarity. But sometimes, switching mics on FaceTime becomes tricky. Some users run into issues and feel stuck. That’s why this guide covers how to change the microphone on FaceTime. It also explores reasons why switching fails. Plus, expect quick fixes and easy tips to boost your audio. Get ready for clearer calls.
How to Change Microphone on FaceTime on iPhone/iPad?
Changing the microphone on FaceTime for iPhone is now limited. In fact, this issue has been discussed several times on Reddit.

So, what’s the solution? The option to manually switch is no longer available by default. Previously, users could choose their mic during normal calls. Now, that setting only appears while using screen-sharing mode.

However, connecting an external mic still works automatically. Once plugged in, the iPhone uses the external mic for FaceTime.
For example, the Hollyland Lark M2 connects quickly with iPhones and iPads. This wireless mic kit also supports Mac computers without extra steps. Its button-size design makes it perfect for casual or pro settings. Thanks to universal compatibility, it also works with Android, Windows, and cameras.

Hollyland LARK M2 - Mini Lavalier Microphone
An incredibly lightweight and compact wireless button microphone that captures high-fidelity audio.
Key Features: 9g Button Size | 48 kHz/24-bit | 40 Hours Battery
Here are the steps to connect a wireless microphone to your iPhone or iPad so that the FaceTime app automatically uses it.
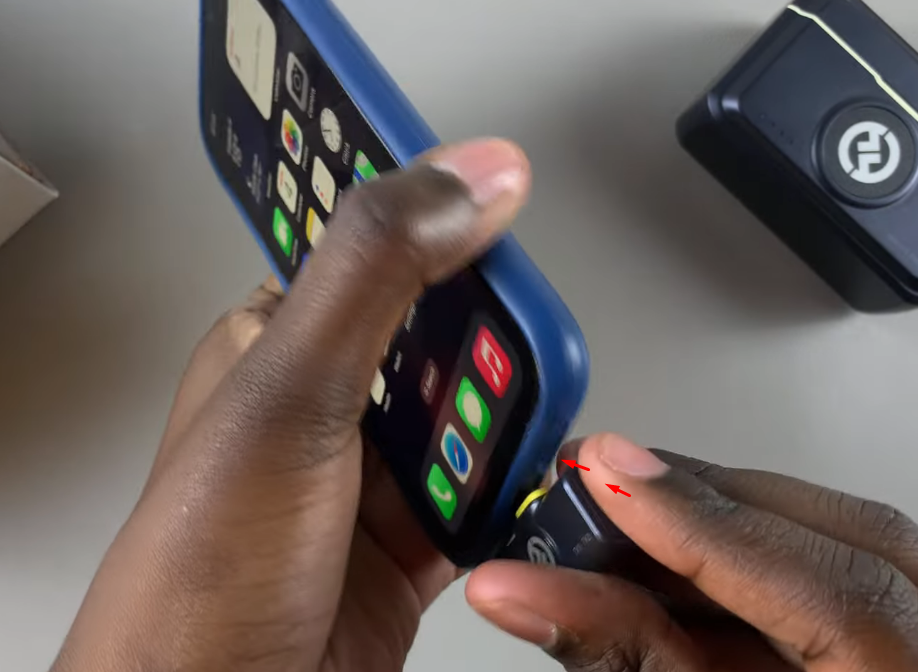
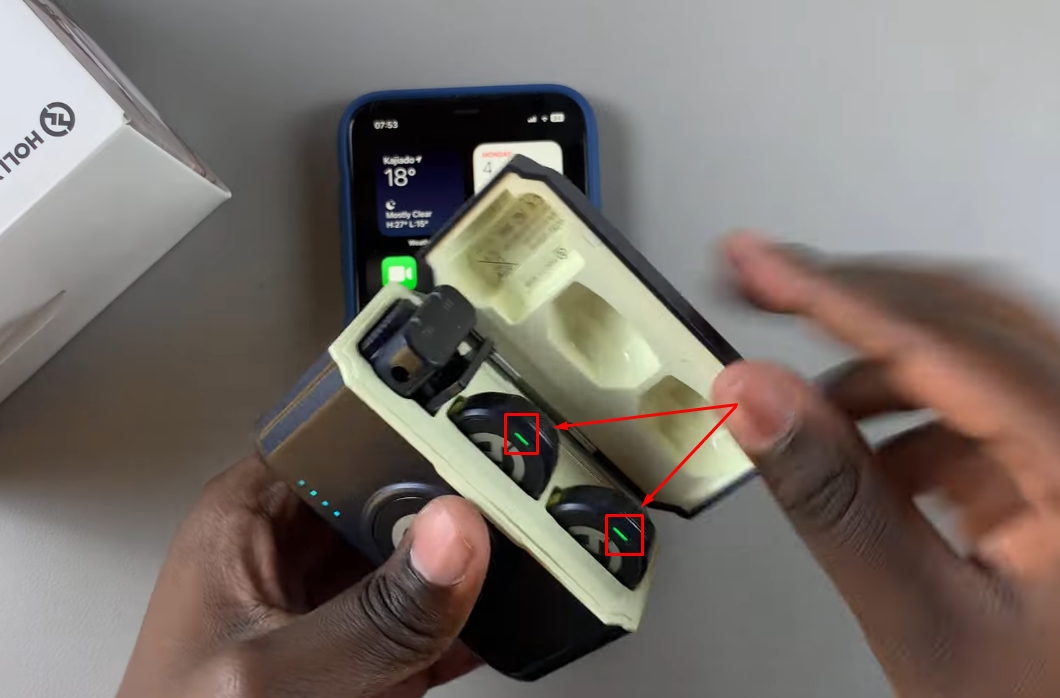
- Step 1: Open your wireless microphone kit. Inside the charging case, you will find two transmitters and a receiver. If you have Hollyland Lark M2’s combo version, you will get a USB-C and Lightning receiver, making it compatible with almost all mobile phones, including old and new iPhone/iPad models

- Step 2: Carefully insert the receiver into your iPhone/iPad’s charging port
Once done, you will notice that the blue indicators will turn on the receiver. It means your device has detected the RX unit.
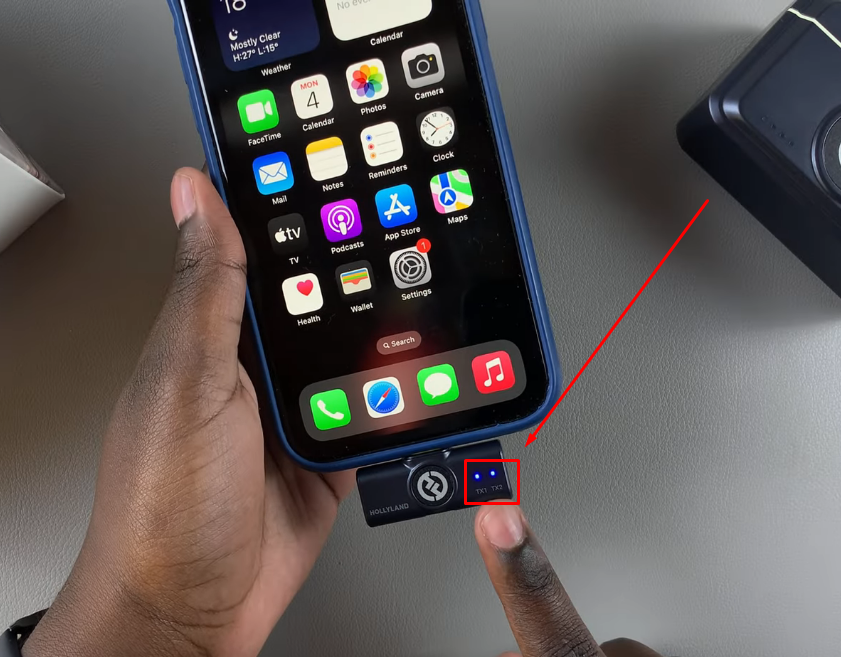
Next, open the charging case, and you will notice a green light on both transmitters. This means the microphones are not paired yet.
- Step 3: Pull out the transmitters from the charging case, and they will be paired automatically with the receiver. You can confirm the pairing by observing the indicator lights on both transmitters changing from green to blue
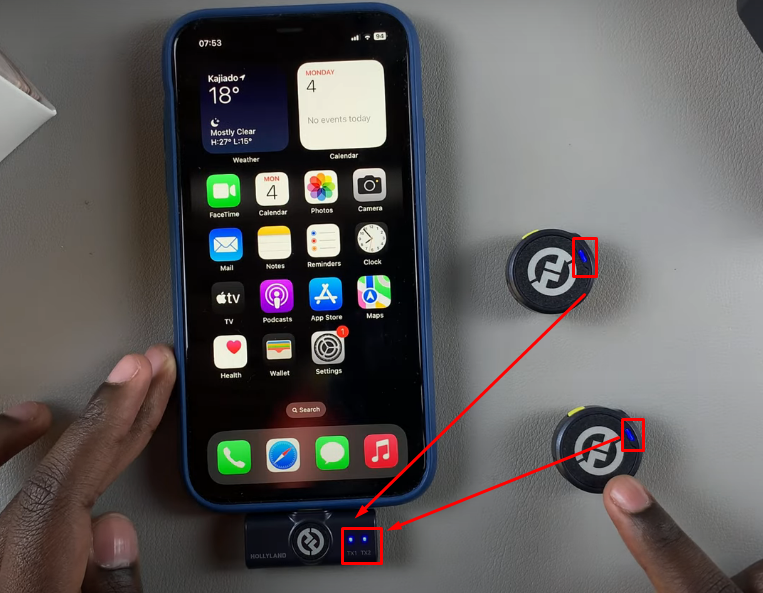
- Step 4: Open your FaceTime app and start calling it with an external microphone instead of your device’s built-in mic.
That’s it! Fast and easy.
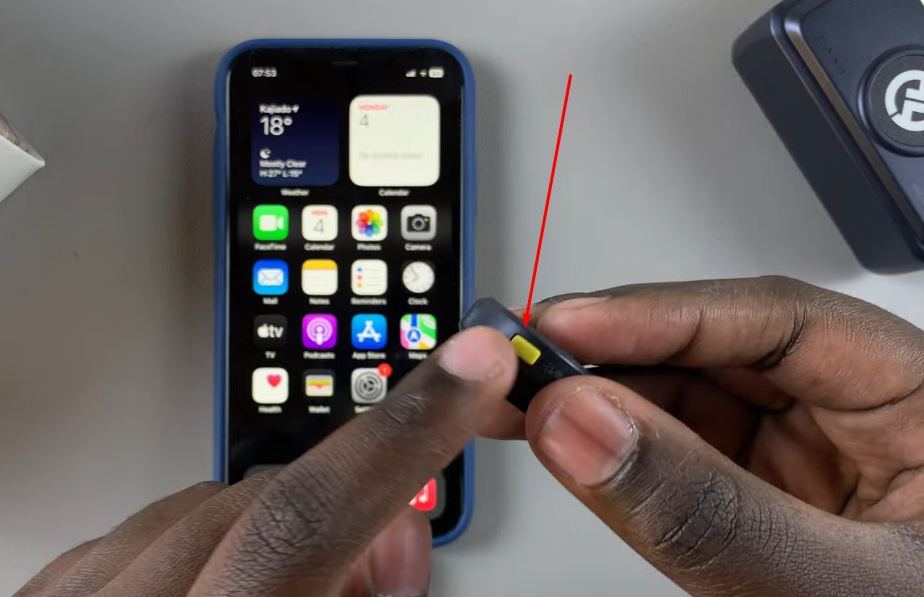
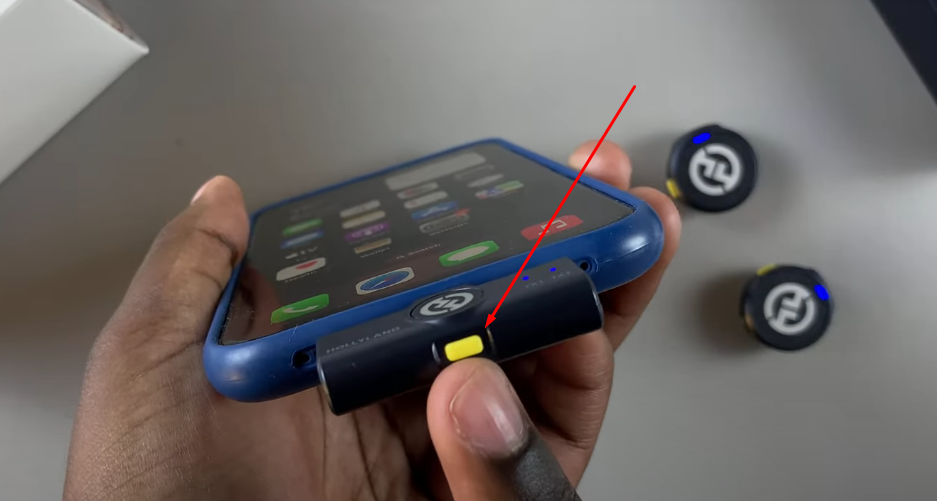
NOTE: In case the units are not automatically paired, you can press and hold the yellow button on the transmitter and receiver for 3 seconds to pair them manually.
Steps to Change Microphone on FaceTime on Your Mac Computer
There are two possibilities for changing the microphone on the FaceTime app from Mac.
From Mac System Settings
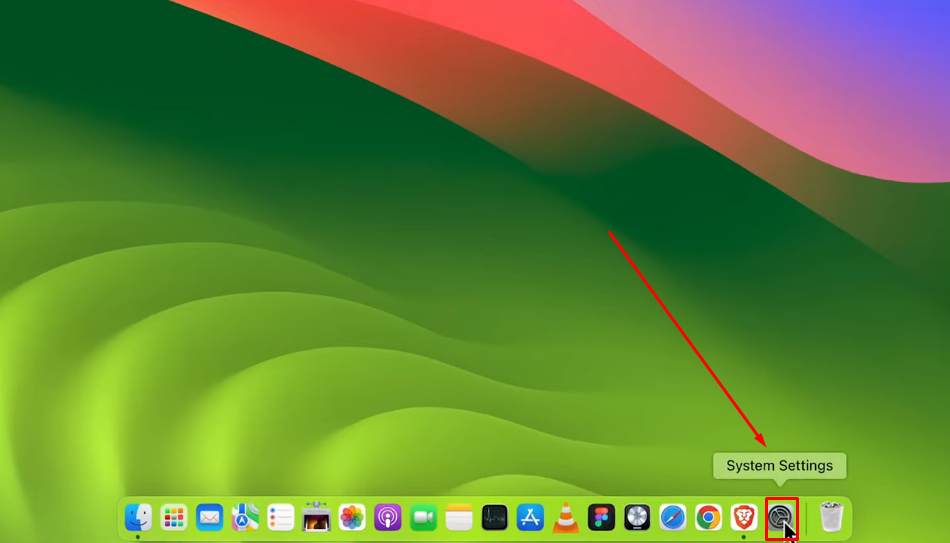
- Step 1: On your Mac, enter “System Settings” by clicking on the gear icon on the dock
- Step 2: A new window with several options in the left panel will appear. Look for the “Sound” option and click on it
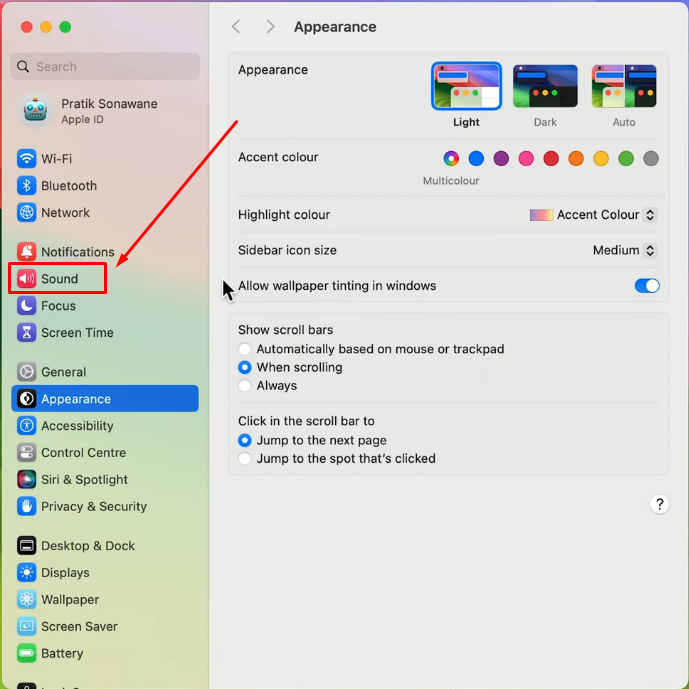
Doing so will show you the main settings related to audio and sound on the right side of the screen.
- Step 3: Now, find the “Output & Input” section and click on the “Input” tab
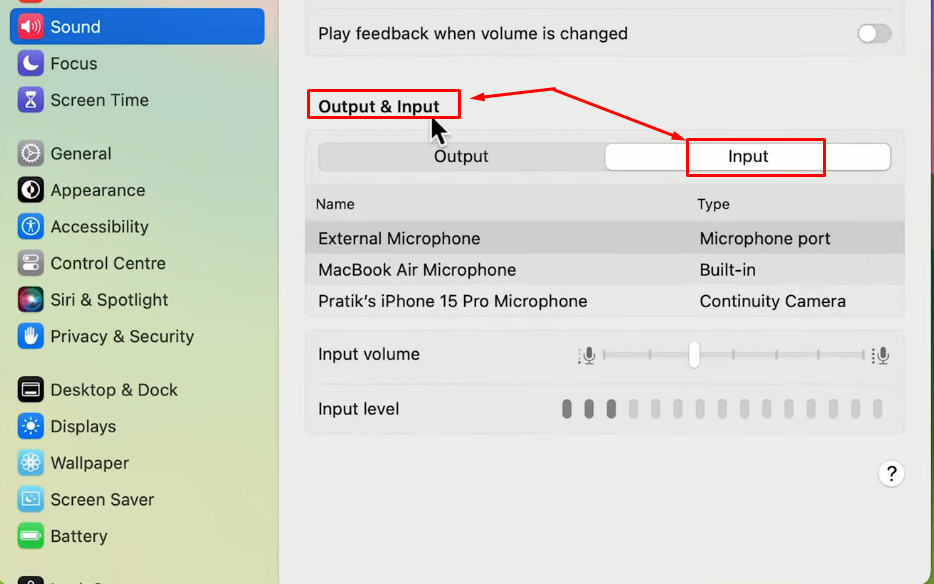
As soon as you do that, you will see the names and types of microphones your Mac is currently detecting. If no external mics are connected to your system, you will only see the name of the built-in microphone.
- Step 4: Assuming you want to change the input from an internal to an external mic for better audio quality on FaceTime, click once on the name of the external microphone to select it
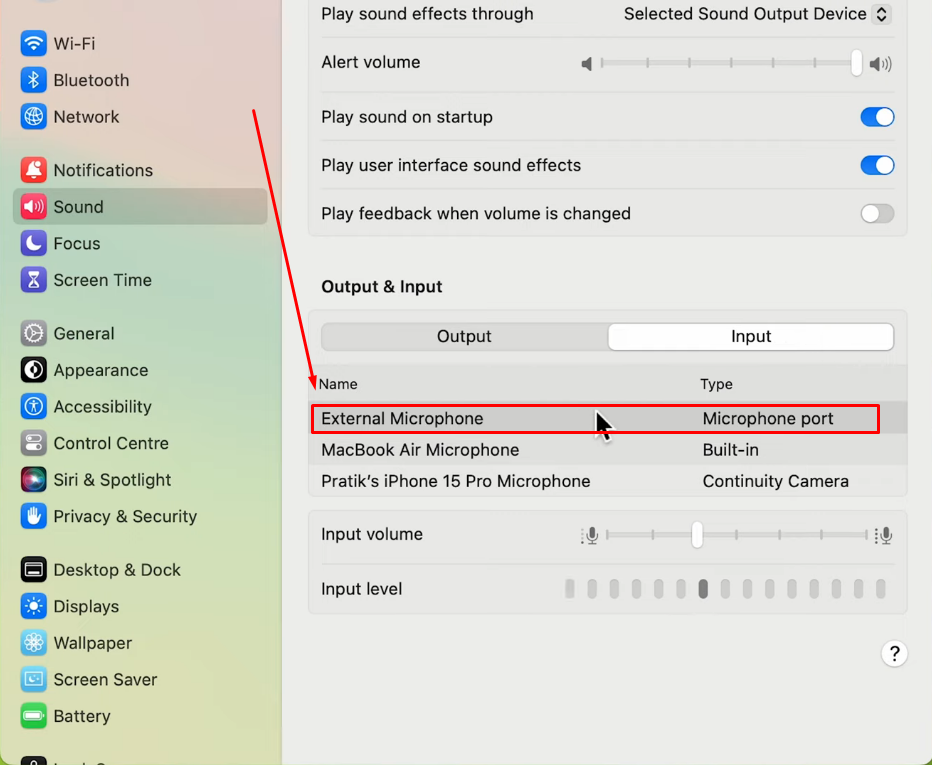
- Step 5: Now, launch FaceTime on your Mac and the microphone should automatically be switched to the selected microphone.
From FaceTime Video Menu
- Step 1: Launch FaceTime on your Mac
- Step 2: Click on the “Video” tab on the top to open the menu
- Step 3: Now, under the “Microphone” section, click on the external microphone you want to use on FaceTime instead of the built-in mic of your Mac
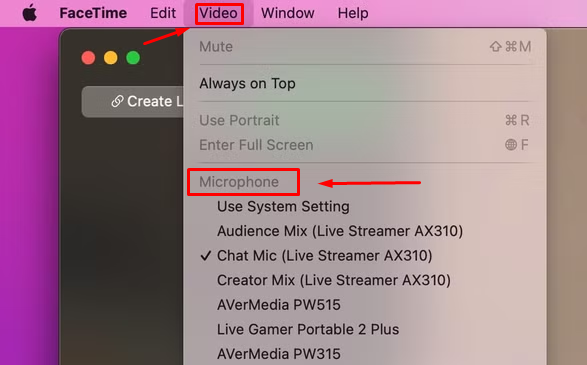
NOTE: If you have changed the microphone for FaceTime through System Settings, there is no need to change it from the Video menu.
Microphone Not Working on FaceTime? Try These 5 Fixes!
If you are experiencing issues with audio on FaceTime iPhone/iPad or Mac, here are a few solutions.
Allow Microphone Access for the FaceTime App
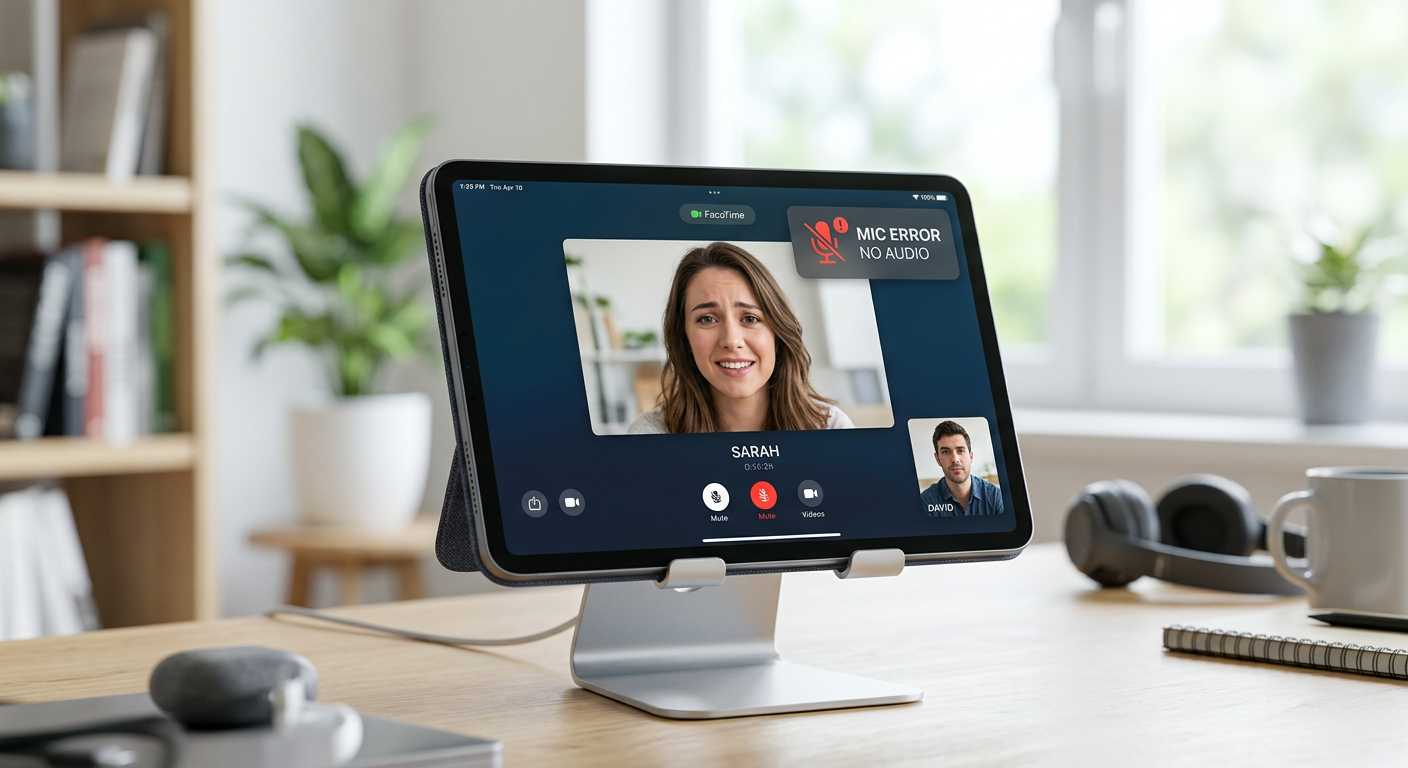
If FaceTime has restricted access to the mic, the internal or external microphone may not work while using the app.
Here’s what you should do.
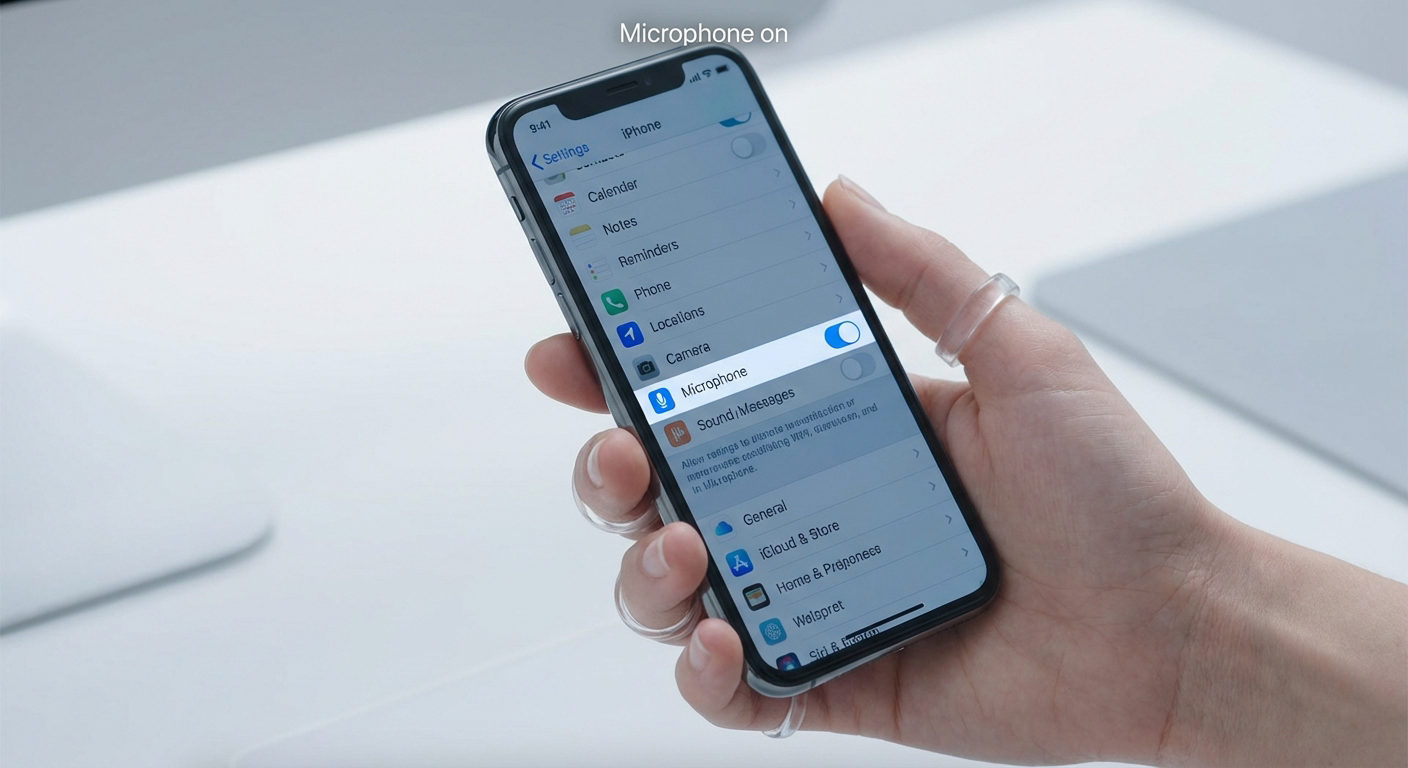
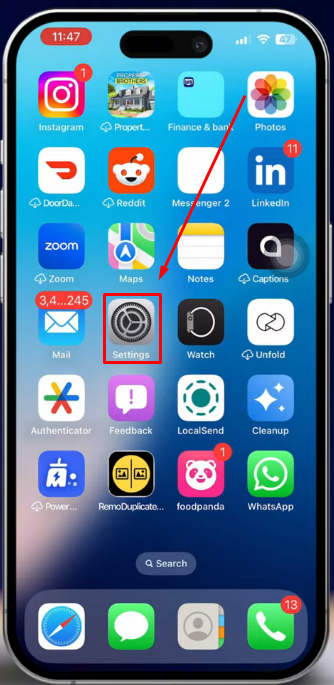
- Step 1: Unlock your iPhone. Find the “Settings” app and tap on it
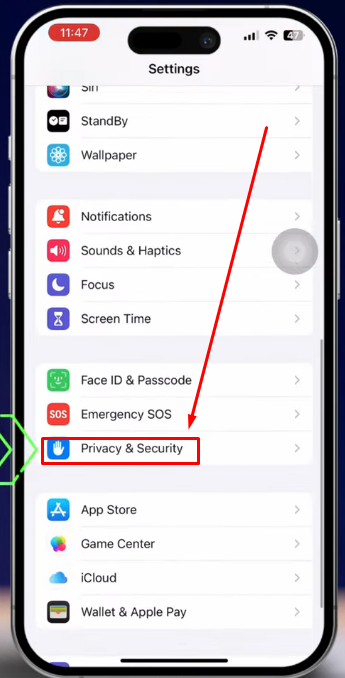
- Step 2: You will see several options on the “Settings” page, so scroll down and tap on the “Privacy & Security” option
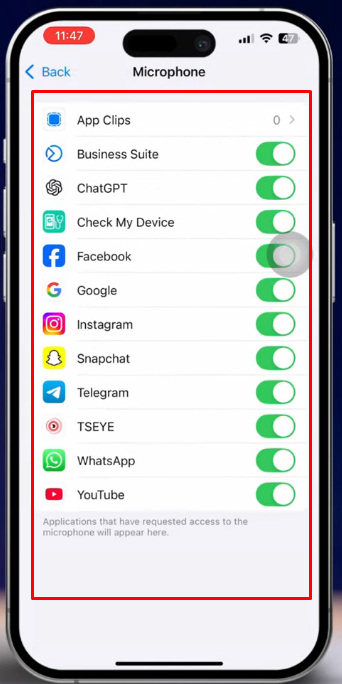
- Step 3: Next, click on the “Microphone” option
- Step 4: You will see different apps with their dedicated toggle switch. So, find the “FaceTime” application and tap on the toggle switch next to the app to turn it on.
- Step 5: Open FaceTime and check if the microphone is working by making a call
Disable Content Restrictions for the FaceTime App
Disabling content restrictions may fix microphone issues on FaceTime. Sometimes, strict settings block the app from using your microphone. This can happen when communication limits are turned on accidentally. Such restrictions may interfere with FaceTime’s ability to access audio. By turning them off, the app can work more smoothly.
This allows FaceTime to use the microphone without trouble during calls. Still, privacy settings must also be checked and adjusted. App permissions should allow microphone access at all times. When all settings align, FaceTime performs better with clear audio. This step is simple but often solves the problem instantly.
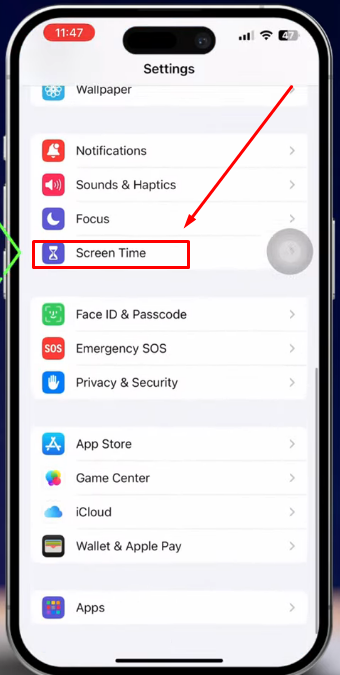
- Step 1: Tap on the “Settings” option on your iPhone or iPad

- Step 2: Now, scroll down to the “Screen Time” option and tap on it
- Step 3: On the Screen Time page, tap on the “Content & Privacy Restrictions” option under the “RESTRICTIONS” section

- Step 4: You will notice that the toggle for Content & Privacy Restrictions is turned on. So, tap on the toggle button to turn it off
- Step 5: Next, scroll down to “Microphone” under the “PRIVACY” section and tap on it

- Step 6: Tap on the “Allow Changes” option if it’s not selected. If it is already check-marked, then tap on the “Don’t Allow Changes” and again tap on the “Allow Changes” option

- Step 7: Then, on the same page, scroll down and turn on the toggle for the “FaceTime” app

- Step 8: Restart your device and then use FaceTime. The microphone should be working now.
Turn Off and Turn On the FaceTime App Again
Toggling the microphone permission off and on can help quickly. This step refreshes FaceTime’s connection to your device’s microphone. It forces the system to recheck and reload access settings. That way, any temporary bugs or misconfigurations get cleared out. As a result, the microphone may start working normally again. The iOS system reestablishes proper communication between FaceTime and hardware.
Once the toggle is back on, everything resets smoothly. This method often fixes issues without extra effort. It’s a fast way to apply fresh permissions and restore audio. When done right, FaceTime should detect the microphone without further problems.
This is how it’s done.
- Step 1: Tap the “Settings” icon. Then, scroll down until you see the “Apps” option and tap on it to see the list of applications installed on your device

- Step 2: Scroll the list and select the FaceTime app. Or, type FaceTime in the search field on the top and tap on the FaceTime app

On the next screen, you should be able to see the FaceTime app name alongside a toggle button that will be turned on like this.

- Step 3: Tap on the toggle switch to turn off FaceTime

Then, tap the toggle button again to turn on FaceTime again to complete the resetting process

- Step 4: Check if the microphone is now working after changing it during the screen-sharing mode or by connecting an external microphone
Update Your Device’s Software
Updating to the latest iOS can often fix microphone issues. It helps clear out bugs that may disrupt FaceTime audio. New updates usually improve system stability and app performance. Apple regularly releases fixes for known software problems. So staying current means fewer chances of running into glitches.
When installed, updates refresh key system settings behind the scenes. This allows the microphone to work better during calls. It also ensures smooth compatibility with new features. In most cases, updating helps prevent future audio troubles too.
This is how you can update to the latest version.
- Step 1: Go to your iPad/iPhone’s “Settings”

- Step 2: Then tap on the “General” settings icon

- Step 3: Select the “Software Update” option

- Step 4: Wait for a few seconds to let your device check for any available updates

Contact Apple Support
If microphone issues continue on FaceTime, contact Apple Support directly. This step becomes useful when basic fixes don’t work. Sometimes, the problem goes beyond settings or app permissions. Apple’s team can help with deeper troubleshooting methods. They may also check for possible hardware problems. Guidance is available for both iPhone and iPad users.
To do that:
- Step 1: Simply go to support.apple.com/contact in your browser

- Step 2: From there, pick your Apple device or service
- Step 3: Next, choose a topic that matches your issue
- Step 4: If it’s not listed, type a short description
Apple will then show you available help options.
Tips to Improve FaceTime Audio after Changing the Microphone
So, you switched the microphone on FaceTime for better clarity? Try these tips to further refine your FaceTime experience.
Connect to a Stronger Wi-Fi
Good sound on FaceTime needs a solid internet connection. A weak signal or mobile data can hurt audio quality. Voices may cut out or sound robotic during the call. That’s why switching to a stronger Wi-Fi network helps a lot. A stable connection keeps the audio smooth and steady from start to end. For even better results, stay close to the router.
Remove the Phone’s Case if Using an External Microphone
Using an external mic on your iPhone or iPad? The phone case might be causing problems. Some microphones connect through the charging port. A thick or tight case can block the mic from plugging in fully. That may stop it from working or cause the sound to break up. Before connecting the mic, remove the case completely. This makes room for a secure connection. It also helps your microphone record without interruptions.
Use Microphone Modes
Devices running iOS 15 or later offer new mic settings. These modes can change how your voice sounds on calls. They also control how much background noise gets picked up. You can switch between modes during a FaceTime call. Other apps using the mic may also support them.
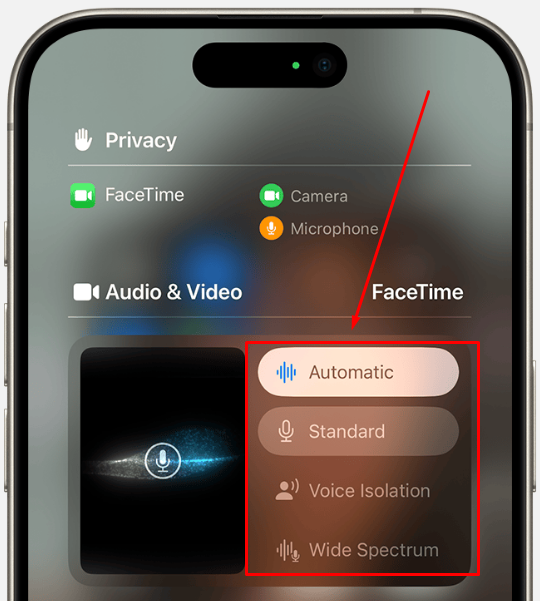
- The Automatic mode adjusts settings based on your call setup. When using the phone receiver, it activates Voice Isolation. That blocks background noise and boosts your voice. If on speaker, it switches to the Standard mode.
- The Standard mode uses your mic without filters. Your voice sounds natural, just as it is.
- The Voice Isolation mode blocks out most background sounds. Fans, traffic, and crowd noise are filtered. Only your voice comes through clearly.
- The Wide Spectrum mode does the opposite. It picks up all sounds in the room. This is useful for group talks or when playing music.
NOTE: These mic modes need updated software. FaceTime and other apps require iOS 15 or higher to use Voice Isolation and Wide Spectrum. To use Voice Isolation on phone calls, update to iOS 16.4 or later. For Automatic mic mode, iOS 18 is required.
How to Change Mic Modes on FaceTime on iPhone/iPad?
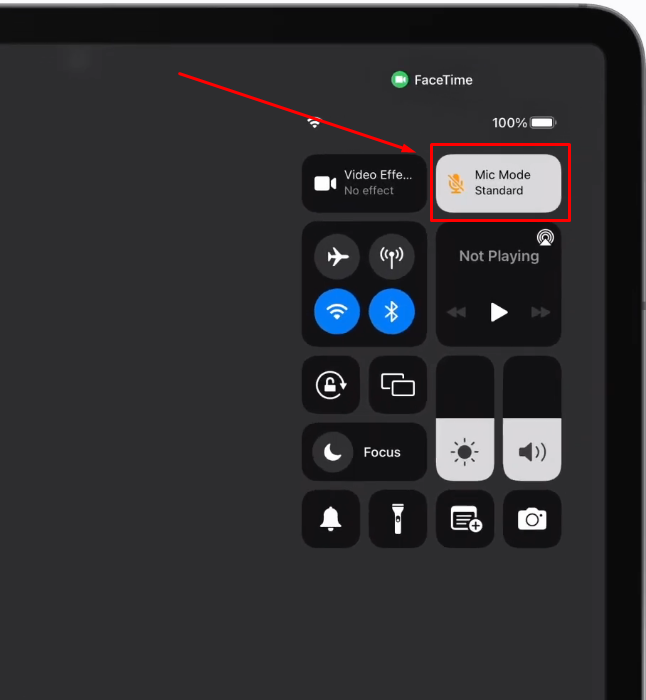
- Step 1: During your FaceTime call, swipe down the screen from the top-right corner to open the control center

- Step 2: Tap on the “Mic Mode” option
- Step 3: Change the mic mode on FaceTime by tapping on the available options, such as

Or
How to Change Mic Modes on FaceTime on Mac?
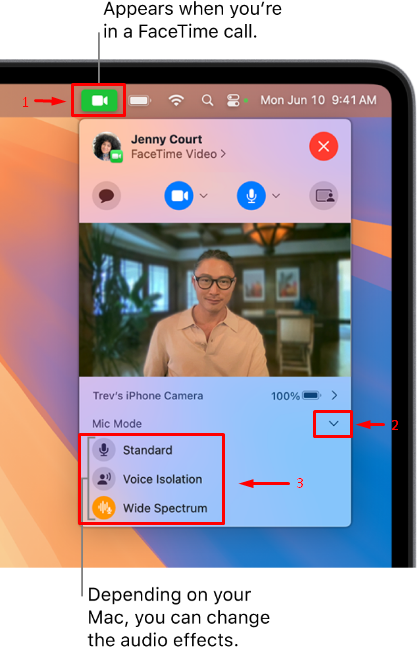
- Step 1: During your FaceTime call, click on the FaceTime icon on the top menu bar
- Step 2: Click on the downward arrow icon next to the “Mic Mode” option
- Step 3: Change microphone modes on FaceTime from the available effects
Conclusion
Changing the microphone on FaceTime can feel a bit tricky. Some iPhone users say the option suddenly disappears without warning. Others notice it only shows during screen sharing. On the other hand, Mac users have better control over audio settings. It’s easy to switch mics from system settings or the FaceTime menu. Still, issues may appear if permissions are blocked or the software is outdated. That’s why learning how to change the microphone on FaceTime really helps. Voice modes can also improve call clarity, but they need updated software. With the right steps, FaceTime audio becomes smoother and more reliable every time.
Frequently Asked Questions about How to Change Your Microphone on FaceTime
Q1. Why can’t people hear me when I FaceTime them?
FaceTime audio issues arise when the microphone is not working properly. Audio problems occur when FaceTime cannot access the microphone. First, ensure the microphone is not muted. Next, check that the app has permission in the Privacy and Security settings. Moreover, verify that the “Do Not Disturb” is turned off. Also, confirm that the device and FaceTime are updated. In addition, remove any obstructions near the microphone. Ultimately, these steps help resolve audio issues during calls.
Q2. Why is my voice muffled on FaceTime?
Voice muffling can result from various issues. First, verify a strong and stable internet connection. Then, restart the device to clear software glitches. Next, inspect the microphone for obstructions or debris. Furthermore, remove any case that may block sound. Also, update FaceTime and the device to the latest versions. Finally, check app permissions for the microphone. These steps improve call clarity.
Q3. Why is my FT call so loud?
Excessively loud FaceTime calls may stem from volume settings. First, adjust the device volume during calls. Then, check for a blocked speaker or debris. Furthermore, inspect audio settings for anomalies. Also, verify that no faulty applications interfere with the call sound. Moreover, consider restarting the device to reset the volume options. Finally, ensure system updates are applied.
Q4. How do I test my FaceTime microphone?
Testing the FaceTime microphone is simple and effective. First, open the Voice Memos app and record speech. Next, play back the recording to check clarity. Alternatively, perform a FaceTime call with a friend. Moreover, verify that sound is accurately captured. Also, examine microphone settings for proper access permissions. Finally, confirm that the device is free from obstructions.
Q5. How to change the mic from AirPods to a phone on FaceTime?
Switching the microphone input on FaceTime is straightforward. First, remove the AirPods to switch the input automatically. Then, the phone’s built-in microphone becomes active. Alternatively, review details on how to change the microphone on FaceTime. Furthermore, review the audio settings to confirm the change. Also, check that AirPods are disconnected properly before switching. In addition, ensure the device is updated for optimal performance. Ultimately, this method offers a hassle-free solution.