


.png)
.png) Français
Français .png) Deutsch
Deutsch .png) Italiano
Italiano .png) 日本語
日本語  Español
 Whether you’re working with a vintage tube combo from the 1960s or a feature-packed digital modeling amp that just launched last year, the connection process isn’t always one-size-fits-all. Different amps have different requirements and input types. Using the wrong cable or connection method can mess with your tone—or worse, damage your gear.
In this ultimate guide, you’ll learn exactly how to connect your guitar to an amplifier, what you need, and why it matters—whether you’re going straight into a basic amp or running through a pedalboard with multiple effects. Let’s dive in.
Essential Tools & Concepts
Before we start plugging anything in, let’s get a few things straight on certain cables, ports, and connections, and why they matter.
Cables: Not just any audio cable will do when connecting a guitar to an amp. Here’s what you need to know:
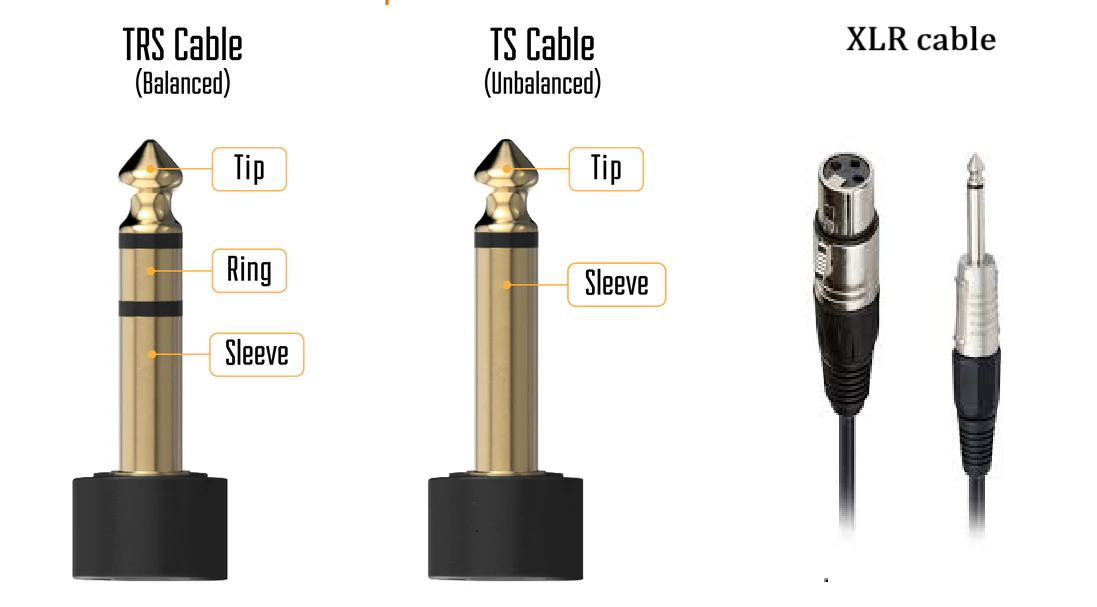
- TS Cables (Tip-Sleeve): This is your standard ¼-inch unbalanced cable for guitar. It’s unbalanced, mono, and used for carrying instrument-level signals. It has one black ring on the connector.
- TRS Cables (Tip-Ring-Sleeve): These are balanced cables used for stereo or control signals, not for direct guitar-to-amp connections. It has two black rings.
- XLR Cables: Typically used for microphones or balanced line-level signals. You only need them when using a DI box or sending the signal to a mixer or audio interface.
A 10-20 ft cable is ideal for most setups. Longer cables can cause signal loss; shorter ones limit mobility.
Impedance Matching: Impedance is basically how much a device resists the electrical signal. When your guitar’s output impedance doesn’t match your amp’s input impedance, it can lead to tone loss, volume issues, or even signal distortion.
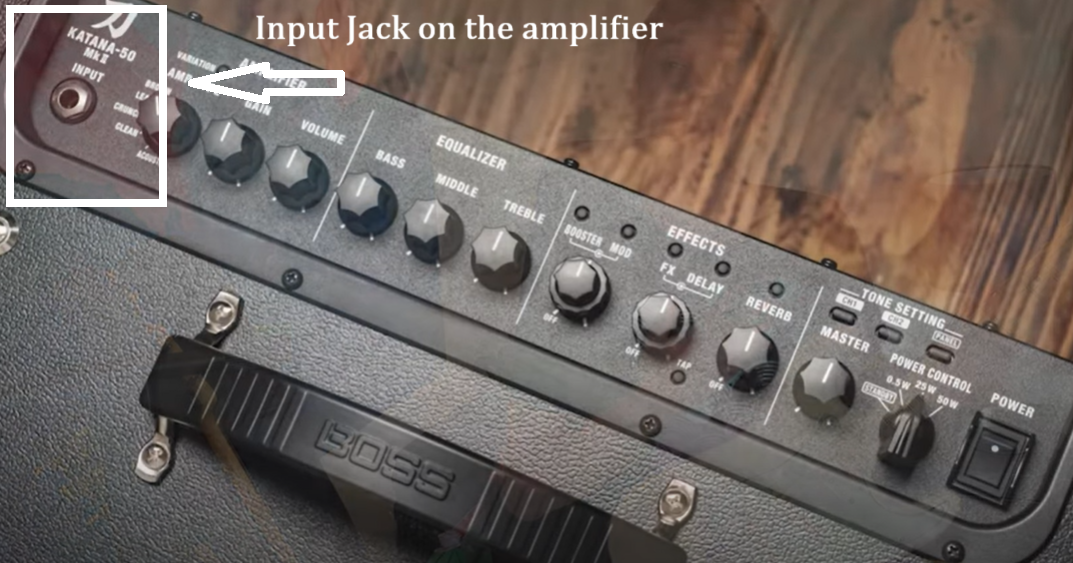
Guitars typically have high impedance (10k–50k ohms). So the amp input should also be high impedance (Hi-Z) to match, labeled as “Guitar In,” “Instrument In,” or “Input.”
Avoid plugging into line-level inputs (meant for keyboards or preamps), as they expect a stronger signal.
Connecting a Guitar to a Combo Amplifier
Combo amps combine the amplifier head and speaker in one box. They’re super common for practice and gigging and often come with one or two inputs, a few tone controls, and sometimes built-in effects or multiple channels.
Method 1: Direct Cable Connection
This is the simplest way to get started. Perfect if you’re just plugging in and playing.
Guitar → ¼” TS Cable → Amp Input
- Grab a ¼-inch TS instrument cable.
- Plug one end into your guitar’s output jack. Make sure it clicks in firmly.
- Plug the other end into your amp’s instrument input. It’s usually labeled “Input” or “Guitar”.
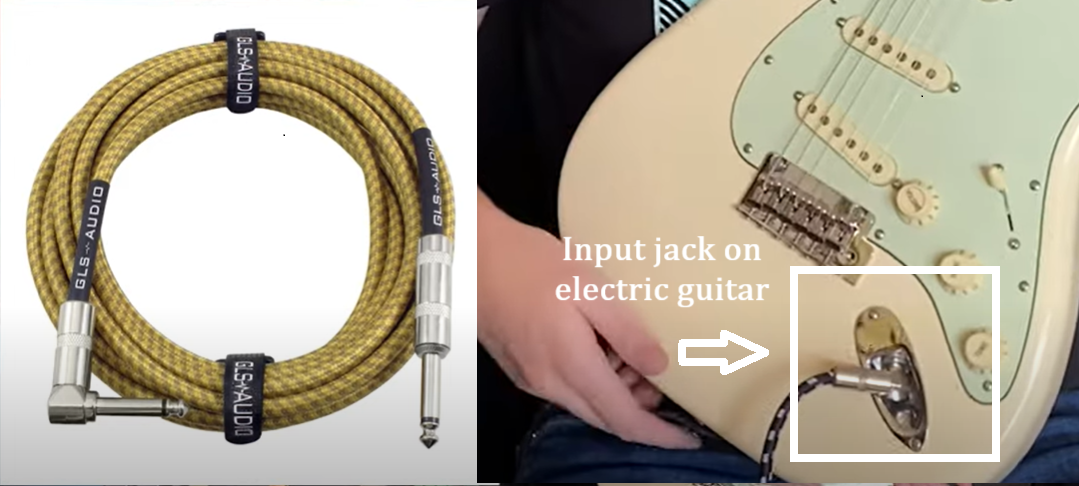
Avoid plugging into any input labeled “Line In” or “Aux In”, meant for devices like keyboards or phones, not guitars.
Method 2: Using an Effects Pedalboard (Signal Chain)
If you’re using multiple pedals, the signal chain becomes crucial. There are two main ways to connect pedals to a combo amp:
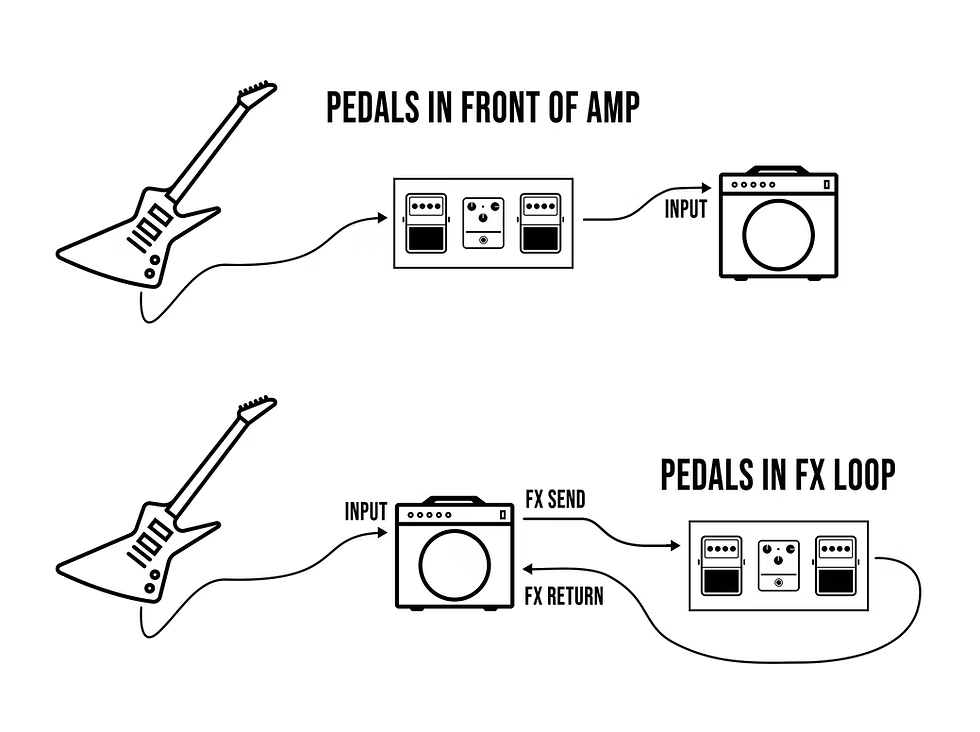
Option A: Through the Front of the Amp
This sends your guitar signal through all your pedals and straight into the amp’s input.
Guitar → Drive Pedals → Modulation → ¼” TS Cable → Amp Input

- Plug your guitar into the input of your pedal.
- Ig you’re using multiple pedals, connect each pedal using short patch cables (6-inch TS patch cables are ideal).
- From the last pedal’s output, run a ¼-inch TS instrument cable into the amp’s input (usually labeled “Input”).
- Adjust gain and volume levels carefully to avoid clipping.
Option B: Using the Effects Loop
Some combo amps have an FX Loop, which splits your signal after the preamp and before the power amp. This is perfect for time-based or modulation effects like delay, reverb, or chorus.
Guitar → Drive Pedals → Amp Input → FX Send → Time-Based Effects → FX Return
- Plug your guitar to front-end pedals (like overdrive) to the amp input just as in Option A.
- Use a ¼-inch TS cable to connect your amp’s “Send” jack (from the FX loop) to the input of your first modulation pedal.
- Connect the output of your last modulation pedal to the amp’s “Return” jack.
- Use good-quality TS cables (not patch cables), around 3 to 6 feet long, for the send/return path.
Tip: Check if your amp has a series or parallel loop. Series loops pass the entire signal through the loop; parallel mixes it with the dry signal. This affects how your effects sound.
Method 3: Multi-Channel Amps: Switching Channels via Footswitch
Some amps have more than one channel—like a clean and a distortion channel—and you can switch between them with a footswitch.
Guitar → ¼” TS Cable → Amp Input | Footswitch → TRS Cable → Amp Footswitch Jack
- Check your amp’s manual for footswitch compatibility.
- Get the correct cable—usually a TRS (stereo ¼-inch) cable for multi-function switching.
- Plug the footswitch cable into the footswitch input jack on your amp. It may be labeled “Channel Select” or simply “Footswitch”.
- Make sure your amp is set to “Footswitch Mode” if needed—some amps require a toggle.
Tap the footswitch to move between channels while playing.
Note: Some amps require a dedicated brand-specific footswitch. Generic ones may not work.
Connecting to a Stack (Head + Cabinet)
Stack amplifiers separate the amp head (the part that powers and shapes the tone) from the speaker cabinet (the part that actually produces sound). This gives you more control over your tone and stage setup, especially in live or studio environments.
Method 1: Standard Setup
This is your basic stack setup: one amp head into one cabinet.
Guitar → ¼” TS Cable → Head Input → Speaker Cable → Cabinet

- Get two cables: A ¼-inch TS cable (for guitar to amp input) and a speaker cable (thick, unshielded, usually labeled “Speaker Cable”—never use a regular instrument cable for this!).
- Plug your guitar into the amp head’s input (use the High-Z input if available).
- Make sure both the amp and the cabinet are turned off while connecting.
- Connect the amp head’s speaker output to the cabinet.
- Match the impedance (ohms) between the head and the cab. (as explained below)
- Power on the amp head.
How to Do Impedance Matching Between the amp Head and the Cabinet?
If the amp head’s output impedance doesn’t match the cabinet’s input impedance, you can damage the amp, get poor tone, or overheat components. Here’s how to make sure you don’t do this mistake:
- Check the amp head’s minimum impedance rating and the cabinet’s impedance (usually labeled on the back.
- If your head says “Minimum 4Ω”, you can use:
- A single 4Ω cab.
- Two 8Ω cabs in parallel (total load = 4Ω).
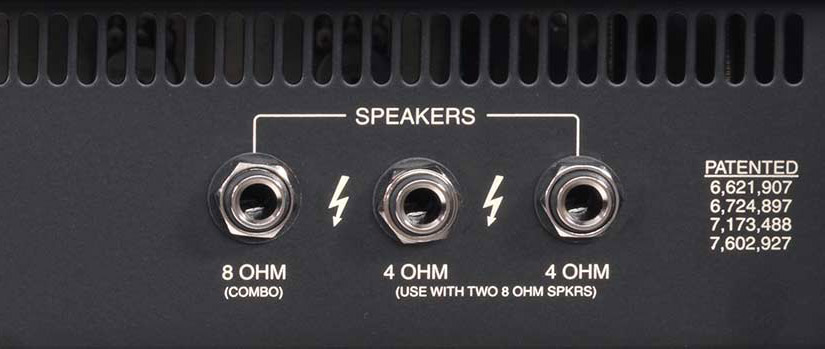
However, never go below the amp’s minimum impedance! (e.g., don’t plug a 4Ω cab into an 8Ω-minimum amp). If unsure, always err on the side of higher impedance (e.g., using an 8Ω cab on a 4Ω-minimum head is safer than the reverse).
- Use a proper speaker cable, not an instrument cable.
- Power on in standby mode first (for tube amps), then switch to full power.
Method 2: Daisy-Chaining Cabinets
Daisy-chaining means connecting more than one cabinet to a single amp head. This setup is great for bigger venues or stereo setups, but it increases the risk of impedance mismatch.
Guitar → Head → Speaker Cable → Cab 1 → Speaker Cable → Cab 2
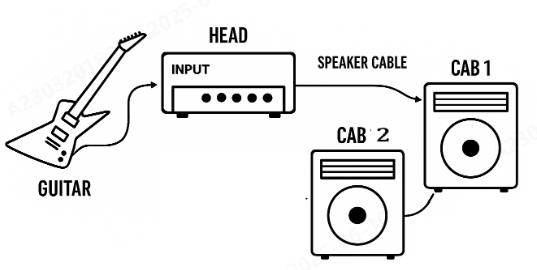
- First, check that your amp head supports multiple cabs. Some have two speaker outputs for this purpose.
- Determine your cabinets’ impedance ratings and whether they’re wired in series or parallel.
- In parallel, total impedance = 1 / (Cab1 + Cab2)
So two 8Ω cabs in parallel = 4Ω load - In a series, you add the values
So two 8Ω cabs in series = 16Ω load
- In parallel, total impedance = 1 / (Cab1 + Cab2)
- Adjust your amp head’s output to match the total impedance.
Use two speaker cables:- One from the amp’s speaker out to the input of Cabinet A
- One from Cabinet A’s thru/out jack to Cabinet B’s input
You can also connect a pedalboard to a stack amp just like we did with the combo amp.
Wireless Connection Methods
Wireless systems are great for stage freedom, home setups with minimal clutter, or simply not having to trip over cables. These systems replace your standard instrument cable with a wireless transmitter/receiver combo. However, wireless isn’t perfect—it can introduce latency, dropouts, or tone coloration if you’re not using a high-quality system.
Method 1: Analog Wireless Systems
These systems transmit your guitar signal over analog radio frequencies (usually VHF or UHF). They’ve been around for decades, are generally lower cost, and simple.
Guitar → Transmitter → Receiver → Amp Input

- Plug the transmitter of the wireless system into your guitar. This is usually a small pack that clips to your strap with a short TS cable.
- Plug the receiver into your amp’s input using a standard ¼-inch TS instrument cable from the receiver’s output.
- Turn on both units and ensure they’re on matching frequencies.
- Test for signal strength and check for interference (TVs, Wi-Fi routers can cause noise) as analog systems can be susceptible, especially in crowded RF environments.
Method 2: Digital Wireless Systems
These transmit your signal as a digital signal, usually over the 2.4GHz band (same as Wi-Fi). They’re increasingly common and much more reliable for tone clarity because of less interference and easy plug-and-play setup.
Guitar → Wireless Transmitter -(2.4GHz)→ Wireless Receiver → Amp
- Plug the transmitter of the system directly into your guitar’s output jack. Many digital units are stick-style and plug in like a cable jack and have built-in batteries or USB charging.
- Plug the receiver into your amp’s input or pedalboard input. Some are pedal-sized receivers that sit right on your board.
- Power both units.
- Pair them—usually this happens automatically, but some have a “sync” button.
- Check for signal stability (digital systems often auto-scan for clean frequencies).
Tip: Make sure your battery is fully charged before gigs. A signal drop from low power is common.
Method 3: Pedalboard-Integrated Wireless
Some wireless systems are built right into pedalboard-sized units. These are great for players who want an all-in-one setup without extra clutter.
Guitar → Wireless Transmitter → Receiver Pedal (on board) → Other Pedals → Amp
- Mount the wireless receiver pedal on your board like any other stompbox.
- Plug the transmitter into your guitar.
- Run your signal from the receiver pedal to the next pedal in your chain or straight to the amp.
- Many of these units include built-in tuners or buffered outputs, which is a bonus.
- Power the receiver via your pedalboard’s power supply (usually 9V DC, center negative).
Optional / Edge-Case Methods (Only if Applicable)
Most guitarists plug straight into an amp, but some setups require creative solutions, especially in studios, live sound, or unconventional rigs. The following methods aren’t for everyone, but they can solve some niche problems.
Method 1: Re-amping (Studio-Only)
Re-amping is a studio technique where you record a dry guitar signal first, then send it back through an amp later to experiment with tones. It allows you to try different amp settings, pedals, or mics without needing the guitarist to re-perform.
DAW → Interface Output → Reamp Box → ¼” TS Cable → Amp Input → Mic → Interface
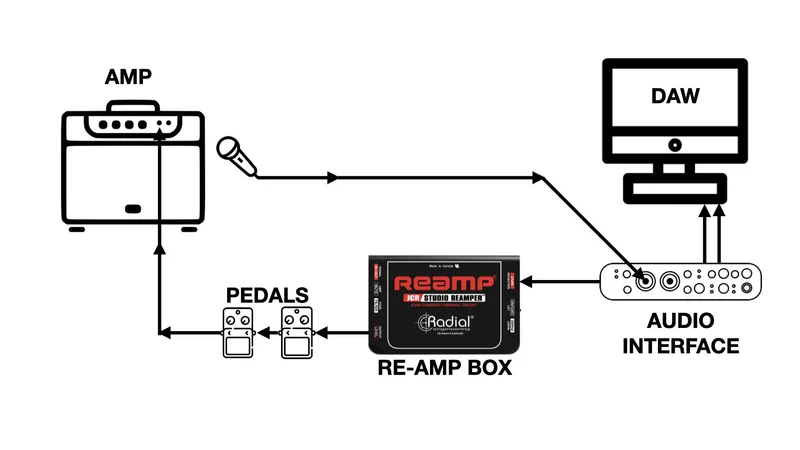
- Record your guitar signal via a DI (Direct Input) box, sending the DI’s XLR output to your audio interface.
- Once recorded, connect the interface output to a re-amp box. This will convert the signal from line level back to instrument level.
- From the re-amp box, run a ¼-inch TS cable into your guitar amp input, just like you would with a guitar.
- Play the recorded signal through different amp settings and mic it up or capture the amp’s output with your interface.
Method 2: Bluetooth Speakers or PA Systems
You cannot connect a guitar directly to a Bluetooth speaker because most such speakers color the sound, so it either ends up harsh or weak. For best work, you’ll need an amp modeler or digital preamp in between.
Guitar → Modeler/Preamplifier → Bluetooth Transmitter → Speaker/PA
- Use a guitar preamp pedal or amp modeling processor (like a Line 6 HX Stomp or Boss GT-100).
- Connect the output of your modeler to a Bluetooth transmitter.
- Pair the transmitter to your Bluetooth speaker or PA system.
- Adjust EQ—cut bass if it’s muddy and avoid latency or tonal degradation.
Method 3: Using a Combo Amp as a “Head”
If you love your combo amp’s tone but want more volume or want to push multiple cabinets, this trick uses your combo amp like a standalone head. However, to make it work.
- Your combo amp must have a “Speaker Out” or “Extension Jack”.
- The internal speaker must be either bypassable or safely disconnected (check the manual!).
Guitar → Combo Preamp → Speaker Out Jack → Speaker Cable → External Cab
- Connect a heavy-duty speaker cable (¼-inch TS, 12–14 gauge) from the combo’s speaker out to the external cabinet.
- If your amp doesn’t bypass the internal speaker automatically, you may need to disconnect the internal speaker cable—only do this if it’s safe to run the amp that way (tube amps need a load!).
- Match impedance carefully—combo output (e.g., 8Ω) should match the cabinet’s rating.
- Power on and test—now you’re using your combo’s tone section to drive a much larger speaker setup.
Additional Considerations and Tips for Connecting a Guitar to an Amplifier
- Always use shielded TS cables for guitar-to-amp connections (prevents noise).
- Use right-angle plugs where needed to avoid stress on jacks, especially on tightly packed pedalboards or amps with rear inputs.
- Avoid running guitar cables parallel to power cords—this helps reduce unwanted hum or interference.
- Let your tube amp warm up for a minute or two before playing for consistent tone and tube longevity.
- Keep a buffer pedal at the beginning of a long effects chain if you notice signal degradation or tone loss.
- Don’t rely on Bluetooth for serious tone-critical performance—it’s fine for casual use but introduces latency and audio compression.
- Know your amp’s impedance settings if it has selectable outputs (e.g., 4Ω, 8Ω, 16Ω)—mismatching can damage the amp or limit performance.
- Use a power conditioner for live shows or studio racks—it protects sensitive gear from voltage spikes and noisy power.
- Avoid plugging speaker outs into anything other than cabinets—this can permanently damage pedals, interfaces, or speakers.
Conclusion
Before choosing how to connect your guitar to an amp, take time to understand your gear and what you need it to do. Are you practicing at home, recording in a studio, or performing live? Do you rely on pedals or prefer a clean, direct tone? Your answers will guide you on which method to use.
If you’re a beginner, stick with a simple combo amp setup. For gigging, you might prefer pedalboards and effects loops. Studio musicians benefit from re-amping or multi-channel heads, and those who want mobility should explore wireless options.
FAQs
Q: Why is my guitar not connecting to the amp?
If your guitar isn’t connecting to amp, check if your cable is working, the volume knobs are up on both the guitar and amp, and the amp is powered on. Try another guitar or cable to isolate the problem. If the amp has multiple inputs, make sure you’re using the correct one (Hi-Z for guitar).
Q: Why is no sound coming out of my guitar?
Make sure the guitar’s volume knob is turned up, and try plugging directly into the amp with a fresh cable. Also, check the amp settings and speaker connection (if using a head + cabinet). Battery-powered active pickups may need a fresh battery.
Q: Can I use a microphone cable (XLR) for my guitar?
No. Guitars need high-impedance TS cables, not low-impedance XLR cables. You can only use XLR if you’re going through a DI box or amp modeler with XLR output. Otherwise it’s better tp stick to TLS cables,
Q: What’s the difference between a speaker cable and an instrument cable?
Speaker cables are unshielded and thicker, designed to handle high power between amp heads and cabinets. Instrument cables are shielded to protect low-level signals from interference and should be used only between guitar/pedals/amp inputs.
Q: Why does my amp buzz/hum when connected?
This issue is usually due to a ground loop, interference from power cables, or poor cable shielding. Reposition your cables away from power sources, switch to a grounded power supply, or use a better-shielded instrument cable. Pedals with poor power isolation can also cause this issue sometimes.


