


.png)
Many users struggle when managing audio inside OBS Studio. It is easy to get confused, especially when multiple sound sources are involved. This article explains how to layer audio in OBS, step by step.
You will also learn how to polish your layered audio using filters. These settings can improve clarity and remove background noise.
If you use a microphone like the Hollyland LARK MAX 2, audio quality gets even better. It features 32-bit float internal recording with up to 8GB of internal storage for safe backups. You can also monitor wirelessly using OWS Bluetooth earphones, so the setup becomes smooth and user-friendly.


How Audio Layers Work in OBS
OBS Studio gives you control over different sound sources. You can split them into separate tracks during recording. This process is called audio layering.
Each track holds a single sound source, like your microphone or desktop audio. That way, you can mute, edit, or adjust each sound without affecting the rest.
Recording separate tracks gives you editing flexibility. Later, you can change volume levels without much trouble. You will not have to worry about background sounds clashing. Having clean audio also makes your videos more professional. Your mic will not compete with loud game sounds or music.
Part 1: How to Layer Audio in OBS
Creating separate layers for each sound helps with control. Here is how to do it:
Step 1: Open OBS Settings
- Launch OBS on your computer.
- Go to the bottom-right corner.
- Click the Settings button.

- A new window will open with various options.
- On the left sidebar, click Output.
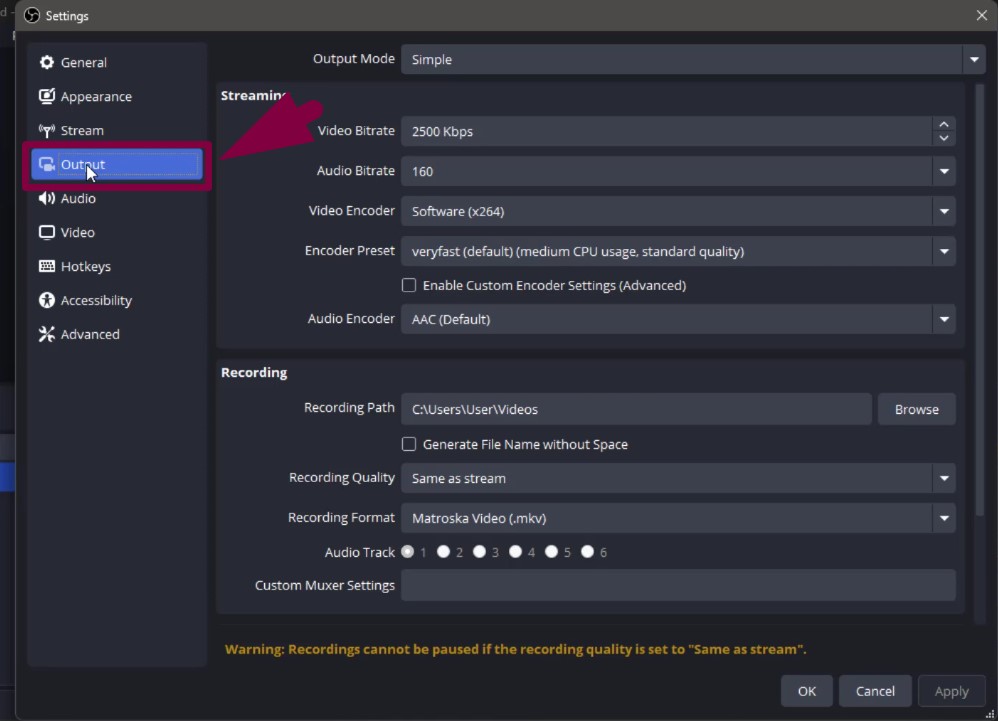
- Change the Output Mode to Advanced.
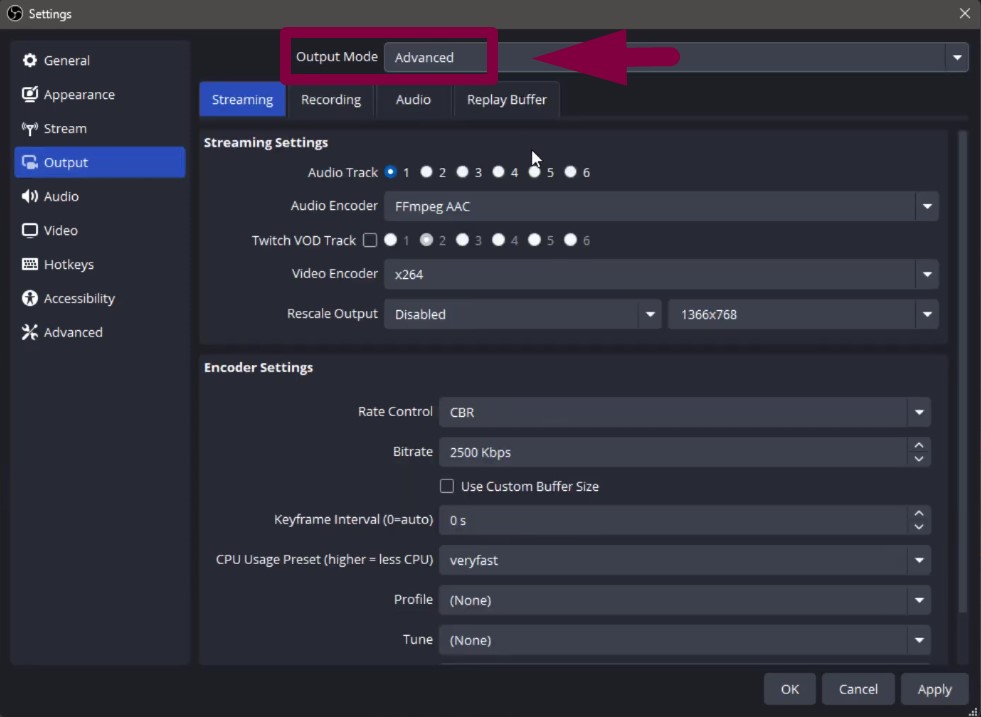
This gives access to detailed audio settings.
Step 2: Enable Audio Tracks
- Inside the Output tab, scroll to Recording.
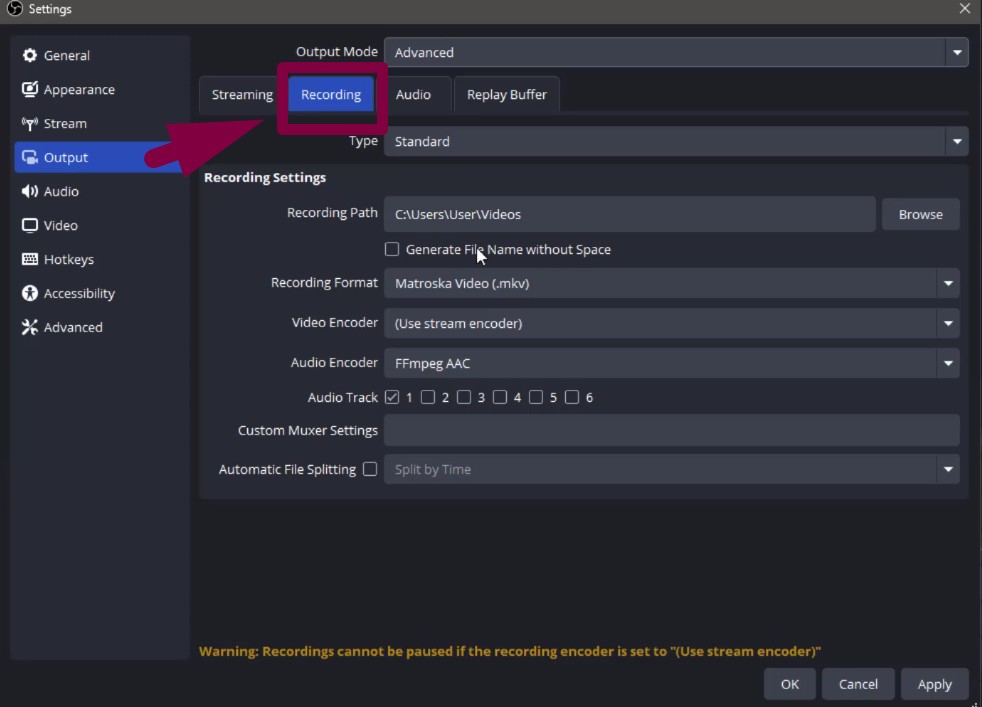
- You will see boxes labeled Track 1 to Track 6.
- Tick Track 1 and Track 2.

This enables two tracks for sound recording. Each track can hold a different audio source. It helps keep your mic and system sounds separate.
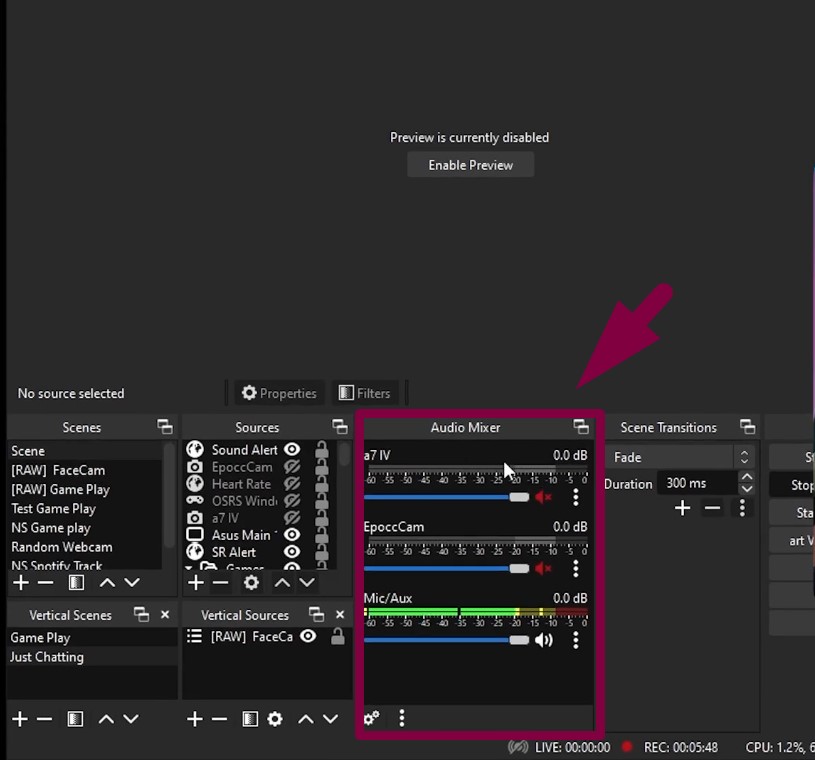
Step 3: Access Audio Mixer Options
- Close the settings window.
- Return to the main OBS screen.
- Locate the Audio Mixer below the preview window.

- Click the gear icon to open Advanced Audio Properties.

Step 4: Assign Audio to Specific Tracks
- A table will appear showing all audio sources.
- Each row represents a different audio input.
- Columns labeled Track 1 to Track 6 are at the top.
- For Desktop Audio: Leave Track 1 checked and uncheck Track 2 to Track 6.
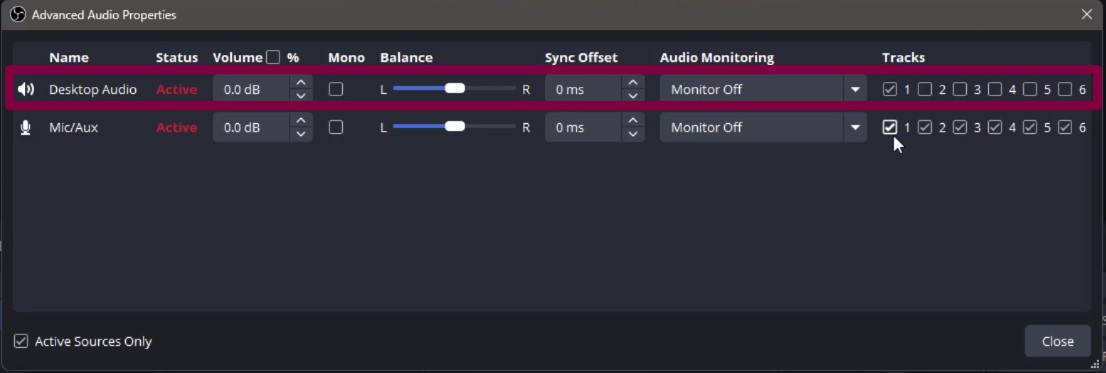
- For Microphone: Uncheck Track 1, Track 3, all the way to Track 6, and tick only Track 2.
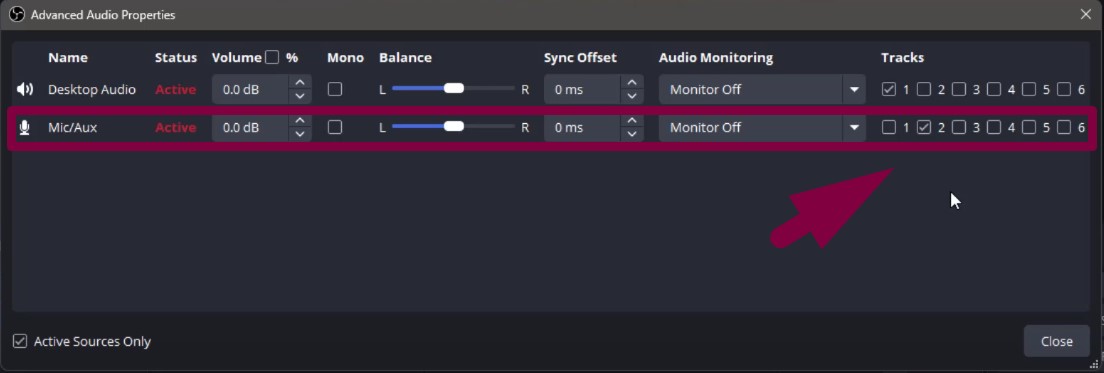
This keeps each sound on its own track. Once done, both your mic and desktop sounds will be cleanly separated. You can edit, mute, or adjust them later without issue.
Part 2: How to Polish Your Audio in OBS
After layering, filters help improve your mic’s clarity. OBS has built-in tools to fix noisy or uneven audio.
Step 1: Find Your Mic in OBS
- Launch OBS Studio.
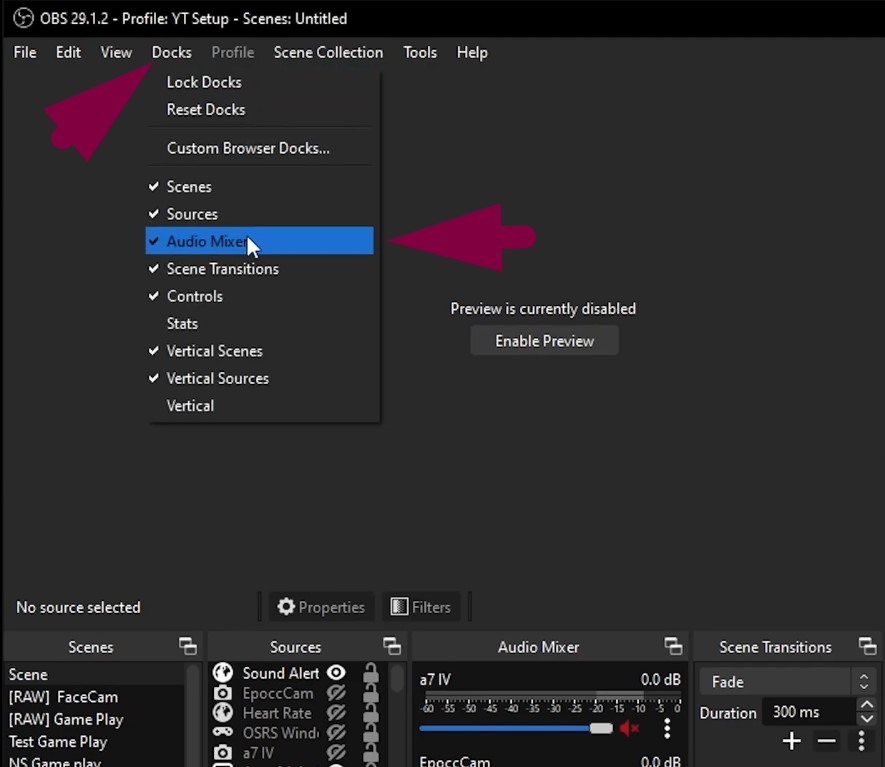
- Make sure the Audio Mixer is visible.
- If not, click View > Docks > Audio Mixer.
- Locate your microphone in the mixer panel.
- Click the gear icon next to it.
- Select Filters from the dropdown list.
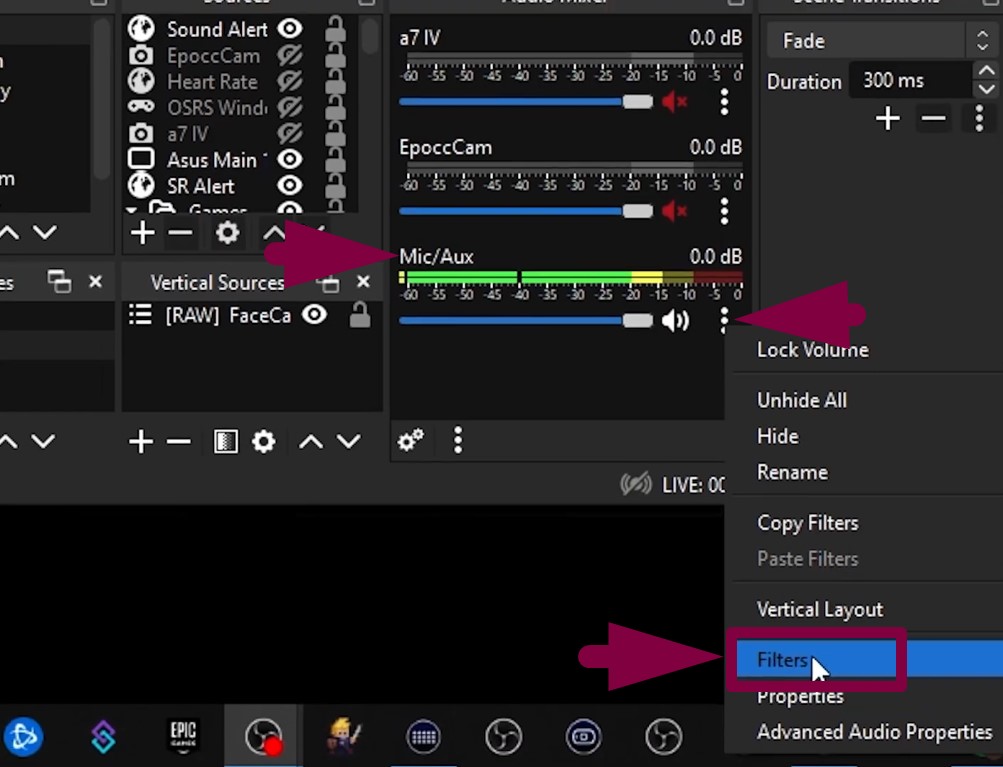
This opens the filter editor window, where you will apply effects.
Step 2: Add Noise Suppression
- Click the + button in the bottom-left corner.

- Choose Noise Suppression.
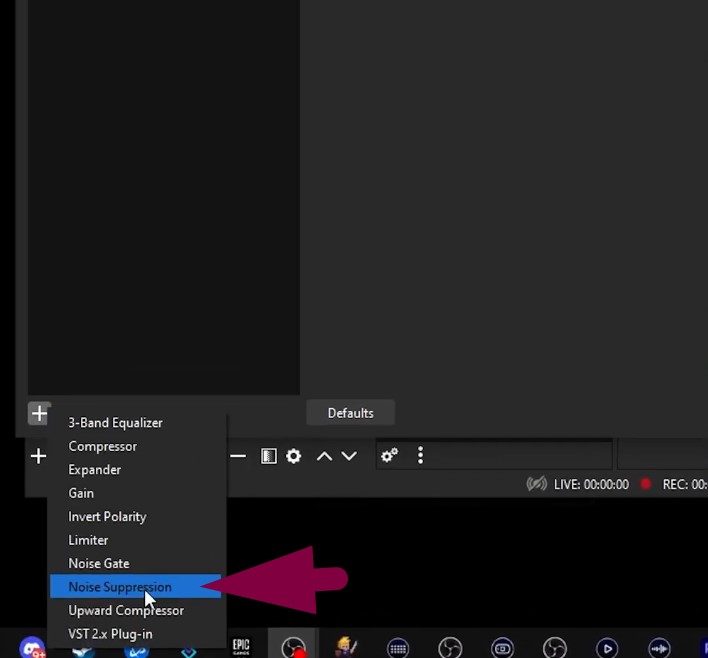
- Give it a custom name like “CleanMic.”
- Two options should now appear: Speex and RNNoise.
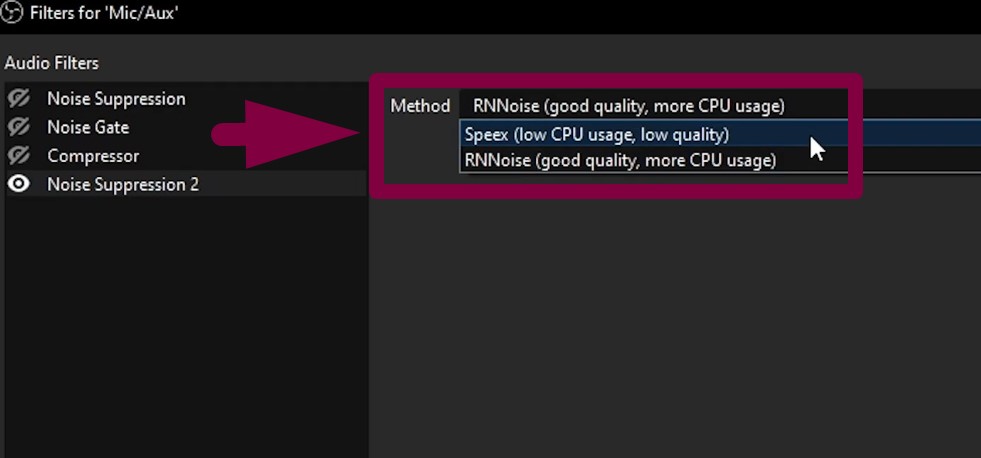
- RNNoise provides better quality but uses more CPU.
- Speex is lighter and suitable for older computers.
With the filter on, background sounds get removed. Also, the AC noise or computer fans will fade away.
- Now, check mic levels before and after to confirm results.
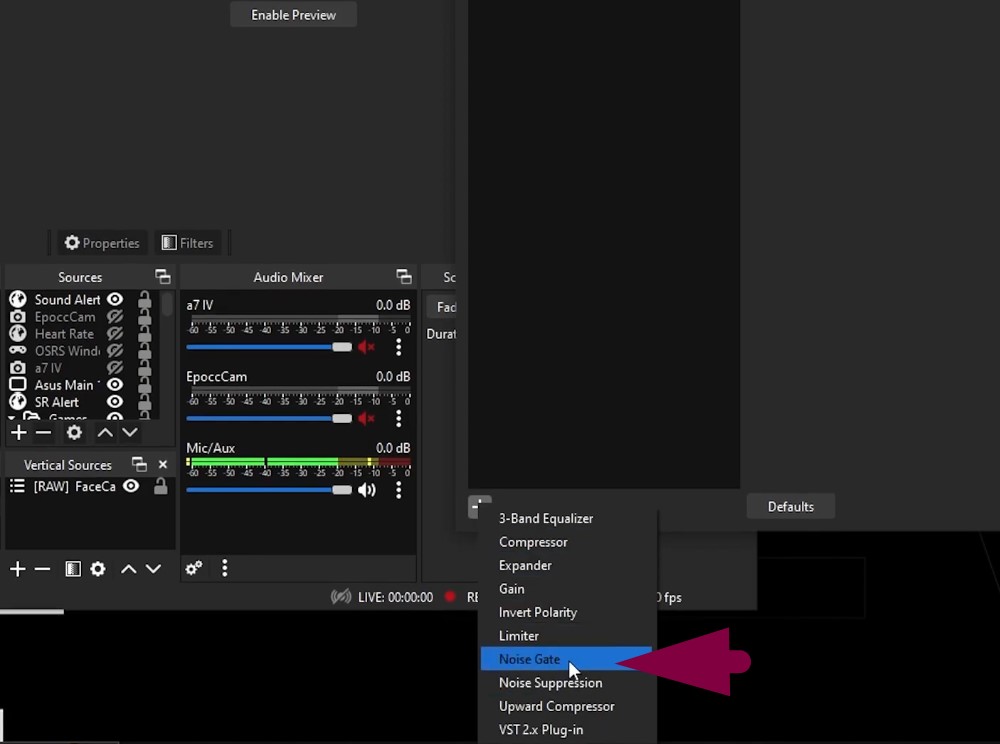
Step 3: Add a Noise Gate
- Hit the + again and select Noise Gate.
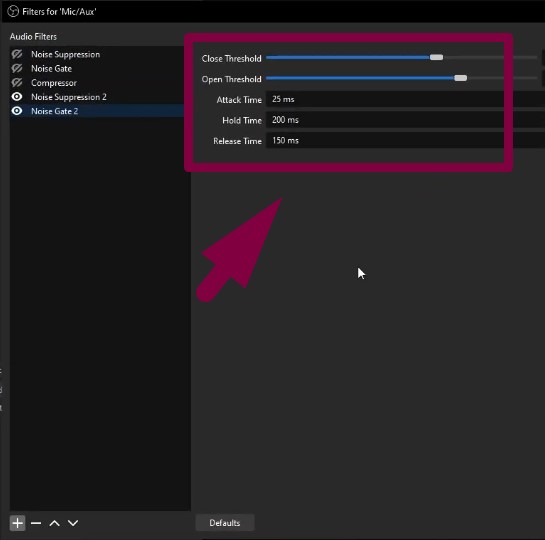
- Set Close Threshold to -32 dB.
- Set Open Threshold to -26 dB.
- These numbers control when the mic activates.
- Below -32 dB, the mic stays off.
- Above -26 dB, it stays on.
- Adjust Attack Time if it clips the start of words.
- Modify Hold Time to control how long the mic stays active.
- Tweak the Release Time for a smoother mic fade out.
- Use soft noises in your room to test the thresholds.
Step 4: Add a Compressor
- Press + once more and choose Compressor.
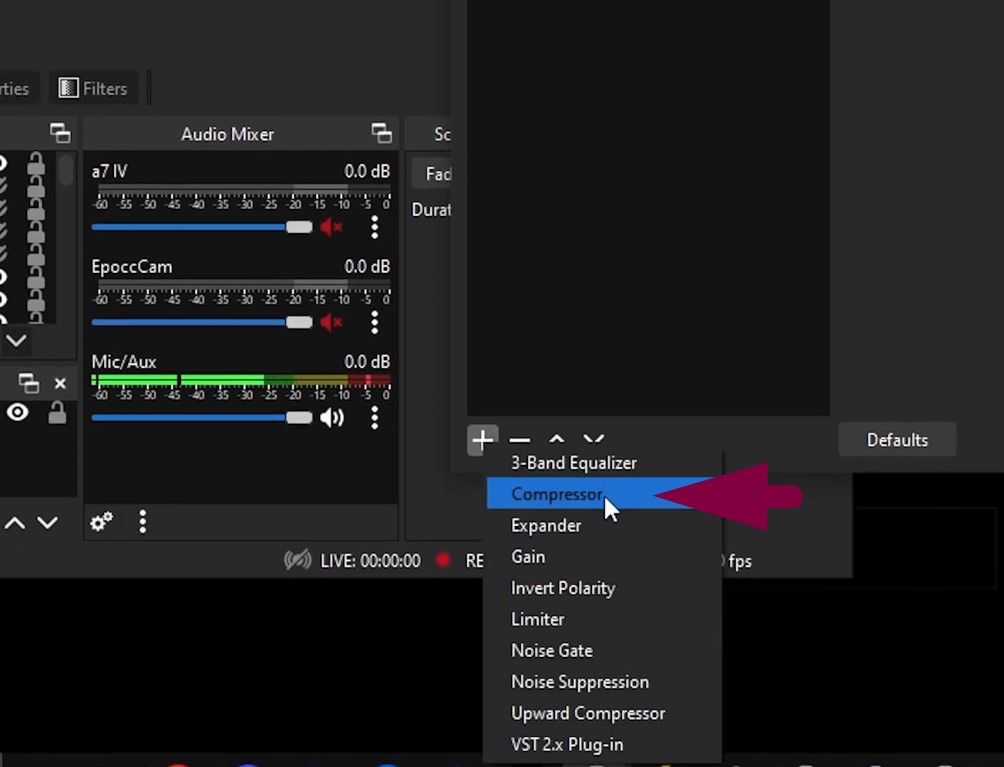
- Set Ratio to 4:1 or 2:1.
- Use a Threshold of around -18 dB.
- Adjust Attack Time for faster mic response.
- Set the Release Time for how long the effect lingers.
- Increase the Output Gain if your voice sounds too soft.

The compressor helps balance the loud and quiet parts of your voice.
IMPORTANT: Filter settings and adjustments may vary from person to person. We suggest tweaking levels according to your studio environment, voice quality, and audio gear.
Note: Use the Right Filter Order
Always apply filters in this sequence:
- Noise Suppression
- Noise Gate
- Compressor
This order blocks noise before it gets amplified. If used incorrectly, background sounds may increase.
Checklist for Layering and Filtering the Audio in OBS
A clean stream needs good audio balance.
- Open OBS and find the Audio Mixer.
- Ensure each audio source has a green level bar.
- Start playing music or game sound.
- Then speak into the mic.
- Watch both levels side by side.
- Your voice should always be louder.
- Make sure the game or background music stays below your mic.
- If needed, lower other audio sources manually.
- Keep your mic at the front of the mix.
This keeps your words clear and prevents distractions during live sessions.
Wrap Up
Setting up separate audio tracks in OBS makes content cleaner. Filters then help improve quality by blocking noise and adjusting levels. Balancing all sounds ensures your voice stays strong and clear during recordings or streams. Now that you have learned how to layer audio in OBS, you can create professional, easy-to-edit sound in every session.
FAQs
1. How to separate two audio tracks in OBS?
Make sure your file type supports multiple tracks, like MP4 or MKV. Then open Advanced Audio Properties in OBS. Use the track matrix to assign audio sources to specific tracks. You can keep the mic on one and the desktop on another.
2. Is audio mixing possible inside OBS?
Yes, OBS mixes all active audio sources by default. However, there is no master output volume meter. You will need to check each source manually and adjust levels. OBS may add a global meter in future updates.
3. How to monitor sound output in OBS?
Right-click inside the Audio Mixer area. Choose Advanced Audio Properties. Go to the Audio Monitoring column. Then select your desired output mode, like Monitor Only or Monitor and Output. This lets you hear what OBS is recording.


