.png)
Have you ever recorded the perfect podcast episode, voiceover, or musical take, only to find it spoiled by awkward pauses, background hum, or volume inconsistencies? You’re not alone. Clear audio is a key to getting the best results.
The good news is you don’t need expensive software to achieve professional sound.
Audacity, a free and powerful tool, is the solution. Paired with a great microphone like the Hollyland LARK M2S, you can capture pristine audio and polish it to perfection. Let us learn the step-by-step process to edit audio using Audacity.

Hollyland LARK M2S - Wireless Hidden Microphone
An ultra-discreet wireless microphone featuring a clip-on transmitter for an “invisible” fit.
Key Features: No-Logo Fit | Ti+ Design | 48 kHz/24-bit
Getting Started (How to Import Audio into Audacity)
Now, before you can begin the creative process of editing, you first need to install Audacity and bring your audio file into the Audacity workspace.
- Visit the official Audacity website and download the latest version for your OS (Windows, macOS, or Linux) and follow the installation prompts.

Here’s how to import your audio:
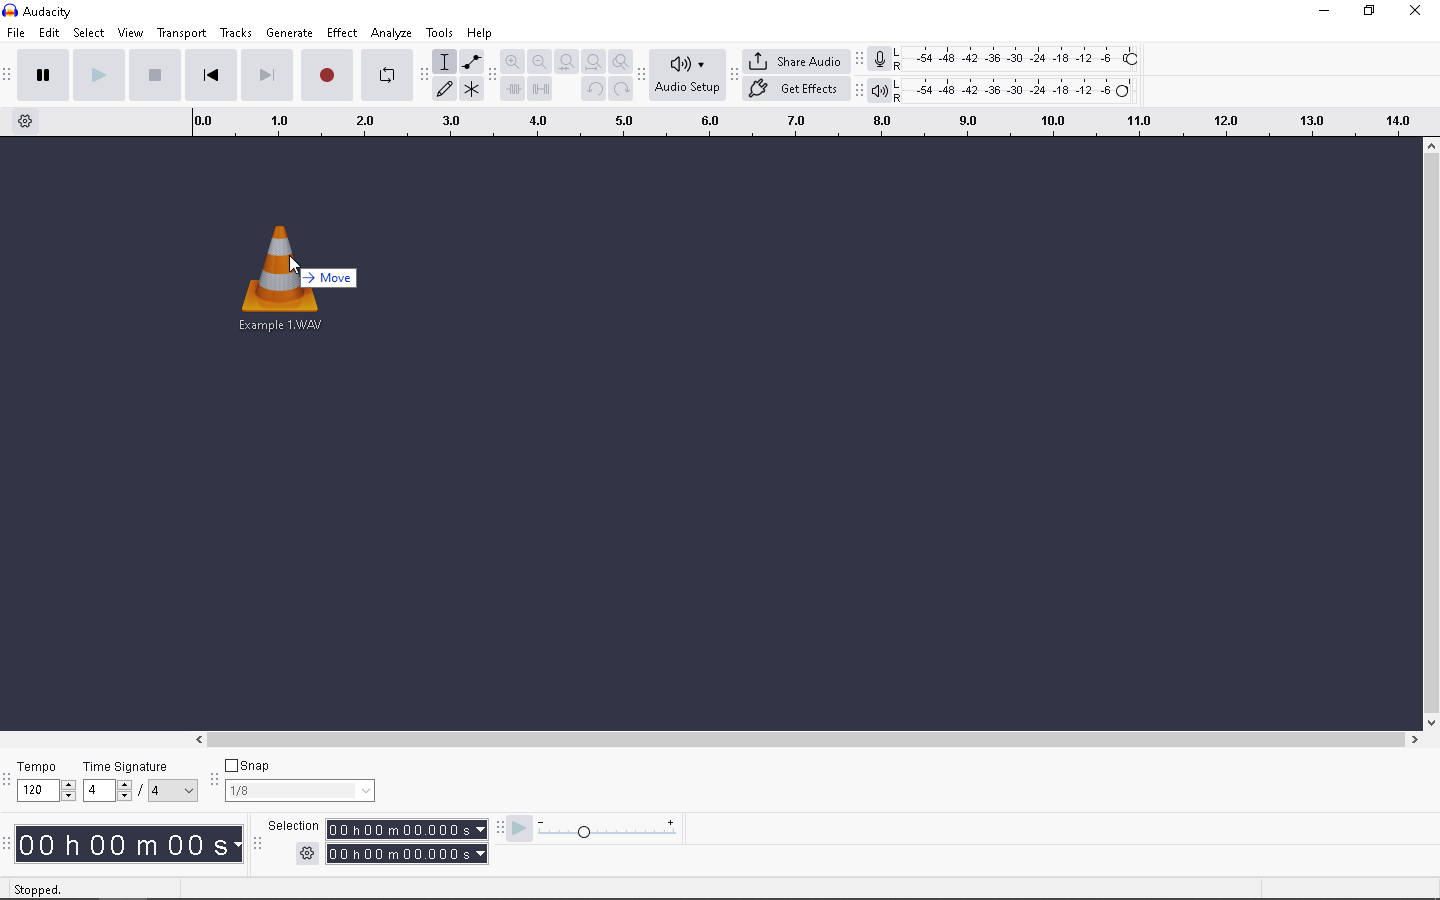
- Launch the application on your device. You’ll be greeted by a clean interface.

- In the top-left corner, click on the File option.
- A dropdown menu will appear. Hover over Import and then select Audio. This will open your computer’s file explorer.

- Navigate to the folder where your audio file is saved. Select the file you want to edit and click Open.

- Audacity will import the file and display it as a waveform in a new track. The blue waves represent your audio’s amplitude; the louder the sound, the taller the wave.

- Alternatively, you can simply drag and drop your audio file directly from your folder into the main Audacity window.
How to Trim and Cut Audio in Audacity
Nearly every audio recording contains unwanted sounds. Trimming and cutting are the most fundamental editing tasks you’ll perform. This will allow you to clean up your recording and create a tight, professional-sounding final product.
Trim the Start and End of Your Recording
- Select the unwanted audio using the Selection Tool (which looks like a standard I-beam cursor and is usually active by default).
- Click and drag your mouse over the portion of silence or noise at the beginning or end of your track. The selected area will be highlighted.

- Now simply press the Delete or Backspace key on your keyboard. The highlighted section will vanish, and the rest of the audio will shift to fill the gap.

Cut Out Mistakes or Filler Words from the Middle
- To select the mistake, zoom in for precision using the zoom tools (the magnifying glass icons) or the Ctrl + mouse wheel shortcut.
- Click and drag to highlight the exact part you want to remove, such as a cough, a filler word like “um,” or a repeated sentence.
- Using a high-quality microphone like the Hollyland LARK M2S can significantly reduce the number of these small imperfections you need to edit out later.

- Press Ctrl + X (or Cmd + X on Mac) or go to Edit > Cut. This removes the selection and copies it to your clipboard.
How to Remove Background Sounds with Audacity Noise Reduction
One of the most common challenges in audio recording is unwanted background noise. Audacity’s Noise Reduction effect is a powerful tool designed to target and eliminate these constant background sounds specifically.
The process involves two simple but crucial steps: telling Audacity what the noise sounds like, and then telling it to remove that sound from the entire recording.
Step 1: Capture a Noise Profile
- Find a few seconds of your recording that contains only the background noise you want to remove. This is your “noise sample.”
- Using the Selection Tool, highlight this section of pure noise.

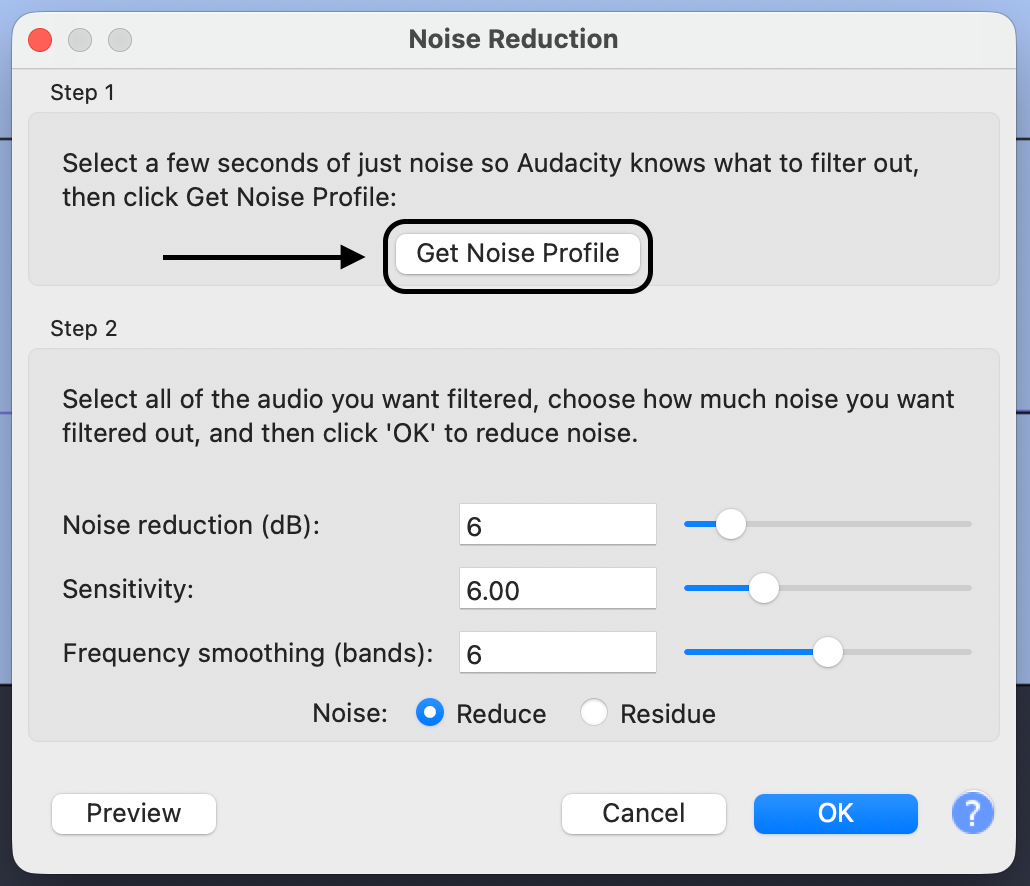
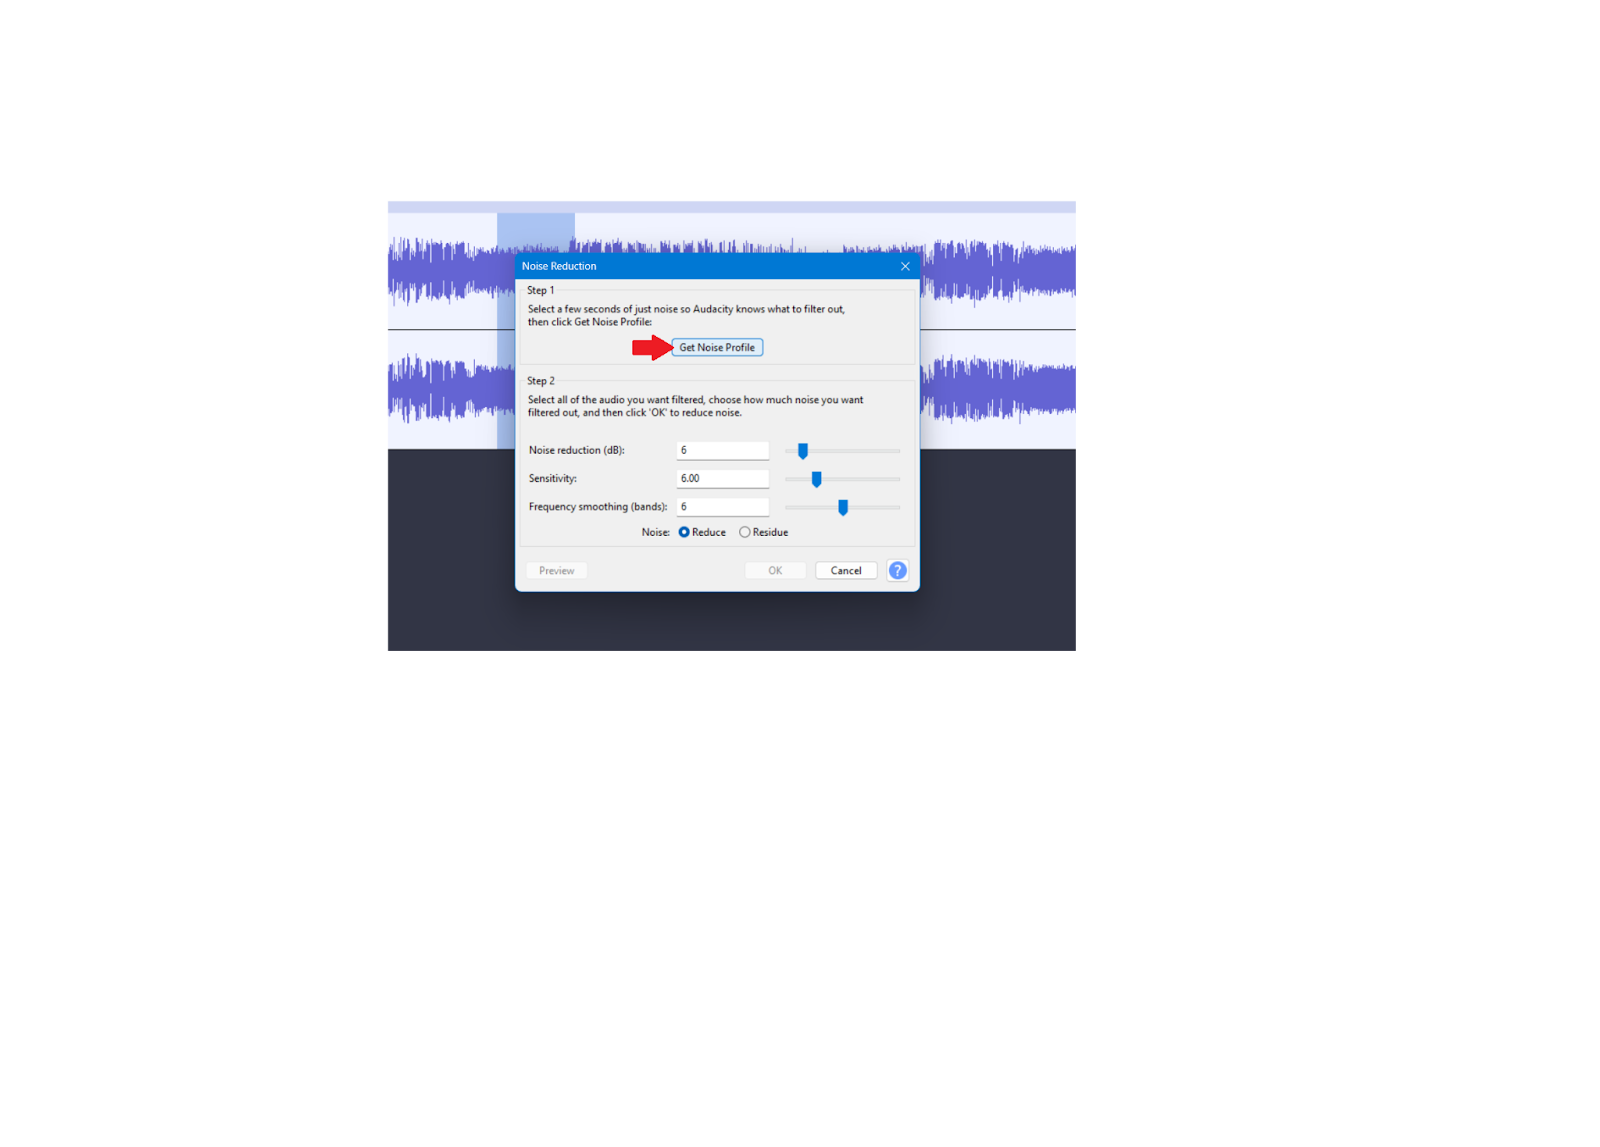
- Go to the Effect menu and select Noise Removal and Repair > Noise Reduction.

- In the dialog box that appears, click the Get Noise Profile button. The box will close, and Audacity now knows what sound to target.
Step 2: Apply Noise Reduction Settings
- Now, select the entire audio track (you can do this quickly by pressing Ctrl + A or clicking on the track information panel to the left of the waveform).

- Go back to Effect > Noise Reduction.
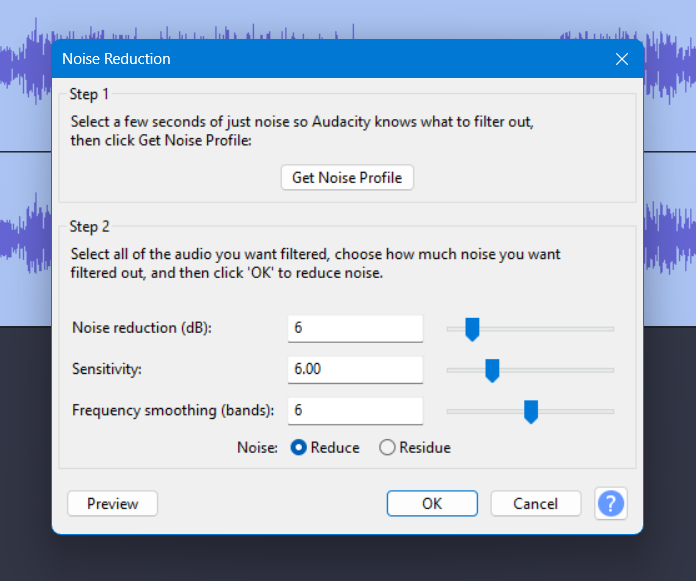
- This time, adjust the settings. The Noise Reduction (dB) slider controls how much of the noise is removed.
- Start with a conservative value like 12dB. The Sensitivity and Frequency Smoothing settings can often be left at their defaults for good results.
- Click the Preview button to hear what the result will sound like. If you remove too much, the audio can sound distorted or “watery.”
- Once you’re happy with the preview, click OK to apply the effect to your selected audio.

How to Use Audio Effects in Audacity for Pro-Quality Sound
Once your audio is clean and free of mistakes, you can start enhancing its overall quality with effects. This is the step that separates a good recording from a great one.
Effects like equalization (EQ) and compression can help balance the tonal qualities of your audio, control its dynamic range, and give it that professional, broadcast-ready sound.
Equalization (EQ)
- Equalization allows you to adjust the volume of different frequencies in your audio.
- Select your entire track.
- Go to Effect > EQ and Filters > Filter Curve EQ.

- You’ll see a graph with a straight line. Dragging the line up boosts a frequency range, while dragging it down cuts it.

- For Voice, a common technique is to apply a gentle boost around the 1-4 kHz range to improve clarity and presence.
- You can also apply a “low-cut” or “high-pass” filter to remove low-frequency rumble below 80-100 Hz.
- Use the Preview button to listen to your changes before clicking Apply.

Compression
Compression reduces the dynamic range of your audio by levelling out the volume in your audio. It makes loud sounds a bit softer and quiet sounds a bit louder, so everything plays at a more consistent level.
- Firstly, select your entire track, by pressing Ctrl+A.
- Now, go to Effect > Compressor.

Here are some key settings you can consider:
- Threshold: The volume level at which the compressor starts working. A good starting point for voice is around 12dB to – 16dB.
- Ratio: How much the audio is compressed. A ratio of 2:1 or 3:1 is subtle and effective for voiceovers.
- Attack and Release: These control how quickly the compressor engages and disengages. The default settings are often fine to start with.

- Ensure the “Make-up gain(dB) for 0dB after compressing” box is checked. This boosts the overall volume of the compressed track.
- Finally, tap on the Preview button and then Apply.

How to Export Audio from Audacity
Audacity saves its projects as .aup3 files, which preserve all your tracks and editing history but cannot be played by standard media players.
To create a universally compatible file, you need to export your project. This process combines all your edits into a single audio file, such as an MP3 for easy sharing or a WAV for the highest possible quality.
Here’s how to export your finished audio:
- Click on File in the top menu bar and select the Export option or press ‘Ctrl+Shift+E’.
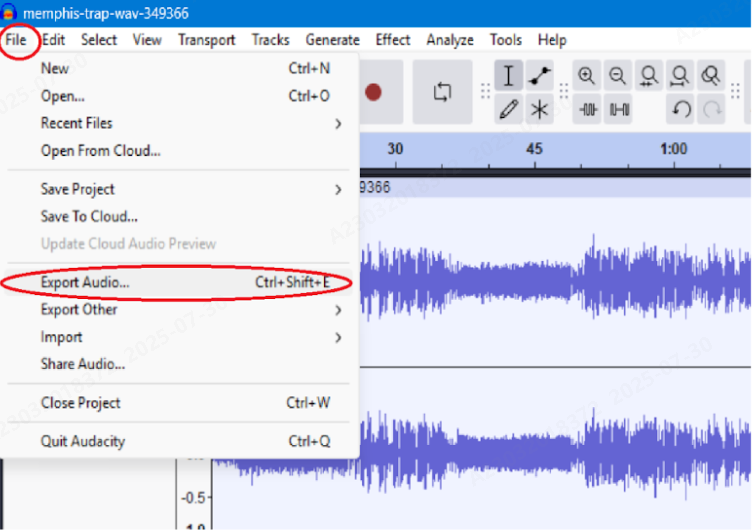
- Hover over the Export option. You can generate a shareable link or choose to save to your computer.
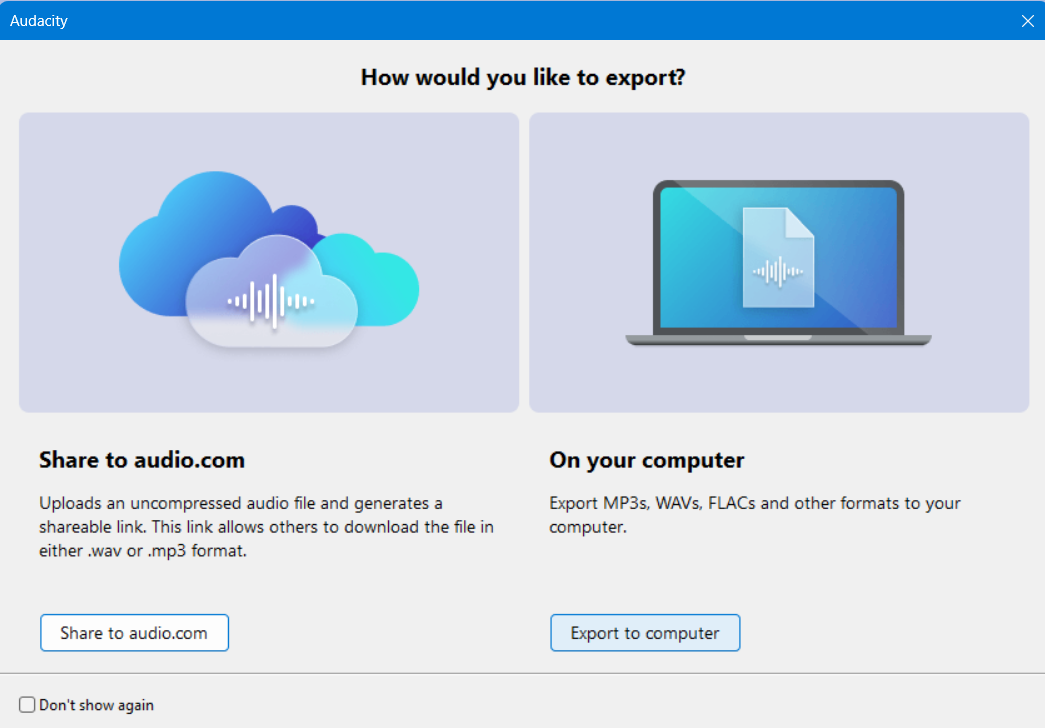
- Choose Export to Computer, and you will see several format choices. The most common are Export as MP3 and Export as WAV.

- A final window will appear, allowing you to add metadata like artist name, track title, and album.
- This information will be embedded in the file. Fill it out if you wish, then click OK. Your audio will now be exported and ready for listening or uploading.

- Name your file, choose where to save it, and click the Export button.

Conclusion
Mastering Audacity opens up a world of creative possibilities, which can transform your raw recordings into polished, professional-grade audio. By learning the fundamental steps of importing, trimming, cutting, reducing noise, applying effects, and exporting, you will have the complete toolkit to handle any audio editing task.
With this guide, you can cover the journey from a noisy file to a clean, crisp final audio.
FAQs
1. Is Audacity truly free?
Yes, Audacity is completely free and open-source software. There are no hidden fees, subscriptions, or feature limitations. You can download and use its full suite of tools without any cost.
2. What is the difference between saving a project and exporting audio?
Saving a project (File > Save Project) creates an Audacity Project file (.aup3) that saves all your tracks, edits, and settings, allowing you to pick up where you left off.
Exporting (File > Export) mixes your project down into a single, playable audio file like an MP3 or WAV that can be shared and played on other devices.
3. Why does my audio sound robotic or watery after noise reduction?
This “watery” or robotic artifact usually happens when the Noise Reduction settings are too aggressive. When you apply the effect, try using a lower Noise Reduction (dB) value (e.g., 6-12dB).