


.png)
.png) Français
Français .png) Italiano
Italiano .png) 日本語
日本語  Español
 Audio visualizers turn sound into motion. You’ve probably seen them as colorful bars or waves in music videos or podcasts. The cool part? You can build one yourself using simple code. In this guide, you’ll learn how to make an audio visualizer with HTML, CSS, and JavaScript.
We’ll use built-in browser tools like the Web Audio API and Canvas. You can even use a microphone to visualize your voice. For clean sound, a mic like the Hollyland LARK M2 helps a lot. It captures clear audio with low noise, so your visuals react better to music, speech, or instruments.

Essential Tools to Create an TML/CSS/JS Audio Visualizer
Before you start building, make sure you have a few key tools ready. Everything here is free and beginner-friendly.
- A modern browser (Chrome, Firefox, or Edge)
- A code editor (VS Code, Sublime Text, etc.)
- A local audio file (MP3 or WAV)
- Basic understanding of HTML and JavaScript
- Optional: A microphone (like the LARK M2) for real-time input
We’ll start by uploading a file to visualize, then show how to use your mic.
What Is an Audio Visualizer?
An audio visualizer is a tool that listens to sound and draws it as shapes. It could be bars, circles, waves, or something else. The shapes change based on pitch and volume. Visualizers read frequency and amplitude in real time and convert that data into movement.
They make audio more engaging, especially for podcasts, music, or livestreams.
Understanding the Web Audio API
The Web Audio API lets JavaScript analyze and manipulate sound. It enables you to do things like:
- Play audio files
- Use your mic
- Visualize frequencies
- Apply filters and effects
We’ll use the AnalyserNode to read real-time frequency data and the Canvas API to draw bars that react to it.
Complete Tutorial to Code an Audio Visualizer with HTML/JS
If you’re new to HTML, don’t worry. Let’s walk through what this block of code does so you know exactly what you’re building and why each part matters.
Step 1: Declare the Document Type and Start the HTML Document

This line tells the browser that you’re writing an HTML5 document. It’s always placed at the top of your HTML file. Then, start the HTML document with the <html> tag.
Step 2: Start the HTML Document

This opens the main container for your HTML page. The lang=”en” attribute simply tells the browser (and search engines) that your page is written in English.
Step 3: Head Section
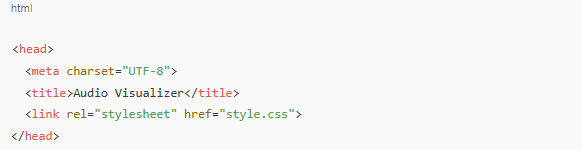
Everything inside the <head> tag contains settings and metadata for your webpage.
- <meta charset=”UTF-8″>: This ensures your page supports all standard characters, including special symbols.
- <title>: The name that appears in the browser tab.
- <link rel=”stylesheet” href=”style.css”>: This links your HTML page to an external CSS file, which will control how your visualizer looks.
Step 4: Body Content
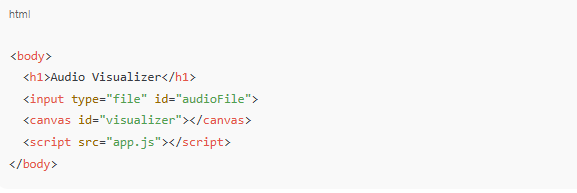
Here’s where all the visible and interactive parts of your webpage go:
- <h1>Audio Visualizer</h1>: A heading. This appears at the top of the page to let users know what the tool is for.
- <input type=”file” id=”audioFile”>: This creates a file upload button. When the user clicks it, they can choose an audio file from their computer. This is how we’ll feed sound into the visualizer.
- <canvas id=”visualizer”></canvas>: This is the drawing area. The JavaScript you write later will use this canvas to draw colorful bars and shapes that move with the audio.
- <script src=”app.js”></script>: This loads your JavaScript file. That’s where all the logic for the visualizer lives, including playing the sound and animating the bars.
Step 5: Close the HTML

This simply ends your HTML document while adding a file input and a canvas for drawing the visual.
Step 6: Style the Page (style.css)
This part of your project controls how your page looks. We’re not changing how anything works, just how it appears to users. Let’s break it down step by step.
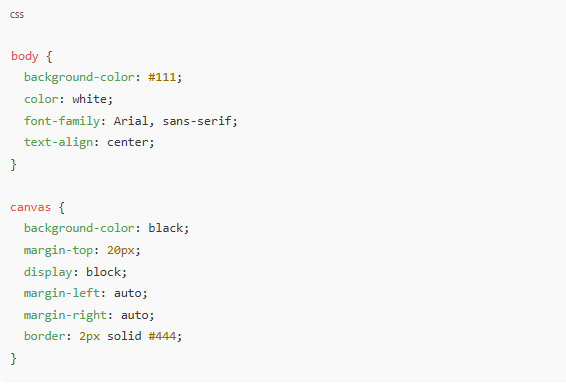
The body Style
body {
background-color: #111;
color: white;
font-family: Arial, sans-serif;
text-align: center;
}
- background-color: #111; This gives the entire page a dark gray (almost black) background. It helps the colorful audio bars stand out.
- color: white;
All text on the page (like the heading) will appear in white. - font-family: Arial, sans-serif;
Sets the text to use the Arial font first. If that’s not available, it falls back to a generic sans-serif font. This keeps the text looking clean and modern. - text-align: center;
This centers the heading and other text elements in the middle of the page.
The canvas Style
canvas {
background-color: black;
margin-top: 20px;
display: block;
margin-left: auto;
margin-right: auto;
border: 2px solid #444;
}
- background-color: black;
Sets the canvas (the area where the animation happens) to pure black, which gives your visualizer a sleek look. - margin-top: 20px;
Adds space between the canvas and the heading or file input. - display: block;
Ensures the canvas is treated like a block-level element so you can style it properly. - margin-left: auto;
margin-right: auto;
These two lines horizontally center the canvas on the page. - border: 2px solid #444;
Draws a thin, dark gray border around the canvas. This gives the visualizer a framed, polished appearance.
Step 7: Add the JavaScript (app.js)
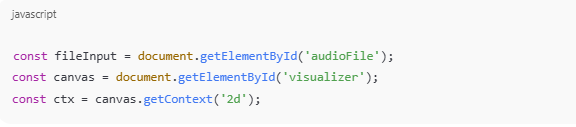
These lines grab elements from your HTML:
- fileInput is the file picker
- canvas is where the animation will appear
- ctx is the drawing context. It lets us draw on the canvas using 2D shapes
Step 8: Set the Canvas Size

This sets the canvas dimensions to 800 pixels wide and 300 pixels tall.
Step 9: Listen for File Upload

This line tells the browser: “When someone uploads an audio file, run the code inside this function.”
Step 10: Set Up Audio Context

This creates a new audio context. It’s a special environment where sound can be analyzed or modified.
Step 11: Load the File

This gets the file the user selected and sets up a reader to decode it.
Step 12: Decode the Audio File

When the file is loaded, this function decodes the audio data into a format the browser can understand.
Step 13: Create the Audio Source

This creates a new audio source and connects it to the decoded audio.
Step 14: Create the Analyser
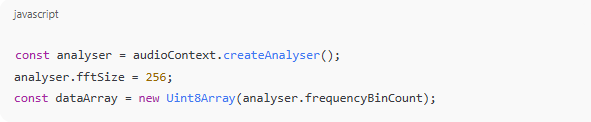
Here, the AnalyserNode is set up to read frequency data. fftSize controls how detailed the reading is. The dataArray will store those frequency values as numbers we can use to draw visuals.
Step 15: Connect the Nodes
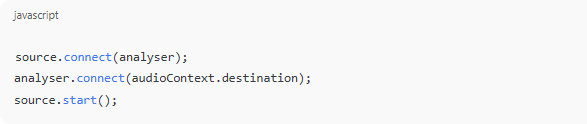
This connects everything in a chain:
- The source sends sound to the analyzer.
- The analyzer sends sound to the speakers.
- The source starts playing.
Step 16: The Animation Function

This function draws the bars and keeps calling itself, creating a loop that runs about 60 times per second.
Step 17: Get Frequency Data

This fills the dataArray with frequency values from 0 to 255.
Step 18: Clear the Canvas

These lines paint the canvas black before drawing new bars, so you don’t get visual clutter.
Step 19: Set Up Bar Dimensions

We calculate how wide each bar should be, then start drawing from the left (x = 0).
Step 20: Draw the Bars
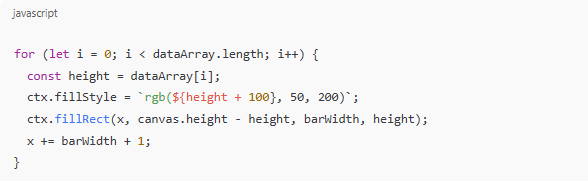
Each bar’s height is based on the frequency value. The color changes slightly depending on the height, creating a cool animated effect.
- ctx.fillRect() draws each rectangle.
- We move x forward each time to space the bars evenly.
Step 21: Start the Animation

This starts the animation function once the audio plays.
Step 22: Read the Audio Data

Finally, this line tells the reader to begin processing the uploaded audio file.
How to Use a Microphone for Live Audio Visualization
Here’s how to capture live sound instead of a file:
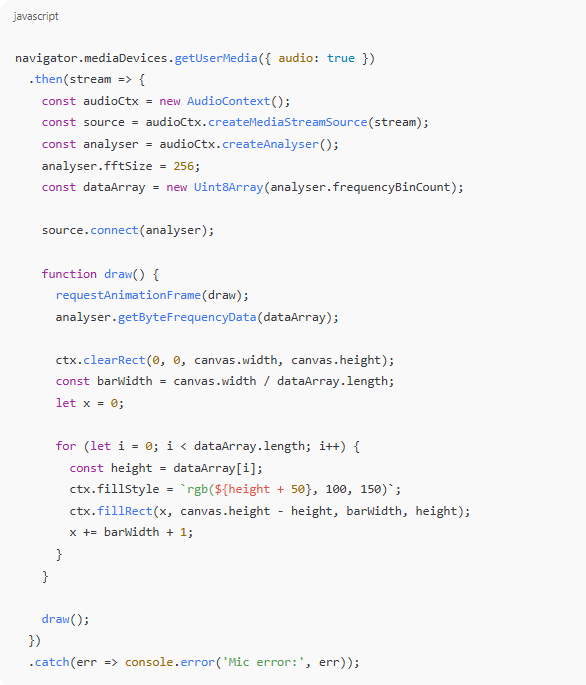
This is where the LARK M2 shines. It’s wireless, lightweight, and delivers clean, balanced audio. When you’re visualizing live sound, mic quality matters. The LARK M2 helps avoid dropouts and noise spikes.
File vs. Mic: Which Should You Use?
| Feature | File Upload | Live Mic |
| Best for | Music, pre-recorded files | Speech, real-time input |
| Setup | Very easy | Requires mic permission |
| Quality control | Always consistent | Depends on environment |
| Visual feel | Controlled | Dynamic and spontaneous |
Bonus: Try a Circular Audio Visualizer for a Unique Look
Want something different? Try this radial visual:
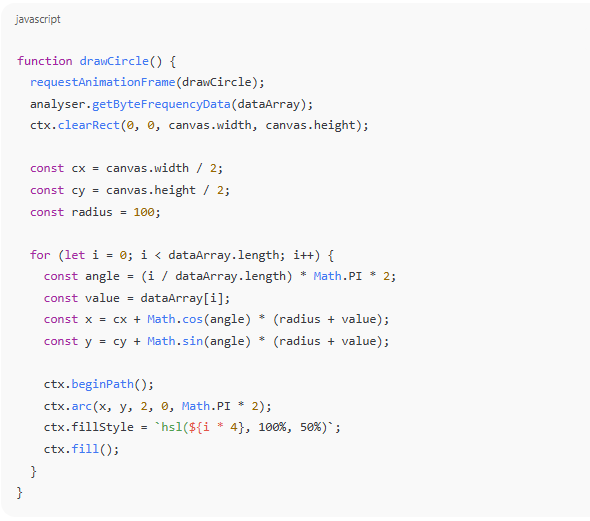
This creates a pulsing ring of dots, great for music or meditation tracks.
How to Style and Personalize Your Audio Visualizer
- Try gradients with ctx.createLinearGradient()
- Make canvas resize on window size
- Add pause/play buttons for user control
- Record the screen to turn it into a video
- Use ctx.globalAlpha for fading trails
From Code to Web: Publish Your Visualizer Easily
Want to share your work?
- Host it for free on GitHub Pages or Netlify
- Upload your HTML, CSS, and JS
- Link to your live page
- Bonus: Add audio and visual branding to make it personal
Conclusion
You’ve just built your own working audio visualizer! Whether you use files or a live mic like the Hollyland LARK M2, you now have a project that brings sound to life.
You learned how to:
- Use the Web Audio API to analyze sound
- Draw visuals on canvas
- Capture sound from a file or a microphone
- Create bar and circular animations
Now go experiment. Try new shapes, combine tools, or connect it to music apps. The creative possibilities are endless.
FAQs
1. Can I use this with music streaming apps?
Not directly. Due to browser security and copyright, you can’t access streams from apps like Spotify. Instead, use downloaded files or a mic input.
2. Will this work on mobile devices?
Mostly, yes. But some browsers limit audio playback and mic access. It’s best to test on a desktop first, then adjust for mobile.
3. How can I save this as a video?
Use screen recording software like OBS or Loom. You can then edit the visualizer into music videos, reels, or intros.

