


.png)
Creating low-quality audio is a creative way to add character, nostalgia, and texture to your creations. To achieve the best results, start by recording with a high-quality microphone like the Hollyland LARK MAX 2, ensuring a clear and detailed source.


Its 32-bit float recording technology captures every detail precisely, while the OWS Bluetooth monitoring gives you real-time control during recording. Once you have a crystal-clear recording, you can experiment with various techniques to intentionally degrade audio quality, transforming your sound into authentic vintage or lo-fi vibes that captivate and inspire.
How to Make Low Quality Audio?
1. Reduce the Bitrate
Bitrate refers to the amount of audio data processed each second, commonly measured in kilobits per second (kbps). High bitrates preserve detail while low bitrates discard audio information, resulting in muffled sounds, loss of clarity, and reduced file size.
To reduce the bitrate, you need specific software or an online tool. Here’s how to use an online tool for this purpose:
- Search for “Audio Bitrate Compressor.”
- Click on the tool you want to use.
- Choose the file from your storage.
- Adjust the bitrate and click “Compress.”
2. Compress the File
File compression discards the audio data and leads to compression artifacts. These include swirling backgrounds, metallic sounds, and missing frequencies. The audible flaws are a direct result of data being discarded during the encoding process.
To compress the file size:
- Visit a reputable online audio compression tool.
- Upload your audio file.
- Choose a compression level or set a target file size that is much lower than the original.
- Initiate compression and download the resulting file.
3. Change Format
Audio formats differ in how they store and compress sound. Some formats, like WAV and FLAC, preserve data meticulously, while others, such as MP3, OGG, and AAC, remove information, especially at low settings.
Converting high-quality audio to a compact format at minimal settings reliably produces low fidelity. To change file format:
- Open an audio converter tool.
- Import the original high-quality audio file.
- Select MP3 as the output format.
- Keep quality settings low, including minimal bitrate, mono channel, and low sample rate.
- Convert and save the file.
4. Lower the Sample Rate
Sample rate measures how often audio is sampled per second (measured in Hz). Lowering the sample rate limits frequency capture. As a result, high notes become muffled, and fine details are lost, resulting in a reduced audio quality.
Here’s how to do it:
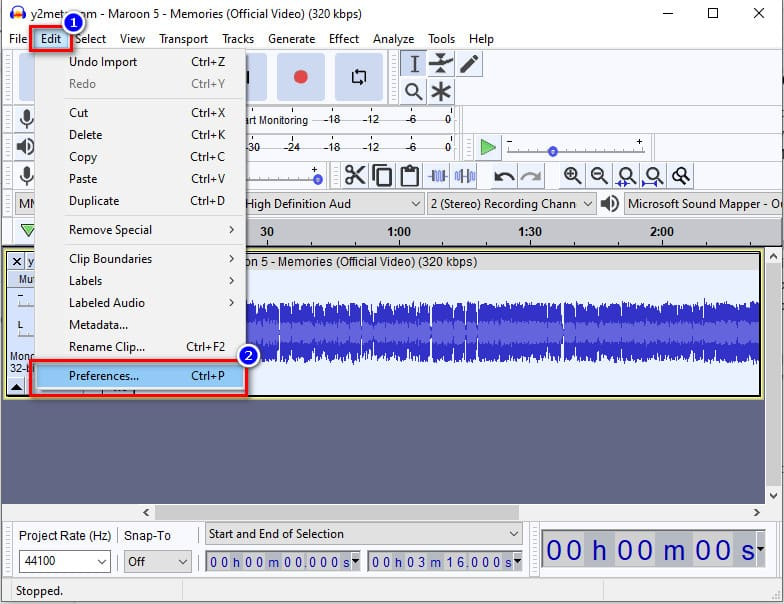
- Use audio editing software like Audacity or your DAW.
- Import your audio file.
- Open “Preferences.”
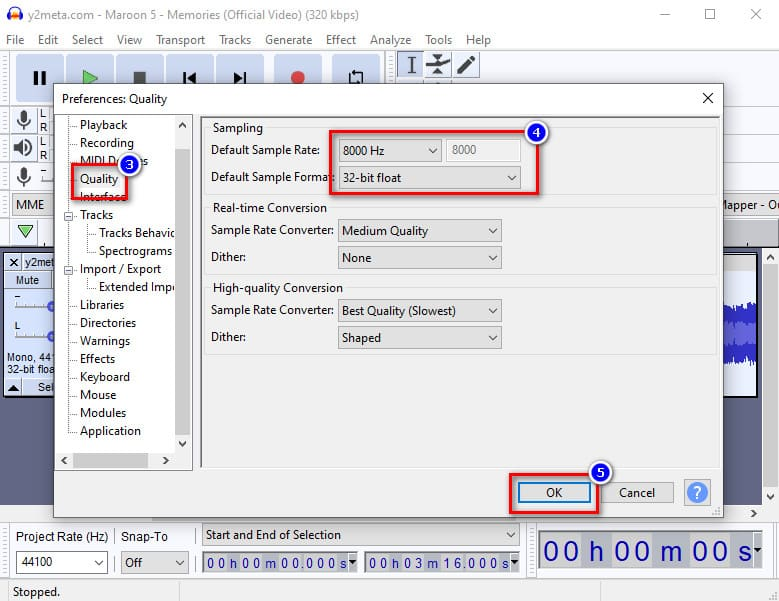
- Go to “Quality,” find the sample rate option, and set it as low as possible (common lo-fi values are 8kHz, 11kHz, or 22kHz).
- Export your file with the reduced sample rate.
- Listen for a pronounced loss of sharpness and high-frequency detail.
5. Use Audio Editing Software
Other than online tools, you can use audio editing software to reduce the sound quality. They work by allowing precise control over parameters like bitrate, sample rate, and bit depth. Additionally, editing software supports batch processing for consistent degradation and offers tools to convert audio to low-quality formats.
These features make it easy to degrade sound for creative or practical purposes deliberately. The most common tool is Audacity. Here’s how to use it:
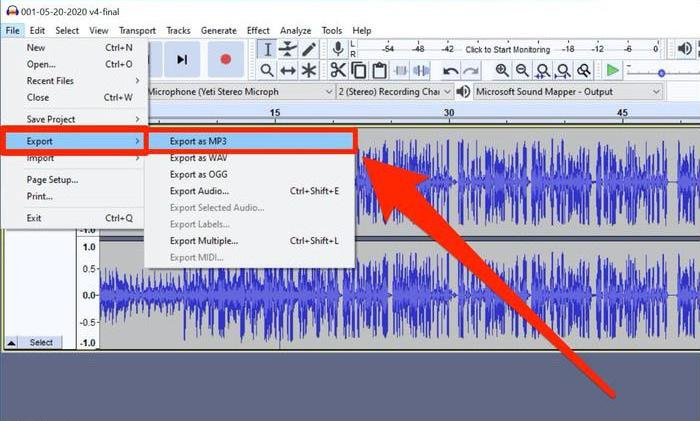
- Import the audio file you want to modify.
- Locate the “Export.”
- Select “Export as MP3.”
- Set the bitrate as low as possible, typically in the range of 8kbps to 64kbps.
- Also, lower the sample rate before finalizing the settings.
- Export or save the file.
- Play back the exported audio to confirm the presence of audible degradation.
6. Apply Effects Like Audio Distortion
Applying effects like audio distortion significantly reduces sound quality by introducing intentional imperfections that alter the original audio signal. Distortion effects create clipping, adding harsh harmonics and noise, while bitcrushing lowers the bit depth, causing digital artifacts and a grainy texture.
To add effects in audio:
- Load your audio file into a digital audio workstation (like Audacity) or an audio editor.
- Insert distortion or bitcrusher effect plugins onto the audio track.
- Adjust parameters such as drive, threshold, or bit depth reduction to increase distortion and digital noise.
- Continuously preview the audio to find the right balance between degradation and listenability.
- Once satisfied, export the processed audio with the applied effects.
7. Use Digital Audio Workstations
Digital Audio Workstations (DAWs) allow audio degradation by simulating vintage sampler workflows, allowing pitch-shifting, bit depth reduction, and low sample rate processing.
These tools offer advanced effects and workflow customization, creating authentic low-quality audio reminiscent of classic hardware samplers. Here’s how to use a DAW to reduce the audio quality:
- Import your audio into the DAW.
- Load a sampler instrument or plugin designed for lo-fi emulation.
- Pitch the sample up several semitones and record it at this higher pitch using pitch-shifting.
- Pitch the sample back down to the original or lower pitch to introduce digital artifacts.
- Experiment with settings to reduce bit depth, sample rate, and switch the audio to mono.
- Export the finalized version of the audio.
8. Add Analog-Style Noise
Adding analog-style noise introduces vintage imperfections such as vinyl crackle and tape hiss.
They contribute to the characteristic warmth and texture of low-quality sound. These noises replicate the natural disturbances caused by physical media, making digital audio feel more gritty.
To add analog-style noise using iZotope Vinyl:
- Download and install iZotope Vinyl from the official Izotope website.
- Launch your DAW (e.g., Ableton Live).
- Open your project and drag the audio file you want to degrade onto an audio track.
- Navigate to your list of audio effects/plugins and locate iZotope Vinyl.
- Drag and drop iZotope Vinyl onto the same audio track.
- In the iZotope Vinyl interface, adjust the following:
- Mechanical Noise: Increase this slider to introduce low-frequency rumble simulating record player mechanics.
- Wear: Adjust up to simulate an older, worn-out record for more pronounced distortion and frequency loss.
- Dust / Scratch: Raise these controls to add random pops and crackle typical of old vinyl.
- Electrical Noise: Introduce subtle background hum for an authentic analog feel.
- Warp Depth/Year: Increase warp for mild pitch fluctuations, and select an earlier “year” setting (e.g., 1930s) for the lowest fidelity.

- You can turn stereo/mono on or off as you prefer.
- Play back your audio and tweak the above settings for the desired amount of hiss, crackle, and sonic degradation.
- Once satisfied, export or render your audio track. The result will have a vintage vinyl character, significantly lowering perceived clarity and fidelity.
9. Hardware Sampler Emulation
Hardware sampler emulation involves using digital tools to replicate the unique sound and limitations of classic hardware samplers, such as the Akai MPC or E-mu SP-1200. These vintage devices had limited memory, lower bit depths (often 12-bit), and reduced sample rates, all of which contributed to their signature degraded, gritty, and lo-fi sound.
To create low-quality audio using hardware sampler emulation:
- Choose a hardware sampler emulation plugin or a built-in DAW sampler.
- Import your audio sample into the sampler.
- Pitch the sample up several semitones, then pitch it back down to create natural artifacts.
- Reduce the bit depth and sample rate to mimic vintage sampler limitations.
- Optionally, add saturation to enhance warmth and texture.
- Apply additional effects such as EQ, compression, or reverb as needed, while maintaining the lo-fi aesthetic.
- Export the resulting audio with the authentic low-quality sampler sound.
Conclusion
Creating low-quality audio opens new creative possibilities, from vintage warmth to experimental textures. With techniques like reducing bitrate, file size, and audio distortion, you can easily tailor sound quality to fit your artistic vision and unlock unique sonic character in your productions.
FAQ
1. Why do people make low-quality audio?
Low-quality audio can be used to emulate vintage sounds, reduce file size for faster transmission, or achieve a specific artistic effect. It is popular in genres like lo-fi hip-hop and for content shared on limited bandwidth platforms.
2. What is the quickest way to make an audio file sound low-quality?
Reducing the bitrate or compressing the file size in an audio editor or converter rapidly degrades audio without requiring time-consuming steps.
3. How does reducing the sample rate affect audio quality?
Lower sample rates capture fewer frequencies, resulting in muffled sound and loss of detail, especially in higher-pitched content.
4. Does converting to MP3 reduce audio quality?
Yes, MP3 uses lossy compression, discarding part of the original data. At lower settings, the audio becomes noticeably degraded with compression artifacts and reduced clarity.
