.png)
Even minor background sounds, such as hums, buzzes, or street noise, can compromise audio quality. This unwanted sound is noise. Whether you’re working on podcasts or music videos, reducing noise means clear, professional sound.
Usually, noise is measured in decibels (dB), which shows how loud the noise is compared to your primary signal. The noise-to-signal ratio (NSR) helps you understand how much background noise you have versus your actual content. So, the lower the NSR, the clearer your audio.
There are numerous ways to reduce noise. This article explores methods to minimize noise in your audio and effectively engage your audience.
4 Methods to Reduce Noise in Audio
1. Preventive Measures During Recording
- Choose a Quiet Location
Your recording space has the most significant impact on sound quality. Background noise from fans, air conditioners, computers, or traffic can detract from your audio experience. Poor room acoustics can add as much as 40 dB of unwanted noise.
Pick a quiet room. Use soft objects, such as carpets, curtains, or cushions, to absorb sound. Turn off devices that make any noise. Add foam panels or bass traps if you can. These steps make a big difference by reducing echo and distractions.
- Get Close to the Microphone
The closer you are to your microphone, the more precise your audio will be. This is called the proximity effect. Standing close makes your voice much louder than any background noise.
Being near the mic can lower noise pickup by up to 20 dB. Try to keep your mouth 6-12 inches (15-30 cm) from the microphone, although this distance may vary depending on your equipment.
- Use Quality Equipment
Good gear matters. High-end microphones with a cardioid pattern. They create cleaner recordings. Cheap mics may have noise floors around -85 dB. Top models go below -120 dB, which means way less hiss.

Use pop filters and windshields to block breath and pops. Some microphones also have built-in noise reduction chips or digital processing to filter hum or static. In short, better equipment leads to quieter, clearer audio.
- Monitor Gain Levels
Gain is the control that sets how much your microphone “amplifies” the incoming sound before it’s recorded. Setting gain correctly is crucial. When it’s too high, every tiny noise gets louder. When too low, your voice sounds quiet or gets distorted if boosted later.
For best results, keep audio peaks between 12dB and 6dB, and the average voice around -8 dB RMS on your meters. This balance keeps your audio clear and avoids issues like clipping or extra hiss. Always check your input levels as you record to stay in the safe zone.
2. Noise Reduction During Recording (Real-Time)
Onboard Noise Reduction
Many new microphones and audio interfaces, particularly those with USB and digital connections, feature real-time noise suppression. They use analog circuits or built-in digital processing (DSP). They serve to cut out electrical hum (50/60 Hz), hiss, and low rumbles before your audio even reaches the computer. This can lower the background noise for recordings to a much cleaner sound.
High-end microphones, such as the Hollyland LARK MAX 2, utilize 32-bit float recording technology. This captures sound with a much wider dynamic range and less distortion. It’s OWS Bluetooth and built-in AI noise cancellation monitoring provide precise, real-time audio feedback. Together, these features help ensure your recordings sound clean and professional.


Noise Suppression Software
Real-time software, such as Krisp, NVIDIA RTX Voice, or built-in plugins in meeting apps, uses smart algorithms to distinguish your voice from background noise. These tools can eliminate unwanted sounds without altering your voice. They’re beneficial during live calls or streams when you can’t fix the audio later.

Windows/Mac System Settings
Both Windows and Mac computers have options for noise cancellation. Here is how to do it:
Windows 10/11

- Right-click the speaker icon, select “Sounds.”
- Go to the “Recording” tab, select your microphone, and click “Properties.”
- Find the “Enhancements” tab.
- Check “Noise Suppression.”
- Click “Apply” and “OK.”
Mac (macOS Ventura and later)

- Open Apple menu → “System Settings” → “Sound.”
- Select the “Input” tab.
- Check “Use ambient noise reduction”.
- Test your microphone.
3. Post-Production Noise Reduction
Digital Audio Workstation (DAW) Tools
Audio software, such as Audacity, Adobe Audition, and Logic Pro, provides detailed control over noise removal. These DAWs allow you to fine-tune how much noise is removed. They help you keep vocals and instruments sounding natural. These tools include:
- Noise Profile Sampling (Spectral Subtraction)
With spectral subtraction, you pick a section that’s just noise, like a hum or background air. The software builds a “noise profile” from this and subtracts that pattern from the rest of your track. This works well for steady noises (like air conditioning), often lowering them by 15–30dB.
- Notch Filters
Notch filters target a small set of frequencies, such as a 50/60Hz hum from power lines or a sharp whistle. They cut out these problem spots without affecting other parts of your audio. You can remove hums with up to 25–30dB reduction using this focused approach.
- Noise Gates
A noise gate mutes or reduces sound when it falls below a set level. During breaks in conversation or music, the gate closes and blocks out room noise. This simple tool can drop your noise floor by as much as 20dB between the louder sounds.
- EQ (Equalization) Techniques
High-pass filters remove rumbling, such as the sound of air conditioners or footsteps, by cutting everything below 80–100 Hz. A low-pass filter eliminates hiss above 10–12 kHz. You can also use EQ to target and reduce narrow frequency bands where noise is intense. This cuts harsh tones by 5–15 dB. These filters help clean your audio while preserving the clarity and naturalness of essential sounds.

Specialty Noise Reduction Software & Plugins
- AI-Based Noise Removers
AI-driven plugins, such as iZotope RX, utilize deep learning to identify noise patterns and separate them from the desired signal. This preserves natural tone and details more effectively than traditional methods. These tools work well with changing noises, such as crowd sounds or shifting backgrounds. They can reduce noise by 30 dB or more, usually with very few unwanted effects on your audio.
- Restoration Suites
Comprehensive restoration packs bundle noise reduction, de-clipping, click removal, and spectral repair tools. These are standard in professional post-production to restore archival or compromised audio, often reducing noise while maintaining audio fidelity.
4. Advanced and Hardware-Based Noise Reduction
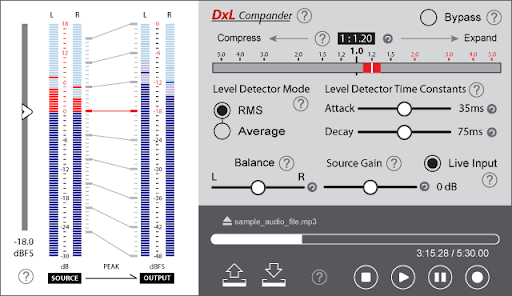
- Compander Systems
Compander systems are often used in analog recording and broadcasting. They compress quiet sounds when recording, then expand them during playback. This process makes background noise less noticeable. Companders can improve the signal-to-noise ratio by up to 20 dB. Well-known brands like Dolby and dbx use this technology, especially with tape and analog equipment.
- Physical Noise Barriers and Damping
Acoustic treatment greatly improves sound quality. Foam panels absorb mid- and high-frequency echoes, reducing reverb by 10–15 dB. Bass traps control low-frequency buildup. Rearranging furniture, adding rugs, or thick curtains also helps. Sound isolation booths or vocal shields block noise before it reaches the mic, ensuring cleaner recordings.
Conclusion
Reducing noise in audio is essential for precise and professional sound. By employing effective recording practices, utilizing real-time tools, and applying post-production techniques, you can significantly enhance audio quality. Focus on lowering background noise and maintaining a strong signal. With these methods, your recordings will always sound crisp, clean, and enjoyable to listen to.
FAQs
Why do I hear static in my audio recording?
You hear static in your audio because of electrical interference, poor cables or equipment, high mic gain, or a noisy environment. Loose connections and faulty interfaces can also cause it. Use high-quality cables, lower the gain, and record in a quiet space to minimize static.
Can I combine different noise reduction methods?
Absolutely! Often, the best results come from layering techniques. This includes good recording practices, real-time suppression, and post-production tools. All these work well in combination.
How do I avoid making the audio sound unnatural after noise reduction?
Use subtle settings. Target one type of noise at a time, and preview frequently during processing. Overprocessing can introduce artifacts and degrade audio clarity.
Can noise reduction eliminate all types of noise?
Complete noise elimination is not always possible, especially in very noisy environments. Most techniques significantly reduce distracting sounds. However, they may not remove every unwanted noise without affecting audio quality.
What are the potential side effects of using aggressive noise reduction?
Overusing noise reduction can introduce artifacts such as distortion, “bubbling,” a muffled sound, or digital echoes and “oozing” effects. It’s crucial to preview results and use moderate settings.