Rekordbox’s recording features are quite intuitive and let you capture every beat and transition with ease.
From recording your live DJ performance to pre-planning your sets complete with cue points and loops and syncing across devices through cloud connectivity; it can turn your computer into a powerful DJ setup when connected to DJ controllers or mixers.
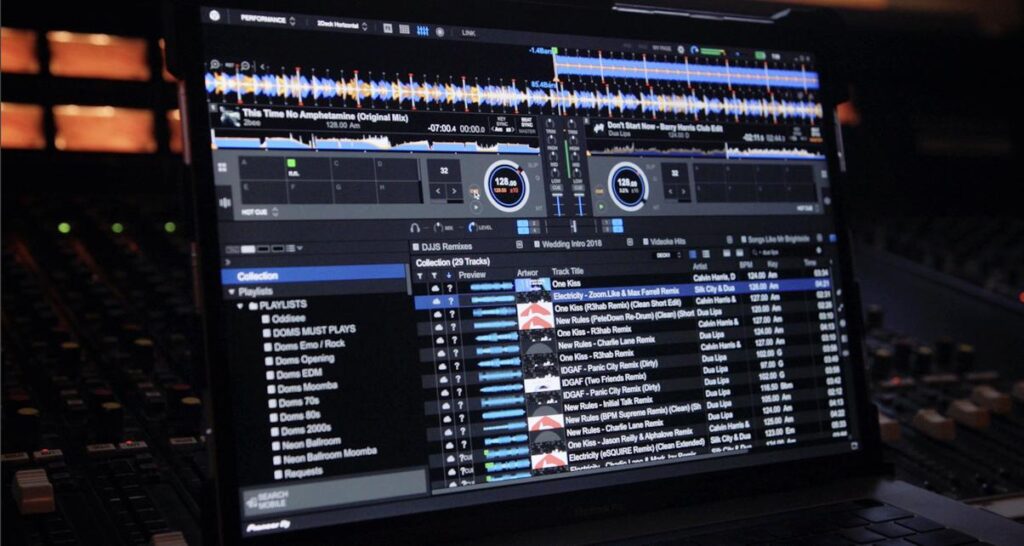
You just need to adjust a few settings before you’re ready to record with Rekordbox hassle-free. These settings are simpler to configure than you might think. You can easily record your mixes by following the steps mentioned in this post.
In this guide, we will cover how to set up your equipment, configure the initial settings of Rekordbox, and record high-quality DJ sessions with ease. Whatever be your purpose – personal analysis, sharing online, or creating demo tapes – mastering the process of recording with with Rekordbox opens up a world of possibilities for growth.
Let’s get started on how to capture your vibe with Rekordbox.
Key Takeaways
- Recording your DJ set is crucial to showcase your skills and prove your expertise.
- You can record your DJ set with your phone, with your own equipment, or with DJ software like Rekordbox.
- To record your DJ set in Rekordbox, adjust the recording settings in the preferences menu, load a track onto deck A, and click on the record button.
- After recording, you can manage and share your recorded mix. Edit your recording and even upload it to platforms like SoundCloud or Mixcloud.
- You cannot record vocals using any wired microphone or wireless microphone since Rekordbox is typically made for DJing. If you want to capture vocals to the Rekordbox through the master output, you will first need to connect your wireless microphone kit, such as Hollyland Lark 150, to an external recorder or audio interface.
Prerequisites for Recording on Rekordbox
Before you start recording your DJ set with Rekordbox, make sure you have the right hardware and software lined up.
You’re going to need a compatible DJ mixer or controller that can work with the software. Update the Rekordbox software to get the latest version installed on your computer.
Once you’ve got these basics in place, you’re all set to capture your mixes with precision.
Hardware requirements
To successfully record your DJ set in Rekordbox, you’ll need compatible Rekordbox-ready DJ equipment, such as a controller or mixer that interfaces seamlessly with the software. Going along with the DJ controllers like DDJ-RZ or DDJ-FLX6 by Pioneer DJ is your safe bet. But if you have any other hardware, check if your device is listed on the Rekordbox supported hardware page.
The files are by default created in WAV format and can be sizable. As these recordings are in high-quality formats, you’ll also need enough free disk space to save them. It is best to carry along an external hard drive for extra storage so that you won’t have to let go of any previous files in case of a storage crunch.
Also, check that you have all the necessary cables. Lastly, ensure that your audio interface is set up correctly to capture the sound from your mixer or controller. These small steps will get you professional-level output.
Software requirements
You’ll need the latest version of the software installed on your computer to access all recording features.
But before you hit that record button, make sure you’ve checked off a few other software prerequisites:
- Your operating system must meet Rekordbox’s requirements. Whether you’re using Windows or macOS, cross-check that your system is up to date.
- You’ll need sufficient hard drive space, not just for the software but also to accommodate the audio files you’ll create.
- Make sure your sound card and audio drivers are compatible and properly configured within the recording software to avoid any technical issues.
Here is what will get you sailing smoothly:
- Operating System:
- Windows: Windows 10, 8.1 (latest service pack, 64-bit version)
- macOS: macOS Catalina 10.15, macOS Mojave 10.14, macOS High Sierra 10.13 (latest version)
- CPU:
- Intel® processor Core™ i7, i5, i3
- AMD Ryzen™ processor is also a viable option
- Memory (RAM):
- 8 GB
- 8 GB
- Hard Drive:
- Free space of at least 2 GB for installation
- Additional space for music files (SSD preferred for faster access and reliability)
- Display Resolution:
- 1280 x 768 or higher
- 1280 x 768 or higher
- USB:
- USB 2.0 port (for connecting DJ controllers or external hard drives)
- USB 2.0 port (for connecting DJ controllers or external hard drives)
- Sound
- An onboard sound card or an external audio interface for better sound quality
- An onboard sound card or an external audio interface for better sound quality
- Other:
- Stable internet connection for software activation, account sign-in, and access to certain features like track analysis and updates
- Latest graphics drivers
Tick these boxes, and you’re all set to capture your mixes flawlessly!
Setting Up for Recording
You’ll need to set up recording parameters to preferred settings to get the best output.
Start by launching the software and head over to the ‘Preferences’ menu under the ‘rekordbox’ tab on the top.
Connect Your DJ Controller
Begin by connecting your DJ controller to your computer. This is usually done via USB. As discussed above, it is a must to ensure that Rekordbox recognizes your hardware and allows you to control your mix directly. In case your controller has a built-in soundcard, it should be selected as the audio output device.
From the categories listed at the top, select the ‘Audio’ section. Here, you need to ensure your audio interface is correctly configured.
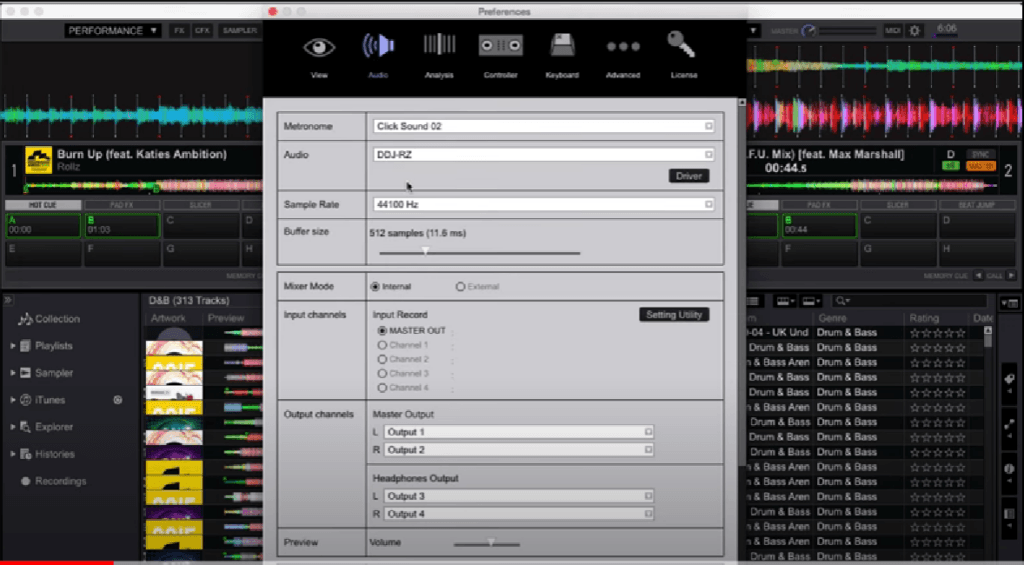
Next, move to the ‘Recordings’ tab under the same preferences menu. Decide where you want your recordings to be saved by setting the ‘Recordings’ folder. Again it is best to choose a location with ample space since DJ sets can be large files. Also, select your preferred file format; WAV for the best quality or AIFF for slightly compressed but still high-quality recordings.
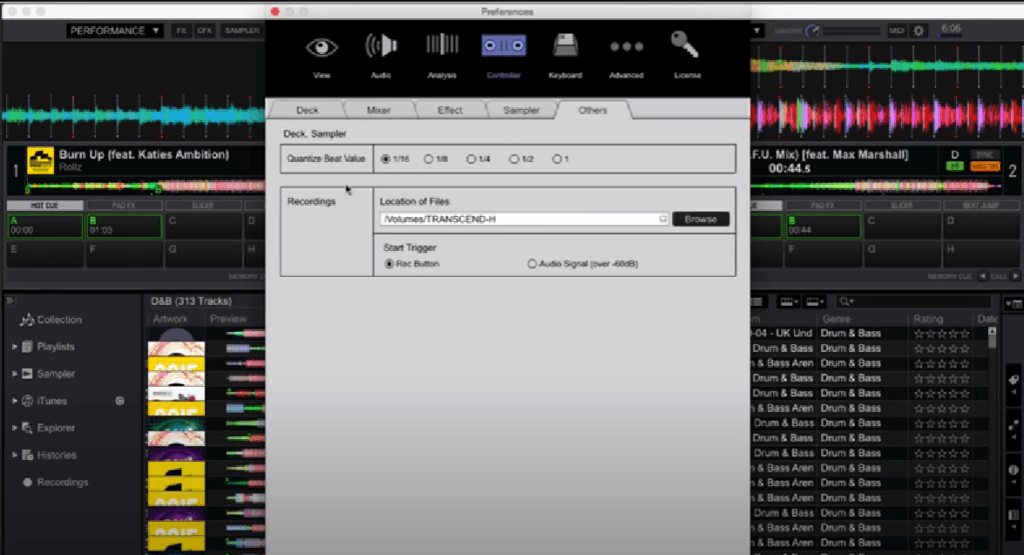
Adjust the recording level to prevent clipping; a good rule of thumb is to keep peaks in the yellow range, never hitting red.
Default Input Channels:
- Master Out
Default Output Channels:
- Output 1 & 2: Master
- Output 3 & 4: Headphones
You’re now ready to record your mix.
Load Tracks in Rekordbox
Just load your chosen tracks into the software. This is your canvas; organize and prepare your tracks in a way that complements your mixing style.
You can drag and drop music files directly into your Rekordbox interface or use the ‘File’ menu to import tracks or entire folders.
Now, Rekordbox will analyze the tracks once imported for gauging the BPM, setting beat grids, and identifying keys.
You may even organize your tracks into playlists. This can be based on genre, mood, event type, or any other criteria as per your DJing style.
The best part is that you can manually adjust beat grids as per the flow of your set.
Configure Hotkeys
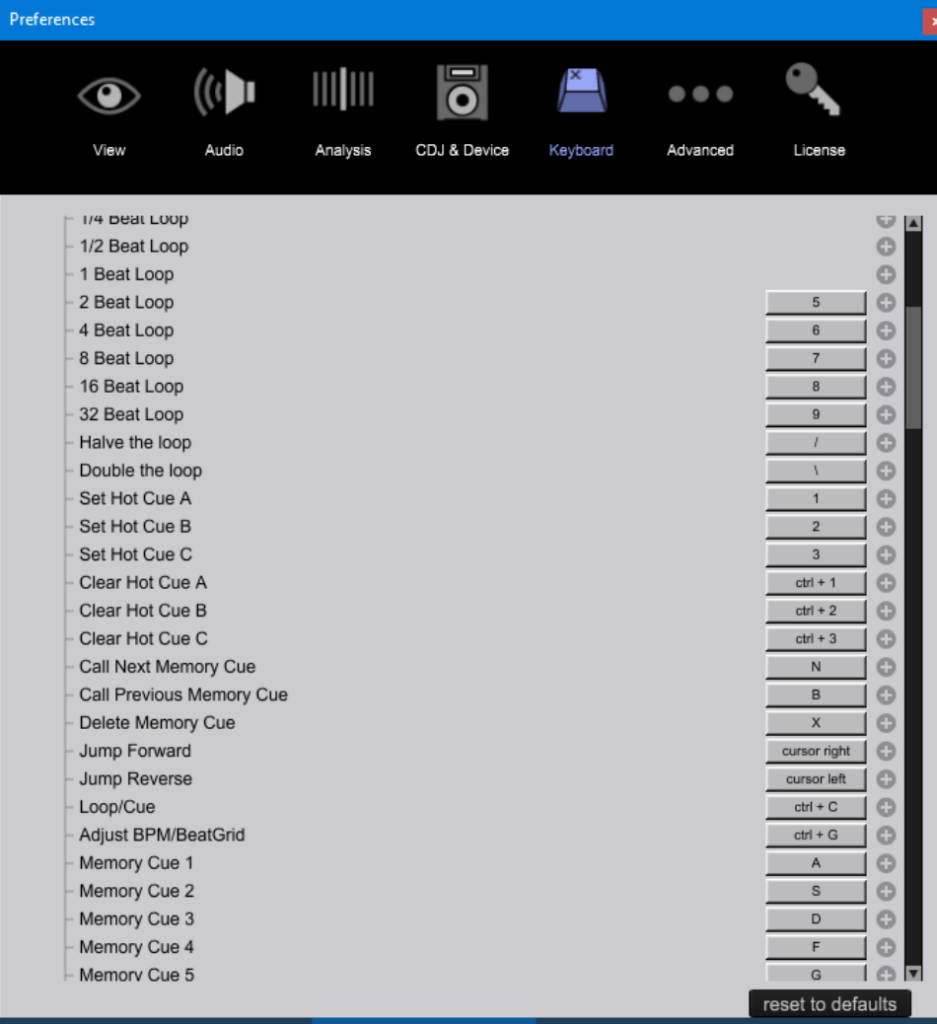
Configuring hotkeys is optional but highly beneficial. It allows you to quickly start or stop recording without the need of clicking through software menus during a live recording.
You can do so in the ‘preferences’ menu or using keyboard shortcuts (like Ctrl + P on Windows or Cmd + P on macOS).
When you’re all set, close the preferences window.
Recording Your Mix
Once done with setting up your recording preferences in Rekordbox, you’re ready to get to the actual steps of capturing your mix. Here’s what you need to do next:
- Start Your First Track
Load the track you want to start your mix with onto one of the decks in Rekordbox. This sets the tone for your entire mix. Choose something that represents the mood or theme you’re aiming for. Make sure it’s cued up to where you want to begin.
- Begin Recording
When you’re ready, press the red “REC” button.
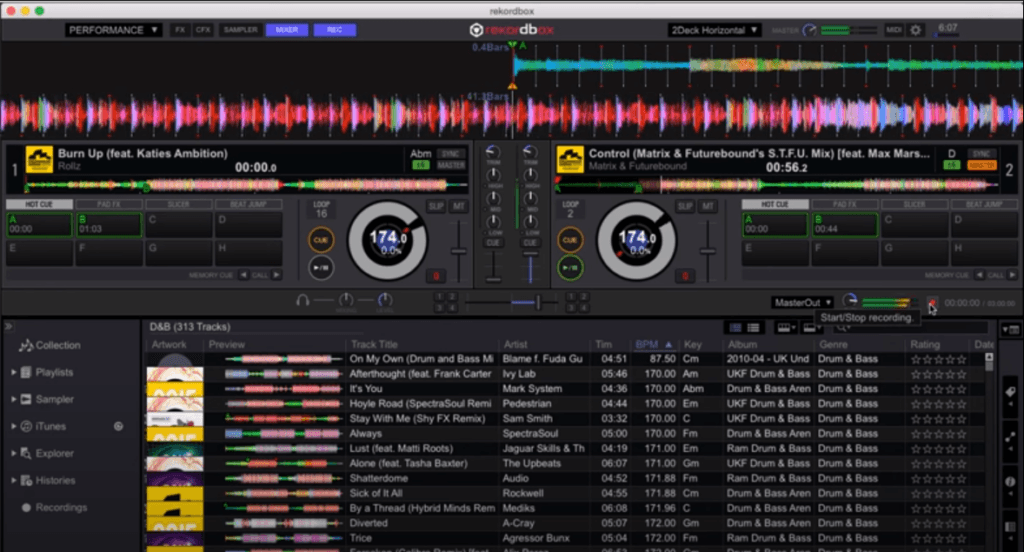
You’ll find this at the top of the screen, often in the center. As soon as you press this button, Rekordbox starts capturing everything that’s played through the master output.
- Perform Your Mix
This is where your skills shine. Blend, beat-match, manage EQs and transition between tracks as you would in any live setting. The point is to perform your mix as you usually would and apply effects to create a dynamic set.
- End the Recording
Once you’re done, press the ‘REC’ button again to stop recording. Rekordbox automatically saves the recording to the specified folder in your preferences. Remember to review your mix for quality and make any necessary edits before sharing it with the world.
Saving and Managing Recordings

The auto-save feature automatically saves your mix to the pre-selected folder on your computer – usually within the Pioneer DJ folder in your music library. This means you don’t have to worry about losing your creative work.
You can manage your recordings in this folder. All the mixes are saved with the date and time as the default file name. It’s a good idea to rename your files to something more recognizable. Right-click the file, select ‘Rename’, and type in a name that reflects the content or vibe of your mix like “Nightclub Mix” or “Romantic Pool Party”.
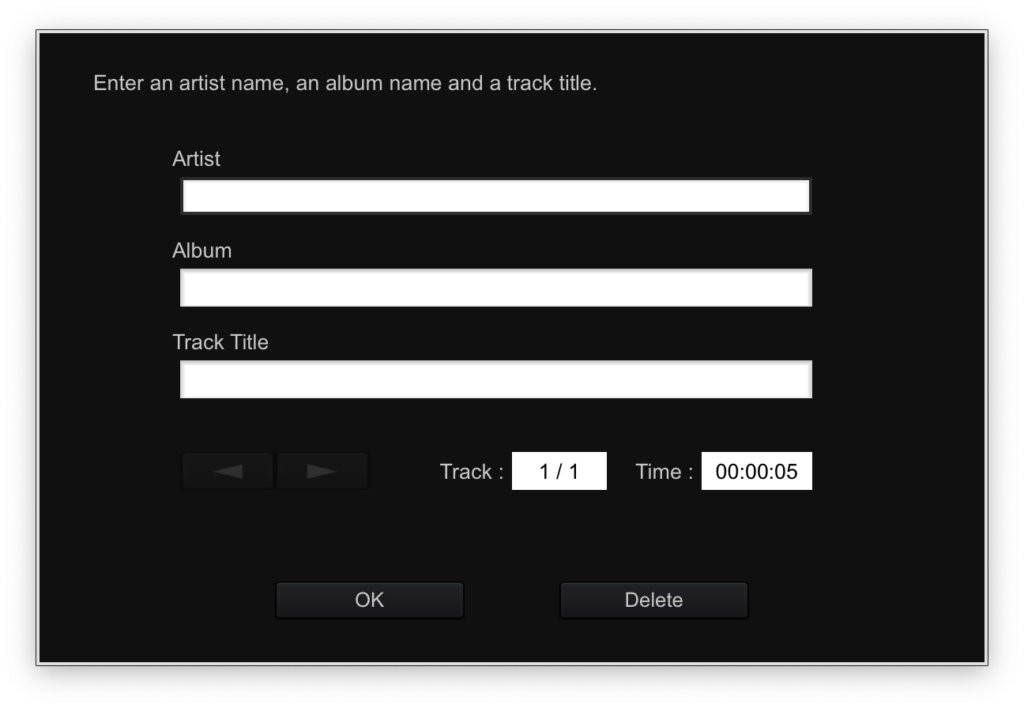
You can do more than just rename here. If required, edit your recording for better quality or trim unwanted sections. Rekordbox offers basic built-in editing features. You can also import your files into external software for more advanced editing.
Finally, export your recording in the format that suits your sharing or storing needs. If you’re looking to share your work, MP3 is ideal for online sharing due to its smaller size. This compresses the file size while maintaining quality, making it easier to upload to platforms like SoundCloud or Mixcloud. WAV is better for archival purposes due to its lossless quality.
Advanced Recording Techniques
The basic recording settings will familiarize you with the software. Rekordbox comes with many advanced features for more sophisticated and polished recordings. These techniques can help you capture your sets in unique ways, offering greater flexibility and creativity.
Let’s step up your game with Rekordbox’s advanced features.
Auto-record feature for seamless recording sessions
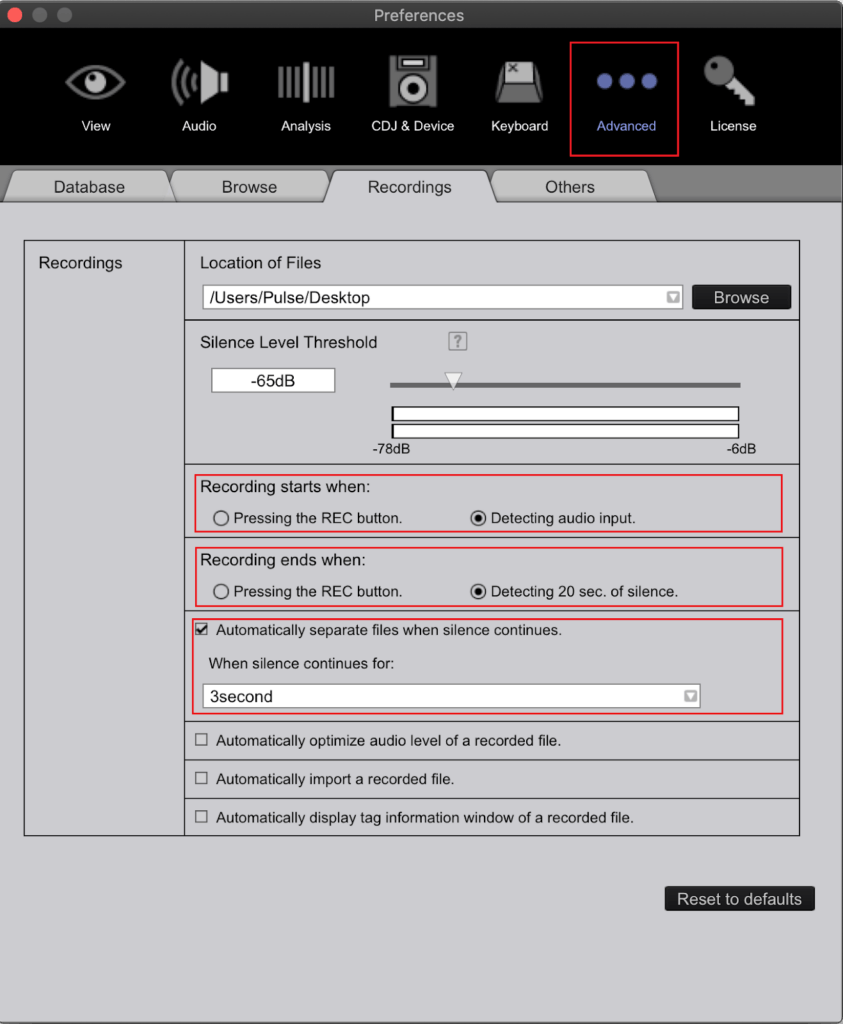
Rekordbox’s auto-record feature streamlines your recording process by automatically capturing your DJ sets without manual intervention. Once you’ve got the hang of mixing and you’re ready to preserve your performances, this feature is a game-changer. This automatically starts recording when you begin your set, ensuring you don’t miss capturing any part of your performance. It allows you to focus on your creativity and flow, knowing that your set is being recorded in the background.
Here’s how you can enhance your recording experience:
- Set it and forget it: Activate the auto-record function and let Rekordbox do the rest.
- Seamless integration: The feature works flawlessly within the software, ensuring high-quality recordings.
- Automatic track separation: Rekordbox can detect pauses between tracks and create separate files for each.
Embrace this advanced technique, and you’ll never miss recording a spontaneous mix again.
Recording specific sections of your mix
To capture just the highlights of your set, you’ll need to master Rekordbox’s advanced recording techniques, allowing you to record specific sections rather than the entire mix.
Start by setting cue points at the beginning and end of the segments you want to highlight.
When you’re ready to showcase a part of your performance, hit the record button as you reach the first cue point.
As you approach the end cue point, prepare to stop the recording. This precision ensures you’re only capturing the cream of your mix.
Afterward, label your recordings clearly so you can find and playback the best parts with ease.
Using external audio sources for recording
Incorporating external audio sources into your Rekordbox recordings can elevate your DJ sets by adding unique samples or live elements. You’ll need to connect these sources to your DJ mixer or controller, which are recognized by Rekordbox. Here’s how to make the most out of external inputs:
- Connect your external source to an available channel on your DJ mixer.
- Adjust the input settings in Rekordbox to ensure the software is receiving the audio signal.
- Use the recording function within Rekordbox to capture the mix, including the external audio.
Troubleshooting Common Recording Issues
When you encounter issues while recording on Rekordbox, it’s often due to a few common problems that you can quickly resolve.
- Audio Latency Issues: Audio latency can disrupt the synchronicity between your actions and the recording. If the recording has a high latency, consider reducing the buffer size, but be careful, as this could also cause potential dropouts.
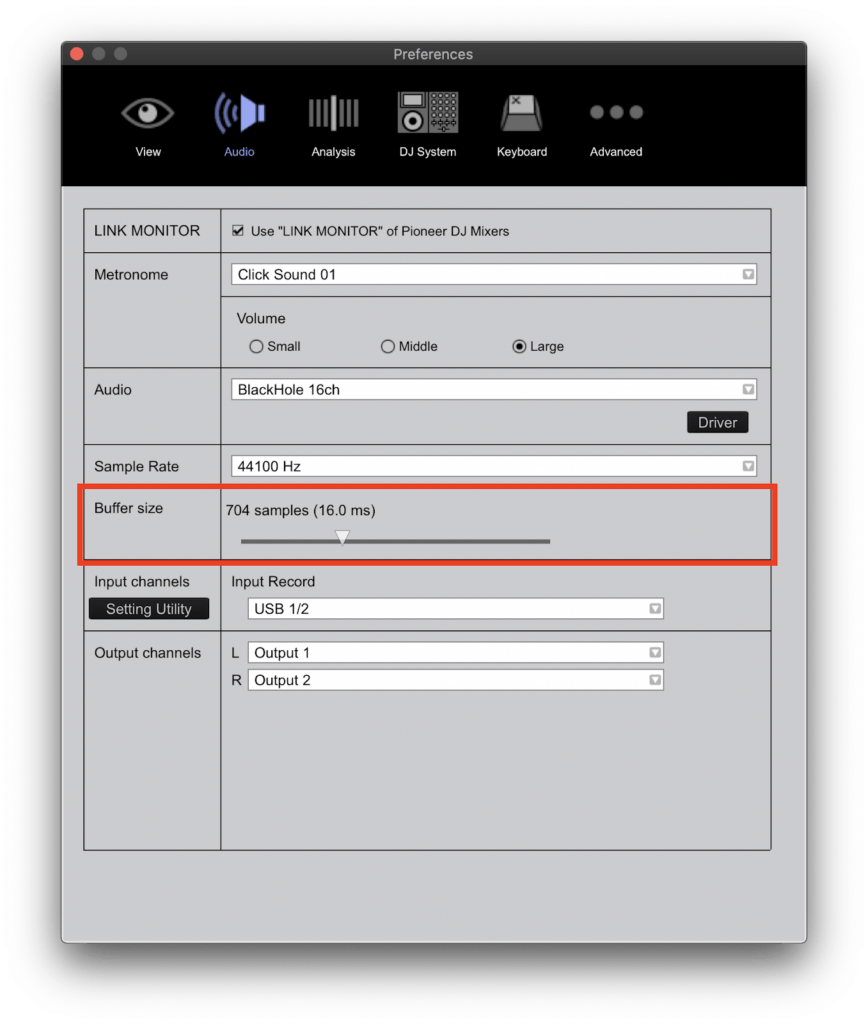
- Recording Quality Problems: Sometimes, recordings can suffer from poor sound quality. This could be due to low buffer sizes leading to audio dropouts or glitches. Increase the buffer size.
- No Audio Output: If the recording stops unexpectedly, you might be running out of storage space. Clear some space on your hard drive and try again. Also, make sure Rekordbox is up to date, as outdated software can lead to various glitches. If you’re not hearing any sound during playback, verify that your master output is routed correctly and your speakers are functioning.
- No Audio Recording: If Rekordbox isn’t recording at all, double-check that the record button is engaged and the correct deck is selected for recording. If all else fails, rebooting Rekordbox or your computer can often fix unexplained issues. Remember, consistent updates and backups of your settings can prevent many problems before they start.
Conclusion
Now you’re all set to capture your mixes like a pro in Rekordbox. The basics are easy: set the stage with the right settings, hit record, and let your creativity flow.
Once you’ve nailed your set, save and organize it for easy access. Experiment with advanced techniques to stand out.
Keep practicing, refining, and recording to get the right hang of recordings with Rekordbox. Ready to show the world what you’ve got? Hit play and start recording!
Frequently Asked Questions
Can I Record my voice alongside my DJ set within Rekordbox?
Yes, you can record your voice or any external audio sources for that matter, with your DJ set. Just connect a microphone or external input and adjust the software’s recording settings accordingly.
How can I ensure my recorded DJ set is legally compliant?
You’ll need to secure permissions for tracks you use to ensure your DJ set complies with copyright laws. Consider using royalty-free music or acquiring licenses for the tracks you’re mixing.
Is it possible to record a back-to-back DJ set with another DJ in Rekordbox?
The software allows for collaboration among the artists to record a B2B DJ set. Startb by connecting both controllers, mix them together, and hit the record button to capture your collaborative performance.
How can I optimize the sound quality in environments with poor acoustics?
To optimize sound quality in poor acoustics, you’ll want to use external mics and adjust their placement. Minimizing background noise and tweaking equalizer settings can also greatly improve your recordings.
Can Rekordbox automatically add track IDs and timestamps to my recorded sets?
When you record a mix in Rekordbox, the software keeps track of the songs played and their respective timestamps. This metadata can be automatically integrated into your recordings by enabling the track information options in the software’s recording settings.
What are some creative ways to utilize recorded mixes?
You can share your recorded mix on social media platforms to showcase your DJ skills and build a following. They’re great for creating a portfolio to present to clubs or event organizers. Another creative use is to extract segments of your mixes for promotional material, like teasers or sample tracks. You may submit your recorded mixes to online DJ contests or use them for radio show submissions. This will get you more recognition.
How can I optimize my computer for smooth recording in Rekordbox?
Free computer resources by closing unnecessary programs. Next, always keep your Rekordbox software up to date. Consider using an external hard drive for storing your music library. An SSD provides faster data processing. If SSD is not an option, upgrade your computer’s RAM.
What are the best practices for sharing your recorded mixes online?
First and foremost, make sure you have the rights to the music you’re using. Platforms like SoundCloud, Mixcloud, or YouTube provide a wider reach in the music industry. Engage with your audience by responding to comments and feedback. This will get you more visibility.


.png)
.png) Français
Français .png) Deutsch
Deutsch .png) Italiano
Italiano .png) 日本語
日本語 .png) Português
Português  Español


