.png)
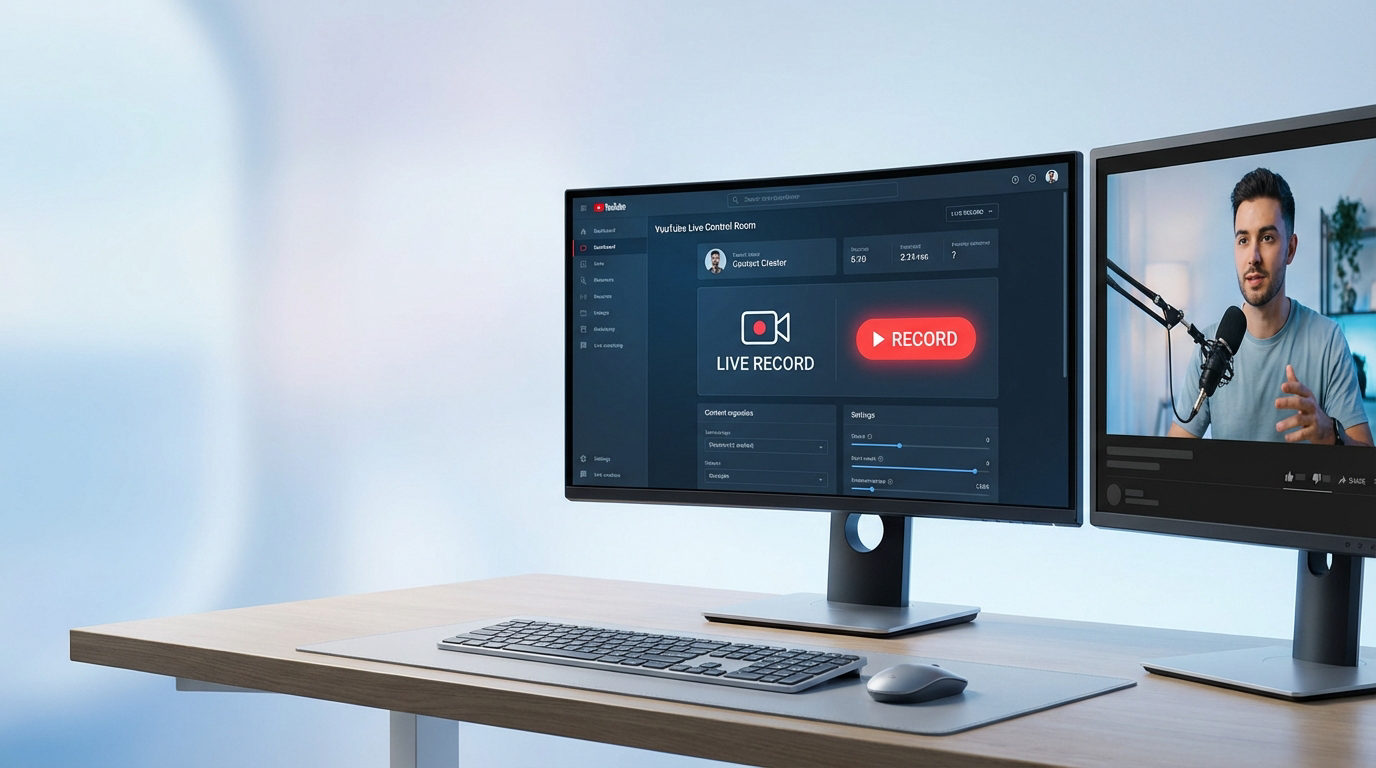
FL Studio has revolutionized the way of recording audio and vocals. Its simple yet powerful interface has made it a go-to choice for music producers and audio engineers. Whether it’s your first note or your final cut, recording in FL Studio is an intuitive process that puts your creativity front and center.
FL Studio allows you to load instruments and samples, and record external sounds using a microphone. The mixer in FL Studio can be used to add effects and playback the mix. All your projects can be saved in various audio formats. The main windows in FL Studio are Channel Rack, Piano Roll, Mixer, and Playlist, and they are movable, resizable, and switchable.
In this guide, we will explore the simplicity of recording in this versatile software.
Let’s begin.
Key Takeaways
Audio Interface Settings
- Open FL Studio and go to the settings window (F10)
- Select the ASIO driver for your audio interface
- Adjust the buffer size for optimal recording (around 256 samples)
- Keep buffer size low while recording to avoid delay in headphones
- Increase buffer size for mixing with lots of plugins
Mixer Track Setup
- Find a blank mixer track (insert track)
- Select the input (e.g., Input 1) and use the mono channel
- Set the gain for the vocal mic to -16 to -12 level
- Use a fruity balance plugin if more gain is needed
- Choose the location to save the recorded audio file
Main Window Settings
- Right-click on the record button and enable recording audio
- Enable the record starts on playback option
- Turn on the countdown timer for extra preparation time
- Choose whether to use the metronome based on the stage of the song
- Select song mode for the playlist focus
Recording Process
- Use headphones to prevent sound bleeding into the microphone
- Adjust the volume to hear the music without distractions
- Consider hearing yourself sing for practice
- Click the record button or press R to start recording
- Press the space bar to stop recording and view the audio file in the playlist
Setting Up and Configuration
Before you hit that record button in FL Studio, you’ll need to configure your audio settings so that everything runs smoothly.
Begin by opening a new, empty project in FL Studio. This gives you a clean slate for your recording session, be it vocals or instruments.
Also, setting up recording filters will help you control which inputs are recorded. It also keeps unwanted noise out of your tracks.
Audio Settings
To ensure a smooth recording session in FL Studio, you’ll frequently need to adjust your audio settings to match your hardware setup. Here’s how to get your audio settings fine-tuned for that perfect take:
- Choose the right ASIO driver for low latency and high fidelity sound.
- Arm your desired Mixer track for recording to keep everything organized.
- Set your input source correctly to capture the nuances of your performance.
- Adjust buffer settings to minimize latency, ensuring immediate feedback as you record.
- Don’t record on the Master Mixer track. Rather choose an unused Mixer Track for recording.
- Set the Monitor external input setting to ‘Off’ to eliminate latency echo and use direct monitoring if supported by your audio device.
Remember, these tweaks make a world of difference in capturing the emotion and clarity in your music.
Take a moment to get these settings right, and you’ll avoid the frustration of technical hiccups during your creative process.
Optimum audio settings at a glance:
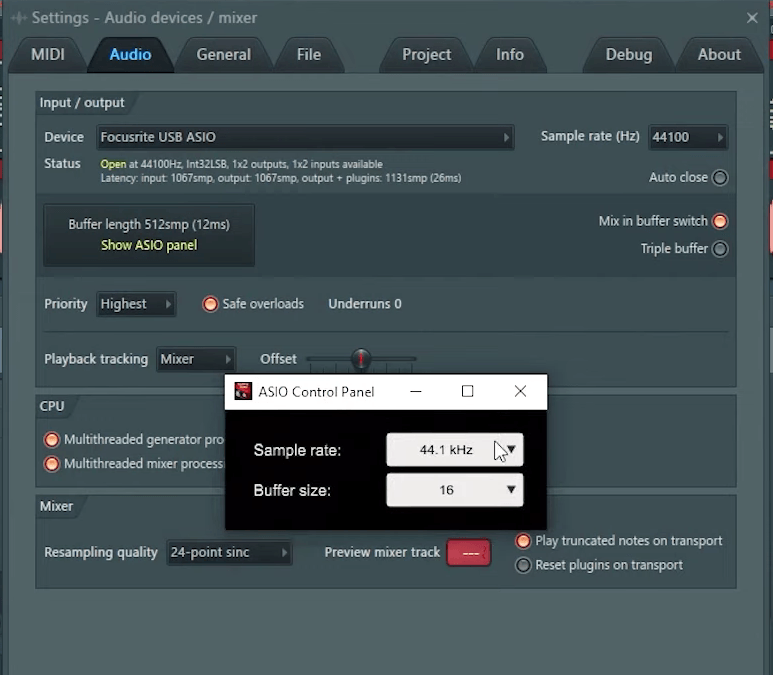
- Navigate to Options > Audio Settings
- Input/Output Device: Focusrite USB ASIO. Choose the appropriate audio interface as per options.
- Sample Rate: 44,100 Hertz
- Buffer Length: 512 samples or 12 milliseconds
- Bit depth: 24-bit
- Metronome Track: Select a dedicated metronome track in your mixer
- Volume Control: Adjust the volume and pan settings of the metronome track
Creating an Audio Track
Once you’ve fine-tuned your audio settings, next step is to create an audio track for recording.

Step I: Click on the Channel Rack button and hit the plus sign to select ‘Audio Clip’.
Step II: Then click on the newly created Audio Clip and choose the folder icon to import your audio file.
Step III: Drag the clip onto your desired track in the Playlist, aligning it precisely to where you want it to start playing.
Step IV: Adjust volume and panning to blend it seamlessly with your other tracks.
Step V: Remember to save your project regularly to avoid losing any imported audio files.
Recording Filters
While setting up FL Studio for recording, you’ll need to configure your filters to ensure that unwanted frequencies are eliminated from your input signals. It can be done within an entire mix, on individual instruments or synths, and on vocals. Here’s how you can set the right filter settings to get the most out of your recordings:
- Identify the Problem Areas: Listen carefully to your input source. Is there a hiss? Rumble? Identify frequencies that need cutting.
- Choose Your Filter Type: Select a low-pass or high-pass filter with the stock plugin called Destructor to tackle the specific frequencies causing issues.
- Set the Cutoff: Adjust the cutoff knob to isolate and remove the unwanted frequencies without affecting the desired sound.
- Fine-Tune with Resonance: Use the resonance knob to sharpen the filter effect, adding clarity and focus to your recording.
Note: Keep in mind that different instruments and sounds may respond differently to filtering techniques.
Recording Audio
Now that you’ve set up the prerequisites, it’s time to start recording audio in FL Studio.
You’ll need to create a record track and monitor your input to make sure you get the professional-sounding vocals.
Let’s break down the recording process – including how to use auto-tune and loop recording to perfect your takes.
Arm the Track for Recording
Before you start recording audio in FL Studio, give the mixer track a descriptive name like ‘Vocal Record’ or ‘Guitar’ and also choose a color. You can do this by right-clicking on the track name at the bottom of the mixer track and choosing ‘Rename/color’. This helps in easily identifying the track, especially in larger projects.
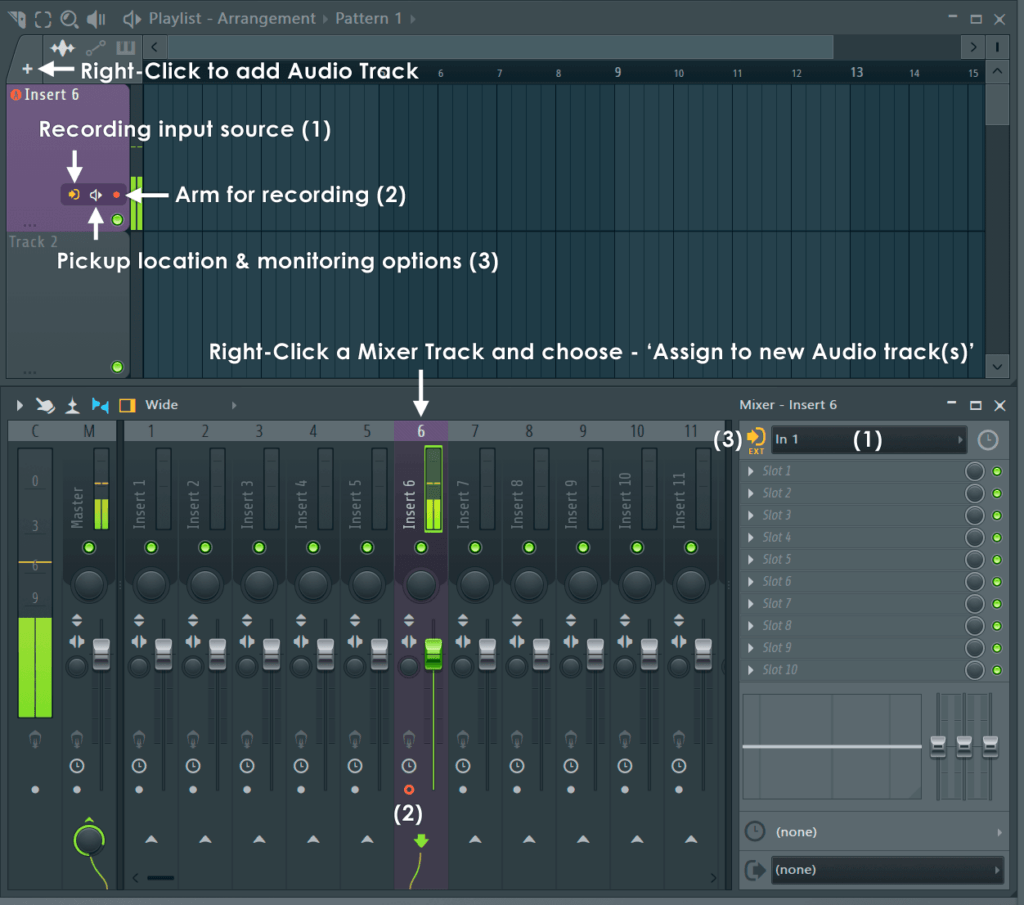
Next, click on the small circle icon (record button) at the bottom of the mixer track. It will light up, indicating the track is armed and ready for recording. Here’s what you need to fine-tune at this point:
- Check Levels: Speak or play into your microphone/instrument and watch the mixer track’s meter. Adjust the input gain on your audio interface if necessary to avoid clipping.
- Latency Settings: Go to ‘Options’ > ‘Audio Settings’. Under the ‘Device’ section, adjust the buffer length to manage latency. Lower buffer sizes reduce latency but require more CPU power.
Monitoring the Input
If you want to hear yourself while recording, activate the monitor icon on the mixer track. Keep an eye on the Mixer’s meter to ensure the signal isn’t peaking. If the levels hit the red, your audio may distort, and that’s something you want to avoid. Aim for the signal to peak at around -6 dB, giving you enough headroom for mixing later on.
You can adjust the input level either from your audio interface or within FL Studio itself using the channel gain knob.
It’s crucial to listen through headphones as you record, allowing you to catch any issues in real time without any latency or echo.
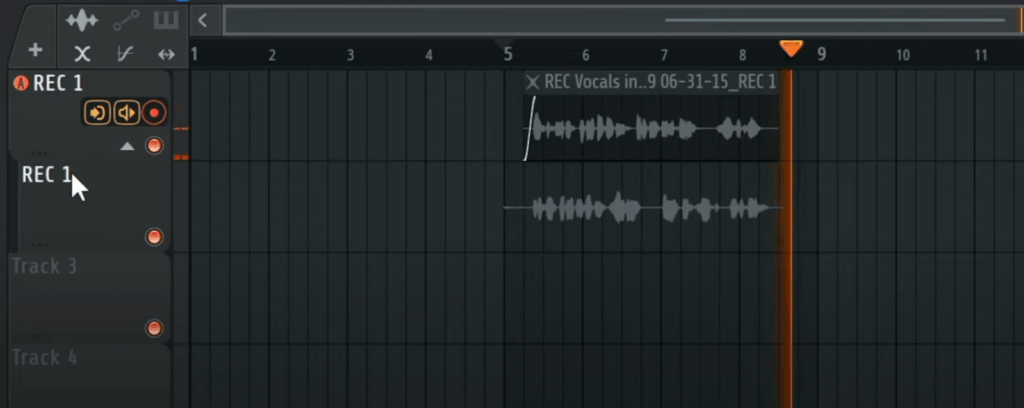
Recording Process
Once everything is set up, press the play button to start recording your vocals. In the Playlist window, choose the recording mode (audio, automation, or pattern) by clicking on the recording button.
For parts where you need to correct a specific section, use the punch-in recording technique. Set the playback marker before the part you want to re-record and enable recording. FL Studio will seamlessly replace that section in your take.
It’s often helpful to record multiple takes to capture the best performance.
Here’s how to get that perfect composing and sequencing in FL Studio:
- Musical notes and chords can be played live or entered manually in the Piano roll.
- The Snap to Scale feature helps create melodies and chords that sound better.
- Step Sequencers and Piano rolls are interchangeable for each Channel.
- Patterns can be edited in Pattern Mode to play the currently selected pattern.
- Step-sequencer steps can be activated or deactivated for percussion programming.
Loop Recording
If you’re experimenting with different vocal styles or melodies, use the loop recording feature. It helps to layer multiple takes seamlessly. Begin by enabling loop recording and set a loop around the section you’re working on. Record multiple takes back-to-back.
Place an empty pattern in the playlist, extending it to the desired length—can be anything from four to ten bars for looping in song mode. As you record, your new notes will add to the existing pattern without replacing them, perfect for building complexity.
For precise timing, right-click the record button to access input quantize features. Notes will align with the grid based on your main snap setting, ensuring a tight groove.
Whether you’re using a keyboard, pad controller, or an unsupported MIDI device, FL Studio’s flexible setup lets you loop record with ease.
Editing and Processing the Recorded File
Once you’ve recorded your audio in FL Studio, it’s time to polish it up.
This is where you refine your recording to improve its quality and make sure it fits perfectly within your mix. From adjusting timing and pitch and background noise reduction to enhancing the audio; editing and processing really let you deliver a piece that will resonate with your listeners.
Here is all you can do post-recording to get that professional level.
Trimming and Splitting Audio
Trimming and splitting audio is a straightforward process in FL Studio. This step is important so that your audio starts and ends precisely where you intend it to. This way, you can cut out unnecessary sections at the beginning or end of the recording, such as silence or unwanted noises. Here’s how to clip your recordings:
- Select your clip: Click on the audio clip in the Playlist to highlight it. Closely examine the waveform of your recorded audio. Look for any unwanted sections in the recording.
- Split the clip: Place the playback marker at the desired point. Use the slicer tool or the shortcut key (usually C) to divide the clip at a specific point.
- Rearrange sections: Move the parts of the recording to craft the perfect sequence, or apply different processing to separate sections.
Applying Effects
Once you’ve completed the basic editing, such as trimming and splitting, you can start experimenting with various effects to achieve the desired sound. It can dramatically transform the sound and feel of your track.

You can add various effects right in the Mixer window. Simply drag an effect from the Browser onto the track or use the Plugin Picker.
Check out this table of commonly used effects and their typical uses:
| Effect Type | Purpose | Example | Settings |
| Reverb | Adds space and depth | Fruity Reeverb 2 | Effects like chorus, flanger, or distortion for creative sound design |
| Compression | Balances dynamics | Fruity Compressor | Adjust the threshold, ratio, attack, and release settings |
| EQ | Adjusts frequency balance | Parametric EQ 2 | Boost to 3kHz to 5kHz increases clarity, while cutting around 200Hz to 300Hz reduces muddiness |
| Delay | Creates echoes | Fruity Delay 3 | Use the quantize function to align it with the beat. |
| De-essing | Tame harsh ‘s’ and ‘p’ sounds | Fruity Fast Dist | A bit of saturation can add warmth and help the vocals stand out in the mix |
Experiment with different settings to find the perfect blend for your track and shape the song’s vibe.
Exporting Audio
Exporting the audio is the final step in your production process. Export your project into desired file format that can be easily processed for sharing, playback or distribution on any compatible device or platform.
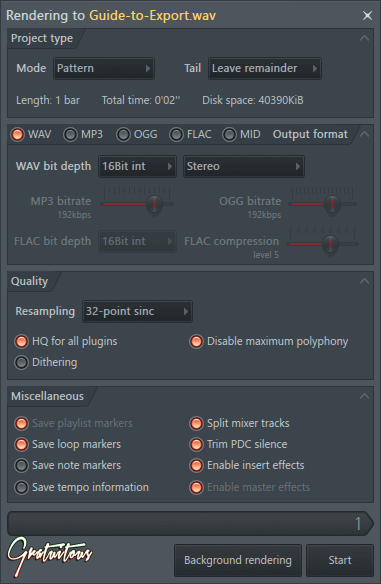
Popular Export Formats:
- WAV for lossless, high-quality audio, ideal for mastering or further processing.
- MP3 for a compressed format, suitable for online sharing or streaming.
Optimum Export Settings:
- Bit Depth: Choose 16-bit for CD quality or 24-bit for higher resolution.
- Sample Rate: Typically set at 44.1 kHz for CD quality or higher for more detail.
- MP3 Bitrate: For MP3s, a higher bitrate (e.g., 320 kbps) results in better quality.
- Leave Headroom: Aim for a peak level around -6 dB to -3 dB to prevent clipping.
Note: Save your FL Studio project file (.flp) along with the exported audio as a backup or for future alterations.
After fine-tuning your track’s effects in FL Studio’s Mixer, it’s time to export your creation into a polished audio file. This is the moment you’ve worked so hard for, to turn your project into a tangible piece of art that the world can experience.
Here’s how to turn your project into a tangible piece of music:
- Choose ‘File’ then ‘Export’, and pick your desired format.
- Decide on the mode—either ‘Song’ for the complete track or ‘Pattern’ for a specific section.
- Set your bit depth and sample rate—higher for studio-grade sound.
- Click ‘Start’ to begin rendering.
- Choose a location to save your file and give it a descriptive name.
What’s New in FL Studio 21?
FL Studio has introduced several new features and updates with its version 21. These include colored waveforms, stem separation, improved MIDI control, automated updates and many more. These additions give you more control over DAW and can significantly enhance your music production workflow:
- Stem Separation: Extract vocals, drums, and other instruments from your tracks with this AI-powered tool (available in Producer Edition and above).
- FL Cloud: A cloud storage and collaboration platform built specifically for FL Studio users. They can share projects, collaborate with others, and access your files from anywhere. Access it from under the Sounds tab in the Browser.
- Audio Clips in Fruity Edition: Users of Fruity Edition can now enjoy eight Audio Clip slots.
- Automated Updates: FL Studio can be set up to automatically download and install the latest updates without you having to update manually. This way users can access the newest tools and fixes as soon as available.
- Colored Waveforms: New version gives a visual representation of frequency content. This is really helpful when recording and editing audio as one can quickly identify the parts they want to work on.
- Improved MIDI control: A new External sync mode and better MIDI master clock stability, ensures that your hardware and software are tightly synchronized.
- Snap to Scale function: Version 21.1 has a new Snap to Scale function in the Piano roll. It simplifies the process of composing melodies and chords that fit into a certain key.
Explore these new features and discover how FL Studio 21 can streamline your recording and production process.
Conclusion
Recording in FL Studio requires a bit of technical know-how along with your creativity. Once you are able to configure your equipment to optimum settings and learn to use FL Studio’s powerful audio tools, you are all set to capture high-quality audio.
It would take some practice and experimenting with different techniques in the beginning to find your mojjo.
FL Studio offers lifetime free updates. So, if you’re an existing user, al the latest feature in FL Studio 21 and beyond are already available for you to explore.
When aiming for professional-quality recordings in FL Studio, capturing clear vocals or instrumentals right from the start is crucial. A wireless lavalier microphone offers a practical solution, providing the flexibility and clarity you’ll need to effortlessly create crisp, broadcast-ready audio.
Frequently Asked Questions
What additional equipment I might need to record external instruments?
For recording external instruments like guitars or keyboards into FL Studio, you’ll need an audio interface to connect your instrument to your computer. This device converts the analog signal from your instrument into a digital format that FL Studio can use.
Also, ensure you have the necessary cables and a decent microphone if you’re miking an amp or acoustic instrument. Then, set up the equipment and start recording!
How can I troubleshoot latency issues during recording in FL Studio?
Adjust your audio settings to troubleshoot any latency issues. For this open FL Studio’s ‘Options,’ navigate to ‘Audio Settings,’ and choose an ASIO driver for lower latency.
Adjust the buffer length; a shorter buffer reduces latency but it may cause clicks if too low.
Another useful thing you can do is to close other programs on your system to free up your CPU.
If the problem still remains, upgrade your sound card and use dedicated audio interface.
How can I optimize FL Studio for smooth recording on lower-end computers?
Lower end computers can have significant latency issues during the recording. It can be rectified to some extent by increasing the buffer length to reduce load on CPU. Also shut down unnecessary background programs to free up system resources.
Consider using ‘Smart Disable’ for plugins to save processing power within the software. FL Studio also has something called ‘Eco mode’.
Follow the above steps to get smoother recording sessions without overloading your system.
Can FL Studio record and comp multiple takes into one perfect recording?
This process, known as ‘comping,’ let’s you piece together a perfect recording by combining the best segments from each take. FL studio let’s you do that too. You can record multiple takes into the same Playlist track or into separate tracks. After recording, you can listen to each take, slice the best parts, and seamlessly merge them into a single, cohesive track using the Playlist or the audio editor.
How to integrate hardware synthesizers or drum machines into my recording workflow?
In FL Studio, go to the MIDI settings. Make sure your hardware is recognized and configured correctly for MIDI control. Select an empty mixer track, then assign your interface’s input port to it. You can then record the audio output of your hardware directly into FL Studio or use the hardware as a MIDI controller to play and record using FL Studio’s internal instruments and plugins.