.png)
Microsoft Teams is a big player in the way we communicate today, especially with the rise of remote work. An important part of its functionality is the ability to share audio quickly and effectively. In this article, we’ll discuss the various methods and best practices for sharing audio on Microsoft Teams.
Setting Up Your Device
- Checking Your Device Compatibility:
Make sure your computer or mobile device meets the minimum system requirements for using the audio sharing feature in Microsoft Teams. Check Microsoft’s documentation for the latest compatibility details based on your OS version and hardware specifications.
- Updating Teams to the Latest Version: Open the Microsoft Teams app or browser and check if you have the most recent version installed. Teams is frequently updated with new features and bug fixes, so using the latest version ensures optimal performance for audio sharing. If a newer version is available, update Teams through the app’s settings or browser plugin options.
C. Ensuring Your Audio Device is Properly Connected
- Connect your microphone, headset or speakers to your computer/mobile device using the appropriate ports or Bluetooth if wireless.
- Open your device’s audio settings and select the connected microphone and speakers/headphones as the default audio input and output devices.
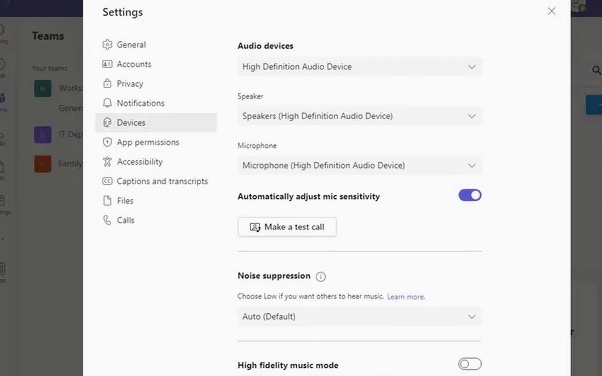
- In the Teams app, go to Settings > Devices and make sure the correct microphone and speakers are selected.
- Do an audio test by unmuting yourself on a Teams call and speaking into the microphone to ensure it’s working properly.
Preparing to Share Audio
A. Selecting the Right Environment for Clear Audio Sharing
- Choose a quiet room with minimal background noise for best audio clarity
- Minimize potential audio interruptions by closing doors/windows
- Use a headset or headphones in noisy environments to reduce echo/feedback
- Position yourself close to the microphone for optimal audio pickup
B. Using External Microphones for Enhanced Audio Quality
- Consider using an external USB microphone instead of your device’s built-in mic
- External mics often provide better audio quality and noise cancellation
- Make sure to select the external mic in Teams audio settings
- Popular options include Blue Yeti, Audio-Technica AT2020, Rode NT-USB etc.
C. Adjusting Your System’s Audio Settings for Optimal Sharing
- Check your operating system’s audio control panel/settings
- Set the microphone volume and boost levels appropriately
- Enable any noise suppression or echo cancellation features
- In Teams, adjust the microphone sensitivity and speaker volumes
- Use the real-time audio indicators to check and modify levels
Sharing Audio During a Teams Meeting
- Open the Teams app and start a new meeting or join an existing one
- Once in the meeting, locate the Share Tray at the top of the window
- Navigate to the Share icon (rectangle with an arrow pointing upwards)
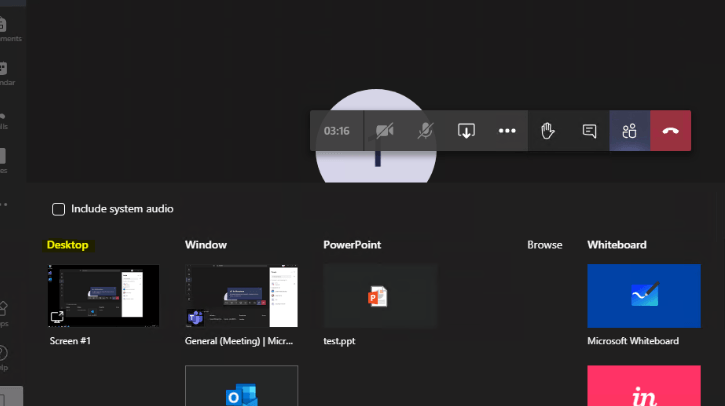
- You’ll see different options to share content like screens, windows, PowerPoint etc.
- If you want to share your entire screen, Select the “Desktop” option to share your entire screen
- Check the box for “Include System Audio” to share sound playing on your computer
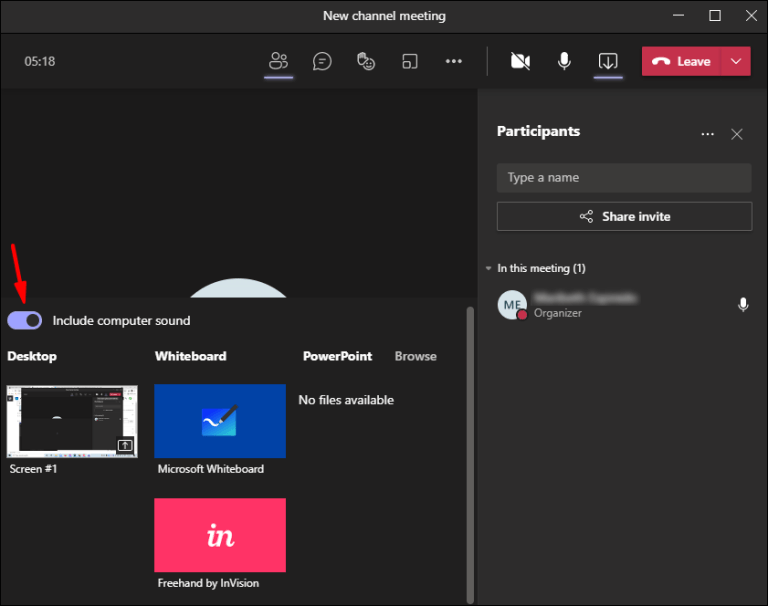
- If you want to share only an application window, choose the specific application window you want to share from the list
- Ensure the “Share audio” option is enabled for that application
Sharing Audio from a Video or Presentation
By embedding audio and video into your PowerPoint file first, you can seamlessly present it via screen sharing in Microsoft Teams, with the media playing back for all participants
Embedding Audio or Video Files in PowerPoint Presentations
- Open your PowerPoint presentation file
- Insert > Media > Audio/Video to embed multimedia files on the desired slides
- Make sure audio/video files are properly linked and not just temporary files
Sharing the Presentation via Teams
- Using the Share Tray to Select Your Presentation
- In the Teams meeting window, click the Share icon
- Navigate to the PowerPoint file you want to present
- Select the file, which will load the presentation in present mode
- Playing the Presentation with Embedded Audio/Video
- Advance through your slides normally
- When you reach a slide with embedded audio/video, it should play automatically
- Use the playback controls to pause/resume the media as needed
Tips for Smooth Playback During the Meeting
- Close any unnecessary applications to free up system resources
- Have the presentation file locally accessible for best performance
- Use the PowerPoint Presenter View to see your notes
- Mute notifications that could interrupt or make noise during playback
- Ask participants to mute themselves to prevent audio interference
Troubleshooting Common Audio Sharing Issues
Audio Not Sharing
- Check the “Include System Audio” Option
- Ensure the “Include System Audio” or audio sharing option is enabled when sharing your screen or window
- This setting allows Teams to capture and share any audio playing on your device
- Verify Application Window Selection
- If sharing just one application window, double-check that you selected the correct one with audio
- Some apps may have multiple windows, so ensure you picked the right window to share audio from
Poor Audio Quality
- Adjusting Audio Settings on Your Device
- Check your device’s microphone, speaker and audio settings
- Increase microphone boost levels or enable noise cancellation if available
- In Teams, adjust microphone sensitivity and speaker volume controls
- Ensuring a Stable Internet Connection
- A poor network connection can degrade audio quality significantly
- Check if you have a strong, stable WiFi or wired internet connection
- Try restarting your router or disconnecting other bandwidth hogs
Participants Unable to Hear Shared Audio
- Confirming Participant Volume Settings
- Ask participants to check if their speaker volume is turned up
- They may have their device muted or set to low volume
- Recommending Rejoining the Meeting for Participants
- If some participants still can’t hear, suggest they leave and rejoin the meeting
- Rejoining can resolve audio routing issues in some cases
Best Practices for Sharing Audio on Teams
- Pre-testing Audio Sharing Before the Meeting
- Test your audio settings and sharing capabilities ahead of any important meetings
- Share a test screen or window with audio playing to identify any issues beforehand
- This allows you to troubleshoot and make adjustments prior to the actual meeting
- Keeping Your Microphone Muted When Not Speaking
- Mute your microphone when you aren’t actively presenting or talking
- This prevents any unwanted background noise from disrupting the meeting
- Use the push-to-talk feature or temporarily unmute when you need to speak
- Using the Chat Feature to Share Additional Information or Troubleshoot
- Leverage the Teams chat to provide supplementary information like links, files, etc.
- If participants can’t hear audio, use chat to troubleshoot and give instructions
- The chat serves as a helpful side channel during meetings for smooth communication
Want to make sure your voice is crystal-clear when sharing audio on a Teams call or presentation? A wireless lavalier microphone can dramatically enhance your audio clarity and ensure your audience hears every word effortlessly.
FAQs
Q: Can I Share Audio Without Sharing My Screen on Teams?
A: Yes, you can share audio without sharing your screen on Microsoft Teams. When you’re in a meeting, you can click on the “Share” button at the bottom of the meeting window, then select “Browse” and choose the audio file you want to share. This allows participants to hear the audio while still seeing the meeting interface, without having to share your entire screen.
Q: Why Can’t Participants Hear the Audio I’m Sharing?
A: There could be several reasons why participants can’t hear the audio you’re sharing:
- Ensure that you’ve selected the correct audio source to share. Sometimes, if you have multiple audio devices connected, Teams may default to the wrong one.
- Check your audio settings to make sure your microphone and speakers are properly configured and not muted.
- Ensure that the audio file you’re sharing is not corrupted or in a format that Teams doesn’t support.
- Participants may also need to adjust their own audio settings or unmute their speakers to hear the shared audio.
Q. How Do I Ensure High-Quality Audio When Sharing?
A: To ensure high-quality audio when sharing in Microsoft Teams, consider the following:
- Use a reliable internet connection to prevent audio lag or distortion.
- Choose audio files with good sound quality and in supported formats (such as MP3 or WAV).
- Close any unnecessary applications or browser tabs that may be consuming bandwidth and affecting audio quality.
- Use a high-quality microphone and adjust your audio settings to optimize sound levels.
Q: Is There a Way to Share Audio from a Mobile Device?
A: Yes, you can share audio from a mobile device in Microsoft Teams. During a meeting, tap the “…” (More options) button at the bottom of the screen, then select “Share content.” Choose “Share audio,” and you’ll be able to share audio files directly from your mobile device. Make sure to grant the necessary permissions for Teams to access your audio files.