.png)
.png) Français
Français .png) Deutsch
Deutsch .png) Italiano
Italiano .png) 日本語
日本語 .png) Português
Português  Español
 Adding audio to a webpage with HTML is pretty easy. Anyone with basic HTML knowledge can do it. The key is understanding how the <audio> tag works and how to link your sound files properly.
That said, audio quality is just as important as functionality. If you’re adding voice recordings, using a quality microphone can make a big difference. Something like the Hollyland LARK A1 works great. It gives strong performance, with features like Auto-Limit Clip Protection, a 650-foot wireless range, and 3 levels of Intelligent Noise Cancellation.

Hollyland LARK A1 - Affordable Wireless Microphone
A perfect starter mic for creators on a budget. It’s simple to use and features effective noise cancellation.
Key Features: 48kHz/24-bit | 3-Level Noise Cancellation | 54-Hour Battery
How the HTML Audio Tag Works
You can play sound on a webpage using the <audio> tag. It’s a standard HTML5 feature. Also, it works similarly across most modern browsers. This tag helps you add music, sound clips, or voice recordings. To display audio controls (like play, pause, and volume), use the controls attribute.
Place the source tag inside the audio tag to link your file. This tells the browser what audio to load and what format to expect. If a browser doesn’t support the audio tag, you can show a short message. That way, users will know the sound feature isn’t working for them.
There are also a few extra attributes:
- autoplay: Starts the audio when the page loads.
- muted: Makes the audio silent by default.
- loop: Repeats the audio again and again.
HTML supports these three audio formats:
- MP3 (best support across browsers)
- WAV
- OGG
MP3 is the safest choice since it works almost everywhere.
How to Add Audio in HTML: Step-by-Step Instructions
Follow these steps to add audio to your HTML page:
1. Prepare Your Audio File
- Use MP3 for best results across all browsers.
- Place the audio file in the same folder as your HTML file.

- You can get free music from YouTube’s Audio Library.


You can also download tracks from any royalty-free website.
2. Create the HTML Structure
- Open your HTML file.
- Inside the <body>, add an opening and closing <audio> tag.
<audio></audio>- Save the HTML file and refresh the browser.

3. Add Controls to the Audio Player
- Inside the opening <audio> tag, add the word controls.
<audio controls></audio>- Save and refresh the page.
- You should see an audio player on the browser page.
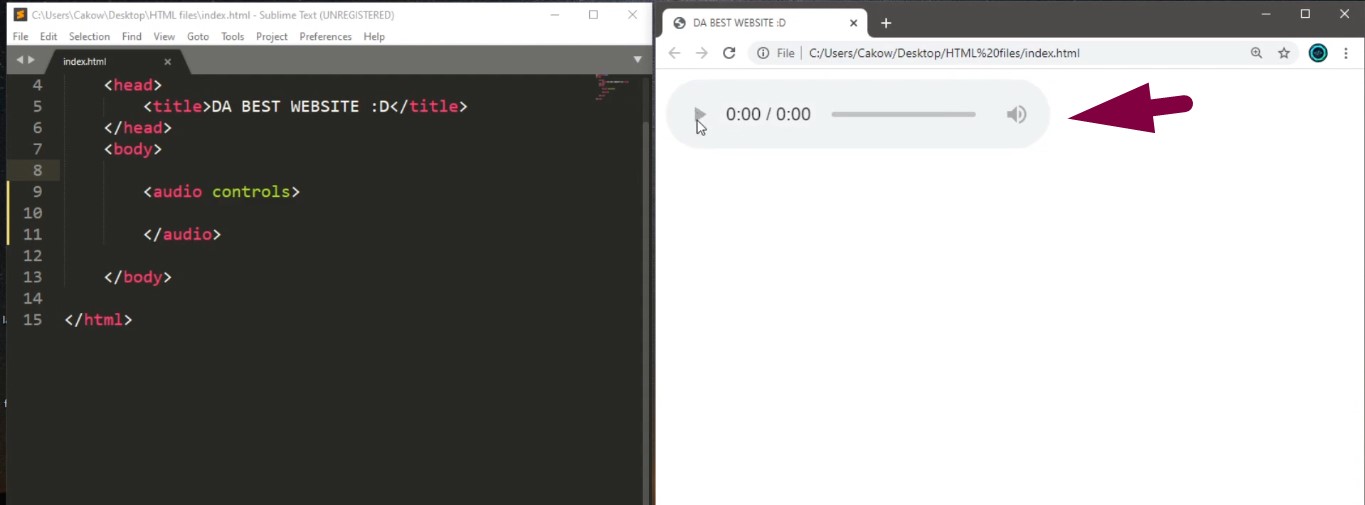
However, at this moment, the bar should be greyed out, signaling that we need to add more attributes and tags.
4. Link the Audio File
- Between the opening and closing audio tags, insert a <source> tag.
- Use the ‘src’ attribute to point to the audio file name.
<audio controls>

  <source src="bro_time.mp3" type="audio/mpeg">

</audio>- Save and refresh. The audio controls should now be active.

5. Add Fallback Message
- In case the browser doesn’t support audio, write a simple message.
<audio controls>

  <source src="bro_time.mp3" type="audio/mpeg">

  Your browser does not support audio.

</audio>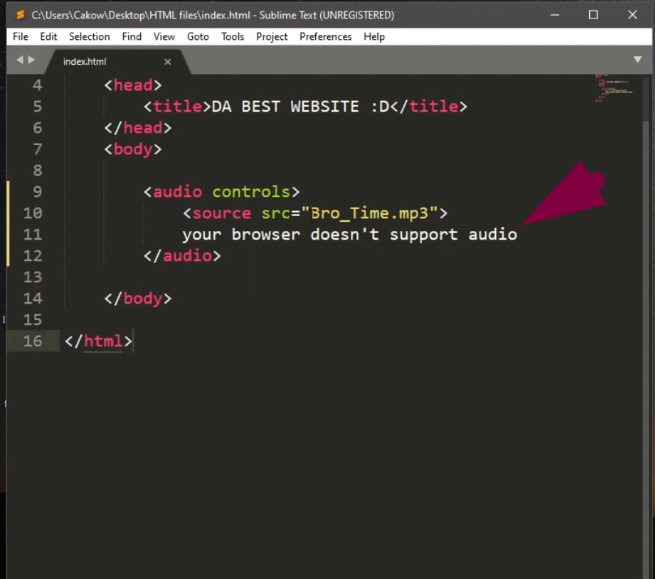
6. Use a File Path (If Audio is in a Different Folder)
- If the audio file is not in the same folder, include the full path.
<source src="C:/Users/YourName/Desktop/bro_time.mp3" type="audio/mpeg">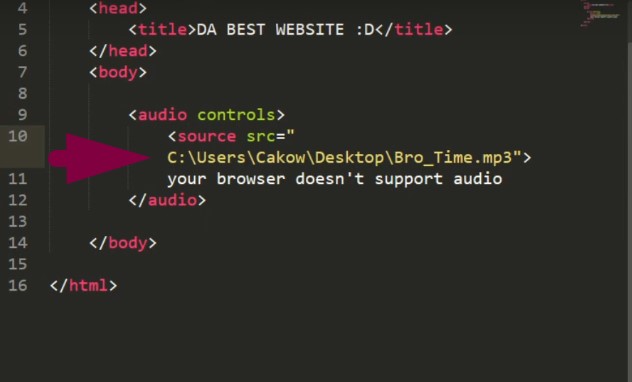
7. Loop the Audio
- To repeat the audio continuously, add ‘loop’ to the audio tag.
<audio controls loop>

  <source src="bro_time.mp3" type="audio/mpeg">

</audio>
8. Start the Audio Muted
- To play the audio silently by default, use muted.
<audio controls muted>

  <source src="bro_time.mp3" type="audio/mpeg">

</audio>
9. Autoplay the Audio
- Add autoplay to start the audio automatically.
<audio controls autoplay>

  <source src="bro_time.mp3" type="audio/mpeg">

</audio>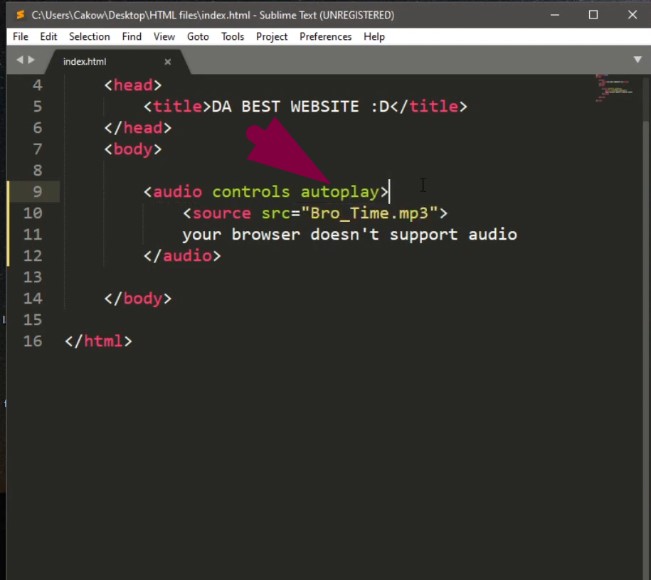
Important: Autoplay doesn’t work well in modern browsers, especially Chrome and mobile. Also, many experts don’t recommend the autoplay audio tag since it can breach users’ privacy.
10. Hide Controls for Background Audio
- Remove the controls attribute to play background music with no player visible.
<audio autoplay>

  <source src="bro_time.mp3" type="audio/mpeg">

</audio>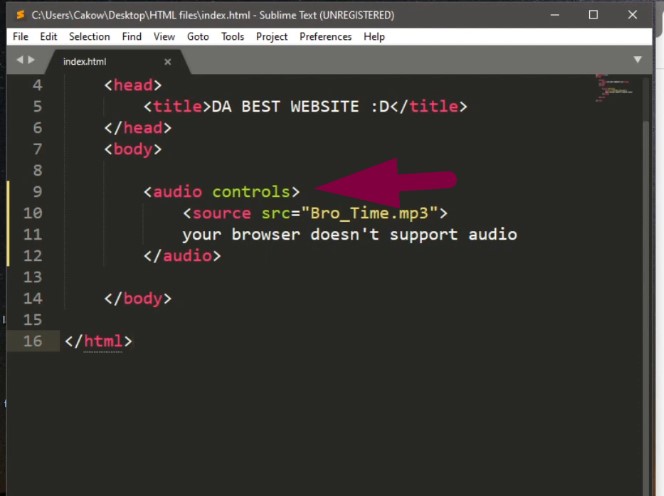
- Use this wisely. Auto-playing hidden audio can annoy users.
Use Case: Making a Webpage with Multiple Audio Files
Want to try a real example? Let’s make a basic music page. This can be a fun project. All you need are a few audio files and a basic HTML file.
Follow these steps to build it:
Get Your Audio Files Ready
- Pick at least four MP3 songs or sound clips
- Name them clearly like bro_time.mp3, block_party.mp3
- Place all audio files in the same folder as your HTML file
Start a New HTML Document
- Open any text editor like Notepad or VS Code
- Create a blank .html file
- Save it in the same folder as your audio files
Set Up the Page Title
- Inside the <body> section, add a main heading
<h1>MeTunes</h1>
Add the First Audio Track
- Type the name of the song using an <h3> tag
- Add an audio player below with the source file
<h3>Bro Time</h3>

<audio controls>

  <source src="bro_time.mp3" type="audio/mpeg">

  Your browser does not support audio.

</audio>
Repeat for More Songs
- Copy and paste the same structure
- Change the heading and the source file name
<h3>Block Party</h3>

<audio controls>

  <source src="block_party.mp3" type="audio/mpeg">

  Your browser does not support audio.

</audio>

<h3>City Night Lights</h3>

<audio controls>

  <source src="city_night_lights.mp3" type="audio/mpeg">

  Your browser does not support audio.

</audio>

<h3>Beat Your Competition</h3>

<audio controls>

  <source src="beat_your_competition.mp3" type="audio/mpeg">

  Your browser does not support audio.

</audio>
Add Space Between Each Track
- Use <br> tags to add extra spacing
- This keeps the page clean and easy to read
Test It in a Browser
- Double-click your HTML file to open it
- Make sure all songs are working correctly
- If something doesn’t play, check the file names and paths
You now have a working music page using basic HTML. Each audio file shows its own player, and everything plays fine.
TIP: Here’s the complete code of this project. Simply copy and paste it. Change the file paths and song names to practice adding your favorite jams to an HTML site.
<!DOCTYPE html>

<html>

  <head>

  <title>MY PRACTICE AUDIO HTML SITE</title>

</head>

  <body>

    <h1>SongSite</h1>

    <br>

Song One:

    <br>

<audio controls>

  <source src="song_one.mp3" type="audio/mpeg">

  Your browser does not support audio.

</audio>

<br>

Song Two:

    <br>

<audio controls>

  <source src="song_two.mp3" type="audio/mpeg">

  Your browser does not support audio.

</audio>

    <br>

  Song Three:

    <br>

<audio controls>

  <source src="song_three.mp3" type="audio/mpeg">

  Your browser does not support audio.

</audio>

<br>

    Song Four:

    <br>

<audio controls>

  <source src="song_four.mp3" type="audio/mpeg">

  Your browser does not support audio.

</audio>

    <br>

  </body>

</html>
If you have done it correctly, the HTML page should appear similar to this:

Wrap Up
When you understand the basics of audio tag, inserting music into an HTML page becomes a cupcake. This article shows every essential step that allows you to add an audio track to HTML.
However, it is important that you use the correct attributes to ensure user privacy. In the same way, we always recommend using free-to-use or licensed music to save yourself from copyright infringement.
FAQs
1. How do you make the audio player invisible in HTML?
To keep the audio player hidden, skip the word controls in the tag. When someone visits your page, the audio plays without showing anything. If you also use autoplay, it starts right away. Just be careful. Some browsers may block sound if there are no controls.
2. What do the audio and video tags do in HTML?
The audio and video tags let you add sound or video. You can place music or clips directly on your page. These tags are part of HTML5 and work in most browsers today. Add them inside the body section to show players on screen. They also support different file types, depending on the browser.
3. Do people still use HTML for modern websites?
Yes, HTML is still used to build every site online. Even advanced pages need HTML for structure and layout. It helps with SEO, loading speed, and page design. Whether it’s a small page or a complex one, HTML is still important. Without it, no website would load correctly in any browser.