.png)
iMovie has made a favorite corner in the hearts of beginners and professionals who prefer smooth editing features. However, this free software sometimes compromises the video quality, even if you have edited and created the perfect footage. Many macOS users upload their edited videos to YouTube for enhanced engagement, further deteriorating the quality.
This guide provides the simplest ways to upload a video from iMovie to YouTube without disturbing its quality. Furthermore, it will help you select high-quality resolutions when exporting and importing the content.
How to upload a video from iMovie to YouTube
The older iMovie versions let you connect your YouTube account and upload a video with a single click. However, the latest version has removed this functionality, allowing you to export and upload the desired quality video to YouTube. Though iMovie is ideal for basic video editing, below is the most straightforward process to upload your premium videos from iMovie to YouTube.
How to Upload to YouTube from iMovie on Your Mac
Step 1- Create New Project
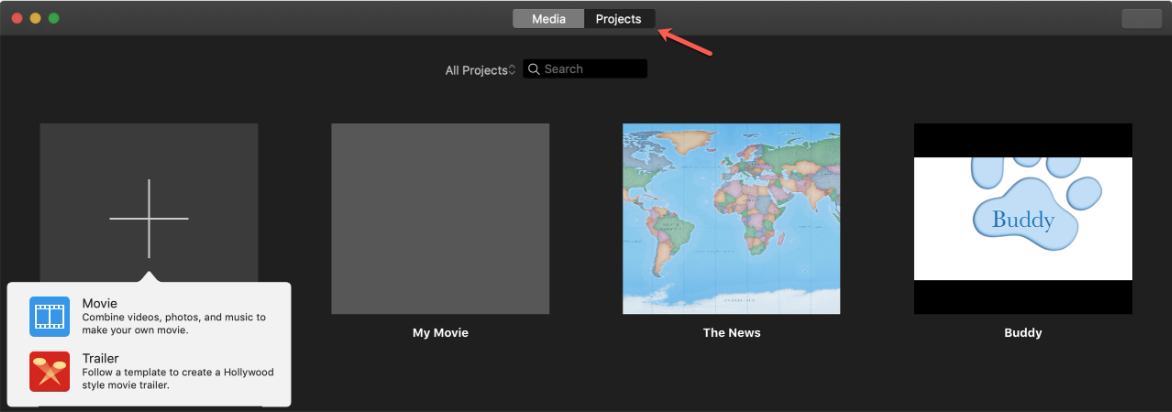
- First, go to iMovie on Mac and click “Projects” at the top. Then tap “Plus” or the new project icon on the left.
Step 2- Import Media
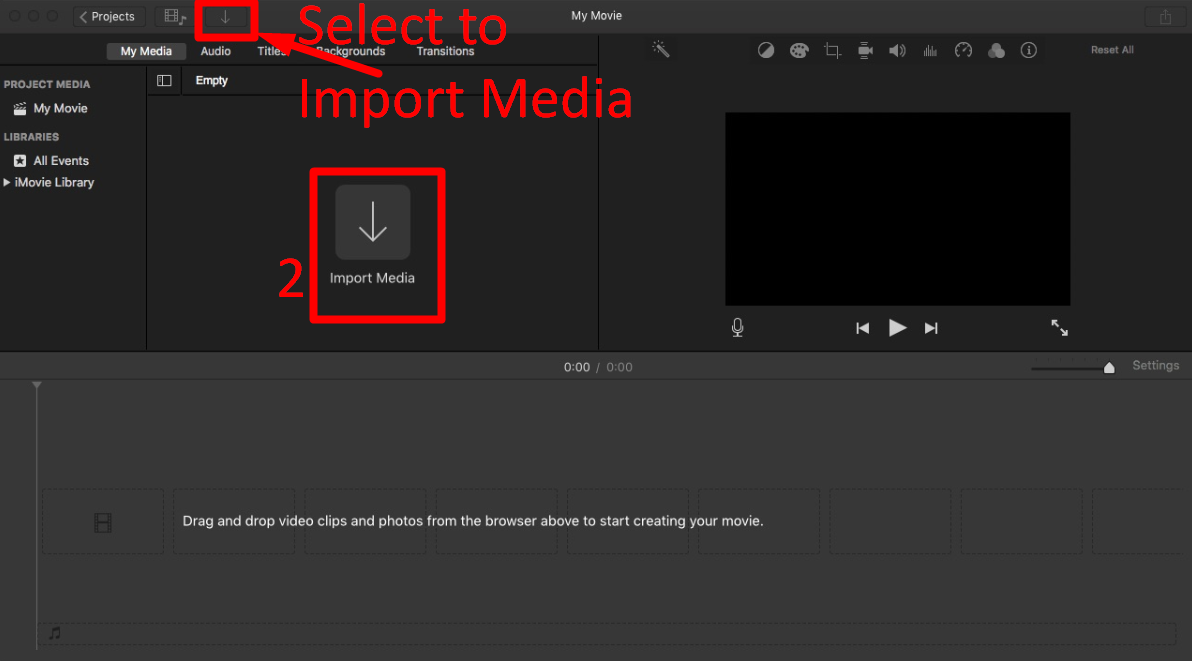
- Click “import media” or the “down arrow” button to import the required media file from your computer.
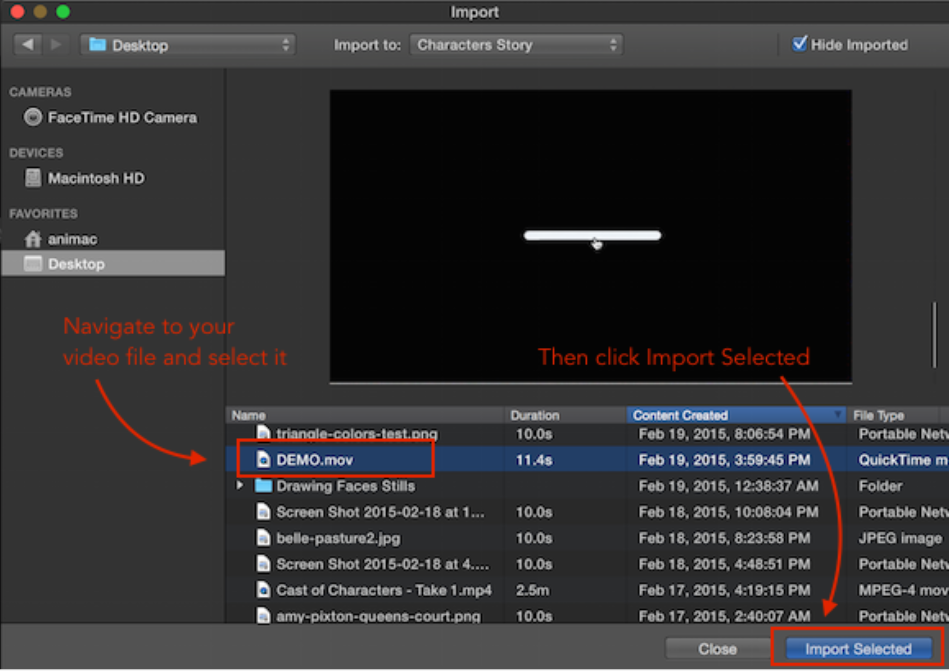
- Select the videos you want to import and click “import files” below
- Alternatively, if you have a desktop folder ready, then open that folder, select the video files, and drag and drop them into the project window
Step 3- Add to Timeline

- You can drag your video to the timeline, trim it, or drag the video edges to start editing.
- Then click the “titles, backgrounds, or transitions” tab to edit the video further.
Step 4- Share Button
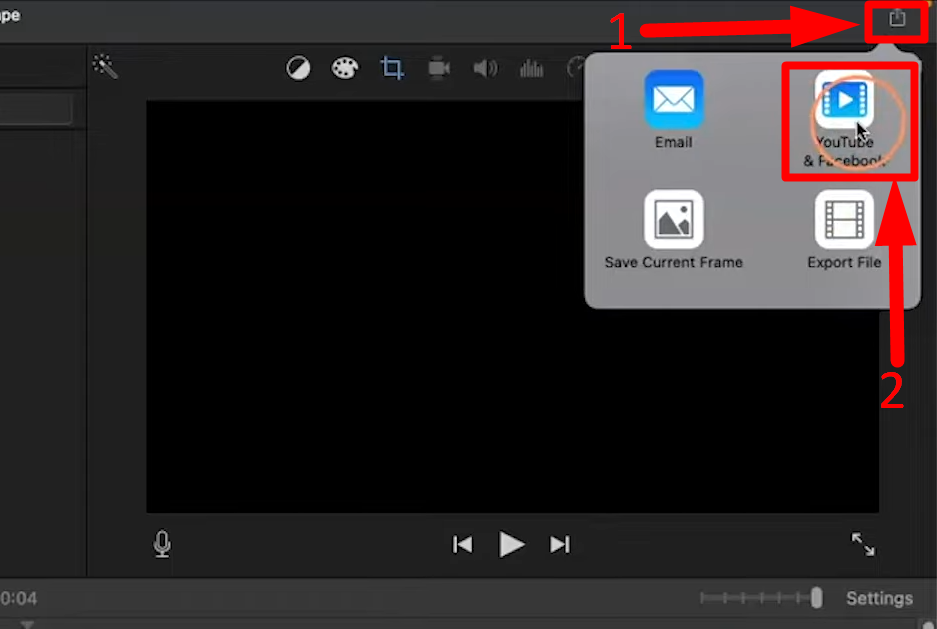
- Once edited, go to the “share” icon at the top right corner of the iMovie screen.
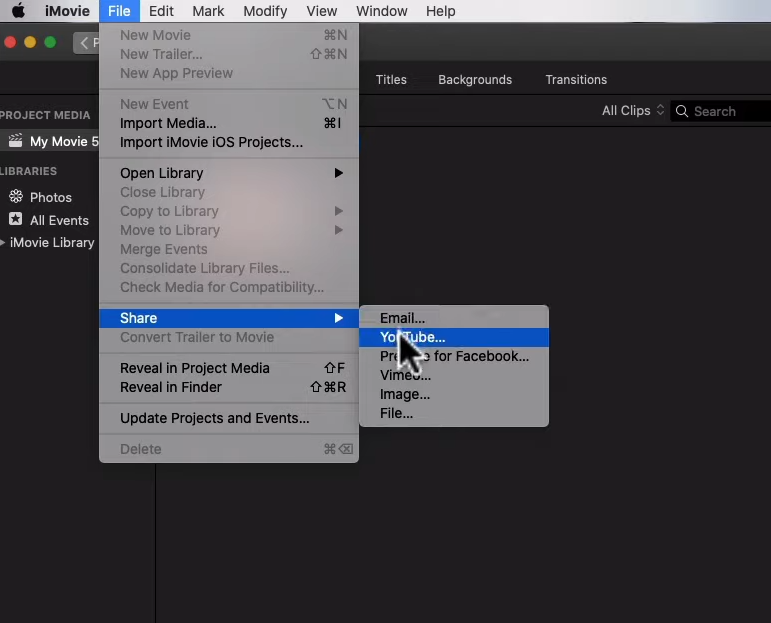
- Alternatively, click “File” from the top left and select “Share.”
- Choose a social media platform, such as YouTube, to upload it directly to their
Step 5- Edit File Info

- From the next window, click to add your videos’ titles, tags, and descriptions.
Step 6- Select Desired Resolution
- Click the “Resolution” tab, choose the highest quality available, such as 1080p or 4k, and select a size for your video.
Step 7- Save Video
- Tap “Next” and select the location where you want to save your video from the next window.
For the Highest iMovie Settings
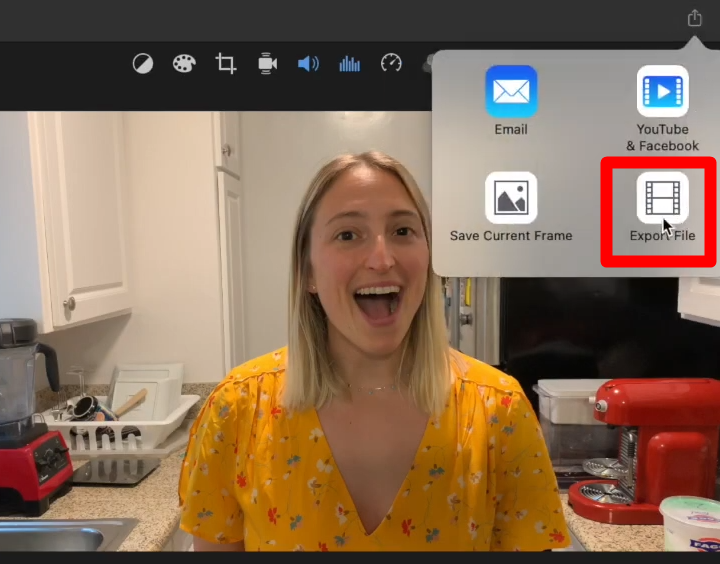
- After clicking the “share” button, select “Export” file.
- Enter your video’s title, tags, and description in the pop-up menu window.
- It provides additional “Quality” options under the “resolutions” tab.
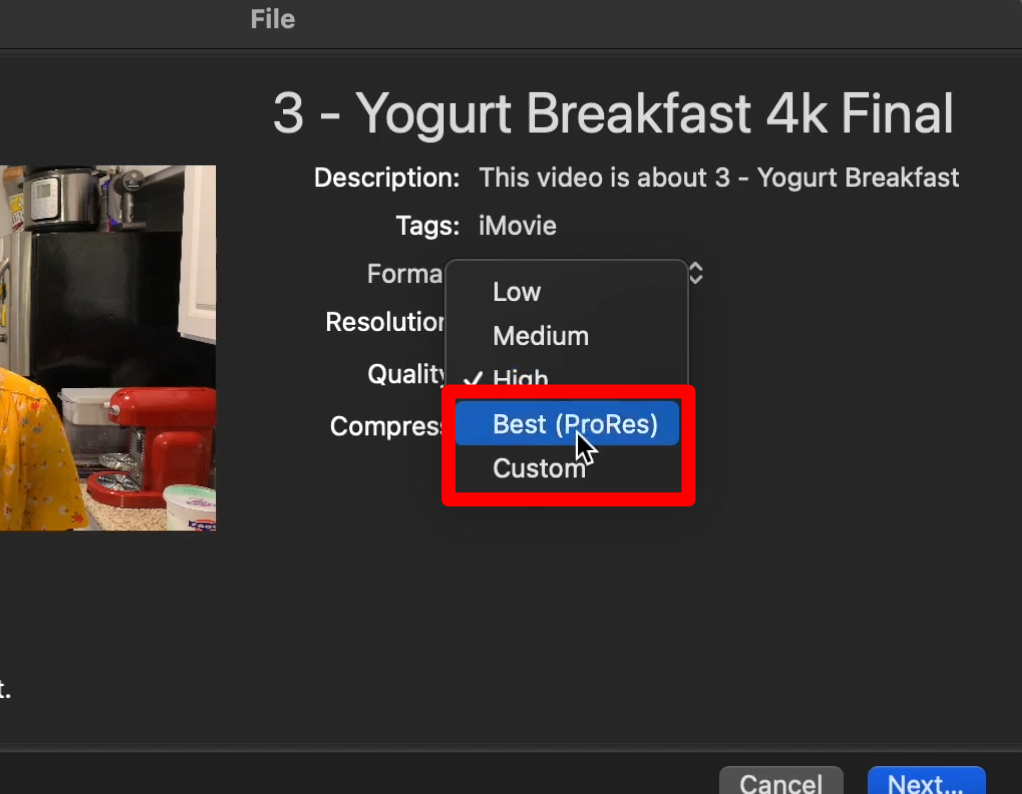
- Choose “ProRes,” the highest-quality video codec that allows you to download detailed videos.
Note: Choosing ProRes will not improve your footage if you have shot videos with your mobile or the media doesn’t have a high bit rate.
- Select the “Custom” option, then drag the slider to the right according to the desired video quality.
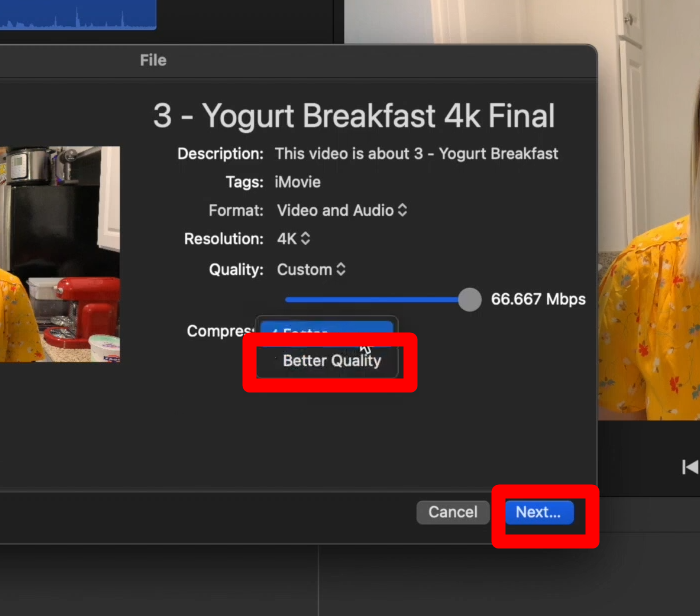
- Then select the “Better Quality” option under the “Compress” tab.
- Click “Next” and choose the desired location to save the media file.
Step 8- Upload to YouTube
- Go to YouTube Studio from your browser and log in to your YouTube account
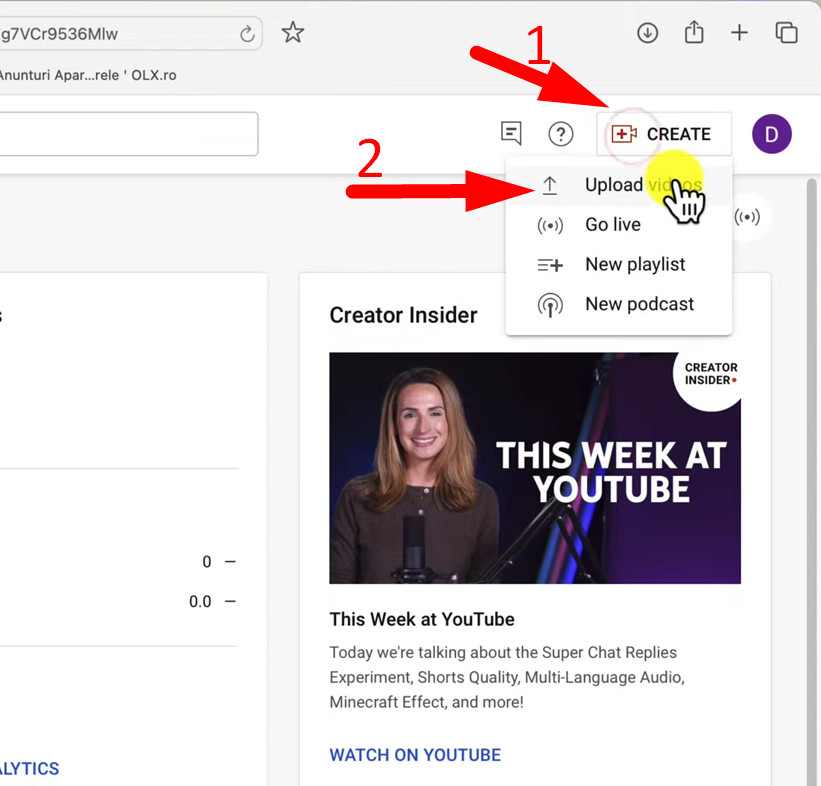
- Click the “Create” button at the top right and select “Upload Video.”
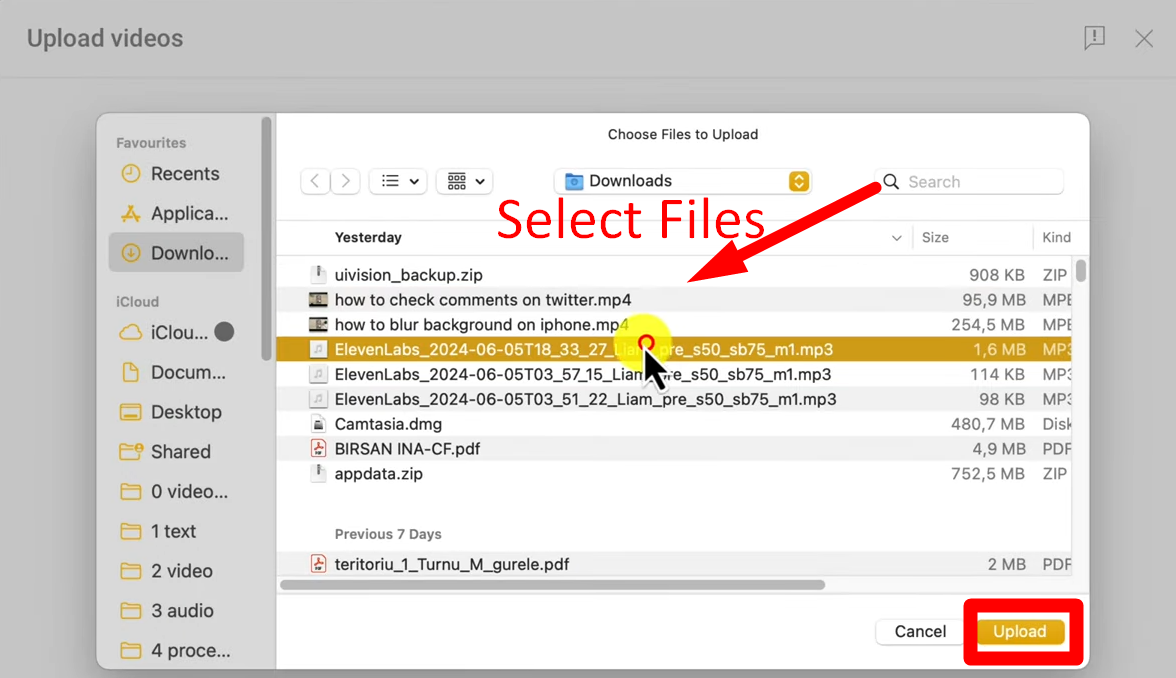
- Tap “Select File” and navigate to the file you exported from iMovie
- Then click “Upload” to start the uploading process
Step 9- Edit YouTube’s Video
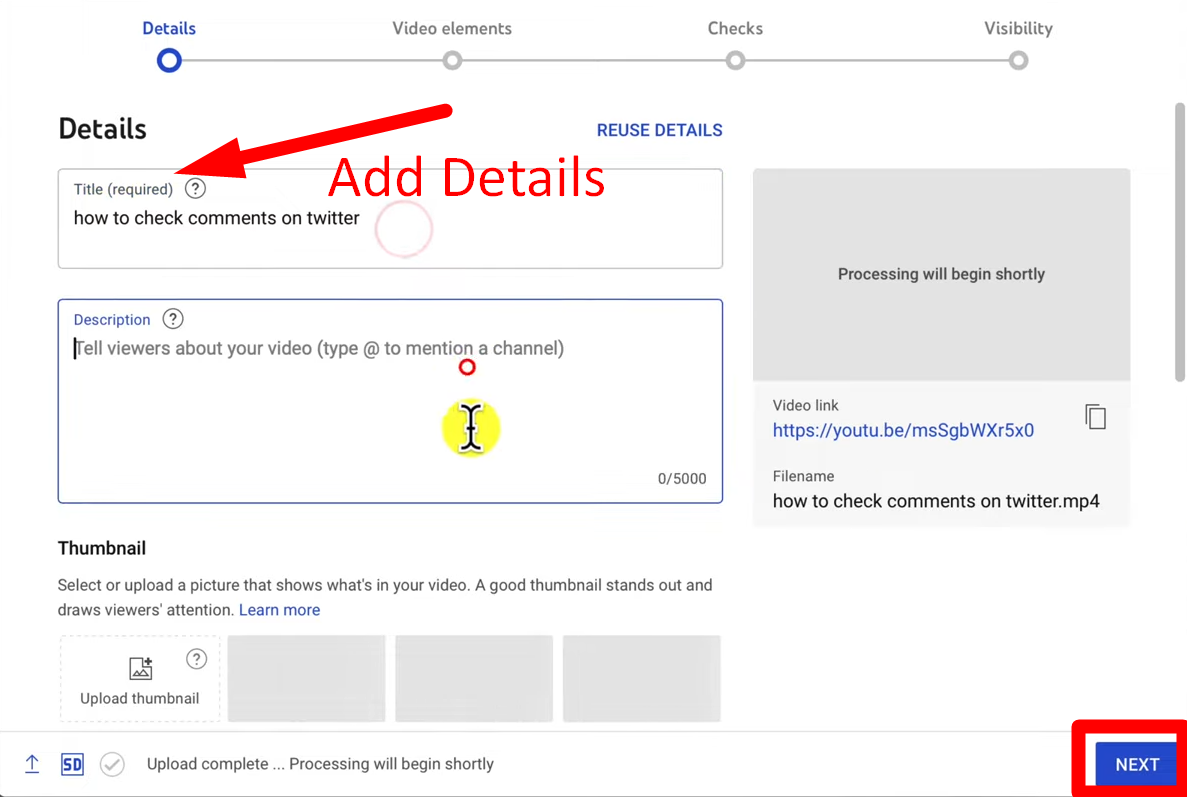
- You can set your video’s metadata and add its title and description when uploading.
- Once uploaded, you can choose a frame for the thumbnail or upload your custom thumbnail.
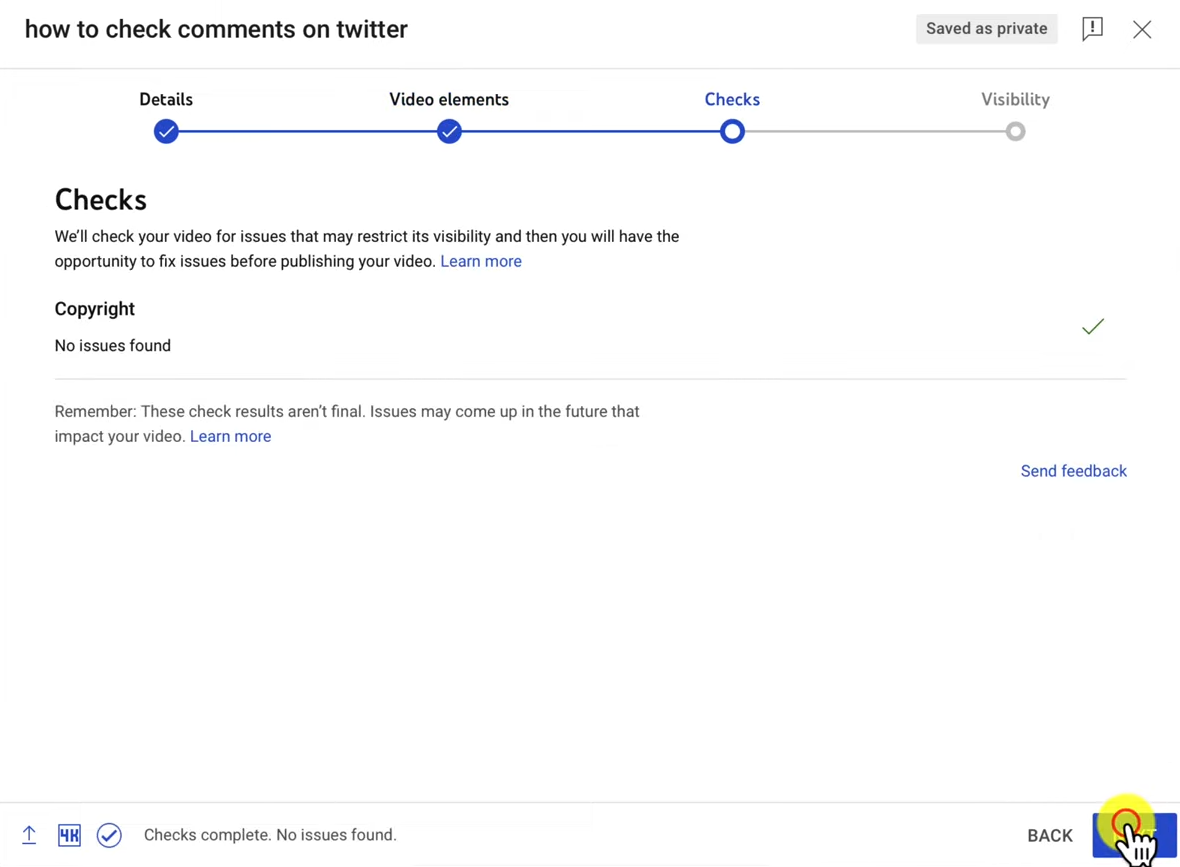
- From the next page, turn on your video’s monetization. The following window will check the media for copyright flags.
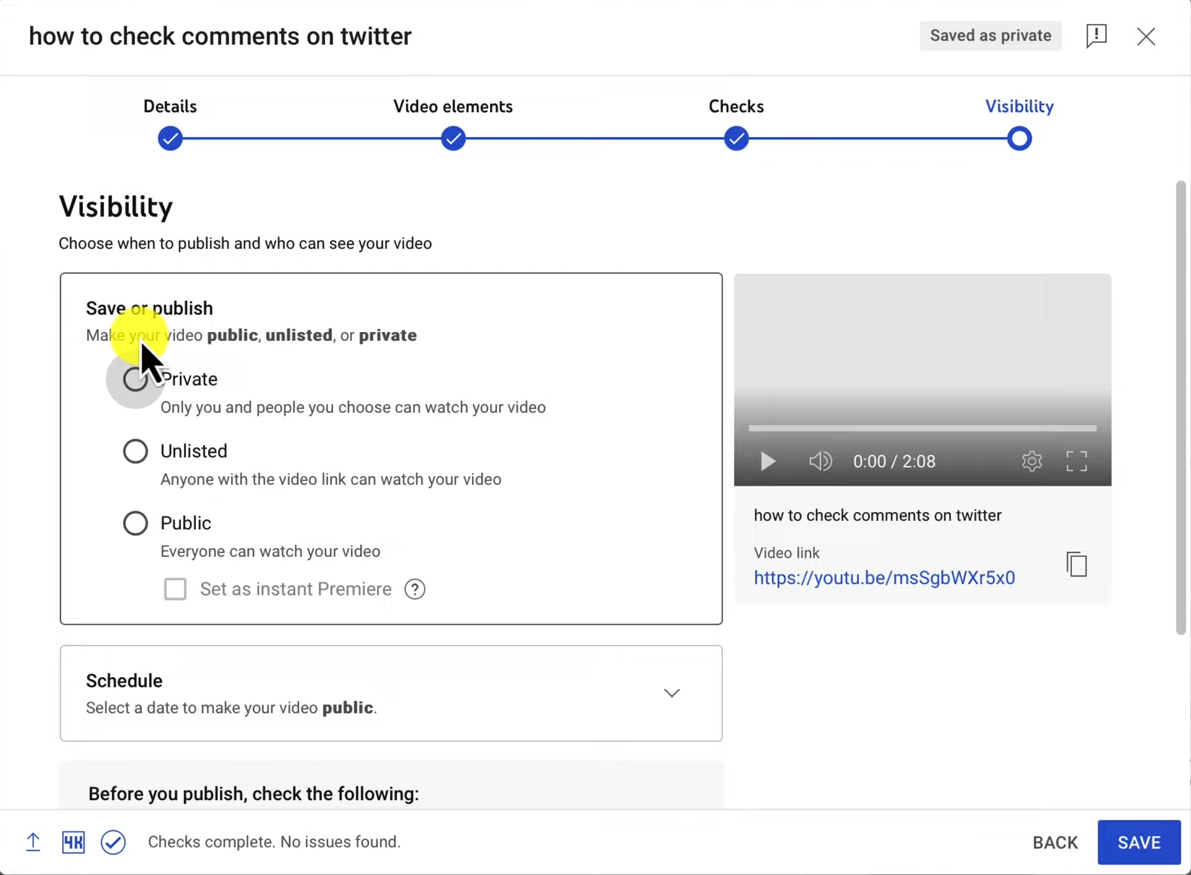
- Once cleared from copyright, choose the media visibility status of your videos, such as clicking “Public” or selecting “Unlisted” if you want your video availability to users with links
- Click “Upload” to upload your video from iMovie to YouTube
How to Upload to YouTube from the iMovie App on Your iPhone
iMovie allows users to upload videos to YouTube from its app, but users should ensure they use the latest version for better quality options.
Step 1- Open the iMovie Video
- Go to the iMovie app on your iPhone or iPad and tap “Browse Project” at the top.
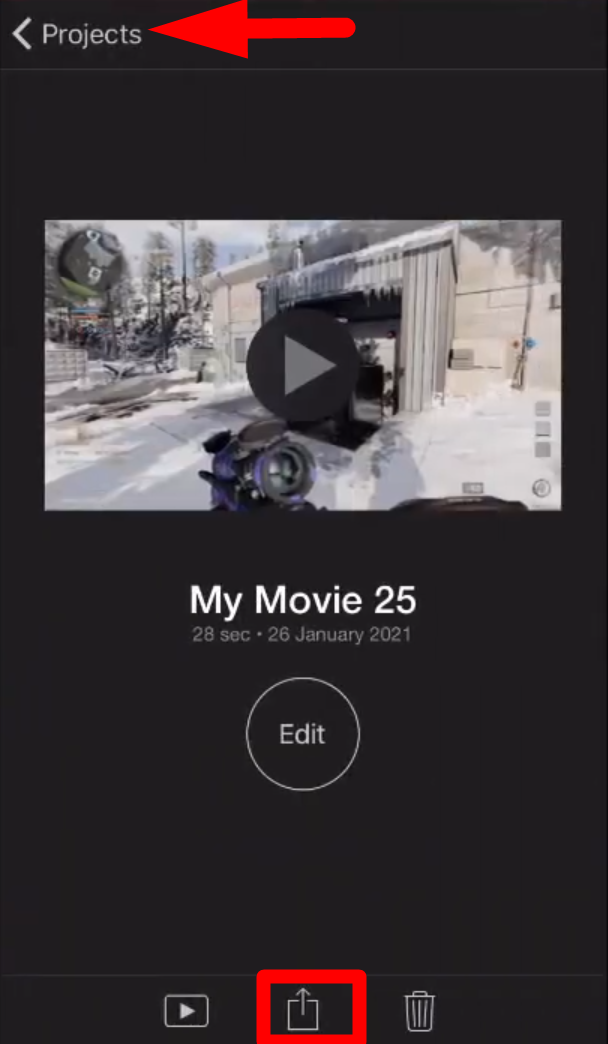
- Then select the desired project that you want to share on YouTube
- Tap the share button or the “arrow” icon at the bottom

- Click the “Options” tab from the pop-up menu on your app screen.
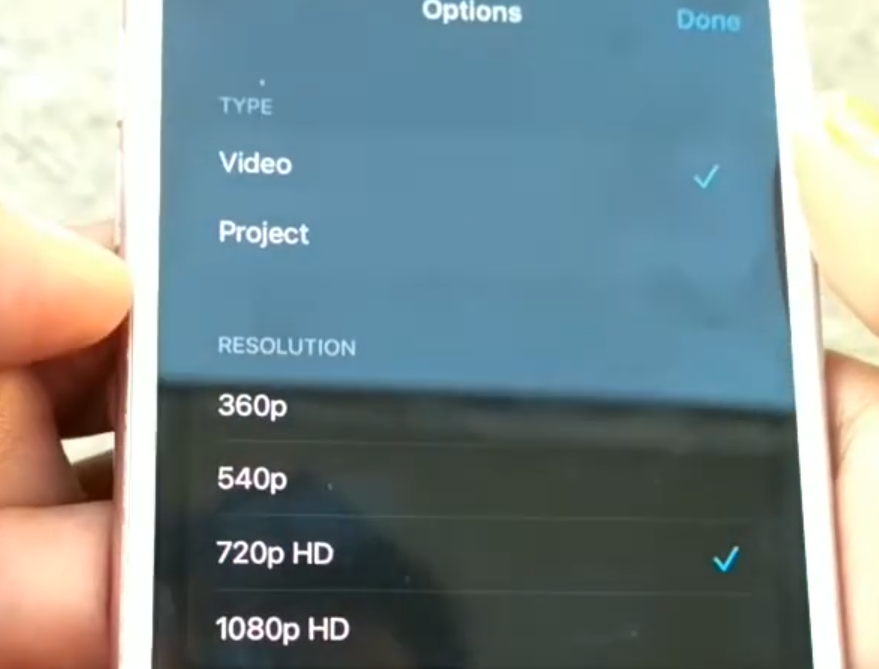
- It will allow you to change project resolution and aspect ratio, turn HDR on or off, and use other advanced editing settings.
- Then select “Done” to apply the new settings
Step 2- Save the Video
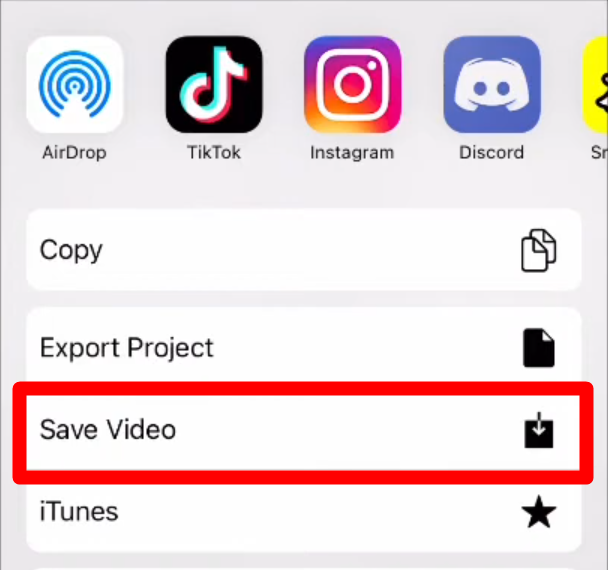
- Click “Save Video” to download the edited video to the Photos Library on your iPad or iPhone.
- Furthermore, if you have enabled iCloud Photos, you can access the video file on your drive using other devices.
Step 3- Upload to YouTube
- Open the YouTube app from your phone and sign in to your account
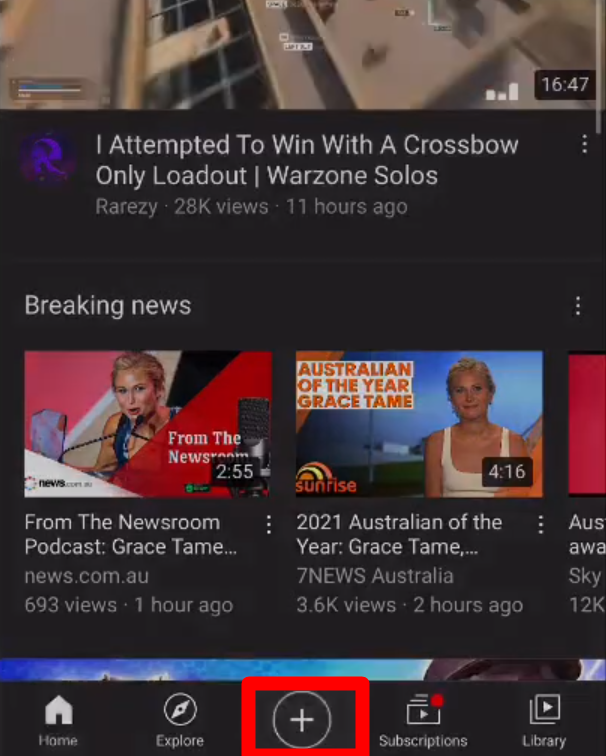
- Click the “Plus” icon in the middle of the screen.
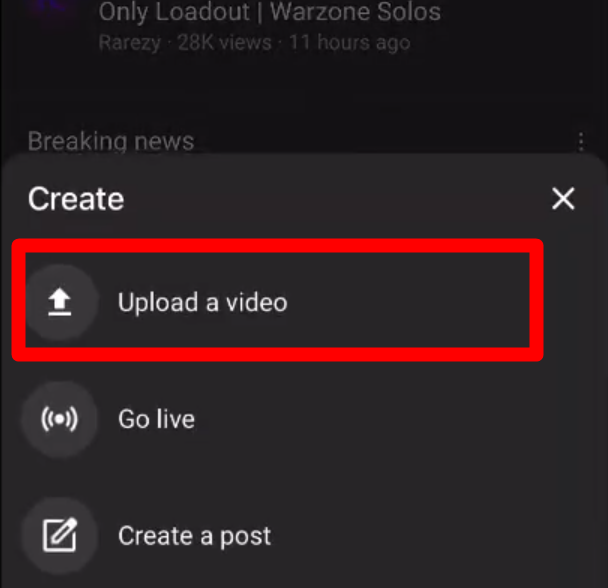
- From the next window, select Upload to choose a video from the library you downloaded from iMovie.

- Tap “Next,” then add information for your videos, such as tags, titles, descriptions, locations, and other privacy settings
- Once the video is cleared of copyright, choose “Upload,” and it will upload the video to your account.
Main Reasons for Failing to Upload a Video from iMovie to YouTube
Usually, the “iMovie to YouTube” issue occurs when you try to upload a video from iMovie to YouTube directly. Below are the common reasons and fixes when iMovie fails to upload:
iMovie Export Failed
It happens when you don’t have enough storage on your Mac or when exporting a glitchy or corrupted file. Try exporting the video in a different resolution and uploading an error-free original file.
The video won’t upload on YouTube.
It happens when you want to upload a video longer than 15 minutes. However, the issue never appears if your Google Account has been verified, but the maximum upload size is 128 GB.
iMovie is Slow
Sometimes, iMovie competes with other background apps for memory use. Therefore, all the applications must be stopped to clear out memory and storage space for better performance. However, if the problem continues, clear the app’s cache folder or reinstall it to its updated version.
iMovie video format is not compatible with YouTube
- iMovie Formats: .MP4, .MOV, .M4V, .AVI
- YouTube Video Formats: .MOV, .MP4, .3GPP .AVI, .WMV, .FLV.
These formats overlap and differ, and you need to convert M4V to the one that YouTube supports, like MP4, to eliminate compatibility issues.
Conclusion
iMovie offers decent video editing features, but it lags in terms of advanced video-sharing options. It allows you to upload videos directly to YouTube or manually export and upload them to YouTube. Direct uploads are convenient, but the manual method provides more control and retains the video quality. So, this guide enables you to professionally upload videos from iMovie to YouTube and helps you resolve issues efficiently.
FAQs
Does iMovie compress video quality when uploading to YouTube?
iMovie applies auto compression when uploading or exporting video, specifically if you select lower quality or resolution settings. The built-in settings are optimized to balance file size and quality, but not to preserve the original quality. So, export manually to 4 K to maintain the quality, then upload the video to YouTube.
What should you do if iMovie doesn’t upload to YouTube?
- Clear storage space
- Try closing other apps running in the background
- Restart the iMovie app on your device
- Check file settings to ensure compatibility
- Reinstall or update the iMovie app to the latest version
Can I add a thumbnail and tags when uploading from iMovie to YouTube?
After clicking the export button, iMovie allows you to add titles, tags, and descriptions to your videos. However, you cannot add custom thumbnails or detailed tags when uploading directly to YouTube. For this, manually export the video from iMovie and upload it to YouTube to add custom thumbnails and other advanced settings.
What are the best iMovie export settings for YouTube videos?
For YouTube, the best iMovie export settings balance video quality and file size for better and faster uploads. YouTube recommends 1080p for most videos, but you can also choose 4 K video resolution. Select “ProRes” for maximum video clarity and choose “Better Quality” to maintain the original file size.