.png)
It is one of the most frustrating moments in audio editing: You hit the spacebar, the cursor glides across the blue waveform, and the green playback meter is bouncing energetically. The visual data proves that sound is playing, yet your headphones or speakers remain dead silent.
This is what we call the “Green Bar Paradox.”
If you are struggling to figure out how to fix ‘can’t hear playback’ in Audacity, the good news is that your audio file is likely safe. Audacity is successfully processing the digital audio, but the signal path is broken at the very end of the chain.
Think of it like a letter that was successfully mailed but delivered to the wrong house. Audacity is sending the audio signal out, but it is directing it to the wrong Output Device, such as:
- A computer monitor that has no speakers.
- A “Virtual” driver (like Microsoft Sound Mapper).
- An HDMI port that isn’t currently active.
Because Audacity does not always automatically switch to your default system device (like Windows does), it often clings to old connections or silent ports. Here is how to route that sound back to your ears.
Solution 1: Check the Audio Setup Toolbar (The #1 Fix)
This is the most common cause of the “silent playback” issue. Unlike web browsers or Spotify, Audacity does not always automatically switch its output when you plug in headphones or connect a Bluetooth speaker. You must manually tell the software exactly where to send the audio signal.
Follow these steps to route your audio correctly:
- Locate the Audio Setup button in the top center toolbar (marked by a microphone icon).
- Note: If you are using an older version of Audacity, look for the “Device Toolbar” dropdown menu next to the small speaker icon.

- Click Playback Device from the menu options.
- Select your actual hardware device from the list (e.g., “Headphones,” “Speakers (Realtek),” or your USB interface).
- Avoid generic virtual drivers like “Microsoft Sound Mapper” or “Primary Sound Driver” if a specific hardware name is available. These wrappers can sometimes fail to hand off the audio correctly.
Pro Tip: Did you plug your headphones in after opening Audacity? If so, they likely won’t appear in the list because Audacity only scans for hardware on startup. You don’t need to close the app; simply go to Transport > Rescan Audio Devices in the top menu bar to force Audacity to detect the new hardware.
Solution 2: Verify System-Level Volume & Mute Settings
Getting lost in Audacity’s internal menus is easy, but sometimes the culprit is simply your operating system. Even if Audacity is sending the audio signal perfectly, you won’t hear a thing if your computer has muted the application or the master output.
Before diving into complex driver updates, rule out these system-level issues.
For Windows Users
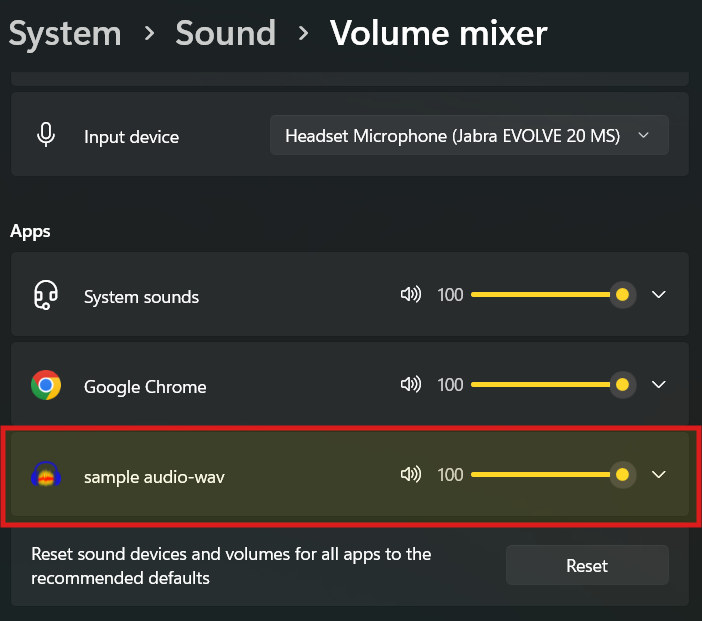
Windows has a Volume Mixer that allows you to mute specific apps while keeping the rest of the system loud. It is common for users to accidentally mute Audacity here.
- Right-click the Speaker icon in the bottom-right corner of your taskbar.
- Select Open Volume Mixer.
- Scroll horizontally until you see Audacity.
- Ensure the slider is up and the speaker icon below it is not crossed out (muted).
For Mac Users
macOS handles audio routing globally. If your system output is misconfigured, Audacity cannot override it.
- Open the Apple Menu and go to System Settings (or System Preferences).
- Select Sound and click the Output tab.
- Ensure the correct device (e.g., External Headphones) is selected.
- Check the Output volume slider at the bottom of the window to ensure “Mute” is unchecked.
Solution 3: The “Software Playthrough” Confusion
One of the most common misunderstandings in Audacity involves the difference between Playback and Monitoring.
- Playback: You hit the “Play” button to listen to audio you have already recorded.
- Monitoring: You want to hear your voice (or instrument) in your headphones while you are recording it.
If your issue is that you cannot hear yourself while you are speaking, your output device isn’t broken—Audacity just has this feature turned off by default to prevent nasty feedback loops.
How to Enable Live Monitoring
To hear your input signal through your headphones in real-time, you need to enable Software Playthrough:
- Go to the top menu bar and click Transport.
- Hover over Transport Options.
- Click Enable
Software Playthrough(Enable audible input monitoring) (ensure it has a checkmark next to it). - Click in the monitoring meter (the microphone icon) to start monitoring without recording, or simply hit Record.
The Latency Warning (The “Echo” Effect)
While Software Playthrough allows you to hear yourself, it is rarely a perfect solution. Because the audio has to travel from your mic, into the computer, through Audacity’s processing, and back out to your headphones, there is almost always a slight delay.
This delay (latency) creates a distracting echo effect that can make it very difficult to speak naturally. If the echo is too distracting, disable Software Playthrough.
Pro Tip: How to Bypass Monitoring Latency Entirely
If you managed to get sound working by enabling Software Playthrough but can’t stand the echo, you are dealing with latency.
To avoid the headache of software latency and complex playback routing, professional creators switch to Hardware Monitoring. This means listening to your audio directly from the receiver or microphone before it ever touches your computer’s confusing sound settings.
The Wireless Monitoring Advantage
Hardware monitoring is standard on audio interfaces, but it is now available for wireless setups too. The Hollyland LARK MAX 2 offers a dedicated solution for this exact workflow: Wireless Audio Monitoring via OWS earphones.


Instead of relying on Audacity to play back your voice, you can connect the new OWS (Open Wearable Stereo) earphones directly to the receiver. This allows you to hear exactly what you are recording in real-time, completely independent of your computer’s drivers or latency issues.
- Why this matters: You get Studio Quality 48kHz/24-bit audio directly to your ears. Even if Audacity’s playback meter freezes or the software glitches, you can be 100% confident that your source audio is clean and distortion-free. This effectively separates your “recording confidence” from your computer’s technical quirks.
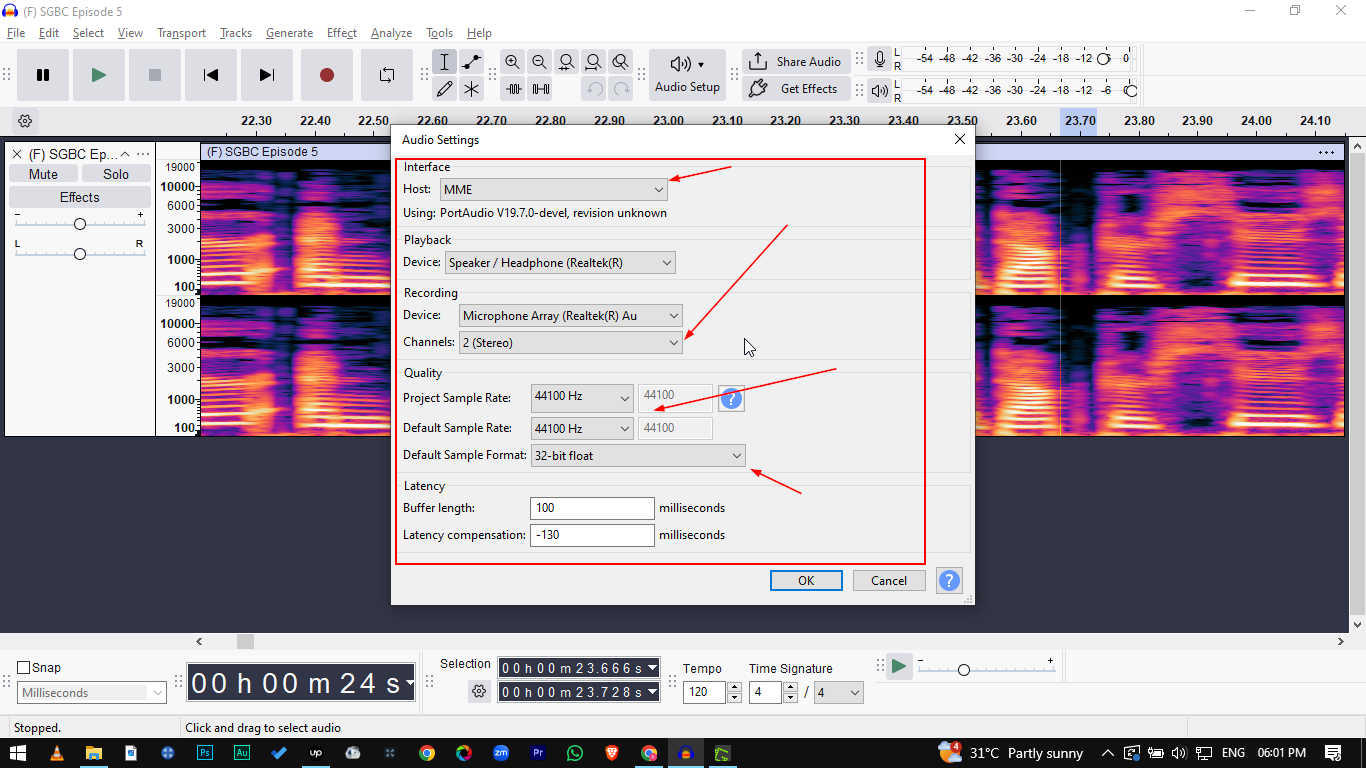
Solution 4: Match Your Project Sample Rates
If you have tried changing output devices and are still met with silence, you likely have a Sample Rate Mismatch. This is a “digital handshake” failure between Audacity and your computer’s sound card.
Audio data is processed at specific speeds, typically 44100 Hz (Standard for Music/CDs) or 48000 Hz (Standard for Video). If your Audacity project is set to one rate, but your headphones or audio interface are hard-locked to another, the driver may simply refuse to play the audio. Alternatively, you might hear the audio, but it will sound pitch-shifted (like a chipmunk or in slow motion).
How to Sync Your Sample Rates
You need to ensure Audacity and your Operating System are speaking the same language.
- Check Audacity: Look at the bottom-left corner of the Audacity window. Locate the Project Rate (Hz) dropdown. Ensure it is set to a standard rate (usually 44100 or 48000).
- Check Windows Settings:
- Right-click the Speaker icon in your taskbar and select Sound Settings.
- Click More sound settings (or go to the Sound Control Panel).
- Right-click your active playback device (e.g., Headphones) and select Properties.
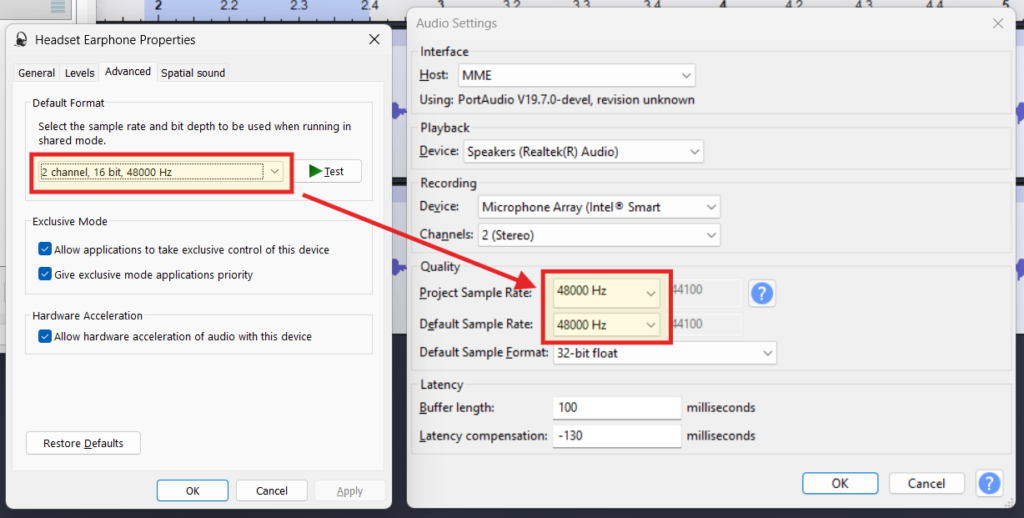
- Go to the Advanced tab.
- Look at the Default Format. If this says “2 channel, 16 bit, 48000 Hz,” you must change your Audacity Project Rate to match 48000 Hz.
- Check Mac Settings:
- Open Audio MIDI Setup (cmd + space, type “Audio MIDI”).
- Select your output device.
- Ensure the Format matches the rate displayed in Audacity.
Note: If you change the rate in Audacity, you may need to close and reopen the application for the change to take effect on the audio driver.
Solution 5: Rescan Audio Devices
One of Audacity’s most common quirks is that it does not automatically detect hardware changes while the application is running.
If you plugged in your USB interface, Bluetooth dongle, or headphones after you already launched Audacity, the program is still looking at the “old” list of available devices. Your new hardware won’t show up in the Output Device dropdown until you force a refresh.
Instead of restarting the entire application, use the Rescan function:
- Navigate to the top menu bar and click Transport.
- Select Rescan Audio Devices.
- Wait a second for the interface to refresh (the toolbars may blink briefly).
- Return to the Audio Setup button or Device Toolbar and check your Output Device list again.
Your headphones or interface should now be selectable.
Advanced Troubleshooting (Drivers & Hosts)
If checking your output device and sample rates didn’t bring your audio back, the issue likely lies deeper in how Audacity communicates with your computer’s hardware. This connection is managed by the Audio Host.
Switch Your Audio Host
The Audio Host acts as the bridge between Audacity and your sound card. Sometimes, this bridge gets “stuck” or conflicts with another application. Changing the host forces Audacity to establish a new connection.
For Windows Users:
You will typically see three options in the Audio Setup toolbar (or the dropdown menu on the far left of the interface):
- MME: This is the default and most compatible option. It is older and has higher latency (delay), but it works with almost all hardware. If you are on WASAPI, switch back to MME.
- Windows DirectSound: A middle-ground option. If MME is failing to produce sound, try this next.
- Windows WASAPI: This offers the lowest latency and highest quality, but it is “strict.” It often takes exclusive control of your audio device. If you have YouTube or Spotify open in the background, WASAPI may refuse to play audio in Audacity (or vice versa).
For Mac Users:
You will usually only see Core Audio. Mac audio handling is generally more stable than Windows, so you rarely need to change this. However, if you see no options listed here, your Mac may not be detecting the audio interface at all.
Update Audio Drivers (Last Resort)
If switching hosts fails, your physical sound card drivers may be outdated or corrupt.
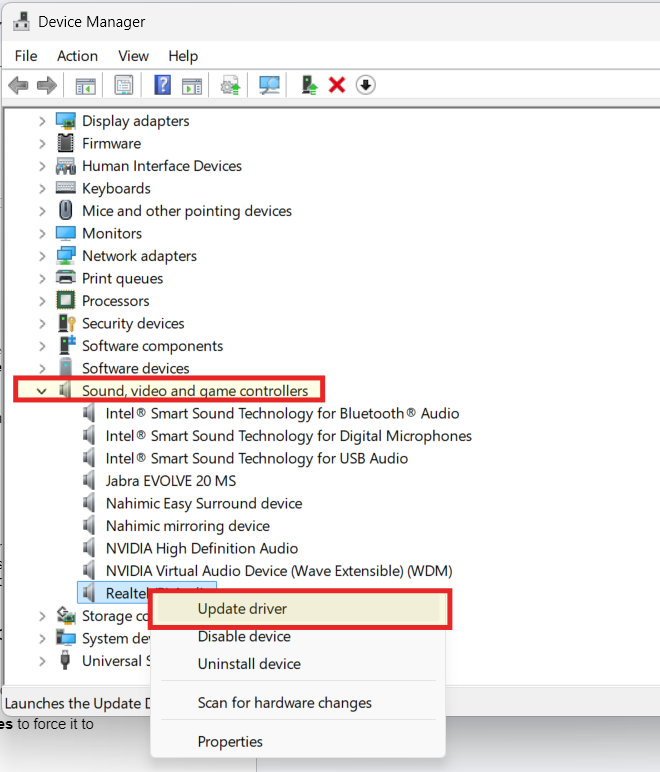
- Windows: Right-click the Start button and select Device Manager. Expand Sound, video and game controllers. Right-click your audio device (e.g., Realtek High Definition Audio) and select Update driver.
- Mac: Audio drivers are built into the OS. To update them, you generally need to update your macOS version via System Settings > General > Software Update.
Frequently Asked Questions (FAQ)
Why can I see the sound waves but not hear them?
This is known as a routing error. If the green playback meter is bouncing and the playhead is moving, Audacity is technically playing the audio correctly. However, it is sending that audio signal to the wrong destination (like a virtual driver or a disconnected monitor). Change your Playback Device in the Audio Setup toolbar to fix this.
Why is sound coming from my speakers when headphones are plugged in?
Audacity does not always support “Hot Swapping.” If you launch Audacity before plugging in your headphones, the software locks onto the system speakers and will not automatically switch over when you plug the jack in. Use Transport > Rescan Audio Devices to force it to recognize the headphones.
How do I reset Audacity settings to default?
If you have changed multiple settings and can’t trace the source of the problem, a factory reset is the fastest solution. Go to Tools > Reset Configuration and confirm the prompt to restart Audacity. This will revert all preferences to their original installation state.
Conclusion
Troubleshooting audio can be frustrating, especially when the visual meters tell you everything should be working. However, the “Green Bar Paradox” is rarely a sign of a broken file or a corrupted system.
Remember, 90% of playback issues in Audacity are solved simply by checking the Output Device list.
Audacity does not automatically switch to your headphones just because you plugged them in. By manually verifying your destination device in the Audio Setup toolbar and ensuring your sample rates match, you can resolve the vast majority of these silence issues in seconds.
Now that your playback is fixed and your workflow is restored, shift your focus to the quality of the recording itself. Capturing cleaner audio at the source—using reliable hardware like the Hollyland LARK MAX 2 to monitor sound before it even hits the computer—will save you from hours of editing and technical troubleshooting in the future.