.png)
If you have ever tried to record a podcast or capture game audio on Windows, you know the struggle: latency delays, background hiss, or just confusing silence. The solution is often hidden in a simple dropdown menu. Learning how to use WASAPI for high-quality recording in Audacity changes everything.
By switching to this modern driver, you bypass the messy Windows mixer entirely, allowing for a clean, digital signal path. Whether you need to record internal computer audio without cables or capture a microphone with near-zero latency, WASAPI is the key. Here is how to set it up and why it matters.
What is WASAPI and Why Use It Over MME?
When you open Audacity, the first option in the Audio Setup toolbar is “Host.” This setting tells Audacity how to talk to your sound card. While Windows gives you three main options, choosing the right one is the difference between a muddy, delayed recording and a crisp, professional take.
Here is the breakdown of your options:
- MME (Multimedia Extensions): The default driver. It is incredibly compatible—it works with almost anything you plug in—but it is old. It routes audio through several layers of Windows processing, which adds significant delay (latency).
- Windows DirectSound: A slightly newer alternative to MME. It is more stable, but it still routes audio through the Windows Mixer, which can alter the sample rate and add noise.
- Windows WASAPI: The Windows Audio Session API is the modern standard. It allows Audacity to communicate directly with your audio device, skipping the Windows mixer entirely.
The Two Major Benefits of WASAPI
Switching to WASAPI gives you two advantages that MME and DirectSound simply cannot match:
- Loopback Recording: WASAPI is the only host that natively supports “Loopback.” This lets you record the audio playing inside your computer (like a YouTube video, Zoom call, or game audio) digitally, without physical cables.
- Exclusive Mode: WASAPI can take “exclusive control” of your audio interface. This stops other apps (like system notification beeps) from ruining your recording and ensures the audio data is transferred bit-for-bit.
Comparison: MME vs. WASAPI
If you are unsure which host to select via the Audio Setup toolbar, use this comparison guide:
| Feature | MME (Default) | WASAPI (Recommended) |
|---|---|---|
| Primary Use Case | General compatibility; troubleshooting older hardware. | High-fidelity recording; System Audio (Loopback). |
| Latency | High (Significant delay). | Low (Near real-time). |
| Audio Path | Through OS Mixer (Processed). | Direct to Hardware (Bit-Perfect). |
| System Audio | Requires “Stereo Mix” (Hardware dependent). | Native Loopback (Digital & Clean). |
| Stability | Very High. | High (Requires matching Sample Rates). |
Method 1: How to Record Computer Audio (WASAPI Loopback)
For years, recording internal PC audio required messy workarounds like “Stereo Mix” or physical loopback cables. WASAPI Loopback solves this. It captures the digital audio stream directly from your sound card’s output before it hits your speakers, resulting in a lossless recording.
Follow these steps to capture system audio directly into Audacity:
- Access Audio Setup
Open Audacity and click the Audio Setup button in the top toolbar. (In older versions, look for the dropdown menus above the timeline).
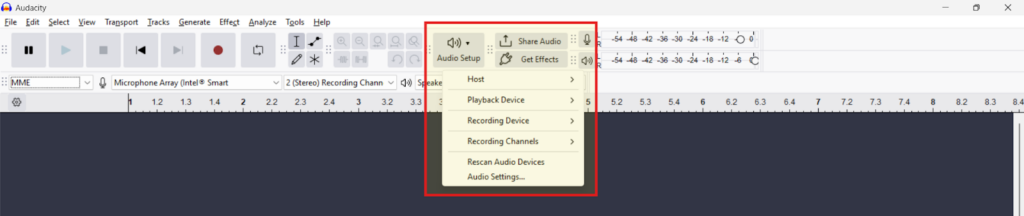
- Change the Audio Host
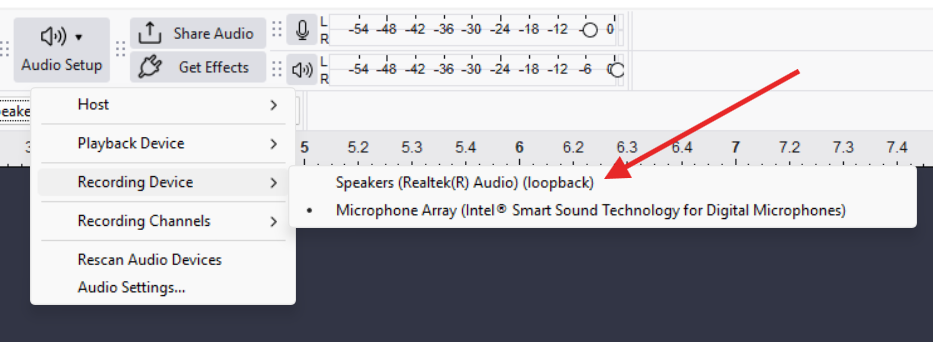
Select Host and choose Windows WASAPI. This is mandatory; MME and DirectSound do not support digital loopback in the same way. - Select the Loopback Device
Go to Recording Device and select the device that corresponds to your speakers or headphones, specifically looking for the one with (loopback) at the end.
- Example: If you listen via Realtek Speakers, select Speakers (Realtek(R) Audio) (loopback)
- Disable Software Playthrough (Vital Step)
Go to Transport > Transport Options and ensureSoftware Playthrough(Enable audible input monitoring) is unchecked (OFF). (This is called Enable audible input monitoring in newer versions of Audacity)
- Why? If this is on, Audacity will try to play the audio it is recording out of the speakers it is recording from, causing an instant, ear-piercing feedback loop.

- Record and Play
Press the Record button in Audacity first, then start playing your media (Spotify, Browser, Game).
- Note: WASAPI Loopback waits for a signal. If no audio is playing, the recording cursor in Audacity may sit still until it detects sound.
Method 2: High-Fidelity Microphone Recording (WASAPI Input)
While Loopback is great for system sounds, WASAPI’s original purpose is even more valuable for voice actors and podcasters: Exclusive Mode.
When you record a mic using standard drivers, the Windows Kernel Mixer adds delay and may resample your audio to match system sounds, degrading quality. WASAPI Input bypasses this mixer. It creates a direct line to your hardware, reducing latency and capturing the raw, unaltered signal.
Step-by-Step Setup
- Select the Host: Click Audio Setup, select Host, and choose Windows WASAPI.
- Select Your Device: Go to Recording Device. Choose your specific USB microphone or interface.
- Note: Do not select the option ending in (loopback). You want the direct hardware input.
- Match Sample Rates (Crucial):
- In Exclusive Mode, Audacity cannot convert sample rates on the fly.
- Check your Project Rate (Hz) in the bottom left corner of Audacity. It must match the default format of your microphone in Windows Settings (usually 44100 Hz or 48000 Hz).
- If these don’t match, you will get “Error opening recording device” or Error -9997.
Pro Tip: To check your device’s default rate, right-click the Speaker icon in your taskbar > Sounds > Recording tab > Right-click your Mic > Properties > Advanced. The format listed here must match your Audacity Project Rate exactly.
Optimizing the Source: The Hardware Requirement
WASAPI is a digital pipeline. It removes software bottlenecks, but it also removes software “safety nets.” Because the signal is raw, the quality of your recording depends entirely on the source hardware. If your input device has a high noise floor, WASAPI will capture that noise with perfect clarity.
To really get the most out of WASAPI, your input source needs to support high-resolution formats.
This is where hardware like the Hollyland LARK MAX 2 becomes essential.


- Studio Quality: It records at 48kHz/24-bit, which naturally pairs with the industry-standard 48000 Hz setting in WASAPI for broadcast-quality sound.
- 32-bit Float Recording: When bypassing Windows limiters via WASAPI, you risk clipping if you shout or laugh too loud. The LARK MAX 2’s internal 32-bit float recording acts as a fail-safe, ensuring your audio never distorts, regardless of volume spikes.
By pairing a high-spec device like the LARK MAX 2 with the direct signal path of WASAPI, you get a recording chain that rivals professional studio setups.
Troubleshooting Common WASAPI Errors in Audacity
WASAPI is picky. Because it skips the Windows mixer to communicate directly with your hardware, any mismatch in settings will trigger an error immediately. Here is how to fix the three most common roadblocks.
Error Code -9997: Invalid Sample Rate
This is the most frequent error. It happens when the Audacity Project Rate doesn’t match the Default Format of your device. If your mic is set to 48kHz in Windows but Audacity is set to 44.1kHz, the stream will fail.
How to Fix It:
- Check Windows Settings: Right-click the speaker icon in your system tray and select Sounds (or “Sound Settings” > “More Sound Settings”).
- Open Device Properties: Under the Playback or Recording tab, right-click your active device and select Properties.
- Find the Rate: Go to the Advanced tab. Note the “Default Format” (e.g., 2 channel, 24-bit, 48000 Hz).

- Match in Audacity: Change the Project Rate (Hz) in the bottom-left corner of Audacity to match that number exactly.
Error Code -9996: Connection Lost
This usually means Audacity can’t access the audio device because another app has locked it. This is common if you use apps like Zoom or Discord that take “Exclusive Control” of the mic.
How to Fix It:
- Go to the Advanced tab in your Windows Sound properties (as described above).
- Uncheck “Allow applications to take exclusive control of this device.”

- Click Apply, restart Audacity, and try again.
The “Flat Line” Issue (No Audio)
If you are using WASAPI Loopback to record a video, you might press “Record” and see the cursor move, but no waveform appears.
The Fix:
Loopback requires an active audio stream. Unlike MME, which records “silence,” Loopback won’t record unless sound is playing.
- Start the Audio First: Ensure your video or music is actually playing before you hit record.
- Check the Stream: If the video pauses, the recording cursor in Audacity may stop moving or record a flat line until sound resumes.
Pro Tip: Managing Latency (Software vs. Hardware)
One of the biggest challenges when recording vocals is latency—the delay between speaking and hearing yourself in the headphones. While switching to WASAPI reduces this delay compared to MME, it doesn’t eliminate it entirely. As long as the signal travels into the computer, gets processed, and comes back out, there is a delay.
The “Software Playthrough” Trap
In Audacity, the Software Playthrough (Enable audible input monitoring) setting allows you to hear what you are recording, but with a distracting echo.
- If Enabled: You hear a “slap-back” echo that makes speaking naturally almost impossible.
- If Disabled: The echo is gone, but you can’t hear yourself at all.
For professional results, keep Software Playthrough (Enable audible input monitoring) OFF and use Hardware Monitoring.
The Zero-Latency Solution
The only way to get true “zero-latency” monitoring is to listen to the audio before it enters the computer.
This is another area where the Hollyland LARK MAX 2 solves a software problem with hardware. Unlike standard USB mics that rely on the PC to send audio back to you, the LARK MAX 2 features Wireless Audio Monitoring via OWS earphones.
This allows you to:
- Monitor in Real-Time: Hear exactly what the mic is capturing with zero delay.
- Bypass the PC: Since the monitoring happens at the headset level, your computer’s buffer size or driver settings don’t affect what you hear.
- Maintain Focus: Speak confidently without the “speech jammer” effect caused by software echoes.
Frequently Asked Questions (FAQ)
Is WASAPI better than ASIO?
It depends on your goal. ASIO is the standard for complex music production because it supports multi-track recording. However, ASIO is hard to set up in Audacity due to licensing issues. WASAPI is the better choice for Audacity users on Windows because it is built-in, requires no extra downloads, and offers similar low-latency performance for stereo recording.
Why won’t WASAPI record my microphone?
If you select WASAPI and hit record but get silence, check these three things:
- Windows Privacy: Go to Settings > Privacy > Microphone. Make sure “Allow desktop apps to access your microphone” is On.
- Sample Rate: Match the Hz in Audacity to your Windows Sound Settings.
- Exclusive Mode Conflict: Close other audio apps (Discord, Zoom) that might be hogging the mic.
Does WASAPI improve sound quality?
Yes. Standard drivers route your audio through the Windows Kernel Mixer, which blends your recording with system sounds and often re-samples the audio, adding noise. WASAPI Exclusive Mode creates a direct digital path to your audio device, ensuring bit-perfect recording with no interference from the operating system.
Conclusion
Switching from MME to Windows WASAPI is the most effective “free” upgrade you can make to your Audacity workflow. Whether you are capturing desktop audio via Loopback or aiming for low-latency voiceovers, WASAPI bridges the gap between amateur and professional audio on Windows.
However, remember that WASAPI is just a pipeline—it keeps the signal pure, but it can’t fix a bad source. To fully use WASAPI’s capabilities, your input hardware needs to be up to the task.
If you are ready to move beyond basic recording, ensure your Project Rate is set to 48,000Hz and consider upgrading your input source to the Hollyland LARK MAX 2. Its studio-grade specs match WASAPI’s architecture perfectly, and the 32-bit Float recording ensures you capture every nuance without distortion. Combine the right driver with the right hardware, and your Windows PC becomes a legitimate production studio.