.png)
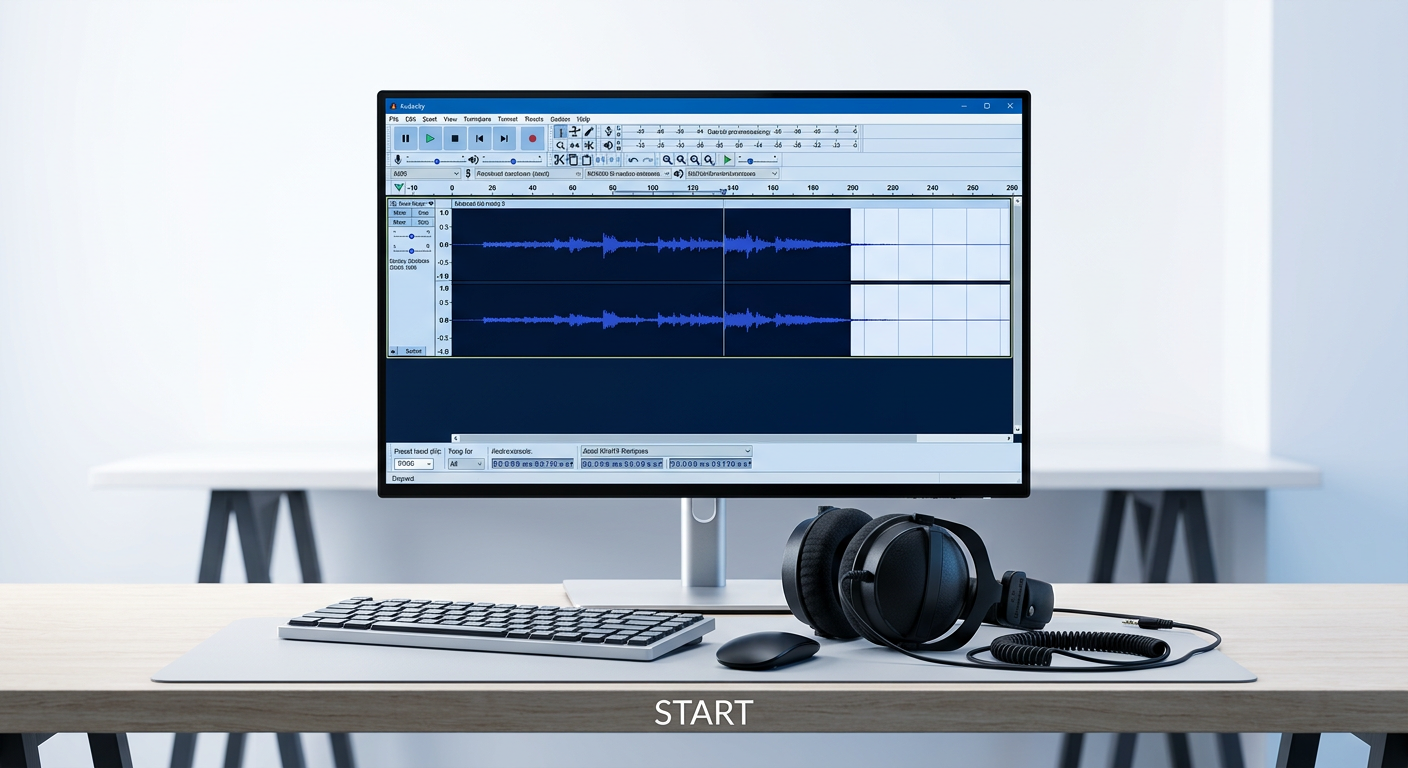
If you are looking to start music production on a budget, you have likely asked: How to make beats in Audacity?
The short answer is yes, you can, but you need to adjust your expectations. Audacity operates differently than industry-standard beat-making software like FL Studio, Ableton Live, or Logic Pro.
Before you dive in, it is critical to understand the difference between an Audio Editor and a Sequencer:
- Standard DAWs (Sequencers): Software like FL Studio uses a Piano Roll or Step Sequencer. You create beats by clicking “dots” on a grid to trigger virtual instruments.
- Audacity (Wave Editor): Audacity does not have a Piano Roll or virtual instruments. It is designed to manipulate recorded audio waves.
How It Works: The “Collage” Approach
Since you cannot “program” MIDI notes in Audacity, you create beats through Sampling and Loop Manipulation.
Think of Audacity as a digital collage. You build a track by importing actual audio files—drum loops, bass samples, or recorded “found sounds”—and physically arranging them on the timeline. You are cutting, pasting, and layering sound waves rather than programming computer data. This is very similar to the “old school” method used by early Hip Hop producers who physically spliced tape to loop drum breaks.
Who Is This Workflow For?
Audacity’s lack of a sequencer makes it difficult for complex EDM or Trap music, but it excels in specific areas. This method is perfect for:
- Lo-Fi & Boom Bap: Genres that rely heavily on chopping up samples and layering “dusty” textures.
- Podcast Intros: Creating simple, repetitive background music without needing expensive software.
- Foley & Found Sound: Producers who want to record real-world sounds (like clapping or hitting a table) and arrange them into a rhythm.
Method 1: The “Loop Collage” Technique (Easiest Way)
If you have never produced music before, this is the best place to start. The “Loop Collage” technique treats audio files like Lego bricks. You aren’t synthesizing sounds from scratch; you are arranging pre-recorded loops (drums, basslines, melodies) into a cohesive structure.
Because Audacity is a wave editor rather than a sequencer, this manual approach gives you total control over every waveform.
How to Build a Beat Using Loops
Follow this step-by-step workflow to construct your first track.
- Source High-Quality Samples
You need raw materials before you can build. Download royalty-free drum loops and melody samples. Avoid copyrighted music to prevent legal issues.
- Recommended Sites: Looperman, Freesound.org, or Cymatics (Starter packs). Look for files labeled with the BPM (e.g., “HipHop_Drum_Loop_90BPM.wav”).
- Import Your Tracks
Open Audacity and simply drag and drop your audio files directly into the workspace. Audacity will automatically create a separate track for each file. Ensure you import a drum loop (the foundation) and a melody loop (the hook).

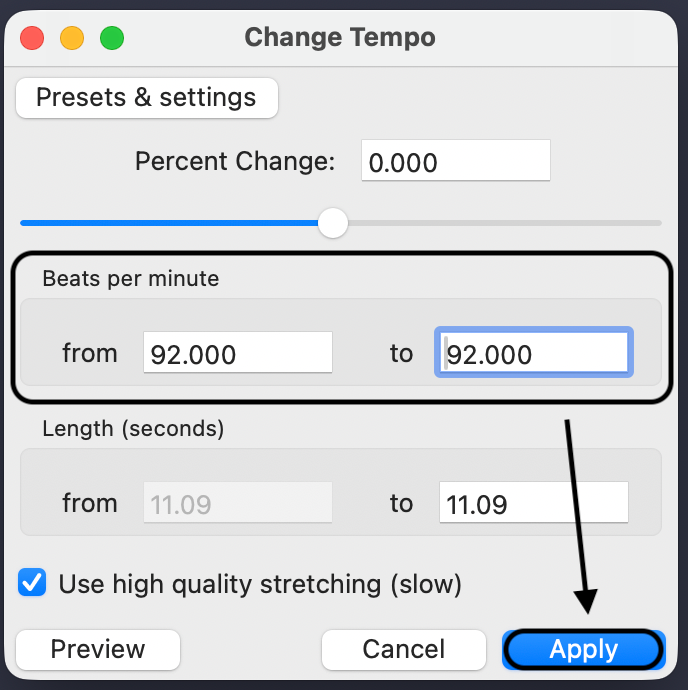
- Match the BPM (Tempo)
If your drum loop is 90 BPM but your melody is 100 BPM, they will drift out of sync. You must standardize the speed.
- Select the track you want to change.
- Go to Effect > Pitch and Tempo > Change Tempo.

- Input the current BPM of the loop and your desired target BPM. Audacity will stretch or shrink the audio without altering the pitch.
- Loop Your Sections
Most samples are only 2 or 4 bars long (about 5-10 seconds). To turn this into a full song, you need to extend them.
- Highlight the clip you want to extend.
- Go to Effect > Special > Repeat.

Enter the number of times you want it to loop (e.g., enter “3” to turn a 4-bar loop into a 16-bar verse).

- Align Tracks (The Grid)
Timing is everything. You need your melody to start exactly when the beat drops.

- Note for Audacity 3.0+ Users: The old “Time Shift Tool” (double-arrow icon) is gone. Now, you simply hover over the Clip Handle (the bar at the top of the waveform) and drag the clip left or right to snap it to the correct timeline position.
Method 2: Creating Custom Samples & Beatboxing (The “Pro” Way)
While dragging and dropping existing loops is easy, the most unique beats come from custom sampling. This method involves recording your own “found sounds”—claps, finger snaps, beatboxing, or even hitting a table—to create a drum kit that nobody else has.
Since Audacity is primarily an audio editor, it excels at capturing and manipulating these raw recordings. However, recording percussion introduces a specific technical challenge: dynamic range.
The Challenge: Why Percussion Sounds Distorted
Percussive sounds (like a loud hand clap or a snare hit) have sudden, sharp spikes in volume. If you try to record these with a standard USB microphone or a smartphone, the input often peaks, resulting in digital clipping. The waveform hits the “ceiling,” and your crisp snare sounds like a distorted crunch.
The Solution: 32-bit Float Recording
To capture professional samples that hit hard without distortion, your recording gear needs high dynamic range headroom. For this workflow, we recommend the Hollyland LARK MAX 2.

Hollyland LARK MAX 2 - Premium Wireless Microphone System
A premium wireless microphone for videographers, podcasters, and content creators to capture broadcast-quality sound.
Key Features: Wireless Audio Monitoring | 32-bit Float | Timecode
The LARK MAX 2 is ideal for sampling because of its 32-bit Float Recording capability. Unlike standard 24-bit recorders, 32-bit Float captures such a massive dynamic range that it is virtually impossible to clip the audio.
- No More Red-Lining: You can record a whisper and a scream (or a loud drum hit) in the same take. Even if the waveform looks “blown out” on the screen, the data is preserved. You can simply lower the gain in Audacity later, and the sound remains crystal clear.
- Studio Quality Foundation: The microphone records in 48kHz/24-bit depth. This high resolution is critical when you start adding effects. When you apply Reverb or Bass Boost to a low-quality recording, it sounds muddy. With the LARK MAX 2, the source audio is pristine, so your effects sound professional.
How to Build Your Kit in Audacity
Once you have your clean source audio, follow this workflow to turn it into a beat:
- Record Everything: Record a long track of you performing various hits (e.g., 5 claps, 5 kicks on a table, 5 shakers).

- Isolate the Best Hits: Zoom in on the waveform (Ctrl + Mouse Wheel). Highlight the single best “hit” from your recording.

- Trim Audio: Press Ctrl + T to trim the audio, removing everything except the highlighted sample.

- Export Selection: Go to File > Export Audio. Select “Current Selection” and save it as a WAV file (e.g., “My_Custom_Snare.wav”).

- Re-Import: Drag your new custom samples back into your main project and arrange them on the timeline to build your rhythm.
Method 3: Using the “Generate Rhythm Track” Plugin
If you don’t have external samples and simply need a steady beat to record vocals or instruments over, Audacity has a built-in solution. The Rhythm Track generator is essentially a customizable metronome that creates a synthetic drum pattern from scratch.
While this won’t sound like a professional studio drummer, it is the fastest way to lay down a tempo map without leaving the software.
How to Generate a Track
- Create a New Track: Go to Tracks > Add New > Mono Track.

- Open the Plugin: Navigate to the top menu and select Generate > Rhythm Track.
- Configure Your Beat: A dialog box will appear allowing you to adjust the settings:
- Tempo (BPM): The speed of your track (e.g., 90 BPM for Hip Hop).
- Beats per bar: Usually set to 4 for standard time.
- Swing amount: Set this to 0 for a straight robotic beat, or add a small value (like 0.2) to give it a “human” groove.
- Beat Sound: Choose between “Metronome,” “Ping,” or “Cowbell.”

- Generate: Click OK. Audacity will render a visual waveform of the beat for the duration you specified.
When to Use This Method
This tool is a utility, not a creative instrument. It is vital to understand its limitations so you don’t waste time trying to make a radio-ready hit with a generated click track.
| Pros (Best Used For) | Cons (Avoid For) |
|---|---|
| Foundation: Perfect as a “Click Track” to keep your live recording on time. | Sound Quality: The sounds are synthetic and robotic; they lack texture and depth. |
| Speed: No need to search for samples or download files. | Flexibility: You cannot change the drum sounds (e.g., swap the snare for a clap) easily. |
| Precision: Guarantees mathematically perfect timing for BPM alignment. | Vibe: Lacks the “soul” or “swing” of a sampled loop or real drummer. |
Pro Tip: Use the Rhythm Track to record your guitar or vocals, then mute or delete it once you have layered your real drum samples (Method 1) on top. Think of it as scaffolding—essential for building, but removed when the house is finished.
Essential Effects to Make Your Beats “Hit Harder”
Raw samples and recordings often sound “dry” or disjointed when first layered together. To achieve a professional sound where the kick drum thumps and the snare snaps, you must process your audio. Audacity provides a suite of built-in tools that can transform a flat loop into a cohesive, hard-hitting track.
Here is a breakdown of the four critical effects you need to master for beat production:
| Effect | Function | Best Used For |
|---|---|---|
| Bass and Treble (Bass Boost) | Increases the volume of low-end frequencies to add weight and “thump.” | Kick drums and 808 basslines. |
| Compressor | Reduces the dynamic range to make quiet sounds louder and loud sounds softer. This “glues” the track together. | The full drum bus or main mix to make it sound punchy. |
| Reverb | Simulates acoustic space, making sounds feel like they are in a real room. | Snares, claps, hi-hats, and background melodies. |
| High-Pass Filter | Cuts out low frequencies below a certain point to remove “mud.” | Hi-hats, shakers, and melodies (to leave room for the kick). |
How to Apply These Effects Properly
1. Bass Boost (The “Thump”)
Go to Effect > Bass and Treble. Be careful not to slide the bass too high, or your audio will clip (distort). A boost of 3dB to 6dB is usually enough to make a kick drum cut through the mix without overwhelming the other instruments.


2. Compression (The “Glue”)
Compression is the secret to modern hip-hop and electronic beats. It ensures your volume levels stay consistent. Go to Effect > Compressor.

- Threshold: Set this to where the audio just starts to peak.
- Ratio: Use 2:1 or 4:1 for drums.
- Make-up Gain: Enter “0” to restore volume after compression.

3. Reverb (The “Space”)
Dry snares often sound cheap. Go to Effect > Reverb. Keep the “Room Size” small (around 30-40%) for a tight drum sound. Pro Tip: Avoid putting reverb on your kick drum or bassline; it will make the low end sound muddy and wash out the beat.


4. High-Pass Filter (The “Cleanup”)
This is the most underrated mixing tool. If your melody has low-end frequencies, it will clash with your kick drum.
- Select your melody or hi-hat track.
- Go to Effect > Filter Curve EQ.

- Select the Manage button > Factory Presets > Low Roll-off for Speech (or manually drag the left side of the line down).

- This removes the bass frequencies from non-bass instruments, ensuring your kick drum has its own space to hit hard.
Pro Tips for Workflow in Audacity
Making beats in Audacity can become chaotic quickly because it lacks the grid-based interface of a traditional DAW. To keep your project organized and speed up your production time, use these essential workflow adjustments.
1. Structure Your Song with Label Tracks
When layering multiple drum loops and samples, it is easy to lose track of where your verse ends and the chorus begins. Instead of guessing, use Label Tracks to create a visual roadmap of your beat.
- How to do it: Click in the timeline where a section begins and press Ctrl + B (Windows) or Cmd + B (Mac).

- Why it matters: Type “Intro,” “Drop,” or “Verse 1” into the label. This creates a magnetic anchor point, making it easier to align your loops to specific sections of the song structure without counting seconds manually.
2. Master the Essential Keyboard Shortcuts
Speed is everything when creativity strikes. Relying on the mouse for repetitive tasks kills your momentum. Memorize these two shortcuts immediately:
- Loop Play (Shift + Space): This is the most critical shortcut for beat making. It allows you to listen to a specific selection repeatedly. Use this to ensure your drum loops cycle smoothly without clicking or “hiccuping” at the transition point.
- Duplicate (Ctrl + D / Cmd + D): Once you have a perfect 4-bar drum loop, don’t copy and paste it manually. Highlight the clip and press Ctrl + D to instantly clone it directly after the original. You can build a full 3-minute backing track in seconds using this method.
3. Use Low-Latency Wireless Monitoring
If you plan to record vocals, beatboxing, or live instruments over your new beat, audio monitoring is non-negotiable. If you can’t hear yourself clearly in real-time, you will drift off-tempo.
For a clutter-free setup, pro creators are moving toward the Hollyland LARK MAX 2’s new OWS earphones. Unlike bulky studio cans, these open-wearable stereo earphones allow you to monitor your backing track wirelessly while keeping your setup clean. This ensures you can hear the beat perfectly without being tethered to your computer, allowing for a more energetic and on-beat performance when laying down vocal samples.
Frequently Asked Questions (FAQ)
Does Audacity have a built-in drum machine?
No, Audacity does not have a traditional drum machine or visual step sequencer like you would find in FL Studio or GarageBand. It is primarily an audio wave editor.
However, it does feature a native plugin called Rhythm Track (found under Generate > Rhythm Track). This tool allows you to create a basic, steady beat or metronome click at your desired BPM to help keep your layered samples in time.
Can I use VST instruments in Audacity?
Yes, but with significant limitations. While Audacity supports VST plugins, it handles them differently than a standard Digital Audio Workstation (DAW). Audacity excels at hosting VST effects (like compressors, EQ, or reverb) to alter recorded audio.
However, because Audacity lacks a MIDI Piano Roll, you cannot “draw” notes to play VST instruments (like virtual synthesizers) effectively. For complex virtual instruments, a dedicated DAW is recommended.
How do I sync tracks in Audacity?
Syncing tracks is a manual process that relies on visual alignment. Follow these steps for the best results:
- Match BPM: Ensure all your loops are processed with the Change Tempo effect so they share the same speed.
- Use the Clip Handle: Hover your mouse over the title bar (the top edge) of the audio clip until the cursor turns into a hand icon.
- Drag to Align: Click and drag the clip left or right.
- Zoom In: Use Ctrl + Scroll Wheel to zoom in on the waveform. Align the sharpest peak (the “transient”) of your snare or kick drum with the grid line or the beat of the track above it.
Conclusion
Audacity might not have the colorful interface of a paid Digital Audio Workstation (DAW), but it is a powerhouse for sample-based production. By mastering the tools of cutting, looping, and layering, you can produce professional-sounding beats without spending a dime on software. It forces you to listen to the waveform rather than relying on visual MIDI grids, which often makes you a better producer in the long run.
Your next step is simple: start building your library. Whether you are dragging in royalty-free loops or recording your own “found sounds,” the quality of your source audio matters most.
For producers looking to create a truly signature sound, try recording your own percussion kits—snaps, claps, and environmental textures. Using a high-fidelity recorder like the Hollyland LARK MAX 2 is a major advantage here. Its 32-bit float recording ensures that even the loudest handclaps or drum hits are captured without distortion, giving you pristine, studio-quality samples to manipulate and layer in your next Audacity project.
Open a new track, hit record, and start experimenting.