.png)
The cajon has become a go-to percussion instrument in everything from unplugged acoustic sets to full band performances. Its punchy bass and sharp snare-like slaps make it incredibly versatile… but only if it’s miked correctly.
A poor mic setup can flatten its tone or miss entire frequency ranges.
As interest in the cajon continues to grow, especially in genres like Latin, pop, and worship music, global sales have been steadily rising since 2018. And with that growth comes an even greater need to capture its sound the right way.
In this guide, we’ll walk you through everything you need to know about miking a cajon. From choosing the right gear and placing your mic correctly to sound treatment and mixing tips, you’ll find all the essentials here.
The Cajon’s Acoustic Anatomy and Sound Zones
Understanding the structure and sound behavior of a cajon is essential before placing a microphone. Each part of the instrument plays a specific role in shaping its unique tone.
Anatomy of the Cajon

Tapa (Front Plate): This is the main striking surface, usually made from thin plywood. It’s where most of the sound originates. The quality and thickness of the tapa directly affect the sensitivity and tone of the cajon.
Cajon Body: The box structure is typically made from hardwood like birch or mahogany. It acts as a resonating chamber, amplifying the vibrations from the tapa.
Sound Hole: Found at the back, the sound hole helps project the cajon’s low-end frequencies. Its size and position influence how the instrument breathes and how the bass tones are perceived.
Internal Snares or Strings: Mounted just behind the tapa, these create the crisp, buzzing sound when the upper part of the cajon is struck. Some cajons use guitar strings, while others use snare wires or bells.
Sound Zones on the Playing Surface
Center Zone: Striking the center of the tapa produces low, warm bass tones. This is the sweet spot for kick drum-like sounds and is typically miked from the rear sound hole.

Edge Zones: Hitting the top edges produces sharper, higher-pitched snare tones. These are ideal for rhythm articulation and are best captured with a front-facing mic.

How Playing Technique Affects Tone
Bass Strokes: Played with the palm against the center, these strokes deliver the deepest resonance. A good mic placement here ensures the body of the cajon is fully captured.
Slap and Pop Strokes: Performed with fingers or fingertips on the corners, they produce bright, cutting snare-like sounds with quick attack. These can be lost in a poor mic setup.
Ghost Notes and Dynamics: Subtle touches and variations in hand pressure create complexity in the groove. The more expressive the playing, the more important accurate mic positioning becomes to preserve detail.
What Matters Before You Even Place a Microphone
Before choosing a mic or setting up your gear, there are four key factors that have a much bigger impact on your final cajon recording:
Start With a Great-Sounding Cajon
If the cajon itself doesn’t sound good, no mic will save the recording. Invest in a well-built instrument with clear low-end and snappy highs. Test different models until you find one that matches the tone you want.
Treat the Room You’re Recording In
A bad-sounding room, too echoey or too flat, can ruin your tone. Use acoustic foam, rugs, or curtains to control reflections and balance the sound. Even small treatment steps make a big difference.
Mind the Player’s Technique
The way the cajon is played matters just as much as the mic. Good technique creates clean, dynamic tones that are easier to capture. Uneven hand strikes or poor control can lead to muddy or unbalanced recordings.
Understand Basic Mic Behavior
Before placement, know what your mic is designed to do. A dynamic mic works great close-up for live use, while a condenser captures more detail in studio setups. Mic too close to the sound hole? Expect boomy bass. Too far? You might lose presence.
Optimal Microphone Placement Techniques for Cajon
Achieving the desired sound from a cajon requires strategic microphone placement. The following techniques are widely adopted in both live and studio settings:
Single Microphone Setup
While there are several ways to position a single microphone with your cajon, these two methods are generally the most practical and reliable:
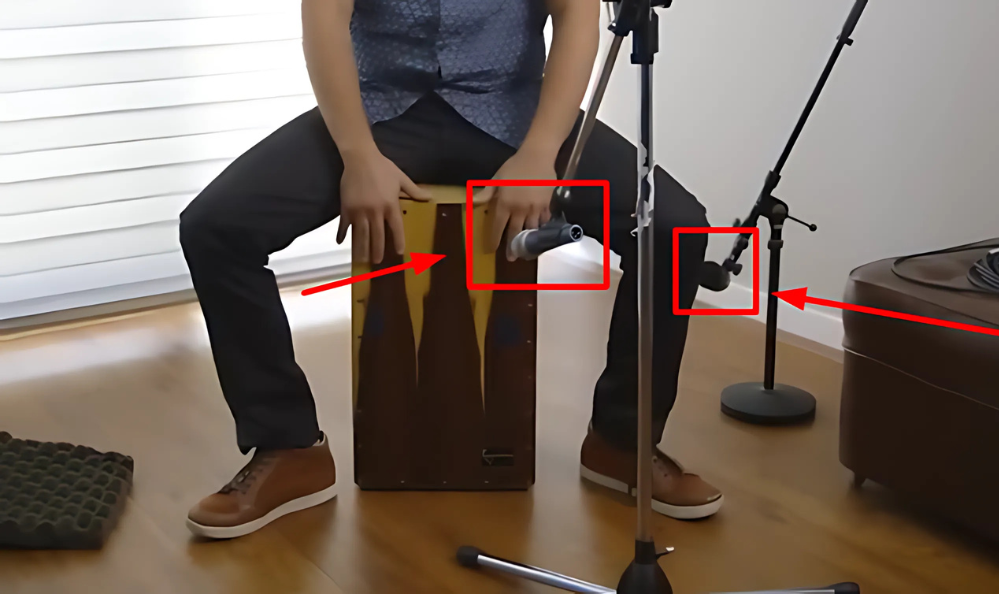
Method 1: Front Placement
When using one mic, front placement is the most efficient choice. In this setup, the mic sits about 6–8 inches from the cajon, angled slightly upward. This captures the sharp slap tones and snare-like textures from the upper part of the tapa. It’s a clean, direct sound that works well for acoustic or solo performances where clarity matters more than deep bass.

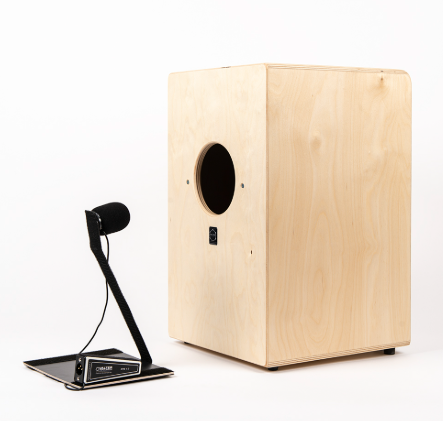
Method 2: Internal Microphone Placement
Placing a mic inside the cajon through the sound hole helps isolate the low-end while minimizing bleed from other instruments. In this setup, the mic is positioned just inside the hole, aimed slightly upward toward the tapa.

This captures deep bass tones with less external noise. To avoid unwanted vibrations or boxy resonance, the mic should rest on foam or padding, not touch the interior walls directly. This method works well in live settings where stage noise is an issue, or when a tight, controlled bass tone is the goal.
Dual Microphone Setup
For a fuller sound, place one mic at the front for snare and slap tones, and another near the rear sound hole to capture bass. In this setup, the front mic is angled toward the upper part of the tapa, while the rear mic is positioned close to the sound hole.
This lets you balance low-end punch with high-end detail.
Make sure to check for phase issues; if the mics are out of phase, the sound may feel thin or hollow. Inverting the polarity of one mic can usually fix that.
Miking a Cajon for Live Performances
Performing live? Check these common challenges before you mic your cajon incorrectly!
Common Challenges
Stage Noise
In live settings, especially with multiple instruments, microphones can pick up unwanted sounds from other sources, leading to a cluttered mix.
Feedback Issues
The proximity of microphones to monitors and speakers can cause audio feedback, resulting in unwanted howling or squealing sounds.
Effective Solutions
Close Miking
Positioning microphones close to the cajon helps isolate its sound and reduce ambient noise pickup. Dynamic microphones are often preferred for their directional pickup patterns and resistance to feedback.

Mic Mounts and Clamps
Using mounts or clamps to secure microphones ensures consistent placement, even if the performer moves during the performance. This stability helps maintain sound quality and reduces the risk of feedback.
Equalization (EQ) Settings
Applying a high-pass filter can eliminate low-frequency rumble and reduce the potential for feedback. Adjusting EQ settings to cut problematic frequencies can also help manage feedback and improve overall sound clarity.
Miking a Cajon in the Studio
This is what you need to know when your micing your studio cajon:
Room Acoustics
The acoustics of your recording space play a big role in how your cajon recordings turn out. If the room isn’t treated properly, it can cause unwanted echoes, uneven frequencies, and other sound issues that make it hard to get a clear and accurate recording.
To do better, try adding some basic acoustic treatments, like:
- Bass traps
- Diffusers
- Sound-absorbing panels
These help control the sound in the room, giving you a more balanced and professional recording environment.
Use of Room Microphones
Along with close miking, using room microphones is a great way to add depth and a natural feel to your cajon recordings. By placing mics a bit farther from the instrument, you capture how the cajon blends with the room, adding a sense of space and realism to the sound.

This works especially well in well-treated rooms, where the natural reverb helps enhance the overall recording without sounding muddy or harsh.
Microphone Techniques
Using both close and room microphones gives you the best of both worlds, with sharp detail from the close mics and a natural feel from the room mics. By adjusting the levels of each, you can shape the overall sound to match the style of your project.
Get Better Cajon Sound with These 5 Practical Tips
You don’t need fancy gear to get a great cajon sound, but a few smart tweaks can make a big difference.
- Customize Your Snare Response
Cajons come with either strings or snare wires inside. If your cajon uses strings, you can adjust their tension to shape the tone. Looser strings give you a drier, softer sound. Tighten them, and you’ll get a sharper, more defined snap.
Snare-style cajons use wires, similar to a drum kit snare. The closer those wires sit to the front plate, the crisper the sound. Some cajons come with a knob for this. If yours doesn’t, you can open the back sound hole or remove the front panel to tweak it manually. Some models even let you add extra snares for more bite.
- Adjust the Front Plate Screws
The pitch and sharpness of your cajon can be adjusted by loosening or tightening the screws around the edges of the front plate. Loosen a few at the top corners, and you’ll get a louder, snappier slap. Go too far, and you risk buzzing or even scratching your hands on exposed screws.
Start small, just a quarter turn at a time, and keep track of which screws you’ve changed. Avoid adjusting the lower screws too much, or you might introduce unwanted rattle from the internal snares.
- Add Simple Accessories
A few small add-ons can expand your cajon’s sound quickly. Cajon-specific brushes give you that classic brushed snare texture without needing a full drum kit. You can also attach accessories like tambourines, castanets, or mini hi-hats to the side of the cajon.
These are made to be played by hand, so your technique stays the same while your sound gets a lot more interesting.
- Use a Cajon Pedal
If you’re a drummer switching to cajon for acoustic sets, a cajon pedal is worth trying. It’s like a kick drum pedal connected by a cable to a beater that hits the cajon.
This lets you use your foot to play bass rhythms while your hands are free for snare and accents. You can even build a small hybrid kit by adding cymbals or a low hi-hat.
- Learn from the Pros Online
Better technique equals better sound. You’ll find tons of helpful cajon tutorials online, many of them free. Heidi Joubert’s YouTube channel is a great starting point if you want to learn different grooves and styles.
You can also study performances by seasoned players like Stephan Maass, Nina Rodriguez, Paquito Gonzalez, and Juan Carlos Melian. Watching how they move, where they strike, and how they layer rhythms can teach you more than gear ever will.
Conclusion
If your cajon recordings or live mixes still sound flat or inconsistent, it’s almost never just the mic’s fault. The real difference comes from how well you match your mic technique to the way the cajon produces sound.
Start with the basics: mic placement, room sound, and player technique. For live use, keep mics close, angle them with intention, and use EQ to cut low-end rumble. In the studio, treat your space and consider blending a close mic with a room mic for depth.
Frequently Asked Questions (FAQs)
What’s the best way to mic a cajon?
For live use, place a dynamic mic near the rear sound hole to capture bass, or up front for slap tones, just keep it close to reduce bleed.
In the studio, combine a front condenser mic with a room mic to capture both attack and natural depth.
How can I make my cajon sound better?
Start with a well-built instrument, then adjust the snare tension and front plate screws to dial in tone. Use accessories like brushes or a pedal to add variety. In studio or live setups, control the room or stage sound, play with good technique, and test mic positions until everything sounds clear and dynamic.