.png)
If your podcast sounds like a whisper one minute and a shout the next, you have a leveling problem. Listeners shouldn’t have to ride their volume dial just to hear what you’re saying. Learning how to normalize audio in Audacity for consistent volume is the quickest fix.
Audio normalization is the process of applying a constant amount of gain (volume boost) to an entire recording to reach a specific target level. Think of it as a “master volume” knob for your track: the software finds the loudest peak in your file and turns the volume up equally until that peak hits a specific ceiling.
Unlike compression, which squashes loud sounds to make room for quiet ones, normalization keeps the dynamic relationship between loud and quiet parts exactly the same—it just makes everything louder.
Why You Can’t Skip This Step
There are two main reasons to normalize every single track:
- Headroom (Avoiding Distortion): Digital audio has a hard limit of 0 dB. If you go over this, your audio “clips” and sounds distorted. Normalization sets a safety buffer (usually -1.0 dB), ensuring your audio is as loud as possible without ever crossing into the red zone.
- Consistency: If you record an intro on Monday and an interview on Tuesday, the volume levels will naturally differ. Normalization ensures the peak volume is uniform across different tracks, so your intro isn’t twice as loud as the interview.
The Goal: Platform Compliance
Ultimately, you want your audio to be competitive. Platforms like Spotify, Apple Podcasts, and YouTube have strict loudness standards. If your raw recording is too quiet, your content will sound weak and amateur compared to professional channels. Normalization is the first step to getting your levels up to industry standards.
Method 1: Using the “Normalize” Effect (Peak Normalization)
For most general tasks, the standard Normalize effect is the best tool. It scans your audio to find the single loudest peak, calculates how much gain is needed to raise that peak to your target, and applies that gain to the whole track.
Here is the step-by-step process:
- Select Your Track: Click the track header or press Ctrl + A (Windows) / Cmd + A (Mac) to select the entire file.
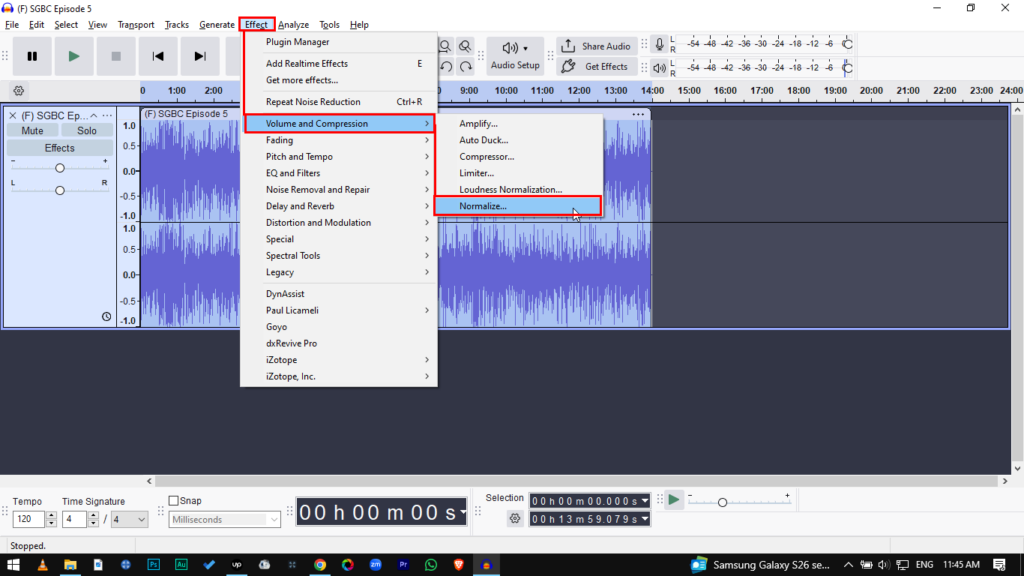
- Open the Effect: Go to Effect > Volume and Compression > Normalize.
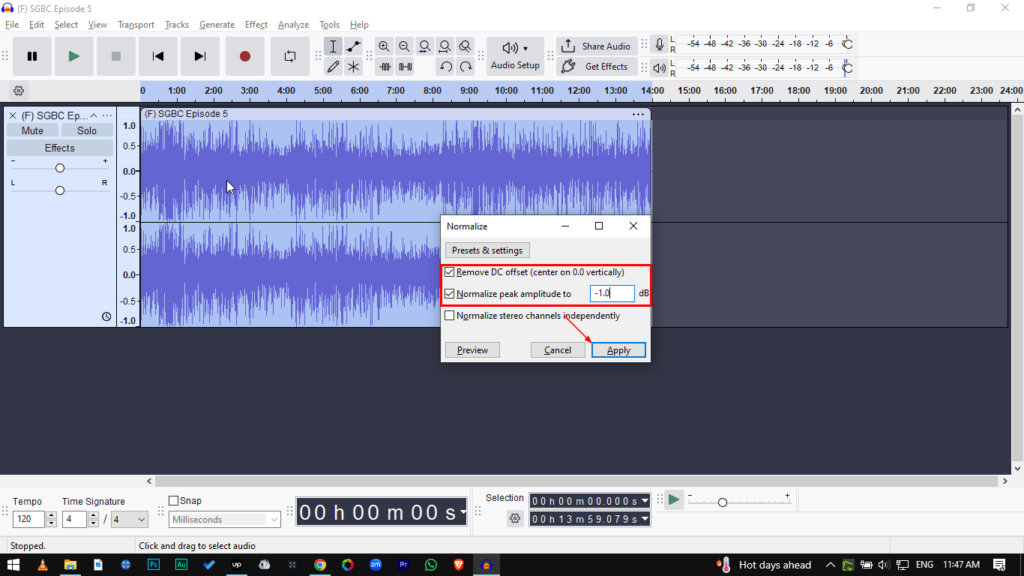
- Remove DC Offset: Make sure “Remove DC offset” is checked.
- Why? DC offset happens when your waveform isn’t centered on the 0.0 line. Leaving this unchecked can cause clicks and pops during editing.
- Set Peak Amplitude: Enter -1.0 dB in the “Normalize peak amplitude to” field.
- Apply: Click Apply.
Pro Tip: Why -1.0 dB instead of 0.0 dB?
technically, 0.0 dB is the maximum volume digital audio can handle. However, you should never normalize to exactly 0.0 dB.
When you export to MP3 or upload to streaming sites, the conversion process can create “inter-sample peaks” that push the volume slightly higher than the original. If you are already at 0.0 dB, this pushes the audio into distortion. Setting your target to -1.0 dB gives you a safety buffer.
Method 2: Loudness Normalization (Best for Podcasts & YouTube)
Standard Peak Normalization has a flaw: it only cares about the loudest moment. If you have a quiet 10-minute conversation with one loud laugh, Peak Normalization will stop boosting the volume as soon as the laugh hits the limit. The result? The laugh is loud, but the conversation is still quiet.
Loudness Normalization solves this by targeting the average perceived volume. It ignores momentary spikes and focuses on making the dialogue consistently loud.
This method is essential for YouTube, Spotify, and Apple Podcasts, which all normalize audio to roughly -14 LUFS (Loudness Units Full Scale).
How to Apply Loudness Normalization
- Select your audio track (Ctrl + A / Cmd + A).
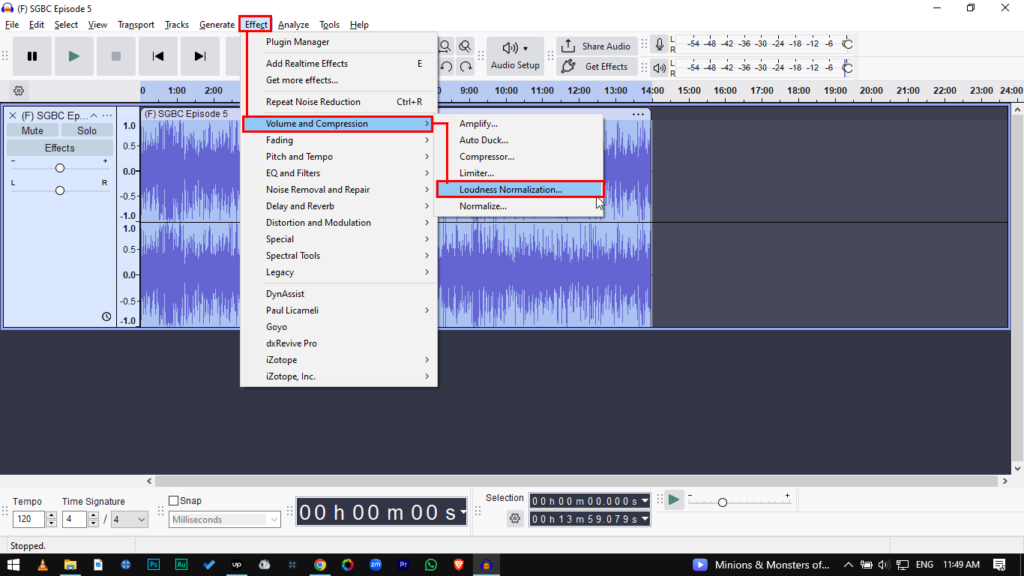
- Go to Effect > Volume and Compression > Loudness Normalization.
- Set “Perceived Loudness” to -14 LUFS. (Use -14 LUFS for stereo content; -16 LUFS for mono podcasts).
- Leave “Treat mono as dual-mono” unchecked unless you are mixing mono tracks for stereo output.
- Click Apply.

Note: You might see your waveform shrink (peaks get lower) after doing this. Don’t panic. This means your average volume now matches professional standards.
Normalize vs. Amplify: Which Should You Use?
In the Audacity menu, you’ll see both Amplify and Normalize. Beginners often use them interchangeably because they both make things louder, but they work differently.
Amplify is a simple volume change. It applies the exact same amount of gain to both the Left and Right channels, preserving the balance between them.
Normalize is a “smart” calculation. It analyzes the track to find the highest peak. Crucially, Normalize can adjust the Left and Right channels independently. If your left mic is quieter than your right mic, Normalize can balance them out.
Comparison Table
| Feature | Normalize | Amplify |
|---|---|---|
| How it works | Calculates gain based on a target “Ceiling” (e.g., -1.0 dB). | Adds a specific amount of gain (dB) directly. |
| Stereo Balance | Can adjust Left & Right channels independently (fixes imbalance). | Changes both channels equally (keeps original balance). |
| DC Offset Removal | Yes (Centers the waveform). | No (Keeps the waveform where it is). |
| Best Used For… | Finalizing a whole track to ensure consistent loudness. | Quick adjustments to specific sections or faint clips. |
Pro Tip: Better Recordings Mean Better Normalization
Normalization is powerful, but it isn’t magic. It operates on simple math: when you turn up the volume of your voice, you also turn up the volume of the background noise (hiss, hum, or room tone). This is called raising the Noise Floor.
If your original recording is too quiet or “grainy,” normalizing it will result in a loud, distorted mess. The best way to get clean normalized audio is to capture high-fidelity sound at the source.
The 32-bit Float Advantage
Professional creators avoid the “noise floor” trap by using 32-bit Float Recording technology, a feature found in the Hollyland LARK MAX 2.


Unlike standard microphones that have a rigid volume ceiling, the LARK MAX 2 captures a massive dynamic range. It handles everything from a sudden scream to a quiet whisper without clipping or losing detail.
Why this matters for Audacity:
When you import a 32-bit float recording from the LARK MAX 2 into Audacity, the data is so rich that you can normalize drastic volume changes without degrading the quality. You get crystal clear, studio-quality 48kHz/24-bit sound that stays clean even after heavy processing.
Monitor Before You Record
Preventing bad audio is always faster than fixing it. The LARK MAX 2 also supports Wireless Audio Monitoring via its new OWS (Open Wearable Stereo) earphones. This lets you hear your levels in real-time, so you can catch volume issues before you hit record.
Common Issues When Normalizing (Troubleshooting)
Since normalization applies math blindly to your entire track, it can sometimes reveal hidden flaws in your recording. Here is how to troubleshoot the two most common problems.
Problem 1: “My Audio is Still Too Quiet”
You normalized to -1.0 dB, but the waveform still looks small and the voice sounds weak.
The Cause:
You likely have a transient spike—a single loud moment, like a mic bump or a cough—that is hitting the -1.0 dB ceiling. Because normalization respects the loudest peak, it stops boosting the volume as soon as that single spike hits the target, leaving the rest of your dialogue quiet.
The Solution:
You need to tame the peaks first.
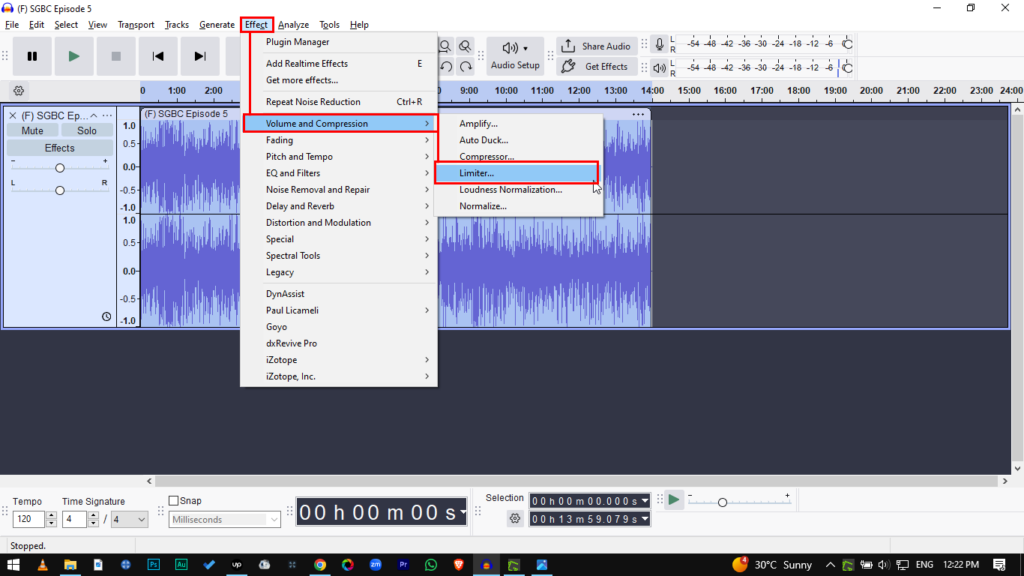
- Use a Limiter: Go to Effect > Volume and Compression > Limiter Set it to “Threshold” and choose a limit (e.g., -3.0 dB). This will “shave off” the loudest spikes.

- Re-Normalize: Now that the spikes are gone, run the Normalize effect again. You will notice the overall volume increases significantly.
Problem 2: “Background Noise Got Really Loud”
After normalizing, your voice is clear, but there is a distracting hiss or buzz in the background.
The Cause:
Normalization boosts everything equally. It cannot distinguish between your voice and the noise floor. When you boost the voice by 10dB, you boost the noise by 10dB too.
The Solution:
- Software Fix: Use Audacity’s Noise Reduction effect before you normalize. Highlight a section of “silence,” get the “Noise Profile,” and then apply reduction to the whole track.
- Hardware Fix: The most effective way to eliminate hiss is to record with a microphone that features Environmental Noise Cancellation (ENC). Using a system like the Hollyland LARK MAX 2 ensures the noise floor is virtually non-existent before you even open Audacity.
Frequently Asked Questions (FAQ)
What is the best dB level for normalization?
- For Peak Normalization: Set your target to -1.0 dB. This leaves enough headroom to prevent distortion when converting to MP3.
- For Loudness Normalization: Aim for -14 LUFS for Spotify, YouTube, or Apple Podcasts. For broadcast TV, the standard is usually -23 LUFS.
Does normalizing affect audio quality?
Technically, no. Normalization is a linear operation; it simply turns the volume knob up. It does not change the tone or EQ of your voice. However, because it boosts the entire track, it will make any background noise much more obvious.
Should I normalize or compress first?
The standard order for a vocal chain is: Clean -> Compress -> Normalize.
- Clean: Remove noise and EQ the track.
- Compress: Tame the loud spikes and bring up the quiet parts.
- Normalize: Do this last to maximize the final volume to the highest safe level (e.g., -1.0 dB).
Conclusion
Audio normalization is the final polish that separates amateur recordings from professional productions. Your goal is simple: ensure your listeners enjoy the content without constantly adjusting their volume.
By mastering both Peak Normalization for general headroom and Loudness Normalization for streaming standards, you guarantee a consistent experience for your audience.
Just remember that post-production tools can only do so much. The cleaner your source audio, the better your results will be. To minimize time spent fixing levels in Audacity, start with a high-quality input device like the Hollyland LARK MAX 2. Its 32-bit Float Recording captures a dynamic range that makes normalization safer, faster, and distortion-free. Get your levels right at the source, polish them in Audacity, and hit publish with confidence.