.png)
Adding audio to PowerPoint presentations provides an immersive experience and enhances the audience’s engagement. From professional to educational fields, adding background music, audio narrations, or sound effects is pivotal to making your slides more interesting.
Understanding how to add audio efficiently is crucial to optimizing the sound for a lasting experience. Therefore, this guide provides technical insights on adding audio to your Windows or Mac to transform your presentations.
How to add audio to PowerPoint Presentations?
The addition of audio transforms presentations for an enhanced experience and effectively engages the audience. Therefore, PowerPoint lets you record or insert audio to make your slides more interesting. So, hereunder is the step-by-step process for seamlessly adding audio on Mac and Windows.
For Windows Users
PowerPoint provides an all-in-one solution enabling you to record or insert audio into your slides, making them more appealing. Follow the process to incorporate audio or sound effects seamlessly:
Step 1- Open your Presentation
- Launch PowerPoint and open the presentation to edit or create a new presentation to add audio.
- Go to the slide where you want to insert or record the audio.
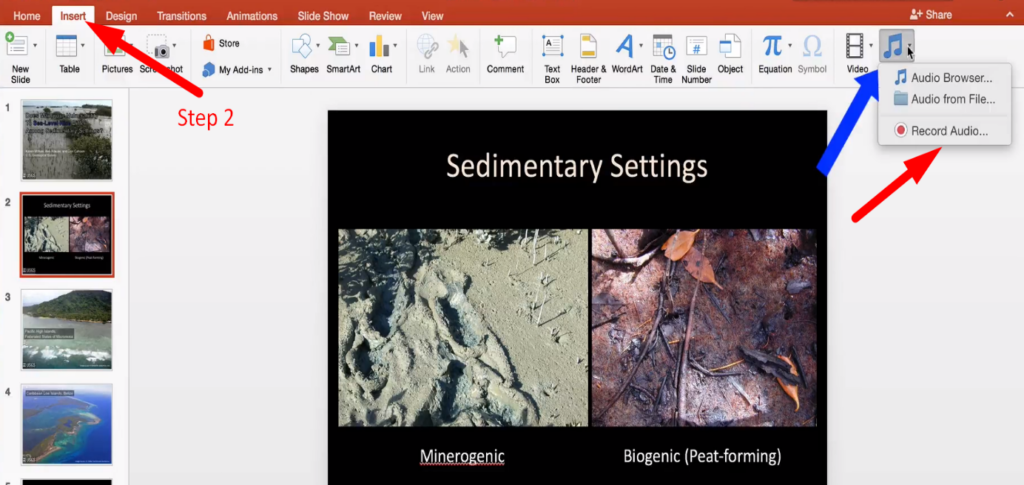
Step 2- Insert the Audio

- Select the “Insert” tab from the top-left toolbar menu and navigate to the “Audio” option under the “Media group.”
- A drop-down menu will appear after clicking “Record Audio” and “Audio on My PC.”
- Record Audio:

- Choose “Record Audio” to record audio directly to your PowerPoint. The popup window will allow you to record the audio, name it, and listen to your audio before inserting it into your slide.
- Once satisfied with the clip, click “OK,” the audio icon will appear automatically, which you can drag onto the slide. If using more than one audio per slide, put the audio icon in the same spot to find it easily.
- Audio on my PC:

- Select “Audio on my PC” to add music or have a pre-recorded audio file. After clicking, a dialog box will open, allowing you to browse the computer for the audio file you want to insert into the project.
- Click “insert,” and an audio icon will appear on the slide.
Note: For PowerPoint presentations, ensure the audio is in a supported file type such as WAV, MP3, MID, or MIDI. Therefore, if the audio differs, you must change the file type to the supported format.
Step 3- Customize Audio Playback

- After inserting the audio, an audio icon will appear on the slide. Click on the icon, and the “Playback” tab will appear on the top toolbar menu.
- From there, you can select “Play in Background” if you want the audio to play automatically and adjust the volume accordingly.
- It also enables you to customize the audio further with “Fade Duration” and “Trim Audio.”
Step 4- Position the Audio Icon
- Click the “Audio icon” to place it anywhere on the slide. If you don’t want the audio icon to be visible, drag it off the slide into the grey area.
Note: When using more than one audio file on a single slide, keeping the icon in the same spot is recommended for smooth functionality.
Step 5- Test the Audio
- After inserting or recording the audio, ensure it plays according to your expectations. Then, you can preview the audio for the current slides or all of them.
- If the recorded audio does not meet expectations, select the audio and press the “delete” button to remove it.
How to add audio to PowerPoint on Mac?
Adding audio to your presentations on Mac follows the same process but with a slight variation in technical steps. Hereunder is the step-by-step guide tailored to add audio and adjust sound settings accordingly.
Step 1- Open the Presentation
- Launch PowerPoint and open your presentation where you want to add the audio.
- Select the desired slide where you want to insert or record the audio.
Step 2- Add the Audio
- Click on the “Insert” tab from the top-left toolbar menu, then select “Audio” under the “Media Group” section.
- A popup window will allow you to choose “Audio from file” or “Record Audio.”
- Record Audio:
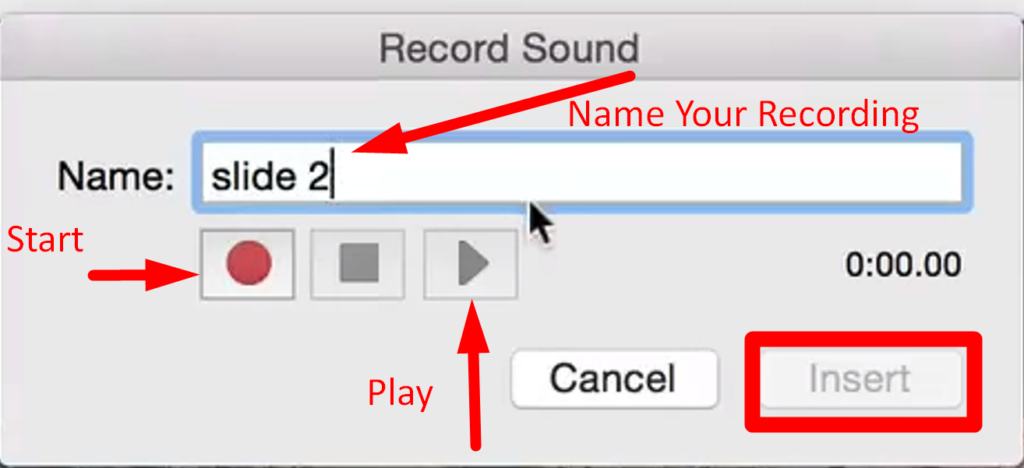
- Before recording, ensure your device has enabled the microphone to record correctly. A new window will appear, so name the file before recording your audio.
- Audio from File:

- Click “Audio from File” to insert audio from your computer, or click “Audio Browser” to insert audio from iTunes.
Within the “choose audio” dialog box, select “Link to File” to attach the link to your audio. However, it does not store the audio in your presentations and ensures you always copy your audio to the same folder as your presentation.
Step 3- Adjust Audio Playback
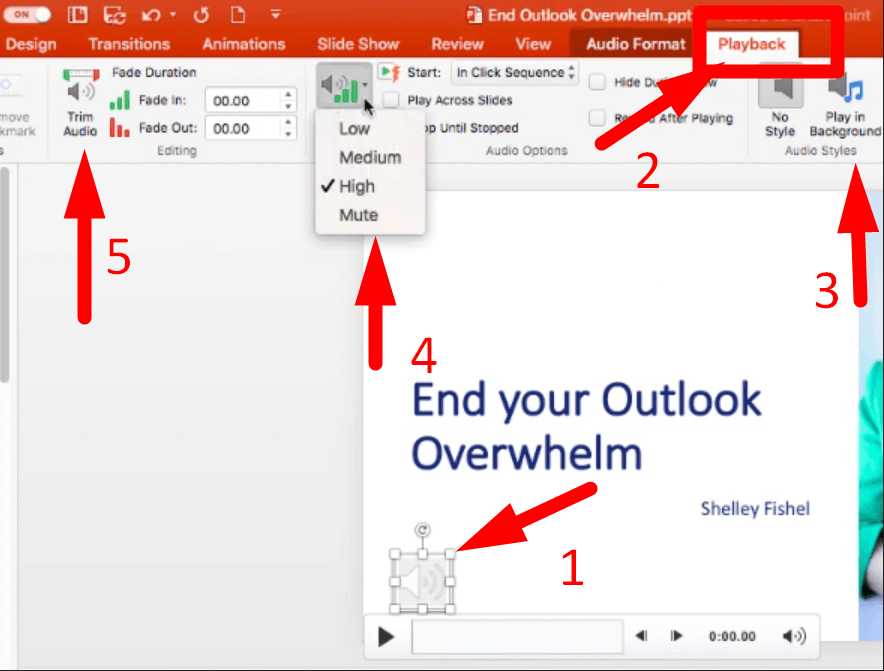
- After inserting the audio, an audio icon will appear on the desired slide. Click on it, and a “Playback” tab will appear at the top menu bar.
- From the playback tab, you can select if audio plays “automatically” or “when clicked.”
- Furthermore, you can adjust the volume or audio play across all slides until stopped.
Step 4- Positioning the Audio Icon
- Go to the “Playback” tab and click the “Hide During Show” checkbox when selecting Play Audio automatically.
- If you select “play automatically,” click on the audio icon and drag it off the slide to the grey area.
- If you play the audio “when clicked on” option, ensure the audio icon is visible in the slide.
Step 5- Test the Audio
- Click on the “Slideshow” tab from the top menu bar and select the “Play” button to preview the audio on the current or all slides.
- If the audio is not as expected, click the discard button, then start recording again.
Embedding Audio from Online Services
Many online streaming platforms, such as Spotify and YouTube, allow you to embed music in your presentations. For this, follow the hereunder step-by-step process:
Step 1- Insert tab

- Go to the “insert” tab from the top menu bar.
- Click the “Audio” option under the “Media” group.
- Alternatively, select the video option if “Online Audio” is unavailable on your PowerPoint.
Step 2- Select Streaming Service
- Select the streaming service you want to use, then enter the audio link you wish to embed.
- Click “Insert,” and you can play the video in Slideshow View or Normal View.
Step 3- Play only audio
- Go to the “Playback” tab and select the “Play Full Screen” and “Hide While Not Playing” checkboxes to play only the video’s audio.
When embedding audio from online services, ensure the availability of an active internet connection during your presentations. Also, check if the desired video is allowed to be embedded from its site.
If you’re recording narration or voiceovers for your PowerPoint presentations, audio clarity is essential. A wireless lavalier microphone can greatly enhance your audio quality, allowing you to capture clear sound and deliver professional presentations effortlessly.
FAQs
Can I add audio to all slides in PowerPoint?
Yes, you can add audio to your presentations and play it across all the slides. Usually, the audio clip stops as soon as you change the clip. Therefore, go to the playback tab after inserting your PC or Mac audio. Then select “Play in Background” to start the audio automatically and play it across all slides.
How to edit an audio clip I’ve added to PowerPoint?
Select the audio icon from your slide to edit an audio clip and click the “Playback” tab from the top menu.
- Go to the “Fade Duration” section and change the Fade in and Fade Out audio durations.
- Select “Trim Audio” and move the red and green sliders to trim the audio from the end or start point.
- Click “Volume” to adjust it according to your preferences.
- The drop-down menu next to “Start” allows you to select how you want your file to start.
- Choose how the audio clip plays during your presentations.
Why won’t my audio play in PowerPoint?
The common reason when PowerPoint is unable to play audio clips is the file compatibility issues. However, there are some other reasons why media is not playing in your presentations:
- The audio codec is missing, damaged, or incompatible.
- Software conflict or operating system error.
- Poor internet connectivity when linking audio from online streaming services.
- Audio formats compatible with Windows will not work on Mac.
Can I add background music to my entire PowerPoint presentation?
Yes, PowerPoint allows you to add background music to make your presentations more attractive and engaging. For this, follow the following process:
·Insert the desired audio and click on the audio icon.
- Go to the “Playback” tab and click on the “Play in Background” to play the audio across multiple slides.
How to convert my PowerPoint presentation with audio into a video?
Converting PowerPoint presentations to video is a straightforward process, described hereunder,
- Open your presentation and click on the file.
- Then select “Export” from the left pane menu and click “Create a Video.”
- Select the file quality and size of the video.
- For narrations and timings, choose “Use Recorded Timings and Narrations.”
- Select “Create a Video” and save the file.
What audio file formats are supported by PowerPoint?
PowerPoint supports many audio file formats for Windows and Mac to incorporate audio into slides seamlessly.
- The supported audio file formats for Windows include AIFF, AU, MIDI File, MP3, MP4 and m4a, .wav, and WMA files.
- Mac supports audio file formats including .aiff or .aif, .mp2, .mp3, .wav, .au or .snd, Apple MPEG 4, .m4r, .ac3, .caf.
How can I ensure my embedded audio plays on another computer?
Sometimes, for various reasons, you may have encountered the issue of no sound when opening presentations on other computers. So, to ensure seamless play of the audio:
- Ensure that the audio file formats are compatible and supported by other computers.
- Ensure that the other computer has the exact version of the PowerPoint.
- Uninstall third-party conflicting software
- Save the file before sending or sharing it with others.
Is it possible to hide the audio icon during the presentation?
Yes, it’s possible to hide the audio icon when the audio clip is set to play automatically or in the background. To do this:
- Click the “sound icon” on the slide and go to the “Playback” tab.
- Select the “Hide During Show” checkbox to hide the icon.
- Drag the icon into the grey area to remove it from your presentations.
Can I loop an audio track on a single slide?
Yes, you can loop an audio track on a single slide. Here’s how you can do it seamlessly:
- Click your slide’s “Sound icon” and go to the “Playback” tab.
- Select “Start Automatically” and click the “Loop until Stopped” checkbox.
- Go to the “animation” tab from the toolbar and select “animation pane.”
- Select the start and end of audio from the popup window on the slides.
How do I add narration to my PowerPoint presentation?
Audio narrations are effective ways to improve audience engagement during your presentations. So, to add narration, follow the following process:
- Open your presentation and click on the “Slideshow” tab.
- Click the “Record Slide Show,” and a popup window will appear.
- Select “Slide and animation timings” and “Narrations, ink, and laser pointer” to add narrations with timing.
- Click “Start recording” and preview the audio to ensure it’s working fine.
Newer PowerPoint versions, such as Microsoft 365, have an additional “Record tab” to record narrations with sound effects.