.png)
Working with audio in Adobe After Effects may not be as intuitive as editors, especially if you’re expecting a drag-and-drop experience. Dropping an audio file onto the timeline won’t automatically play it, and basic controls like volume adjustment aren’t immediately obvious. That’s why many users get stuck figuring out how to add and manage sound in After Effects.
This guide walks you through the entire process—importing audio, syncing it with visuals, adjusting levels, and exporting clean, professional results—all using built-in tools.
Importing Audio Files
To begin, bring your audio file into the project. After Effects accepts formats like WAV, MP3, and AIFF. Also, it helps to name your file properly before importing. Once you start layering things in the timeline, a random file name can slow you down.
1. Open the “File” menu from the top-left, then hover over “Import” and select “File”.
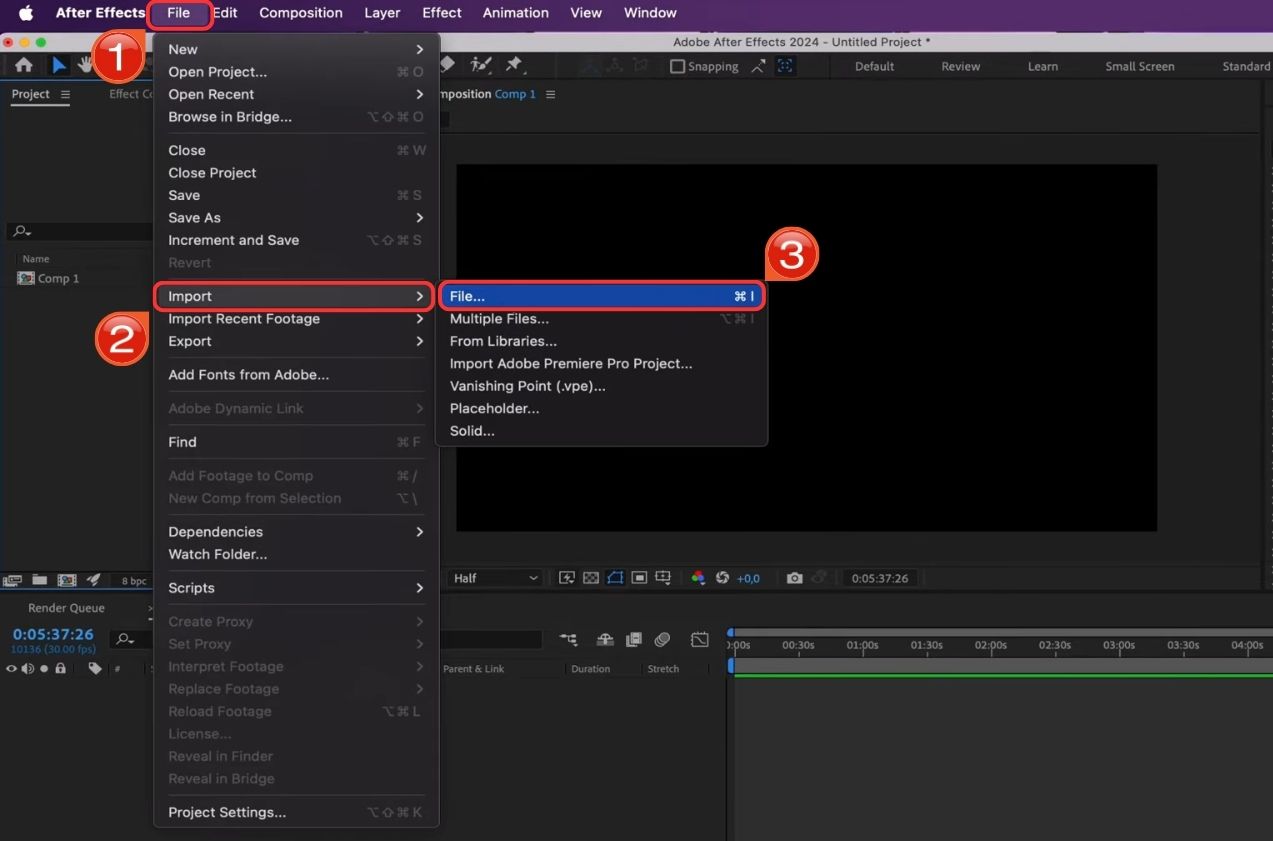
2. Pick your audio and hit “Open”. It should now show up in the Project panel.

3. If you’re adding more than one file, hold “Shift” while selecting them and open all at once.

Adding Audio to the Timeline
Once the audio is in your Project panel, the next step is placing it into your composition.
1. Drag the audio file from the “Project panel” into the “Timeline panel”. You can drop it anywhere below your visual layers.

2. Make sure the audio layer starts where it’s supposed to. If you want it from the beginning, drag it to line up with the start of the comp.

3. Trim the audio by dragging the edges of the layer.
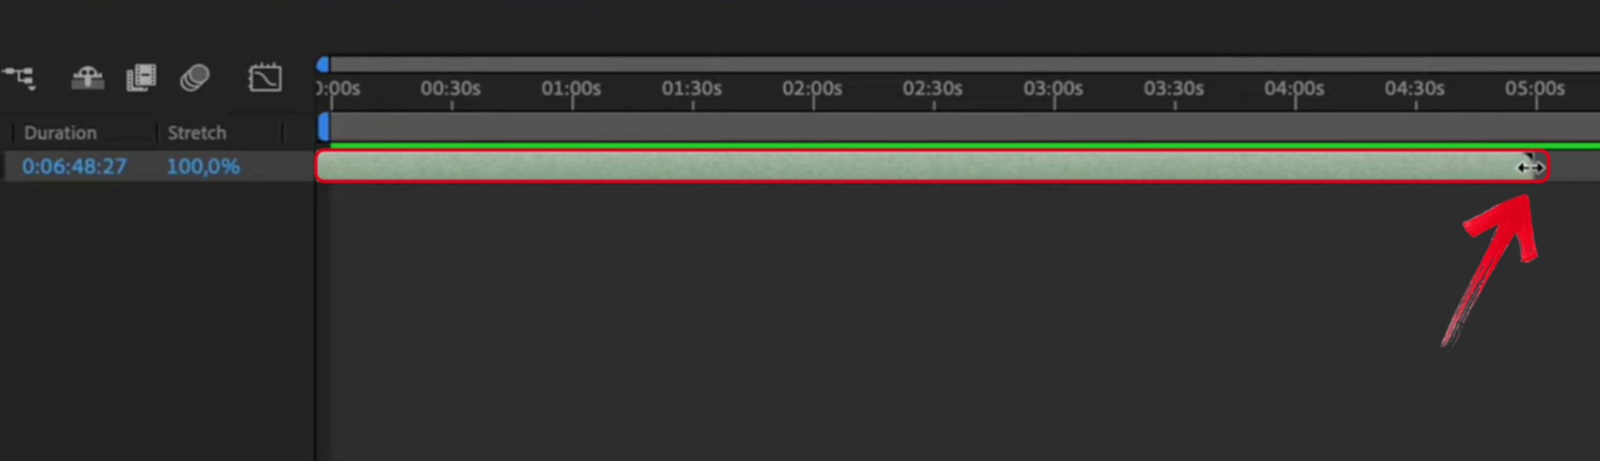
4. If the timing’s off, shift the layer left or right on the timeline until it feels right with the visuals.

Editing Audio in After Effects
After it’s in the timeline, you’ve got a few options to tweak how the audio plays.
1. Click the audio layer, then hit “L” twice on your keyboard. A waveform will show up where the sound kicks in or dips.

2. To change the volume, open the “Audio Levels” under the layer settings. Pull the number down to lower it, or raise it if it’s too quiet.

3. Now, to fade audio in or out, add keyframes on the Audio Levels. Start low and ramp it up slowly, or the other way around if you’re fading out.

4. If you’re trying to sync it exactly with something on screen, the waveform helps a lot. Just line the peaks and dips with what’s happening visually.

Looping Audio
If your audio track is shorter than your composition or needs to repeat, you can loop it manually or by using pre-comps.
1. The simplest way is to duplicate the audio layer. Select it, press “Ctrl+D”, and place the copy right after the original on the timeline.

2. Keep duplicating the audio until it fills the whole timeline, and check that each clip lines up properly.

3. For a cleaner method, you can pre-compose the audio layer. Right-click on it, select Pre-compose, and move all attributes into the new comp.

4. Then apply Time Remapping to the pre-comp. Use an expression like “loopOut()” to make the audio repeat automatically inside that comp.

Exporting Audio from After Effects
By default, After Effects doesn’t give you audio in the export unless you turn it on yourself.
1. Go to the Composition menu at the top, click “Add to Render Queue”.

2. In the Render Queue, hit the text next to where your comp name shows up; it should say “Output Module”.

3. When that box opens, look for “Format” field. Make sure it is set to MP3. Hit OK.

4. Pick where you want the file to save, then hit Render.

Tip: If you’re using Adobe Media Encoder, audio is usually turned on already. Still, worth checking under Export Settings, then Audio, just in case it’s off.
Once the export is done, your audio is now fully part of your After Effects project.
Common Audio Mistakes in After Effects
Even minor oversights in After Effects can affect the final export, sometimes resulting in a file with no sound. These issues are usually avoidable, as they tend to happen when certain steps are missed.
- Not checking “Audio Output” in render settings
After Effects does not export audio by default. If this option is left unchecked, the video will render without any sound.
- Skipping keyframes for volume fades
Without fade-ins or fade-outs, the audio may start or stop too sharply. This can be distracting, especially during transitions.
- Audio not matching the visuals
If the sound is not aligned with key movements or visual cuts, the timing of the entire project can feel disconnected.
- Using compressed or low quallity MP3s
If your audio file is muffled, noisy, or has inconsistent levels, cleaning it up in post can take more time than expected. To avoid this, start with high-quality audio using a reliable mic like the Hollyland LARK MAX. It captures sound in 48kHz/24-bit resolution with MaxTimbre technology for natural voice quality. The transmitter includes 8GB of internal storage and built-in noise cancellation for extra reliability.


Conclusion
Adding audio in After Effects might seem straightforward, but the quality of your workflow depends on getting the details right—from import settings to timeline alignment and level adjustments. Even minor mistakes can lead to frustration and rework. While After Effects gives you plenty of control, starting with clean, well-recorded audio makes editing easier and your final output more professional.
FAQs
Q: Why is there no sound after I export from After Effects?
This usually happens when the Audio Output option isn’t turned on before export. You might hear everything during editing, but the final file ends up silent if that setting’s off.
Q: Why does my audio sound off after exporting?
It could be because of format or sample rate differences. If the export is compressed or set to a different sample rate, the audio might come out weird. Stick to lossless formats or make sure the settings match your original file.
Q: Can I use background music and voiceover together in After Effects?
Yes, you can stack audio layers. Just balance them manually by going into the Audio Levels and lowering one if it’s overpowering the other.