.png)
Unlike its older versions, Adobe Premiere Pro 2021 (v15.4) or later comes with a built-in feature that supports audio transcription. This has made it easier for YouTubers, video editors, and other content creators to generate transcripts for their video/audio recordings accurately. Are you struggling with transcribing audio in Premiere Pro?
You shouldn’t look any further since this tutorial provides a detailed guide, enabling you to transcribe any audio with ease. You’ll also learn some practical tips for better transcription accuracy.
Why Transcribe Audio in Premiere Pro?
You may want to transcribe your audio for different reasons, including the following:
- Editing efficiency: Transcripts allow editors to navigate footage, saving time easily.
- SEO optimization: Having transcripts for your video/audio content is essential for SEO since search engines also index subtitles.
- Accessibility: Through subtitles and captions, the deaf and other individuals with hearing impairment can easily follow along with your content.
- Localization: With transcripts already in place, it becomes much easier to translate your content into different languages.
Requirements for Transcribing Audio in Premiere Pro
Before getting started with the “Speech to Text” feature in Adobe Premiere Pro 2021 (v15.4) or later, your device needs to meet some basic system requirements. Essentially, you need to have the following in place:
- A PC running Windows 10/11 or a Mac running macOS 10.15 or later.
- A random access memory (RAM) of at least 8GB.
- A solid-state drive (SSD) with efficient read/write speeds.
- A multicore Intel or AMD processor (with 64-bit support).
- Fast and reliable internet access is needed to process transcripts or download language packs.
In addition to the above requirements, you also need access to your Adobe Creative Cloud account.
How to Transcribe Audio in Premiere Pro [STEPS]
Below are the detailed steps for transcribing audio using Adobe Premiere Pro:
Step 1. Start Premiere Pro and Launch Your Project
Launch the application on your PC or Mac, then select the project containing the audio or video you wish to transcribe.
Step 2. Go to the Text Panel
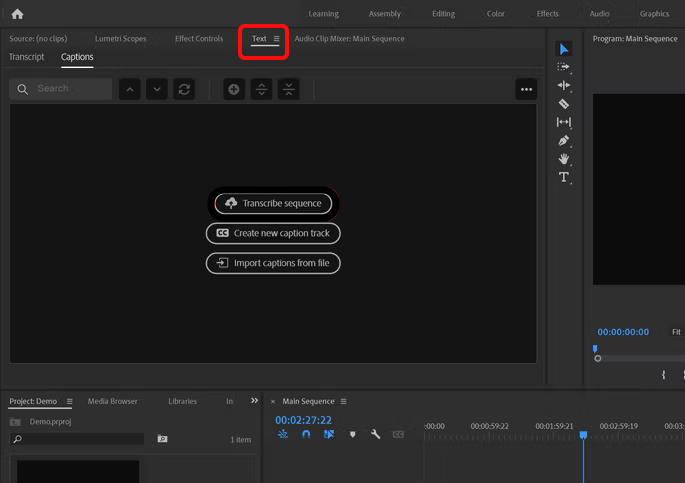
Once on the Premiere Pro main panel, go to “Window” then “Text” to access the text panel. Alternatively, you can access this panel by pressing Shift+Ctrl+X on your PC or Shift+Command+X on your Mac. You’ll then have two tabs displayed: “Transcript” and “Captions.”
Step 3. Create a New Transcription
Next, click the “Transcript” tab and select “Transcribe sequence.” A dialogue box will then appear asking you to select your “Language,” “Audio track,” and “Speaker labelling.” For the audio track, select the audio source you wish to transcribe.

If you want to speak and transcribe your voice directly, consider using a reliable microphone like the Hollyland LARK MAX 2. This mic supports 32-bit float recording, allowing you to capture your voice without any background noise, and has OWS Bluetooth monitoring capabilities, letting you connect to your computer wirelessly from a distance.


Once you’ve connected your microphone, click the “Transcribe” button and start speaking to transcribe the audio sound.

Step 4. Review and Edit the Transcription
Premiere Pro will display a full transcript under the “Transcript” tab once you finish the recording. You can now scroll through the transcribed text to review and edit where necessary. To easily find specific keywords or phrases in your transcript text, use the “Search” tab.

Step 5. Create Captions from the Transcript
Once you’ve finished reviewing and editing your transcript, you can proceed to generate captions. First, click on the “Create Captions” tab. You can then choose your preferred “Format,” “Stream,” “Style,” etc. Lastly, click the “Create captions” button to generate the captions automatically.

Step 6. Adjust Caption Styling and Timing
Now that you’ve created your captions, you can adjust their styling and timing by going to the “Essential Graphics” panel, then select “Edit.” Here, you can set the font, text size, and position.

Step 7. Export Captions and Transcripts
To export captions, navigate to “File”>”Export” then select “Media.” Go to the “Captions” tab and select “Create Sidecar File.” You can then pick your preferred export settings and select “Export” to export your video with captions.

To export the transcripts, click the “Text” panel and select the three-dot menu. Choose the “Export transcript” option and pick whether you want to use a .txt or .csv file.

How to Ensure Better Transcription Accuracy in Premiere Pro
Although Premiere Pro is a reliable transcription software, it’s possible to encounter scenarios where the quality of your transcription is compromised. You can apply the following tips to ensure better transcription accuracy:
- Avoid overlapping dialogue: You can achieve this by using separate audio tracks so that each speaker’s sound is detected differently.
- Use high-quality audio: Ensure that your audio recording has minimal background noise to improve the accuracy of your transcriptions.
- Use language packs: To help transcribe non-English dialogue efficiently, download additional language packs first.
- Limit FX: Before any transcription in Premiere Pro, you need to minimize reverb, distortion, or delay for better results.
Keeping these factors in mind will greatly improve the transcription accuracy.
Common Transcription Issues and How to Troubleshoot Them
Here are common issues that you may encounter when transcribing using Premiere Pro and their possible fixes:
Issue 1: The software can’t detect multiple speakers.
Fix: You must correctly label all the speakers connected to your system before initiating the transcription. Additionally, you can use separate audio tracks or manually label speakers thereafter.
Issue 2: The “Transcribe Sequence” button is unresponsive.
Fix: If you find this button grayed out, it means that you’ve not selected any sequence to transcribe. You need to do so before proceeding further. It’s also good to cross-check whether you’ve signed into your Adobe Creative Cloud account.
Issue 3: The captions aren’t showing.
Fix: You’ll need to enable the caption track for them to show up. Moreover, you must examine if your selected font size and position suit your export format.
Issue 4: There are incidents of inaccurate transcriptions.
Fix: First, you need to check the audio quality to ensure there’s no background noise. Next, try disabling music or effects that share the same track as your dialogue. You can also switch to different language settings to see if there’s any change.
Conclusion
The “Speech to Text” feature in Premiere Pro has come in handy for those who want to boost the accessibility, editing efficiency, and SEO aspect of their video content. This is because it provides a more efficient way to transcribe audio, saving time typically spent in post-production. Ensure you try out this tool today for better transcripts and captions.
FAQs
1. Can I transcribe multiple languages in the same video?
NO. Adobe Premiere Pro allows you to transcribe only one language at a time. If you want to transcribe multiple languages, you’ll need to do it separately. Alternatively, you can use other external software that supports transcribing multilingual content.
2. Does Adobe Premiere Pro support automatic speaker identification?
You must turn on the “Speaker Labeling” feature for automatic transcription to happen during transcription. Premiere Pro will then detect and automatically label the speakers. However, for clarity purposes, you may need to adjust the names manually afterwards.
3. Can I transcribe audio in older versions of Premiere Pro?
The answer is no. Only Premiere Pro 2021 v15.4 or later supports audio transcription, courtesy of the “Speech to Text” feature in them. The older version of the software doesn’t have this feature, hence you may need to perform an upgrade first. The other option is to use other third-party transcription tools.