.png)
There could be several reasons behind your PC’s sound suddenly having a higher pitch. The sound card drivers might be corrupted or outdated. The audio driver might be buggy, or your PC’s OS is outdated. In some cases, your microphone feedback can also lead to this problem.
While the exact reason may vary between devices, there are proven fixes you can try. In this guide, we’ll walk you through several troubleshooting methods to help you troubleshoot and fix the high-pitched sound bug on your PC. So, let’s get started!
6 Methods to Fix a Higher Pitch Sound on Windows PC
Tip: Make sure to try all the methods below in consecutive order.
Method 1. Run the Audio Troubleshooting Tool
To resolve any audio or sound-related issues with your PC, running the audio troubleshooting tool can be an ideal fix. This built-in tool automatically scans your system, identifies any audio faults, and resolves the higher-pitched issue on its own.
Here’s how to do it:
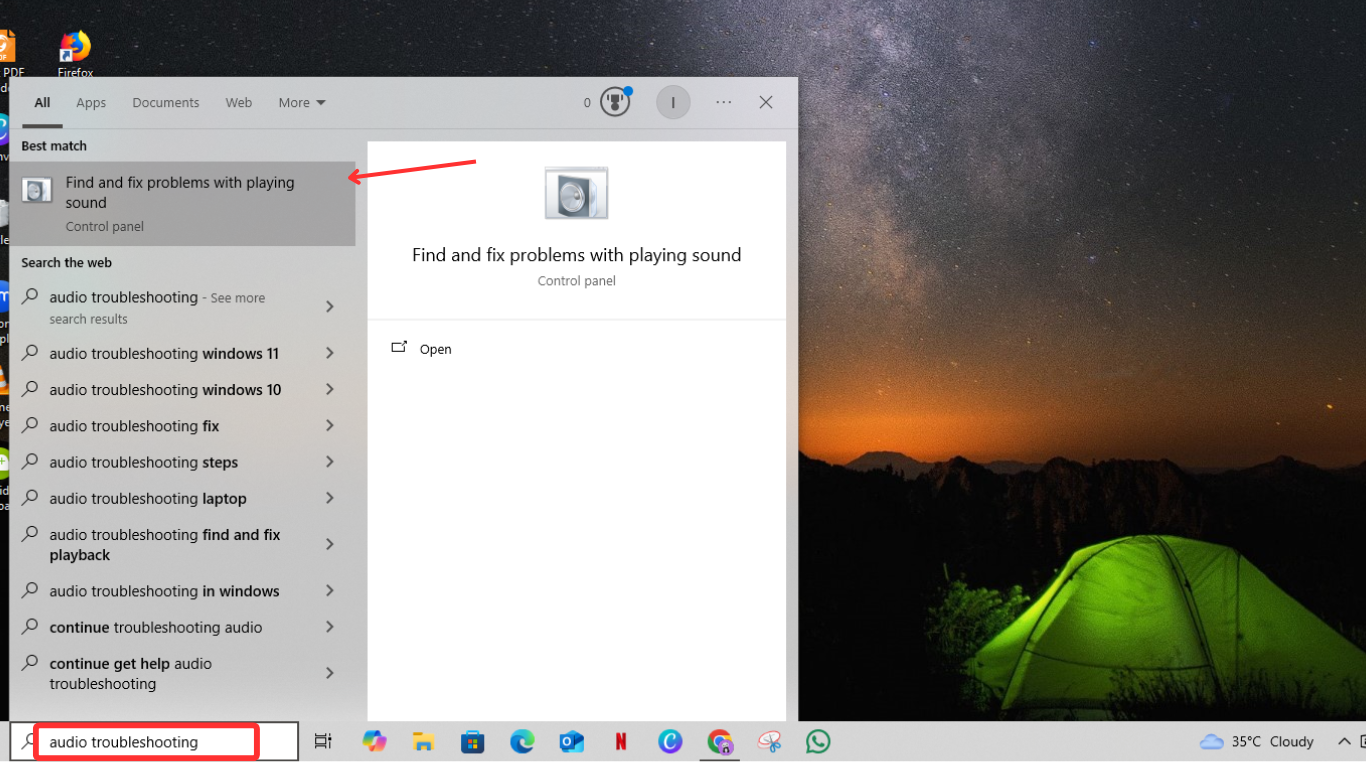
- From the Windows search bar, search for the audio troubleshooter tool.
- When the “Find and fix problems with playing sound” option appears, click on it.
- Within the “Find and fix problems with playing sound” dialog box, click on the “Next” button. The tool will instantly start scanning your system status.

- After the scanning is finished, you’ll be asked to choose the audio device you want to troubleshoot. Simply choose your sound device, tap Next, and follow the on-screen prompts.

If you have followed all the steps and the issue persists, proceed and try the next method.
Method 2. Disable the Microphone
Another great way is to disable the microphone on your PC.
Here’s how to disable your mic:
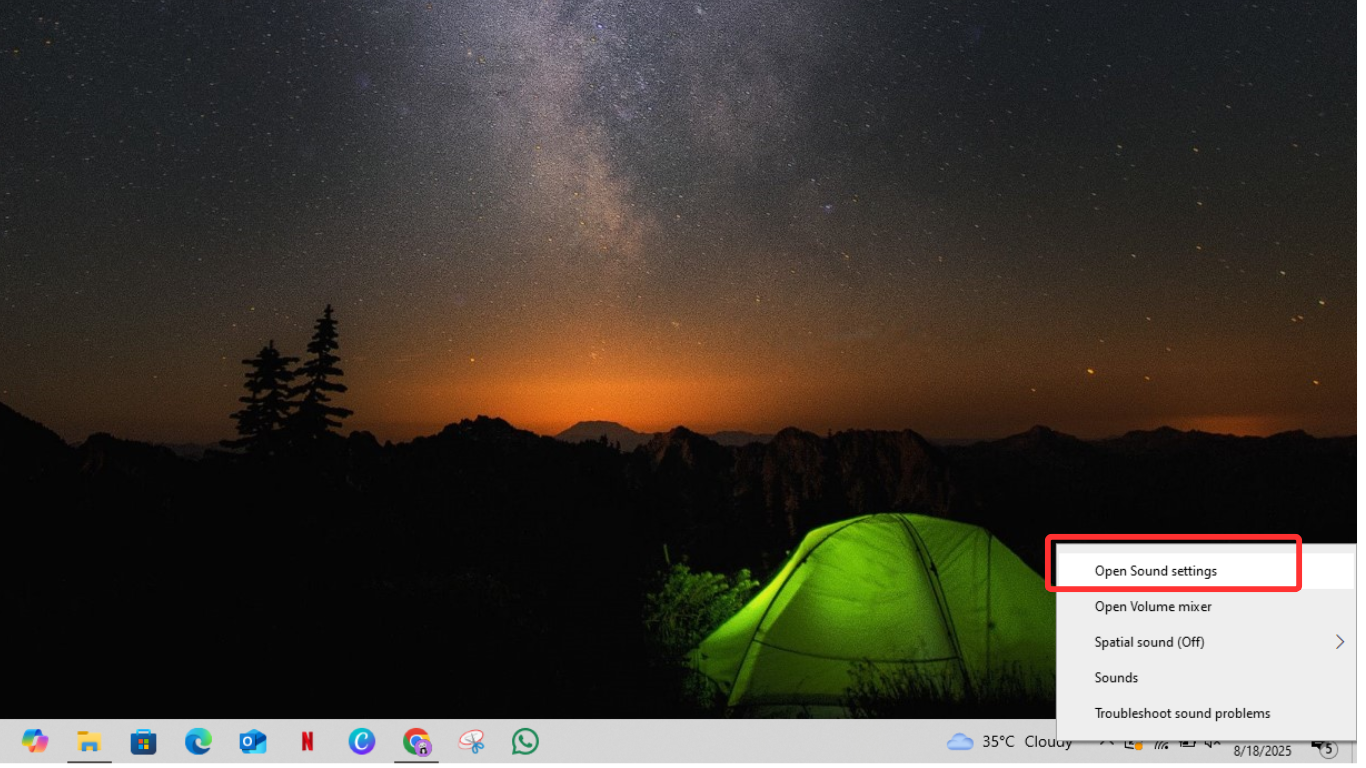
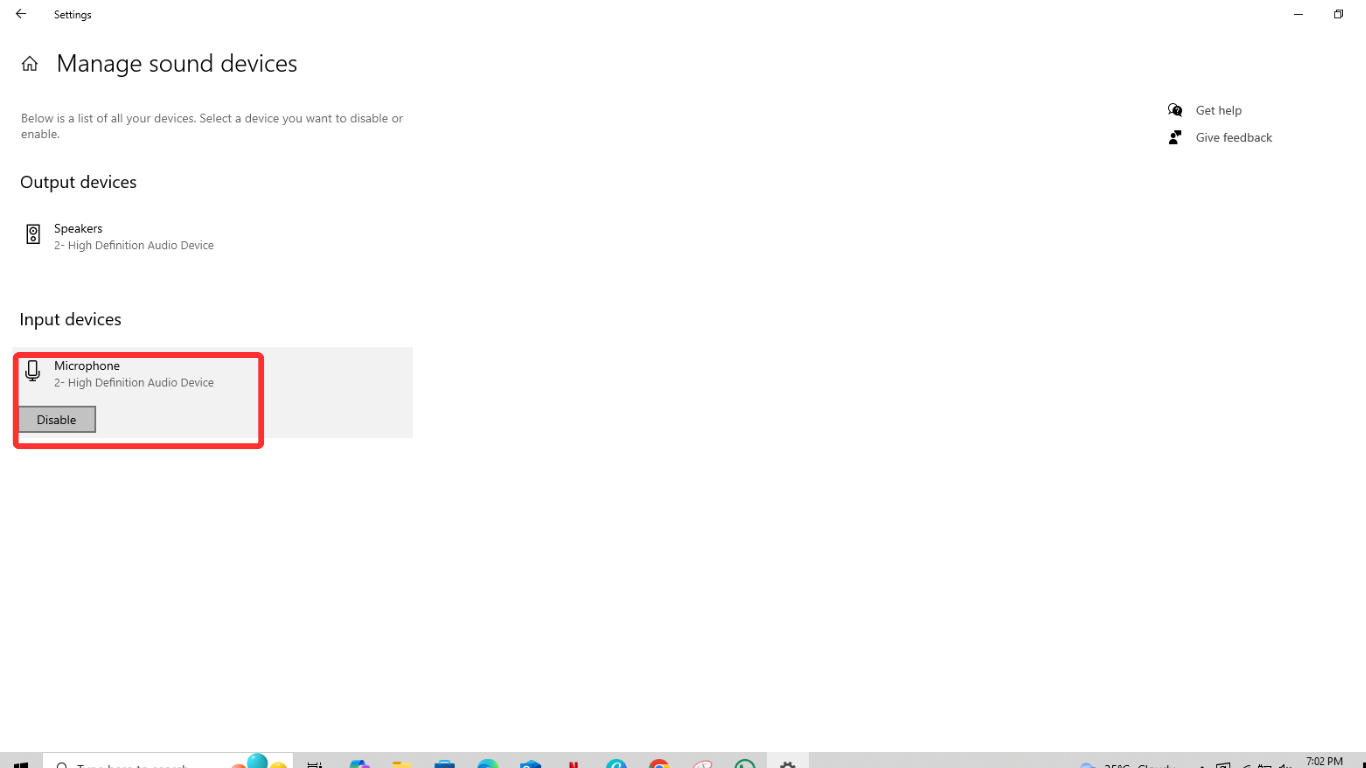
- From the PC’s taskbar, put the cursor on the speaker icon and right-click on it.

- Next, choose and head over to the “Open Sound Settings” section.
- Scroll down to the Input section. Then, under the Troubleshoot button, click on “Manage sound devices.”
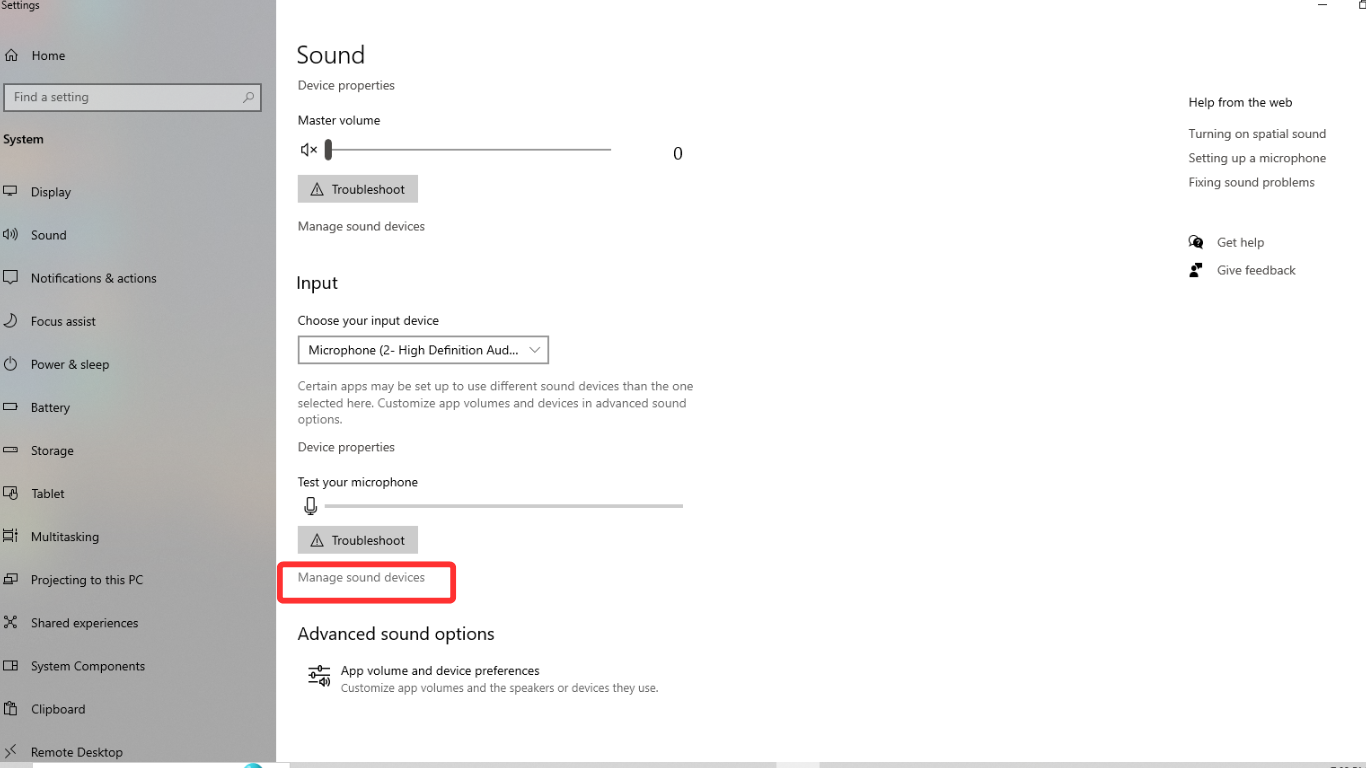
- Now, click on your microphone name under the Input section and hit the Disable button.
If you’re using a standalone or wireless microphone and don’t want to disable it on your PC, we suggest you keep it away from the speakers. After that, play any sound and check if the high-pitched issue goes away.
Method 3. Disable “Listen to This Device” on PC
If you don’t want to disable your mic on your PC, you can still resolve the higher pitch issue on your PC by disabling the “Listen to This Device” feature. Here’s how to do it:
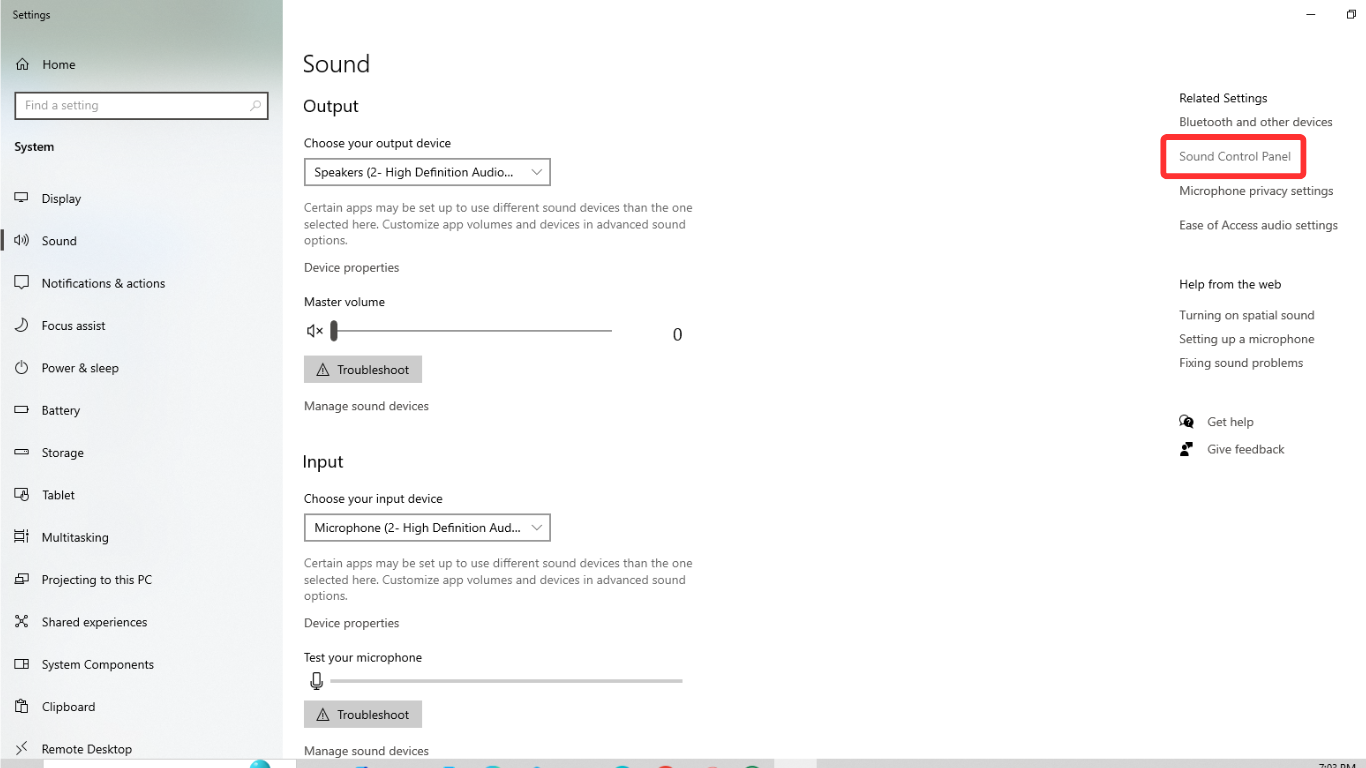
- First, right-click on the speaker icon on the taskbar.
- Then, choose the “Open Sound Settings” option.
- You’ll be redirected to a Sound page. From there, locate and click on the “Sound Control Panel” button.
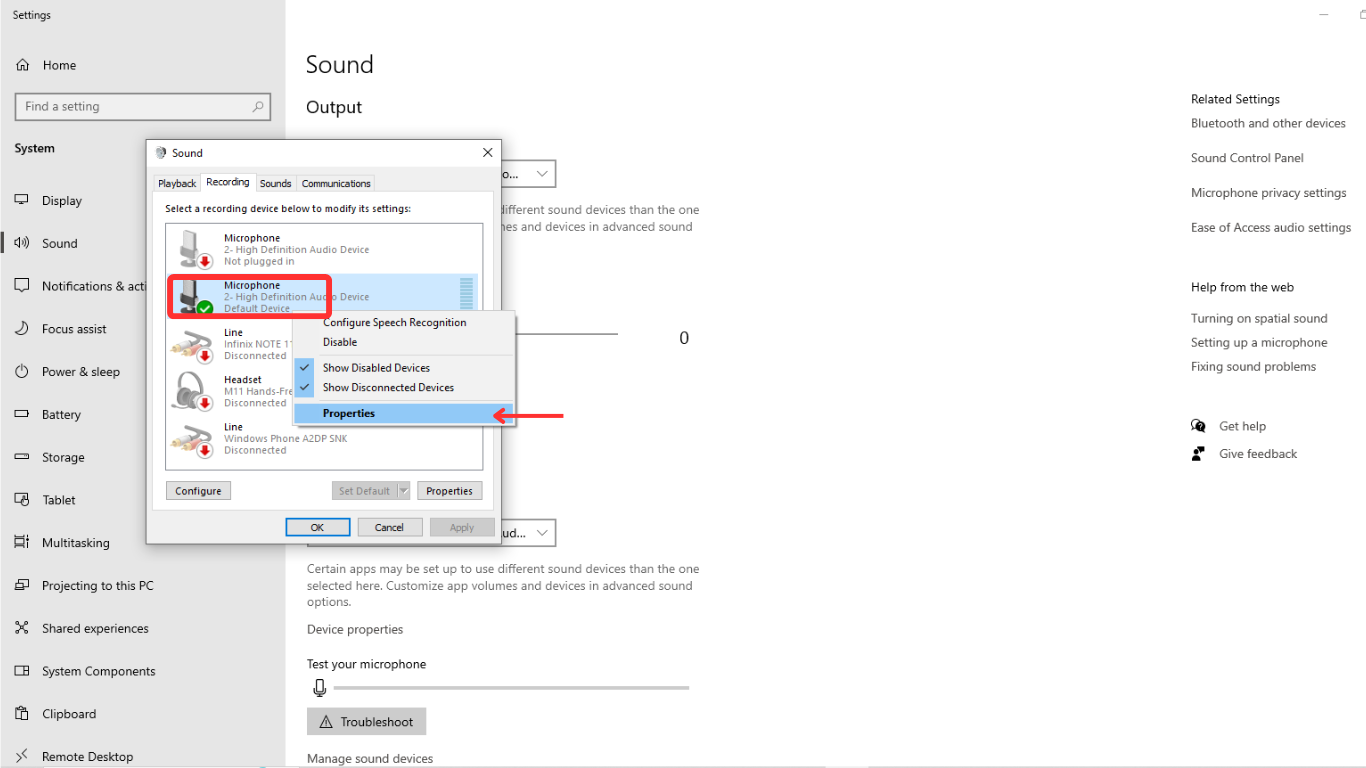
- A sound dialog box will appear. From there, click on the “Recording” tab.

- Next, click on the microphone name and right-click on it. Then, choose the “Properties” option.
- Within the Microphone Properties tab, navigate to the “Listen” tab.
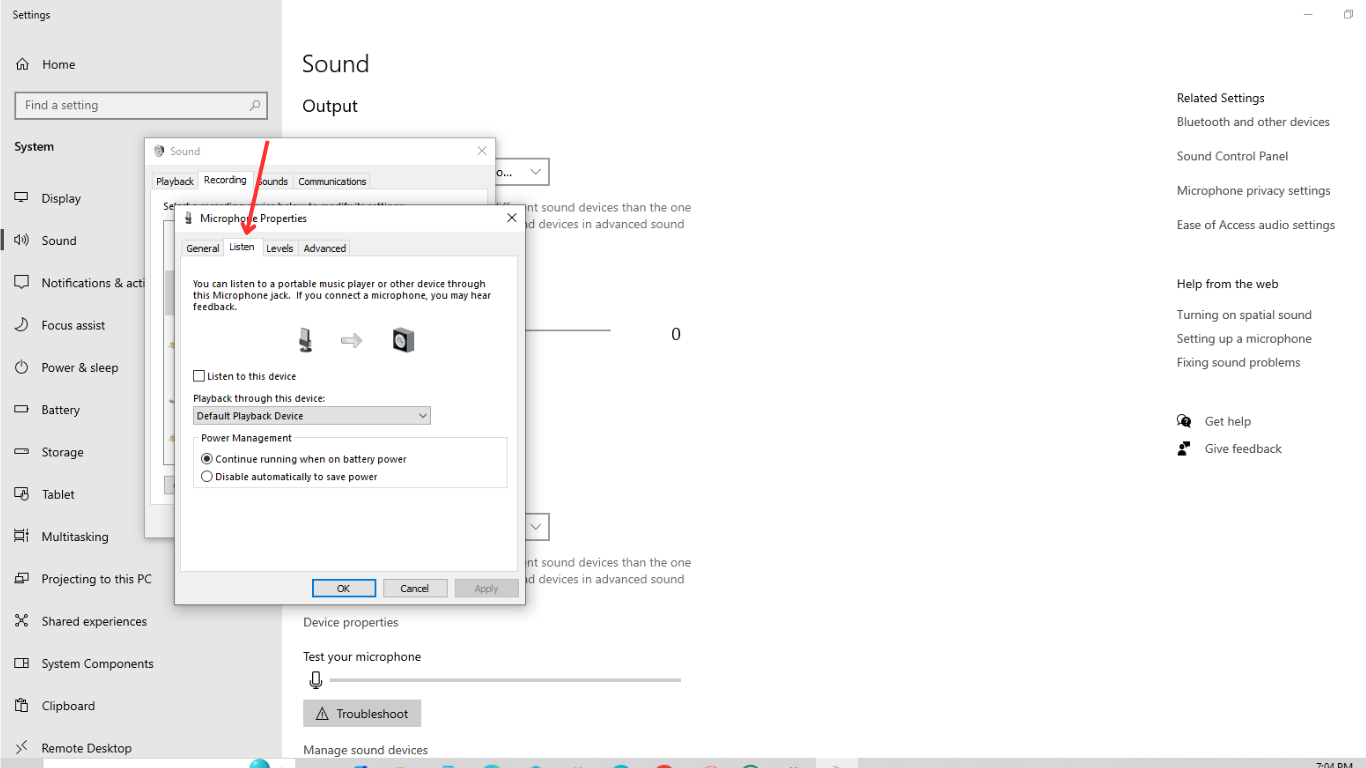
- Now check the “Listen to this device” checkbox. If it’s turned on, make sure you turn it off.

- Once done, click OK and exit the settings menu.
After following all these steps, your PC will no longer send microphone audio directly to your speakers, and you’ll be able to use your mic for recording or calls without any interruption.
Keep in mind that your microphone, if it lacks proper noise cancellation capability, can still lead to interference and cause unwanted feedback or high-pitched sounds.
That’s why using a built-in noise cancellation microphone, like Hollyland LARK MAX 2, can make a big difference. With its ability to reduce background noise and OWS Bluetooth monitoring, it ensures you get clear audio without compromising speaker quality.

Hollyland LARK MAX 2 - Premium Wireless Microphone System
A premium wireless microphone for videographers, podcasters, and content creators to capture broadcast-quality sound.
Key Features: Wireless Audio Monitoring | 32-bit Float | Timecode
Method 4. Perform the Windows Update
If you’re running the older versions of Windows, it’s crucial to install the latest updates. New patches often include fixes for audio, drivers, and overall system stability. Follow these steps to update your Windows system:
Note: Make sure your PC is connected to a stable WiFi network.
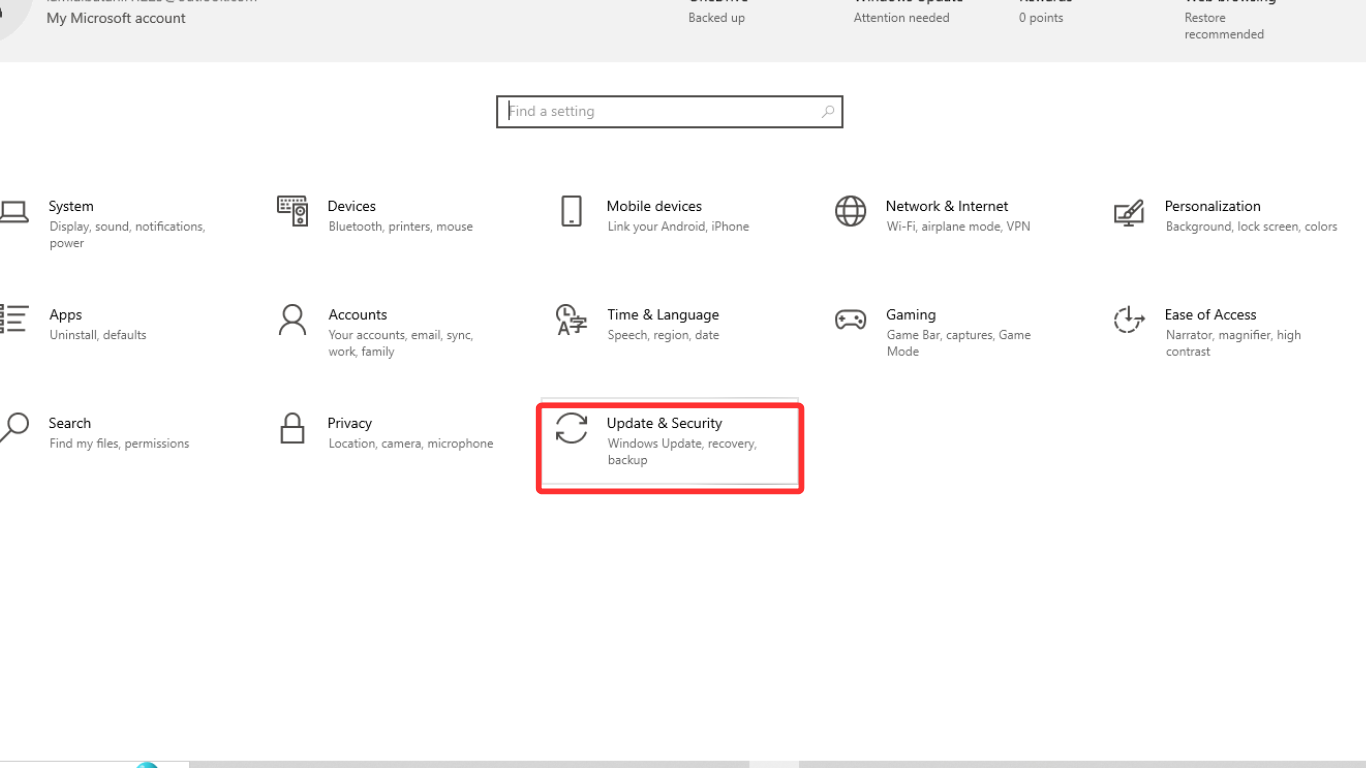
- From your PC’s taskbar, click on the Start button. Then, click on the Settings icon.

- Next, locate and click on the “Update & Security” option.
- Now, click on the “Check for Updates” or “Check online for updates from Microsoft updates” button. Your system will scan and prompt if any patch release is available.
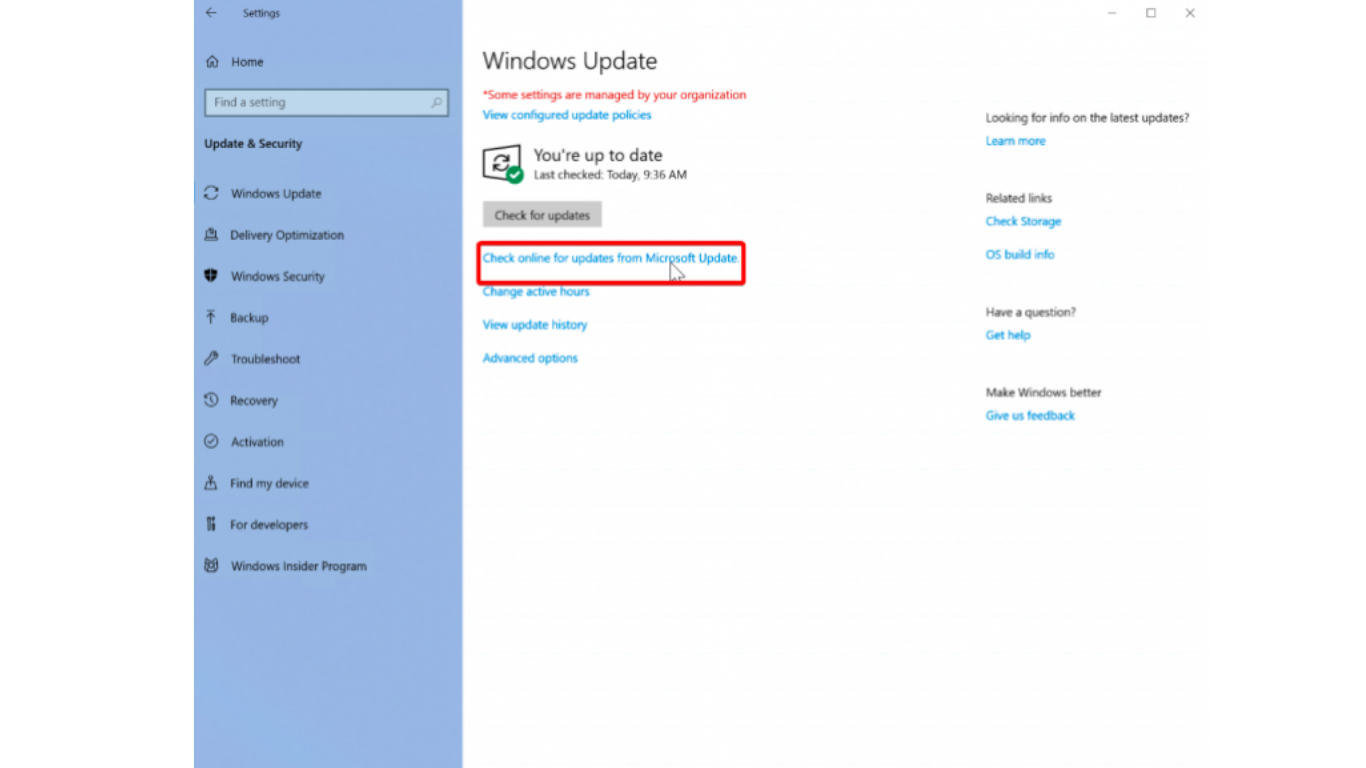
- If an update is available, download and install it on your PC. Once done, make sure you restart your PC so that all the new changes can take effect.
Method 5. Update the Audio Driver Software
Here’s how to update the audio driver step-by-step:
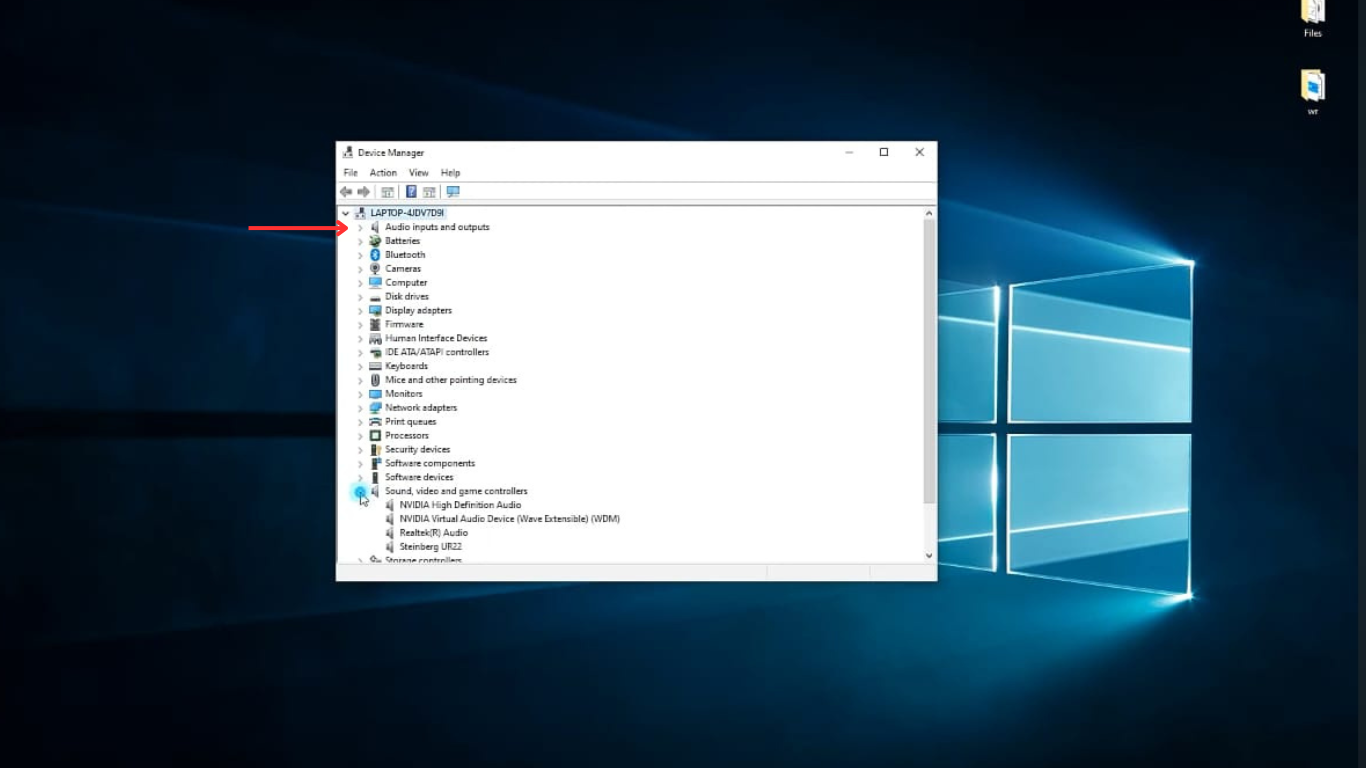
- Firstly, click on the start button. Then, type “Device Manager” and once it appears, click on it.

- From the Device Manager window, locate “Audio inputs and outputs” and click the arrow button to expand the menu.
- Next, right-click on the name of your audio device or sound card. Then, select “Update driver” from the context menu.

- When a new pop-up window appears, choose Search automatically for drivers. Now, your Windows system will look for and install the latest driver, if one is available.

- Once the process is complete, make sure to restart your PC.
Tip: If Windows doesn’t find a new driver, visit your PC manufacturer’s website (such as Dell, HP, Lenovo, etc.) and download and install the latest driver manually.
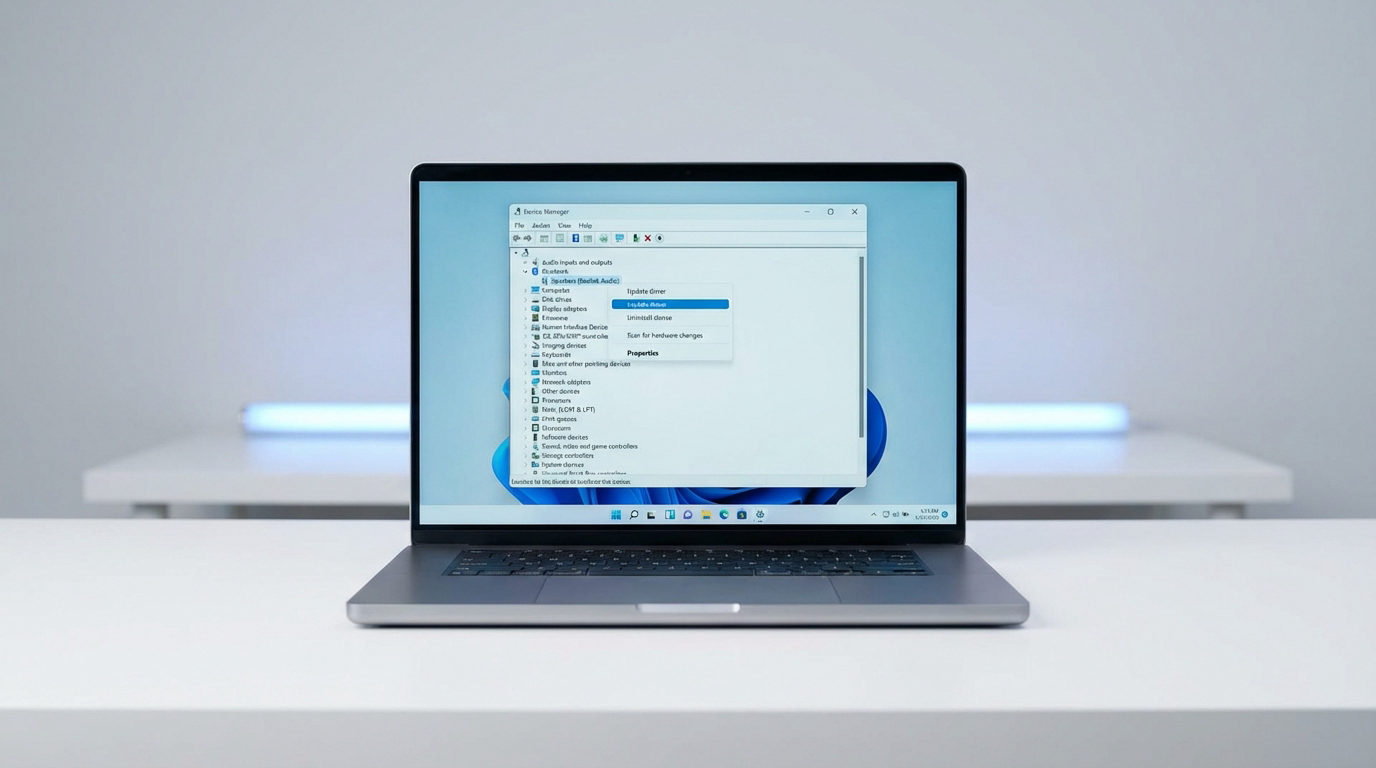
Method 6. Uninstall and Reinstall Audio Driver
If updating the audio card driver doesn’t help, it’s time to uninstall and reinstall the audio driver.
Step 1. Uninstall Audio Driver:
- First, right-click the Start menu from the bottom left. Then, search for “Device Manager” and open it.
- Then, scroll down to the menu until “Sound, video, and game controllers.” Click on the arrow at left to expand the menu. You’ll then see the name of the installed audio driver.
- Next, right-click on the name of your audio device and choose “Uninstall Device.”
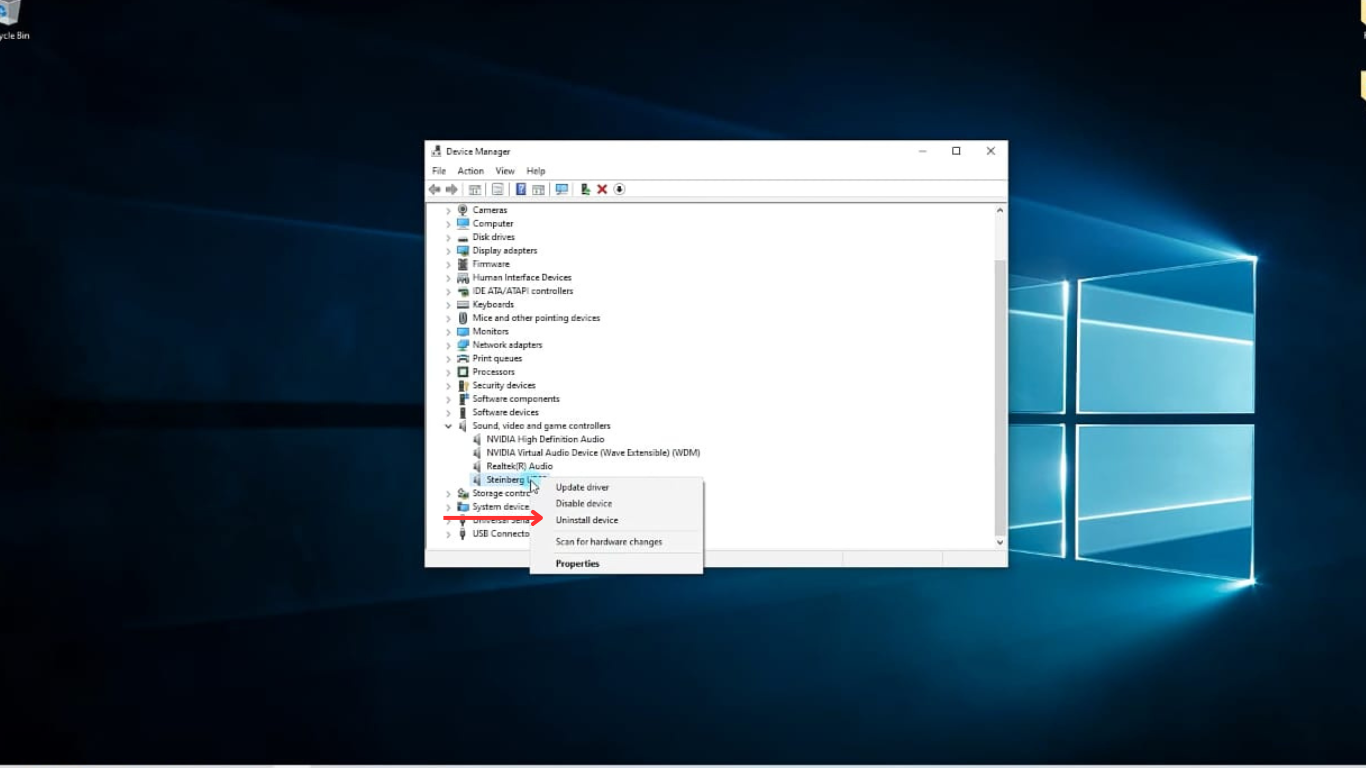
- From the Uninstall Device window, check the box for “Delete the driver software for this device.” Then, select “the Uninstall” button.

- Now that the driver is deleted, restart your computer to complete the process.
Step 2. Reinstall Audio Driver
- First, head over to your PC’s manufacturer’s website and download the driver file. Once the file is downloaded, simply run it and follow the on-screen instructions to download the driver into the system.
- Once you’ve downloaded the driver, it’s time to update it. To update the driver, from the Device Manager, under Sound, video, and game controllers, right-click on the audio device and choose the “Update Driver Software” option.

- Next, from the update drivers window, choose “Browse my computer for drivers” and open the location where you downloaded the audio driver. Then, simply follow the on-screen prompts to install the audio driver.
- Once installed, make sure you restart your PC so the new settings can take effect.
Conclusion
To wrap up, the reason your PC sounds higher-pitched can be anything from outdated audio drivers and pending Windows updates to microphone interference or feedback issues. The good news is that, by following the methods explained in this guide, especially keeping your system and drivers updated, you can usually resolve the problem quickly.
FAQs
- Why is my PC audio high-pitched?
It could be due to a bug or fault with your PC’s software or audio drivers. Sometimes, the PC also plays at a high pitch as a result of the microphone feedback loop response.
- What makes a sound have a higher pitch?
Generally, a sound has a higher pitch when its frequency increases. When it comes to PCs, this can occur due to misconfigured audio settings, driver conflicts, or interference from other wireless devices. That’s why updating your PC’s software and drivers is very crucial.
- How do I fix the high-pitched issue on my Windows PC?
Here’s a list of all fixes you can try:
- Mute the microphone
- Disable the Microphone
- Run the Audio Troubleshooter
- Update Windows Software
- Update or Reinstall Audio Drivers
- Turn off the “Listen to This Device” option