You’ve got your OBS (Open Broadcaster Software) installed, your Nintendo Switch is fired up, and you’re all set to share your gameplay with the world. But wait a minute—where’s the audio? If you’re scratching your head over this, don’t worry; you’re not alone.
This is a common hiccup that many new streamers encounter. But the good news is, it’s an easy fix. In this comprehensive guide, we’ll walk you through every step to ensure your Switch audio is loud and clear on OBS.
How to Get Switch Audio on OBS Capture Card
Before diving into the settings, let’s talk about the capture card. This is the hardware that acts as a bridge between your console and your computer. Brands like AverMedia and Elgato are popular choices. Make sure your capture card is properly connected to your Nintendo Switch and computer.
Step 1: Adding Your Capture Card to OBS

- Open OBS and look at the lower-left corner where you’ll see your scenes and sources.
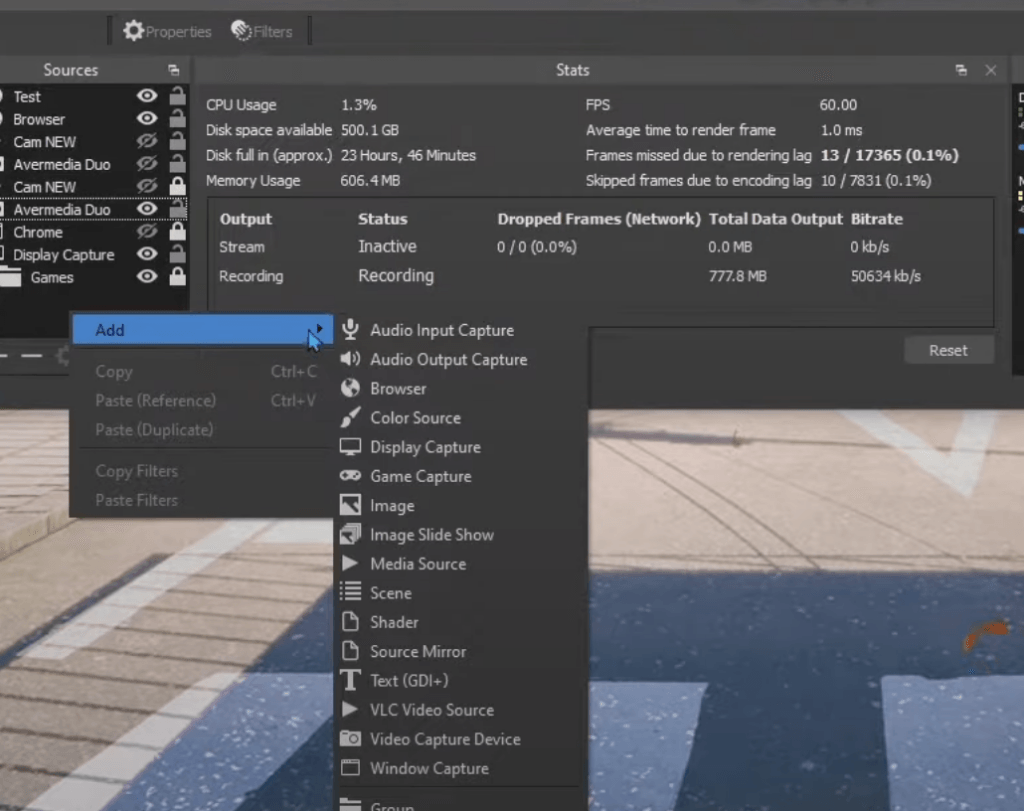
- Right-click in the ‘Sources’ box and choose ‘Add.’
- From the list, select ‘Video Capture Device.’
- A dialog box will appear. Name your capture card to identify it later quickly. For example, you can name it “Switch Capture Card.”
- After naming it, another dialog box will appear. Here, you’ll see a dropdown menu where you can select your capture card model.
Navigating the Maze of Audio Settings
The next step is to configure your audio settings. OBS has evolved over the years, and so has its interface. Depending on the version you’re using, the location of audio settings may vary.
Step 2: Locating the Audio Settings

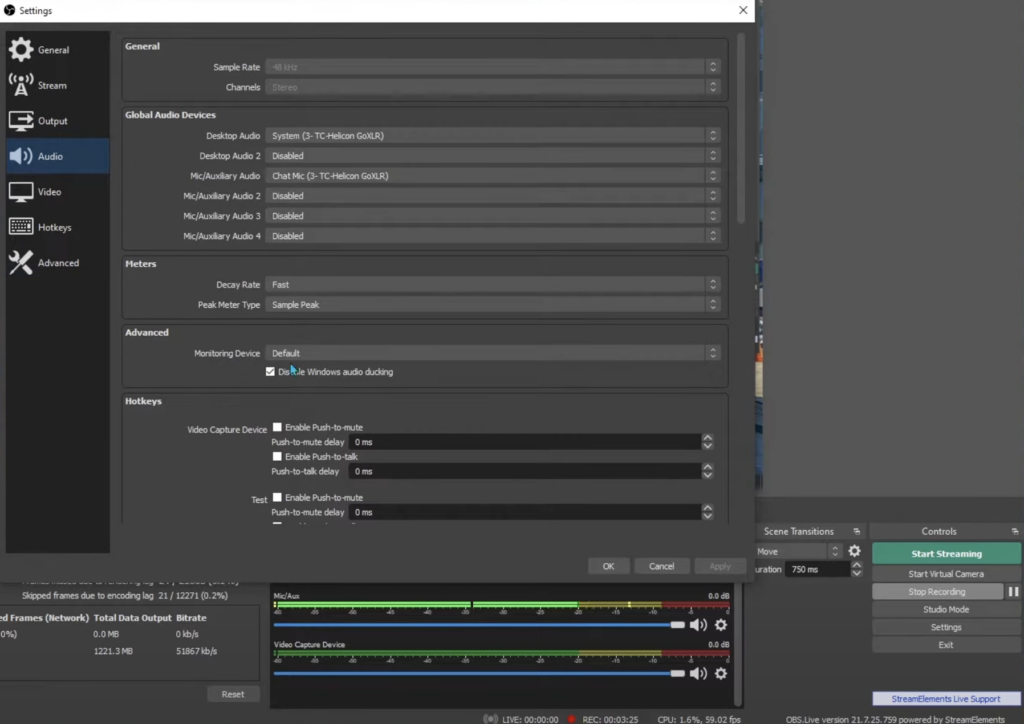
- On the bottom right of the OBS interface, you’ll find the ‘Settings’ button. Click on it.
- A new window will pop up. On the left sidebar, click on ‘Audio.’
- If you’re using an older version of OBS, you might find these settings under the ‘Advanced’ tab instead.
Step 3: Setting the Monitoring Device
- In the ‘Audio’ settings, scroll down until you find ‘Monitoring Device.’
- You’ll see a dropdown menu next to it. You can either leave it as ‘Default’ or select your specific audio device, such as your headphones.
Mastering Advanced Audio Properties
Now that the basic settings are out of the way, let’s dive into the advanced audio properties. This is where the magic happens.
Step 4: Accessing Advanced Audio Properties

- Close the ‘Settings’ window to return to the main OBS interface.
- Look at the right-hand side where your ‘Audio Mixer’ is located.
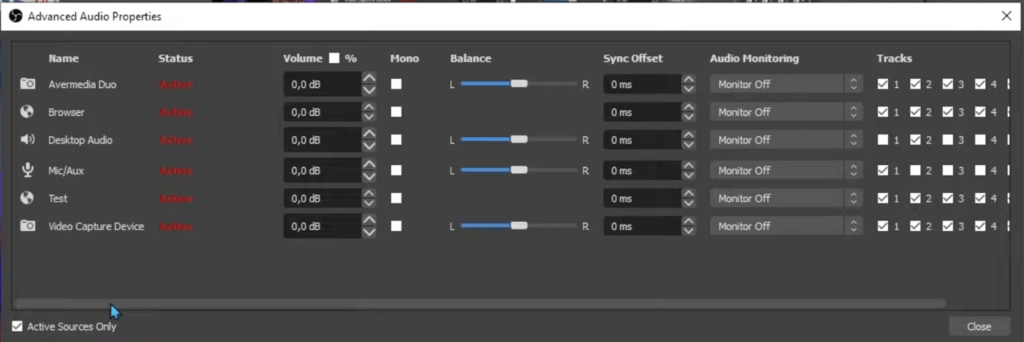
- Right-click on the empty space in the ‘Audio Mixer’ and select ‘Advanced Audio Properties.’
Step 5: Configuring Monitoring Options

- A new window will appear showing a list of all your audio sources.
- Locate your capture card (which you named earlier).
- Find the ‘Monitor’ column and select ‘Monitor and Output’ from the dropdown menu.

Final Tweaks for Perfect Audio
Last but not least, let’s make sure the audio levels are just right.
Step 6: Adjusting the Audio Levels

- Still in the main OBS interface, look at your ‘Audio Mixer’ again.
- You’ll see a volume slider next to your capture card.
- Adjust this slider to set the audio to a comfortable level for both you and your viewers.
Troubleshooting Common Issues
Setting up your Nintendo Switch audio on OBS can sometimes come with its own set of challenges. Here are some common issues you might face and how to troubleshoot them.
No Audio Signal
If you’ve followed all the steps but still can’t hear any audio, try these solutions:
- Check Connections: Ensure that all cables connected to your capture card, Nintendo Switch, and PC are secure.
- Restart OBS: Sometimes, a simple restart of OBS can resolve audio issues.
- Update Drivers: Make sure the drivers for your capture card are up-to-date.
Audio Lag or Delay
Experiencing a lag between the video and audio can be frustrating. Here’s how to fix it:
- Adjust Sync Offset: In OBS, go to ‘Advanced Audio Properties’ and adjust the ‘Sync Offset’ for your capture card. Start with small increments like 50ms and test.
- Lower Bitrate: Sometimes, lowering the audio bitrate in OBS settings can reduce lag.
Audio Quality Issues
If the audio sounds distorted or unclear, consider these steps:
- Check Sample Rate: Make sure the sample rate in OBS matches the sample rate of your audio device. You can find this in OBS settings under the ‘Audio’ tab.
- Disable Audio Enhancements: Some PCs have audio enhancements enabled by default, which can interfere with OBS. Disable these from your PC’s sound settings.
OBS Not Recognizing Capture Card
If OBS isn’t recognizing your capture card, try these solutions:
- Reconnect Hardware: Unplug and replug your capture card.
- Check for Interference: Make sure no other software is using the capture card.
- Run OBS as Administrator: Sometimes, running OBS with administrative privileges can resolve recognition issues.
By addressing these common issues, you’ll be well on your way to a smooth streaming experience.
Conclusion
Setting up your Nintendo Switch audio on OBS might seem like a daunting task, but with this guide, you should be up and running in no time. Remember, the key is to ensure your capture card is correctly set up, your audio settings are properly configured, and your advanced audio properties are fine-tuned. Good luck, and happy streaming!
Now that you’re all set up for streaming with Nintendo Switch audio on OBS, why not try out some of the other features? Whether it’s customizing your overlays or recording gameplay footage in-game, you can turn your stream into a professional production. With the right set up and patience, you’ll be surprised at what you can do. So start streaming! The world of Twitch is yours to explore.
Ensuring stable and high-quality video feeds to your OBS setup is crucial, especially when capturing gaming or live performances at a distance. A wireless video transmitter can greatly simplify your workflow, allowing you to capture crystal clear audio and video signals effortlessly without messy cabling.
FAQs
How do I switch audio through OBS PC?
Switching audio sources in OBS on a PC is a straightforward process.
- Navigate to the Audio Mixer: On the main OBS interface, you’ll find the ‘Audio Mixer’ panel usually located on the bottom or the right-hand side.
- Identify the Source: Locate the audio source you want to switch to. If it’s not already added, you can add it by right-clicking in the ‘Sources’ panel and selecting ‘Add’ > ‘Audio Input Capture’ or ‘Audio Output Capture’ based on your needs.
- Select the Device: A dialog box will appear. Choose the audio device you want to switch to from the dropdown menu and click ‘OK.’
- Adjust Levels: Use the volume slider next to the new audio source in the ‘Audio Mixer’ to adjust the levels as needed.
How do I add a switch to OBS?
Adding a Nintendo Switch to OBS involves using a capture card.
- Connect the Capture Card: Connect your Nintendo Switch to a capture card, and then connect the capture card to your PC.
- Add Video Capture Device: In OBS, go to ‘Sources’ > ‘Add’ > ‘Video Capture Device.’ Name it something like “Nintendo Switch.”
- Select Capture Card: In the properties window, select your capture card from the device dropdown list.
- Configure Settings: Adjust the resolution and frame rate to match your Nintendo Switch’s output.
How do I hear console audio in OBS?
To hear console audio, you’ll need to configure the ‘Monitoring’ settings in OBS.
- Go to Advanced Audio Properties: Right-click in the ‘Audio Mixer’ panel and select ‘Advanced Audio Properties.’
- Locate Your Capture Card: Find the audio source corresponding to your capture card.
- Enable Monitoring: In the ‘Monitor’ column, select ‘Monitor and Output.’
- Check Your Headphones: Make sure your headphones are set as the ‘Monitoring Device’ in OBS settings under the ‘Audio’ tab.
How do I connect my Nintendo Switch to my monitor with sound?
Connecting your Nintendo Switch to a monitor with sound involves a few steps.
- HDMI Connection: Connect the Nintendo Switch’s HDMI out to the monitor’s HDMI in.
- Audio Out: If your monitor has an audio out port, you can connect your headphones or speakers directly to it.
- Alternative Method: If your monitor doesn’t have an audio out, you can use the Nintendo Switch’s headphone jack to connect to external speakers or headphones.
How do I listen to Switch audio and PC audio?
To listen to both Switch audio and PC audio, you can use a mixer or software solutions.
- Hardware Mixer: Connect both your PC and Nintendo Switch audio outputs to a hardware mixer, then connect your headphones to the mixer.
- Software Solution: In OBS, add both your PC audio and Nintendo Switch audio as sources. Enable ‘Monitor and Output’ for both in ‘Advanced Audio Properties.’
How do I add different audio to OBS?
Adding different audio sources in OBS is simple.
- Go to Sources: In the OBS interface, locate the ‘Sources’ panel.
- Add Audio Source: Right-click in the ‘Sources’ panel, hover over ‘Add,’ and then select either ‘Audio Input Capture’ for microphones or ‘Audio Output Capture’ for system sounds.
- Configure: A dialog box will appear. Choose the audio device you want to add from the dropdown menu and click ‘OK.’
- Adjust Levels: You can adjust the volume levels of each audio source individually in the ‘Audio Mixer’ panel.


.png)


