.png)
.png) Français
Français .png) Deutsch
Deutsch .png) Italiano
Italiano .png) 日本語
日本語 .png) Português
Português  Español
 If you’ve ever made an Instagram Reel, you’ve probably faced this issue: You want background music, but you also want to keep your original audio. That could be your voice, ambient sound, or something special you captured while filming. Good news! You don’t have to choose one or the other. You can keep both.
In this guide, we’ll show you how to keep your original sound while adding music, step by step. To get the cleanest voice or ambient audio, a good mic like the Hollyland LARK MAX 2 makes a big difference. It captures crisp sound, even outdoors, so your voice doesn’t get lost under the music.

Hollyland LARK MAX 2 - Premium Wireless Microphone System
A premium wireless microphone for videographers, podcasters, and content creators to capture broadcast-quality sound.
Key Features: Wireless Audio Monitoring | 32-bit Float | Timecode
Can You Keep Original Audio and Add Music?
Yes. Instagram Reels allows you to use both the original audio recorded in your video and background music from the app’s music library. By default, Instagram plays both. But here’s the catch. Music often overpowers your original sound. That’s where volume control and mixing come in.
We’ll show you how to balance them perfectly.
Method 1 – Save and Use Audio from Another Instagram Reel
Sometimes, you hear a great piece of background music or spoken word in a Reel. If you want to use that exact sound and still keep your own audio (like your voice or ambient background), Instagram gives you a built-in way to do that. Here are the steps to keep the original audio while adding your own video and voice:
- Open the Reel
- Find the Instagram Reel with the audio you like
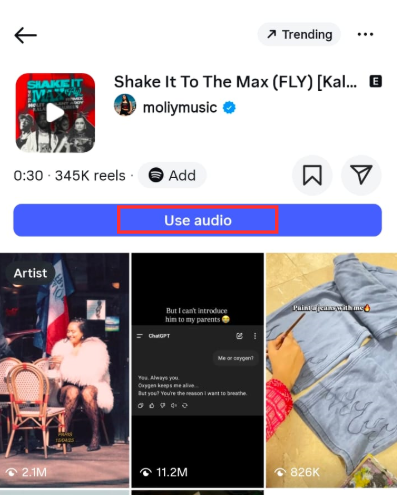
- Tap the Audio Title
- Just below the username, you’ll see the audio name. Tap it. This will take you to the audio’s original page

- Use the “Use Audio” Option
- On the audio page, tap the “Use audio” button. It opens the Reel editor
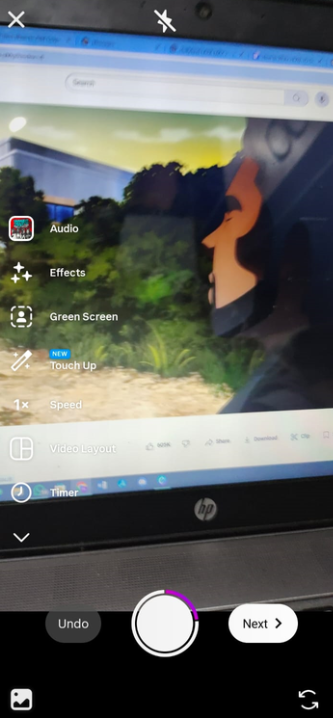
- Record or Upload Your Reel
- Now you can record your Reel while keeping your own voice. You’ll still have the selected music in the background
- Balance the Volumes
- Once recorded, tap the music icon at the top (usually labeled “Mix audio” or “Music controls”). Adjust the original audio and music volume with sliders
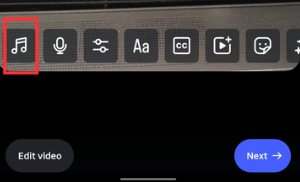
Tip: If you want your voice to stand out, reduce the music volume to about 20–30%.
Method 2 – Play Background Music While Recording
Another way to combine voice and music is by playing the music in the background while recording. It’s simple and doesn’t require any editing apps. Here’s how to do it:
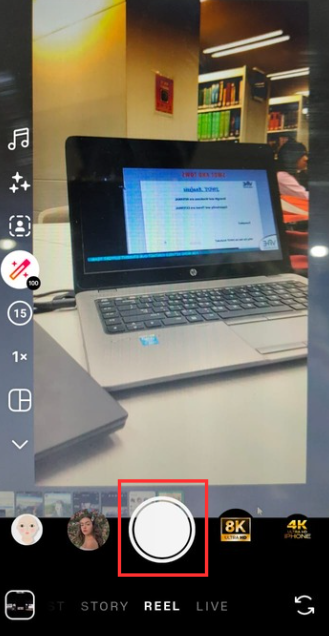
- Open Instagram Reels
- Go to the Reels camera in your Instagram app

- Set Up Your Scene
- Get your background, lighting, and camera position ready

- Start Playing Music
- Use a second device (like a phone or speaker) to play the music you want
- Tap and Hold Record
- Record your Reel while speaking or acting. Instagram will record both the live sound and the background music
Use a Third-Party Editor to Mix Music and Voice
For full control over your audio mix, using a third-party editor like FlexClip is a great option. You can combine voice, music, and timing exactly how you want. Here’s how:
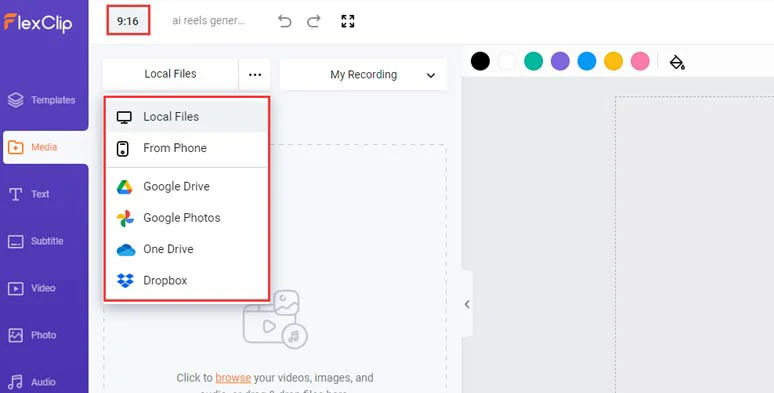
- Go to FlexClip.com
- You can use it from any modern browser. No need to install anything

- Select a free Instagram Reel template to your liking > preview it > and click the Customize button

- Upload your video assets and original audio to FlexClip from your PC or phone, Google Drive, OneDrive, Dropbox, or Google Photos
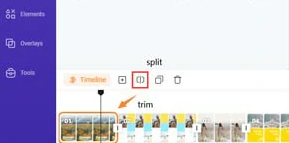
- Replace the pre-made video elements with yours
- Add original audio to Instagram Reels
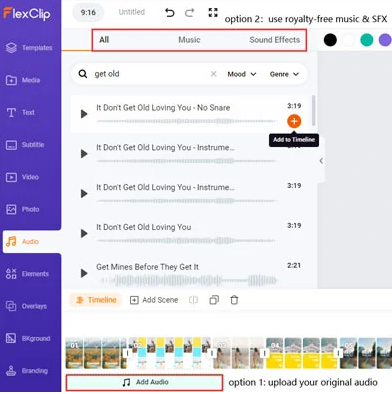
- Automatically add lyrics or captions to your Instagram Reels
- Spice up the Reels with more video effects
- Preview and share
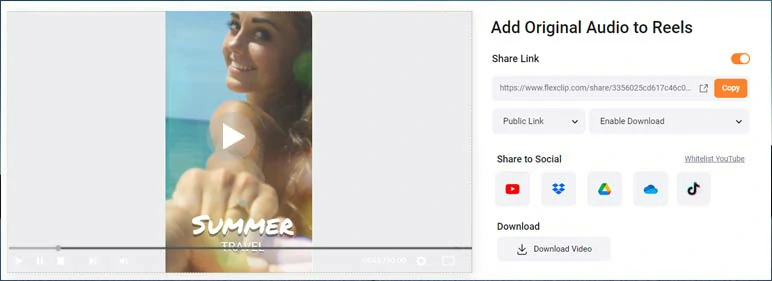
This method works best if you want a high-quality sound mix without relying only on Instagram’s tools.
Tips for Better Results
Here are some easy ways to make sure your audio stays clear and professional:
- Record in a quiet place whenever possible.
- Use a lapel or wireless mic for clearer voice capture.
- Speak directly into the mic. Don’t rely on phone audio from far away.
- Avoid loud background music while recording if you plan to keep the original sound.
- Edit volume levels carefully in the preview before posting.
Can You Use Music Without Replacing Your Voice?
Yes, and Instagram’s built-in volume controls are made for this. Just remember:
- Instagram does not remove your original audio unless you mute it manually
- You can always re-adjust the audio balance before publishing
- Even if music is loud, your voice is still there. Adjusting sliders will bring it back
What if You Already Posted It?
If you published a Reel but forgot to adjust the volume, you can’t edit the audio mix afterward. You’d have to delete it, go back, and re-upload it with correct volume settings.
FAQs
1. Can I mute Instagram’s music but still hear my voice clearly?
Yes, you can. When you’re editing your Reel, tap the music icon at the top of the screen. This opens the audio mixing panel. From there, simply slide the music volume all the way down to zero and leave your original audio at 100%. This will completely mute the background track while keeping your voice or ambient sound loud and clear. It’s a great way to keep personal narration or dialogue front and center.
2. Why does my voice sound too quiet, even after adjusting the volume?
This usually happens when the original recording wasn’t very clear. If there’s too much background noise, echo, or the mic is far from your mouth, the audio will sound distant. Volume sliders help, but they can’t fix poor-quality audio. To avoid this, try recording in a quiet space and speak clearly. Also, avoid covering your phone’s mic while recording.
3. Will Instagram block or flag my video if I use both music and my voice?
Instagram won’t flag your content if you’re using music from its official audio library. However, if you upload music from other sources, make sure it’s royalty-free or that you have permission to use it. Copyrighted music could result in muted sound or blocked content.
Conclusion
You don’t have to sacrifice your original voice or background audio just to add music. Instagram lets you keep both. You just need to adjust a few simple settings. With tools like volume sliders, captions, and even third-party apps, you can balance everything perfectly. And if you want pro-level clarity, recording with a mic like the Hollyland LARK MAX 2 gives your voice the boost it needs.